Make sure the screen doesn't. Why does the monitor screen go blank after several minutes of inactivity even though the power supply settings are set correctly?
A familiar situation: you are reading some information from the screen of your smartphone, and at that moment the display fades out. What if it takes not a few seconds to read, but much more? It is clear that constantly pressing the power button is annoying, to put it mildly.
How to prevent the Android screen from going dark? It turns out that the situation is not as critical as it might seem. There are several ways to solve this, which we will talk about now.
To adjust how your phone's screen turns off using the pre-installed tools, you need to go to " Settings", open section " Screen", select the item " Sleep mode"and set there the time the smartphone is “awake” that is comfortable for you, after which the screen will go dark, or remove sleep mode altogether by checking the corresponding line:

How to disable screen timeout using third-party software
I think it’s not worth going into too much detail about why the “Sleep mode” function is needed, or turning off the screen after a certain period of time (timeout from English - timeout). It is clear that if the smartphone is constantly in active mode, then the battery charge will begin to tend to zero too quickly.
In this case, the problem can be easily solved using special utilities.
Hold Screen On Demo
This program will not let the screen go dark while you are looking at it. Using the front camera, Hold Screen ON captures your gaze and prevents your smartphone from falling asleep. When you stop looking at the screen, it fades and, accordingly, resource consumption stops.
It is possible to bind the utility to a specific application, and then the phone screen will not go dark, identifying your eyes in this application, however, if your camera works in another application, the program will have to wait until it is free.
Owners of the Samsung Galaxy S3 use this function without installing the utility, since this model has it by default, and if you have a simpler device, then you just need to download Hold Screen ON:

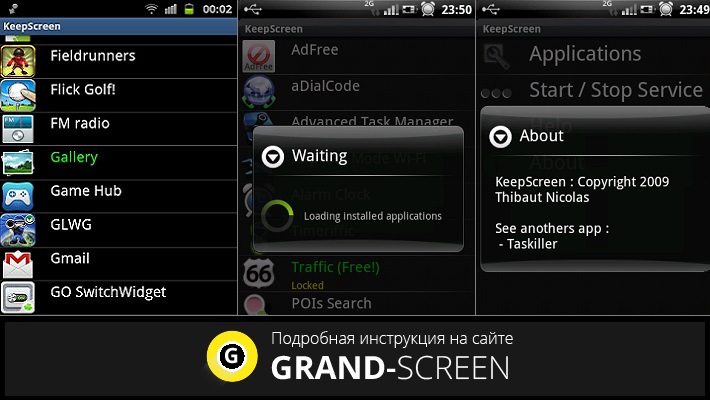
KeepScreen (now free)
Another good application that does a great job of disabling timeout. Unlike the previous one, Keep Screen controls the position of the device using the built-in gyroscope. Therefore, when you hold your gadget in your hands, the utility, taking into account its angle of inclination relative to the horizontal axis, will prevent the screen from going dark.
In addition, there is also the ability to block the screen from turning off on your Android device for selected applications. To do this, after specifying the desired program, click " Start/stop service“, and on the phone, in the screen darkening sensor (see the first screenshot), set the interval to 30 seconds.
Keep Screen takes care of your smartphone's resources and works in the background; to do this, click " On", and after that " Save and restart app».
Important! If you turn off (lock) the device using the power button while the program is running, then after thirty seconds the screen will turn on and will not go off. Therefore, before locking the gadget with the power button, you need to close the application or simply return to the main desktop.
We have nothing more to add on today’s topic, and, of course, you can judge how useful the information presented was. Good luck!
After installing Windows 10, you may find something not entirely pleasant - after some short time, the system turns off the monitor. But not all monitors immediately return to working condition.
This was personally inconvenient for me and I had to disable this automatic screen turning off in Windows 10, if this is also interesting to you, then this note is for you.
But why does the system turn off the screen? This is all done in order to save money, because the monitor in standby mode consumes much less than if it were working.
Therefore, it makes sense not to even disable this behavior, but simply change the interval after which the monitor should turn off.
Let's look at how to do this - right-click on the Start icon and select there Power management:

Then click on the item that is responsible for setting up your power supply scheme:

And the opportunity will become available to either change the time or even prohibit turning off the monitor; to do this, select the appropriate value in the menu:

When iPhone is inactive for a long period of time, the screen automatically locks to save battery power and for security purposes. However, sometimes you need to keep the display unlocked, and below we'll show you how to set the appropriate settings on iOS.
Often, users want to save battery power and protect the data stored on the iPhone, so they prefer to have the screen lock automatically. However, in some cases it is desirable to keep the display active. These include, in particular, the use of the function “ AirPlay video replay" when content from an iOS device is streamed to Apple TV via AirPlay. Locking the screen will interrupt streaming, and to resume it, you need to unlock your iPhone and restart the stream. You can also disable automatic locking if you read a lot on the screen of your iOS device and are tired of dealing with the display constantly going dark.
So, if you decide to disable the automatic screen lock feature, follow these instructions:
How to change iPhone or iPad screen auto-lock time (so the screen doesn't go dark)
1. On your device's home screen, open the " Settings»;

2. Open the section " Screen and brightness»;

3. Select the option " Auto-lock»;

4. In the menu that opens, select " Never».

Now your device's screen will not go dark, no matter what you do - work with an application, read or stream content via AirPlay. If you still want the auto-lock function to work earlier or later, you can set the desired time in the settings.
This is a great way to turn your old LCD LCD monitor into a personal display. Only you will be able to see the image on it, while everyone else will see just a white screen. Convenient to use at work and in other places where you want to have a piece of something personal that no one will guess about.
After the detailed tutorial, if you do everything correctly, it will look like this.
To make a personal monitor like this you will need:
1. An LCD monitor that you don't mind;
2. Old unnecessary glasses;
3. Stationery knife;
4 . A little solvent.

Take a monitor that you are willing to sacrifice

Unscrew the screws

Back cover removed

You need to turn it over and remove the plastic frame from the front of the monitor.

Then carefully cut off the polarized film along the edges of the monitor with a stationery knife; if your arms are straight and well bent at the elbows, then everything will work out.

After you've run the edges of the knife well, you'll need to peel off the polarized film. Most monitors have 2 polarized films: one to filter out light you shouldn't see, and a second layer of anti-reflective coating, which has a matte finish.

The matte film can be peeled off with pleasure and without being careful, we will no longer need it, which cannot be said about the second polarized layer

We tear off the top layer and save the second one. The second polarized layer contains the whole secret of the monitor's operation. The second layer is quite difficult to peel off.

At this stage, a solvent comes into play, which we need in order to remove the glue remaining from the films. You can wipe with a piece of cloth or a paper towel soaked in solvent, but this takes quite a long time.

It is easier to soak the layer of glue in solvent by simply placing paper towels pre-soaked in solvent on top. Do this carefully, it is important that the solvent does not get anywhere else except the display itself.

Then simply remove the solvent-soaked layer of glue from the display surface.

Put the monitor back together

If you did everything correctly, then when you apply the second polarized layer to a monitor connected to the computer, you will get this effect.

Stage two, “confidential”. Take old sunglasses or any used 3D glasses

Using simple movements we disassemble it into several parts.

Like this

You can either measure it yourself or scan the plates that you took out of the glasses.
With solar control glass this will be a little more difficult. But there is a way here too. You can simply glue the polarized layer on top of the glass and then just trim off the excess.

If you scanned it, you can make a pattern according to which you will cut the film

We place our carefully cut pieces of the polarized layer of the monitor on the front of the glasses.

Then we simply glue the second part.

We have to wait a little

And everything is ready! Enjoy watching your personal monitor, which will show the image just for you! Good luck!
It happens that you sit quietly at your computer or laptop. For example, you are reading an article on a website or a book, and the monitor screen suddenly goes dark. You have to press a key on the keyboard or move the mouse to get the screen backlight to work again.
Why is this happening? The problem lies in the power settings. This is more suitable for laptops and netbooks, because they pay more attention to power supply, and more precisely, to its safety.
The screen only goes dark during inactivity and this is determined by settings that are often simply not adjusted or not paid attention to until the right moment.
Now let's figure it out.
Power settings for windows 7
Right-click on the power icon in the Notification Area
if it is not there, then read the article to set it up. Or click on the triangle next to the Language bar and look for the icon there.
A window like this will appear in which we select Power supply

This can also be found in Start - Control Panel - Power Options (when viewing "Large Icons")
Next we go to Power plan settings
We configure it as you need - increase the time Dimming And Shutdown display from the mains or from the battery (you can turn it off altogether by setting it to “Never”).
Don't forget to click then Save changes

I won’t go into detail, because everything is already quite clear there.
Power settings for windows XP
You can go into settings the same way as in Windows 7: Start - Control Panel - Power Options.
Then go to the tab Power Management Schemes.
You can choose one of the preset schemes - maybe there will be one that you like.
Or change the existing scheme.

Well, if this does not help, then the situation may be much worse than these simple settings to ensure that the monitor screen does not fade away while working.


