Light diode tape. Choosing LED strip for home
10078 0 3
LED strip for the kitchen - choose wisely, install quickly
Do you want to add LED lighting to your kitchen but don't know how? Let's go through all the stages of this simple path together. I will tell you in detail which tape to choose, where it can be fixed, and most importantly, how to properly install all this equipment with your own hands.
Choose, calculate, buy
In fact, it is quite easy to hang such a backlight with your own hands, for an amateur it is much more important not to make a mistake when purchasing components.
Choosing an LED strip
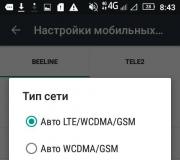
LED strips differ in several parameters and the first characteristic is the number of diodes per linear meter:

The minimum here is 30 points per 1 m/p. Next comes 60 and 120 diodes per meter. But in the SMD3528 model there is a double tape, where 240 LEDs are located per 1 m / n.
Naturally, the more lighting points, the more powerful the luminous flux, as for the kitchen, I recommend choosing models from 60 diodes and above. If you need intimacy and twilight, you can easily adjust this with a dimmer (more on that later).
The next characteristic is the dimensions of the diodes themselves, they can be determined by the first digits of the marking. So in the SMD3528 model, the size of the diodes is 3.5x2.8 mm, and 5x5 mm elements are installed on the SMD5050 tape. There are also SMD5060, SMD5630 and SMD5730 models on our market, but they are not very popular in everyday life.

Now let's talk about the degree of moisture protection. There are 3 main areas in this niche:
- IP33- not a protected tape at all, with completely open conductive paths and LEDs. Designed for dry rooms, it is not recommended to mount it in kitchens, but I install IP33 in a closed box and it works fine;
- IP65- this tape is filled with silicone on top. Such models were developed just for kitchens;
- IP67 and IP68- fully sealed illuminators. That is, silicone is poured both from above and from below.

Silicone protection is a good thing, but it is advisable to mount such tapes on a metal base, because closed LEDs overheat and quickly burn out.
Now let's look at the intricacies of marking. For example, I took the standard marking LED 12V RGB SMD 5050 120 IP65, this model is used more than others for kitchen lighting.
If you want to install lighting with a full color spectrum, then take models with the WRGB marking - these are the most powerful tapes, but they are also the most expensive.

Choosing a power supply and control system
Such lighting is considered low-voltage and requires a step-down transformer or power supply, as it is commonly called. The vast majority of such tapes are supplied with 12V, 24V blocks were previously used, but now they are rare.
Calculating which block you need is simple: any tape comes with an instruction that indicates the power consumption of the product per 1 m / n, you need to multiply the number of meters by the design capacity and add 20-30% to the reserve.

By the way, the control unit (dimmer) is selected in the same way, only the current is taken into account there: find out from the instructions how many milliamps go per 1 m / n, multiply by the number of meters and add a margin.
When selecting tapes and power supplies for them, please note that 1 tape cannot be longer than 5 m, if you need more, you will have to connect the next tape, but they are connected not in series, but in parallel and so on ad infinitum, the main thing is that the power of the block and the dimmer enough.
Below I give the 3 most common schemes:

- This scheme is considered the simplest, here connection in progress directly from the power supply to the LED strips. Such a system will cost inexpensively, but it turns out to be unregulated, the diodes will shine at full power;

- In this case, you will have the opportunity to adjust the level of light flux, because a dimmer is included in it. Although there is a full-fledged regulator with a control panel, it makes no sense to buy a conventional rheostat attached to convenient location. Ribbons are used monochrome, that is, one-color;

- This is how full-color ones are connected RGB systems. The inclusion of amplifiers in the circuit is not necessary, but desirable, especially if the length of the tapes is taken to the maximum (5 m) and there are several such tapes.
We mount the tape under the cabinets with our own hands
Most often, an LED strip is installed in the kitchen under the cabinets, so it turns out the simultaneous illumination of the working area and the illumination of the apron. Although, according to the same principles, this lighting can be mounted anywhere in the kitchen.
| Illustrations | Recommendations |
 |
Tool and material:
|
 |
Accessories:
|
 |
Light box.
Of course, the tape can be glued directly to the base, for example, on the bottom of a kitchen cabinet, but this will heat it up, plus not everyone likes the exposed tape. Therefore, we will hide it in an aluminum box covered with a translucent overlay.
|
 |
Choice of boxes.
The box can be selected for any mounting location - in a corner, on an edge, internal or external, as well as choose a smaller or larger angle of illumination.
|
 |
Measure and cut the tape.
The tape is sold by the meter, but you only need to cut it in places intended for soldering, on many models scissors are drawn there. |
 |
tape extension .
If you need to go around a corner or build up a longer section of lighting, then in the places of the cut, the contacts are stripped and soldered with jumpers. It’s hard to make a mistake there: you connect plus with plus, and minus with minus. |
 |
Multicolor Ribbons.
In RGB tapes, 4 wires are soldered by color (there are symbols on the tape):
The main thing for you then is not to confuse the connection of the plug from the LEDs with the plug from the controller, for this they have arrows. |
 |
Using a connector.
The connector is a kind of clamp, the contacts are inserted into the grooves and clamped with a bar. These adapters allow you to do without soldering, but I don’t use such things and I don’t advise you. In the kitchen, the contacts can oxidize, and then you get tired of looking for the point where exactly the break occurred, so far nothing has been invented better than soldering. |
 |
Preliminary check.
It is advisable to connect the wires from the very beginning, so that later you do not climb into uncomfortable places with a soldering iron. Do-it-yourself installation begins with assembling the circuit and connecting it to the network, you must make sure that everything works correctly. If you plan to install a stationary switch, then remember - it is placed before the power supply. |
 |
Box fixing.
For outdoor installation, the box can be glued to a kitchen set or wall using liquid nails or double-sided tape. But it is better to take special grips and mount on them. Everything is simple there: the grip is screwed to the base with a self-tapping screw, and then a box is inserted into the grooves. |
 |
Insert option.
Outdoor installation is much easier, but the LED box can be cut directly into furniture, although you will need a hand router for this. Of course, more work, but the effect is much better. |
 |
Installing the innards.
It is better to hide the power supply and controller. The photo shows the placement option in the closet above the hood, but you can choose any place. The only thing I don't advise you to do is throw steering group on top of the cabinet. In the kitchen, after a couple of months, all appliances will be covered with a sticky coating and it will be difficult to wash it. |
 |
Finished result.
Job done, now you can use it. I talked about the option of installing a small backlight in the box, but this is far from the only way to arrange it. Below in the video in this article there are alternative and, by the way, quite easy-to-install options. |
Conclusion
It doesn't matter if you are planning to illuminate the work area, an apron or a stream, according to the recommendations above, you can easily cope with any of these tasks. If you have any questions, write in the comments, I will try to help.

If you want to express gratitude, add a clarification or objection, ask the author something - add a comment or say thanks!
» How to choose LED dentaHow to choose LED strip for lighting ceilings?
LED strip, is a flexible strip with electrical conductors on it (the width of the flexible strip can be different from 5mm to 50mm) LEDs and resistors are soldered on one side of this strip, and on the other side there is double-sided tape to make it easy to stick this tape.
LEDs can be soldered onto the LED strip different sizes and a different number per meter. Also, sometimes, to enhance the brightness, when the place already does not allow the LEDs to be soldered close to each other, the LEDs are soldered in the second row, third or even fourth row.
Let's take a closer look. The main difference between ceiling lighting strips is the type of LED, currently the main types are SMD 3028 and SMD 5050. They are shown in the picture below.
Flexible strip LEDs SMD 3028 and SMD 5050
SMD is an abbreviation for "Surface Mounted Device", which in Russian means "surface mounted device". You see, the LED is tightly soldered to the surface of the tape. Hence the name. The number indicates the dimensions of the LED in millimeters. 3028 - this means the size is 3.0 by 2.8 millimeters, 5050 - respectively, 5.0 by 5.0 millimeters.
The dimensions of the SMD 5050 LED are 5x5 millimeters
SMD 5050 LEDs are made up of three dies, you can see this as they have 6 legs coming out of the case. They are about three times brighter than single-chip SMD 3528. Usually, the term luminous flux is used to characterize the emission of an LED, which is measured in lumens. The documentation for SMD 5050 LEDs says that they have a luminous flux of 12 lumens, while SMD 3528 LEDs have 4 lumens. Then everything converges three SMD 3528 LEDs, they shine like one SMD5050. Light streams from each of the three LEDs are added, and the total luminous flux is obtained three times more.Color glow LED ribbons depends on what LEDs it contains. If an SMD 5050 LED is used, then in a colored tape in one LED housing there are three crystals of different colors, red, green, blue.
And if we light only the red color, then the whole ribbon burns red, if we light green, then the whole ribbon is green, etc. An interesting option is obtained if one color is lit at full brightness, and the other, not at full brightness, you can get very beautiful shades . LED brightness control desired color implements the controller, I will talk about them in another article. By mixing the brightness of the three components, you can get 16 million different shades. A very interesting option, if you add to these shades White color, then you can get very delicate colors, such as pale pink. This color is obtained when white is lit at full brightness and a little red is mixed in with it, etc. for creative people, there are huge opportunities for setting the backlight.

Some color options for self-adhesive tape
To illuminate the ceiling, we recommend installing either a white ribbon, or three-color, or both white and three-color together. We do not recommend installing a single-color color on the ceiling, because when you get tired of the same color, it will not be possible to change it, only if you change the entire tape.How is white obtained? There are two ways
Since an LED with a white glow does not exist in nature, it is made from blue by adding a phosphor to the crystal. The phosphor looks like a light yellow spot on the LED chip. On this basis, it is easy to distinguish which LED is in front of you, if you see yellow spots LEDs are white LEDs.
White LED and yellow phosphor on it
But over time, the phosphor loses its properties to convert blue color to white, and the color of the glow of the tape begins to give off shades of blue. After about a year, the brightness may decrease by 20-30% and ask the seller if he will give a guarantee that for a year the brightness white LED will not change, no one will give you such a guarantee. In this case, I suggest using the second method of obtaining white. As you know from the school physics course, white is obtained by mixing the three colors red, green and blue. We have a three-color LED and if we light all the colors at the same time at the same brightness, then we will get a white color, and the problem with the phosphor does not bother us. Three-color LEDs are on an RGB strip, so we suggest using it to get white color and to get any other shades.
RGB ribbon can glow in different colors
This tape will last much longer. Let's say you want it to be just light, turn on the white backlight. You can choose any other according to your mood, the romantic atmosphere is red, green promotes relaxation.All this is very easy to do with the push of a button on the remote. remote control controller.

Remote Control RGB Tape
Just as mentioned above, the tapes differ in the number of LEDs and the more LEDs, the more expensive the tape. The figure below shows various modifications of LED strips.
Tapes with different number of LEDs and different density of their installation
From our experience, we can advise you to install a strip of SMD 5050 3 0 LEDs per meter or more, a warm white glow, or an RGB strip in the ceiling. For decorating furniture, ceiling niches, interiors, it is better to take SMD 3028 tape with 60 LEDs per meter, it will do its job well. The light from a brighter tape will “hit the eyes”, besides, a brighter tape requires more powerful, and therefore larger power supplies, which are problematic to hide in the interior.Now you can make the backlight yourself, without resorting to the services of installers. The cost of their work ranges from 50-150% of the cost of lighting components.
Plus you'll have to invite home strangers for mounting the backlight is not always convenient. Using our kits, you can save up to 100% of the cost of LED lighting in your home, as well as your nerves and time.
Just choose the set that suits your needs and order it, delivery is free. All components in the kit are already connected and tested by qualified installers. To check the backlight kit, you just need to plug the plug into the socket.
You don't need any electrical skills to install the kit, you don't need any tools. The tape is glued to the double-sided tape that is already on it. Everything electrical connections already made and tested by professional electricians.
Lighting effects have long been successfully used by designers as decorative element or to highlight different functional areas. But not every one of us is so friendly with an electrician to mount lighting at will. But with the advent of LED strips, it is quite possible to arrange additional light sources and various interior "chips" with your own hands, not only in living rooms, but also in the kitchen. Therefore, we propose to learn everything about the LED ceiling lighting with a ribbon: how to install, choose the right components and use it for the original design of the room.
To illuminate a false ceiling, there are several types of illumination - from various "point" devices to a system with conductive paths on which diodes are mounted. The latter option is interesting in that it does not require special skills for installation, consumes a minimum of electricity and can be used to illuminate any interior element. Agree, such a decision deserves attention, therefore, we will consider it in more detail.
Lighting effects can be an interesting accent for the interior of the kitchen:


Interesting! LED backlighting is considered the most profitable in terms of savings, because 1 diode will consume only 0.65 kW / h for 12 hours of uninterrupted operation.
Types of LED backlight
For decorative lighting in the store, you can be offered dense “rulers” on a rigid substrate or duralights - cords with a glow angle of 360 degrees. But the most widely used boards on a flexible basis, which we used to call LED strips.

Boards with diodes are produced wound on round bobbins, this protects the system from creases and other damage.
LEDs can be used as a primary, additional light source or simply for decorative purposes. Therefore, choose the option that is most suitable for your interior and ceiling configuration.
- General lighting - involves the complete replacement of traditional lamps with LEDs. For this, several powerful tapes installed around the perimeter and behind the film stretch ceiling. True, this option is rare, since the purchase a large number diodes will have to spend an impressive amount.
- Highlighting the contours - conductive paths with diodes installed behind the cornices or in specially equipped niches along the perimeter of the ceiling create subdued diffused lighting and visually increase the height of the room.
- Figured lighting - with the radiance of LEDs, you can highlight a certain area, emphasize various protrusions or recesses in suspended structures.

Flexible tapes can take even the most intricate and curvilinear shapes
On a note! LEDs can be used not only for ceilings, but also for the design of a working apron, floor podiums, window and door openings. Ribbons effectively emphasize the contours of furniture, appliances, it is easy to focus on paintings, beautiful dishes and other accessories with them.
Options for LED decor for the kitchen:


Illumination "starry sky"
Speaking about original lighting solutions, of course, one cannot mention the hit recent years- backlight with the romantic name "starry sky". True, this type of decor is easiest to arrange for stretch ceilings. The principle of operation is quite simple: LEDs of various diameters and radiant strengths are placed behind the canvas or film, which create an effect reminiscent of twinkling stars.
To arrange such a backlight, individual LEDs of various powers and sizes are selected, which must be soldered into a network, and then glued to the base ceiling with building silicone. This is the most difficult stage, since, in addition to observing the polarity, it is important to enclose each lead in cambric - an insulating tube that will protect your "sky" from short circuits. For more realistic effect several miniature light bulbs can be brought out by making neat punctures in the film.
Then a power supply is selected and installed, the power of which is calculated according to the number of crystals (10 W will be required for 100 pieces). It is also worth purchasing a breaker controller for each section of 5-10 diodes. With it, the "stars" can not only shine, but also blink.

Choosing a space-themed stretch ceiling film will increase the realism of the "star" effect
On a note! If you wish, you can install the "starry sky" in plasterboard ceiling. But for this you will have to cut a niche in it or drill holes according to the size and number of light points.
How to choose and install LED strip
Manufacturers present us with such a variety of Led solutions that it is not surprising for a person who is far from electricians to get confused. But since it depends on the purchase correct installation diode backlight and its operation, let's try to sort out in order the most important technical details.
Varieties of LED strips
All systems with LEDs can be classified according to several parameters: mounting type, number of diodes, color, power. What exactly to pay attention to depends on the design idea that you want to implement with the help of lighting effects.
For example, for decorative lighting, the most important parameter is color shade glow. And according to this characteristic, the tapes are divided into single-color and multi-color. The first, when turned on, emit light of only one tone. And not necessarily the traditional white, it can be red, green, yellow, purple or bright green color. Of the non-standard options, it is worth noting tapes with ultraviolet or infrared glow.

You can choose the shade of the backlight for any interior
Despite the wide range, the choice of backlight gamut should be approached with caution - psychologists assure that prolonged exposure to color affects the psyche. So, the “calm” tones, which can be safely used both for the kitchen and in living rooms, include all shades of green and turquoise, as well as yellow and orange colors. Red, pink and burgundy lighting should be left for the bedroom. But bright blue lights are alarming, a person subconsciously tenses up and feels uncomfortable. The combination of dark blue and yellow is generally not recommended for impressionable natures - such a backlight acts depressingly and can cause a nervous breakdown.
Keep in mind that even the classic white color can have different shades and emit a glow of warm or cold light. These "temperature" nuances are important when creating an organic interior, you can determine them by studying the documentation. So, a backlight with an indicator of 3000-3500K will emit warm light, 5500-6000K - neutral, 6500-7000K - cold.
Important! For open mounting, you should pay attention to the color of the base so that the tape does not stand out from the general background. In addition to the standard white, you can find a gray, brown or transparent substrate.
Multicolor RGB systems can change shades in turn or glow with all the colors of the rainbow at the same time. But they cost an order of magnitude more expensive than their monophonic counterparts and work only in combination with a transformer and a controller that sets the color switching mode.

One of the most important parameters from a technical point of view - the power of the LEDs and the density of their placement. The most popular Led strips with 60 and 120 diodes per 1 m, but there are other options - 30, 72, 90, 240, and the bulbs can be arranged linearly or in several rows.

Varieties of Led-systems according to the density of LEDs
Important! The smaller the gap between the diodes, the brighter the backlight will be and the greater the power consumption. For decorative purposes, 30-60 diodes / meter is quite enough, but if you plan to replace the main light source, you should choose a tape with 120-240 bulbs.
Inspection and purchase of tape and accessories
To determine which material is suitable for your ideas, study the designations on the board. Standard household lighting strips are abbreviated as SMD (short for SurfaceMountedDevice). The numbers indicate the dimensions of each LED. For example, SMD 3528 means that the parameters of 1 diode are 3.5 by 2.8 mm.
On a note! The most common are 3 types of LEDs: small - 3020, medium - 3528 and large 5050.
The intensity of the glow directly depends on the size of the diodes and the density of their placement per 1 m of the ribbon. We dealt with density above, and now we’ll tell you how to find out the power of the system, because the choice of power source depends on it.

Backlight power consumption at different frequency placement of LEDs
To calculate the required footage, arm yourself with a tape measure and measure the perimeter of the illuminated area. Multiply the resulting figure by the power of the meter of the selected type of tape and get the value that you should be guided by when buying a power supply (transformer), and for multi-color products - and a controller. These accessories can be rated for 5, 12 and 24V, but if you do not plan to replace the main lighting, 12V fixtures will suffice.
Important! The total power consumption of the backlight should be no more than 80% of rated power transformer.
LED strips have a different protection class. This indicator affects their ability to withstand moisture, dust and other negative external factors. To determine it, you need to find the abbreviation with the letters IP (stands for IngressProtectionRating) on the package.
- IP 20 - designed for indoor use and not sealed.
- IP 65 - suitable for lighting areas in contact with water: work apron, sink, aquariums, etc. Such material can be used not only for internal works, and on the street.
- IP 68 - fully insulated systems that are even approved for use in water.
It is possible to determine the presence of protection even if visual inspection- ribbons that are not afraid of a humid environment will be filled with a thin layer of transparent silicone.
Important! To illuminate ceilings (including in the kitchen) you can use regular fee designed for open mounting. The fact is that the silicone layer not only dims the light intensity, but also leads to heating of the substrate and the surfaces in contact with it. Therefore, do not use protection where it is not needed.
Do-it-yourself LED backlight installation
To independently install the backlight on the kitchen ceiling, it is important to know that according to the type of fastening, all tapes are divided into:
- Self-adhesive (most common) - mounted on a sticky base, which is equally suitable for wood, plastic or glass. The disadvantage is that the glue can “move away” over time, from moisture or several re-gluings.
- With fasteners - fixed with special brackets-clamps on any material. Such installation will be more reliable, but will take much more time and effort than adhesive-based tape.
Important! Tapes come in 5m rolls, but most retailers offer retail and pieces of the required length. The places for separation are most often indicated by the image of scissors; you need to cut strictly along the dotted lines so as not to damage the chain.

On some tapes, the cuts can only be indicated by a vertical line.
When installing yourself, consider another important feature for any LED products - thermal conductivity. The fact is that manufacturers have not yet been able to achieve one hundred percent efficiency from miniature crystals, so part of the energy is dissipated in the form of heat, which heats the surfaces in contact with the tape. And since in the kitchen high temperatures- a common thing, for powerful or frequently spaced LEDs, it is worth considering insulation, for example, attaching a substrate to a thin aluminum profile. But if we are talking only about decorative lighting, you can do without it.
To assemble the track necessary to highlight the selected area, the cut points must be fastened with a connector or a conventional soldering iron. Please note that the temperature of the device should be no higher than 260 degrees, and the exposure time should be a maximum of 10 seconds.

Single-color track connection diagram
The connection is carried out according to the following principle:
- In single-color boards, the "plus" and "minus" contacts are soldered.
- In multi-color RGB, 4 wires are combined with the same-name contacts on the block, focusing on the marking (R-red, G-green, B-blue, fourth - 12 or 24 V).
- The power cord of the transformer is connected to the N and L pins.
- In RGB ribbons, a controller is additionally connected to the power supply. It is important here not to confuse the positive and negative terminals, otherwise the device will fail.

Ready-made kit for connecting colored lights
Important! Maximum length circuit designed for one transformer - 15 meters or 3 standard reels. If your site is larger, you will have to use another power supply.
Depending on the type of finishing of the kitchen ceiling, there are various options installation strip lighting. The easiest way to hide the decor is in suspended plasterboard structures, but even if your kitchen has a smooth single-level ceiling, you can arrange lighting effects using a regular cornice.
Installing the tape in the plinth on the ceiling
This installation method is applicable even in the case when the kitchen renovation has long been left behind. It does not require special alterations, the main thing is to buy a beautiful ceiling cornice that matches the overall interior design and stick it on “liquid nails” at a distance of 80-120 mm from the ceiling. In order for the design to come out even and look spectacular, it is first necessary to make markings under the level.
Important! When choosing a cornice, pay attention to its thickness - through thin walls, the tape can shine so brightly that the baseboard itself will shine.
When the plinth is installed and the glue has set, we proceed in stages:
- We clean the surface of the eaves from dust and degrease.
- Remove adhesive backing from reverse side ribbons.
- We mount the LEDs on the wall or from the side of the eaves. True, many experts do not trust the factory “self-adhesives”, and recommend additionally insuring the design with silicone glue or double-sided tape.
- We connect the power supply (and for multi-color RGB - and the controller), observing the polarity.
- We check the voltage in the board itself and all components - they must match. Now you can connect the power supply to the 220 W network.

Step-by-step installation of lighting in the ceiling plinth
Installation in plasterboard cornice
Setting the backlight to dropped ceilings best done at the stage of their construction. For this, a standard construction of a metal profile and plasterboard sheets is used, which provides for an open or closed niche for a line of LEDs.
You will need the following tools and materials:
- Drywall and screws.
- Metal profiles CD and UD.
- Dowels and screws.
- Hacksaw and hand shears for metal.
- Drill, screwdriver.
- Level, measuring tape.
- Pencils or markers.
- LED strip with accessories.
The algorithm of work is the following:
- A drawing of the future box is created, according to which the markup is performed.
- The frame is raised. To do this, with the help of screws and dowels, load-bearing UD-profiles are screwed to the walls, and CD-elements are attached to them, in turn. The recommended step is 50 cm. Then, segments 10-15 cm high are installed perpendicular to the ceiling and connected to the profile on the ceiling so that a niche is formed.

On a note! The design may consist of one or more levels. In any case, it is important to keep a gap of at least 10 cm for the passage of light from the diodes.
- The finished frame is sheathed with plasterboard sheets, laid joint to joint. At the ends of the structure, a niche is left to accommodate the LED strip. The outer perimeter must be closed with a side to mask the constituent elements of the backlight.

Plasterboard cornice device for hidden lighting

Create a bright or subdued strip of light will help right choice protective edge height
Important! Do not forget to provide a place in the design for power supplies and a controller.
- The seams are masked with putty, and after complete drying - with a primer and painting.
- Now it's time to mount the backlight. The ribbon must be fixed to the adhesive base directly to the drywall (you can additionally use clamps or an aluminum profile). The light from the diodes should be directed from the bottom up. Then you can connect the system to the current conductors, not forgetting to observe the polarity.

Connection diagrams with one and several transformers
Video: installing LED strip
To clearly demonstrate the work of mounting the backlight, we suggest that you study a small video selection of training materials:
- How to connect LED strip - important nuances, which will help to properly mount the backlight circuit.
- How to make a drywall cornice for hidden lighting is one of the options for arranging a U-shaped box for LED strip.
As you can see, you can cope with the installation of LED backlighting with your own hands. Therefore, the main task is to choose the right material length, transformer and controller, taking into account the configuration of the kitchen ceiling and the expected decorative effect. But if you doubt your abilities or the correctness of the calculations made, it is better to entrust the purchase of components and the installation of the backlight to a qualified electrician.
Do you think LED strip can be used as the main lighting of a living room? Your obedient servant based on own experience undertakes to assert that he can, and is ready to substantiate his position. Doubt? Well, let's argue.
About how LEDs compare favorably with the usual incandescent lamps, halogens and compact fluorescent (so-called energy-saving) lamps, any seller of LED equipment will convincingly and intelligibly tell you.
We will not fall into the sin of verbosity and give only the main arguments in their favor:
- Profitability. The luminous flux of modern LEDs exceeds 100 lumens per watt of power. This is ten times more than incandescent lamps, and one and a half times more than energy-saving light bulbs;
- Huge resource of LEDs (at least 30,000 hours);
- Lack of relationship between the number of on-off cycles and MTBF. Simply put - no matter how much you click the switch, the resource of the LED will not decrease from this;
- No toxic components(as opposed to compact fluorescent lamps with their mercury vapor in the flask).

By LED lighting, we used to understand the use of point sources - chandeliers, wall and ceiling lights, spotlights, etc. However, against their background, lighting with LED strips has major advantage- lack of shadows.
Yes, this is not important for everyone; however, the author will allow himself to give several arguments in favor of such a lighting scheme:
- If you write a lot or type text on a computer keyboard, the absence of shadows greatly simplifies your work, making characters visible right at hand;

- This is also important in the home workshop, when working with small details: the shadow from a pencil or a jigsaw file sometimes interferes with an accurate line or cut;
- For a make-up artist and a hairdresser, shadows are the first enemy: the lighting should be uniform and correspond as closely as possible to daylight.

Let's clarify: in last case not only the absence of shadows is important, but also the spectral composition of the light. Alas, in this respect, the best of today's LEDs are only approaching halogen lamps: Their color rendering index reaches 85% versus 95-100% for halogens.

The tape is useful not only as the main source of light, but also as a backlight. Due to its small cross section and weight, it can be mounted on a foam or polyurethane ceiling plinth.
Ceiling lighting with LED strip gives diffused indirect light, which is very convenient in the nursery when you put your fidget to bed, or when watching a movie in the living room.

Go shopping
So what should we buy?
ribbon
The LED strip for the main lighting should have a luminosity of at least 800 - 1000 lumens per linear meter. The author strongly advises to prefer tapes on modern smd leds 5630 or 5730: Compared to the long-standing smd 5050 on the market, they provide higher luminosity at the same or lower power consumption.

Note: the price of modern tapes is equal to or even lower than the cost of obsolete products with obviously worse characteristics. Progress does not stand still, and new LEDs are not only more economical than the old ones, but also much cheaper.
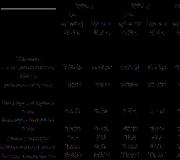
A guideline may well be the instruction prescribed in SNiP 23-05-95 for the selection of illumination for premises for various purposes:
| Image | Room type |
|
|
Children's room - 200 lux (lumens per square meter). |
|
|
Living room, kitchen - 150 suites. |
|
|
Corridor, toilet - 50 lux. |


For example, to illuminate a living room with an area of 20 square meters, a tape with a total luminosity of 20x150 = 3000 lumens is needed, which, with a specific luminosity of 1000 lumens per linear meter, will give us three meters of length.
In practice: it is worth choosing the luminosity with a margin of at least 20-30%. The fact is that most manufacturers overestimate the luminosity of the tape relative to the real one. In addition, with its considerable length, the LEDs farthest from the power wire shine more dimly due to the inevitable voltage drop on the long conductor.
What should be Colorful temperature LEDs?
It all depends on your preferences:
- The color temperature of 2700 Kelvin gives light close to the spectrum of an incandescent lamp and minimally tiring to the eyes;
- 4000K guarantees extremely accurate color reproduction: this is the spectrum of midday sunlight.

Power Supply
The power supply must cover the total tape consumption by at least 20%. This is necessary so that its transistors do not work in their limiting modes: heating the PSU reduces the resource not so much of the transistors themselves as electrolytic capacitors in the power stabilizer.
For example, for 5 meters of tape with a consumption of 18 W / m, you need a PSU with a power of at least 18 * 5 * 1.2 = 108 (adjusted for real values \u200b\u200b- 120) watts.

heat sink
Tape with power density over 14 watts per meter requires heat dissipation. High operating temperature leads to accelerated degradation of LEDs and a drop in their luminosity.
As a heat sink, you can use:
- Regularly produced for this purpose aluminum profile with a diffuser;

- Any metal profile (for example, aluminum or steel corner).
It is curious: along with a metal profile, any material with a sufficiently high thermal conductivity can be used to remove heat. The tape will not overheat if applied to glass or modular false ceiling frame.

Do I need to cover the light source with a diffuser?
Installation
How is the LED strip for general lighting of the living room mounted? Even a person who is far from electricians can do this work with their own hands.
There are a few subtleties here:
- To solder the power wire to the contact terminals, use a soldering iron with a power of no more than 40 watts. Otherwise, you will have non-zero chances to overheat the edge LEDs: the copper base of the tape has excellent thermal conductivity;
- Never connect two five-meter tapes in series: you will get overheating of the power tracks due to high currents and a dim glow of the extreme LEDs. It is much more reasonable to do the opposite - cut each tape into two segments of 2.5 meters each and power each of them with a separate pair of wires;

- Glue the tape on a dirt-free and grease-free surface;
- Cut it only along the marks made between the sections of three LEDs each;
- Install the power supply in a niche that is out of the reach of children and pets. Bare contact terminals can arouse their interest, fraught with unpleasant consequences. It would be a good idea to protect the niche from insects (for example, ventilation grilles with meshes): they cause 4 out of 5 faults in switching power supplies;
The niche for the PSU must be ventilated. Not necessarily forced: natural air convection is sufficient.

- It is advisable to install a switch not only in the power supply circuit of the tape, but also in front of the PSU. In this case, you can quickly and completely de-energize it in case of any malfunction.
Conclusion
As you can see, the LED strip for room lighting has a lot of advantages and is quite easy to install. The video attached to the article will help you learn more about LED lighting. Good luck!
The design of a modern kitchen involves the installation of high-quality lighting. It advantageously emphasizes the interior of the room and makes it possible to perform homework without damage to vision. Ordinary incandescent lamps do not always fit into the concept of a comfortable and beautiful kitchen, so alternative sources are being considered. - a prime example organizing basic lighting or lighting in the kitchen. Let's figure out what it is, how the tapes are installed and whether it is possible to connect the LED strip with your own hands. For convenience, we will assign the abbreviation SDL to the LED strip.
LED lighting is a new direction in the style of the room
What is LED strip and how does it work
The main element of the SDL is the LED. An electric current passes through it and the semiconductor begins to glow. SDL is supplied in coils of 5 meters and vary in a number of parameters. Lighting with the help of SDL creates a cozy and extraordinary atmosphere, saves energy consumption.
Attention!!! LED is connected using additional equipment - 220V voltage is not suitable for it

Additional equipment includes:
- Dimmer
- Amplifier
- Mounting profile if required
Each of the devices and devices has special requirements.
How to choose a strip with LEDs
To make the right choice of LED strip, pay attention to following options and features of semiconductors:
- The density of the elements - the further the LEDs are separated from each other, the more dark spots will be on the illuminated surface. The table shows the dependence of brightness on the number of LEDs
 LED strip is sold in any specialized store
- The type of LEDs - three-chip is suitable for basic lighting, single-chip - this is an LED strip for lighting the kitchen.
- Color rendering is indicated in Kelvin. A lower value corresponds to a warmer glow. For example, 2000 K is comparable to a candle flame, 2600 K is an incandescent lamp, 5000 K is the light of a fluorescent lamp.
- Power - indicated per linear meter in watts. To illuminate one square meter kitchen requires 2 W, which corresponds to approximately 20 W ordinary lamp incandescent. The LED strip in the kitchen should give out an illumination rate of 150 lux.
- Moisture resistance - optimal for the kitchen is SDL marked IP65.
- The base is usually glued, if not, double-sided tape is used for installation.

Knowing the device of the LED strip, the parameters of the glow of the elements, the marking features, the dimensions of the room, the backlight for the kitchen is selected.
Accessories for LED lamp
Let us consider in more detail what you will need to have if you plan to install an LED strip in the kitchen with your own hands.
 Light can be held in any nook and cranny of the kitchen
Typically, one power supply is designed to operate 5 meters of tape. Depending on the SDL, the voltage is selected - 12V or 24V. Power is taken 20% more than required for the connected backlight. Attention is drawn to the type of cooling of the power supply:
- Active - the fan constantly draws air into the power supply, the equipment works without interruption. The noise and size of the power supply are among the disadvantages of this cooling method.
- Passive - heat is given off in environment, rapid overheating occurs, but the small size of the power supply attracts
Dimmer and Amplifier
A device that regulates the lighting of the kitchen with LED strip. Has a built-in potentiometer that stores in memory latest values brightness. The dimmer is controlled mechanically or works with a remote control.
It is set if the dimmer cannot cope with the load or several power supplies are used.
 The mounting profile for the LED strip is perfect for general form cuisine remained beautiful
Mounted slightly below the ceiling when organizing the main lighting or on required level when backlit. Preference is given to an aluminum profile, which is completed with a diffuser. You can use a plastic profile for the LED strip, but then a high-quality material is selected that will not melt from luminous diodes. The dimensions of the profiles are selected in such a way that it is possible to stick a strip with LEDs inside.
Self-installation of LED lighting in the kitchen: in the work area, ceiling and other locations
In addition to the SDL and additional equipment, you will need a drill, a screwdriver, self-tapping screws for attaching the profile, a miter box for forming corner joints of the profile, and a degreaser. If the base of the strip is not self-adhesive, then you will need double-sided tape.
Do-it-yourself installation of the LED strip in the kitchen takes place in the following order:
- Mounting the shield - the organization of a sealed structure in which the optional equipment. If the dimmer works from the remote control, then it is taken out. If necessary, several power supplies are used and an amplifier is installed for every additional 5 meters of the band. All connections are made in parallel;
- Marking - the reference is the ceiling with LED backlight, not the floor level;
- Profile preparation - if there are no mounting holes in it, then it is necessary to drill them before fixing the profile to the wall;
- Profile setting;
- Connecting the tape to the dimmer and power supply, checking the operation of the equipment before mounting the LEDs in the profile;
- Bonding SDL to the profile.
To prevent the tape from peeling off, degrease the surface of the profile before fixing the LEDs on it.
 Mounting tape in 6 steps
What else can you do with your own hands
When you plan to install LED lighting with your own hands, it is not always possible to find the right materials or equipment. In this case, you have to do something yourself.
Profile for SDL
You can make a profile for an LED strip with your own hands from any aluminum profile that has a pleasant appearance, or plastic cable channel. It is important that the SDL fits in width, and the plastic can withstand the heat. A cover is used from the cable channel.
You can make a power supply for an LED strip with your own hands from a 19 V power supply for a laptop or monitor. You should lower the voltage to 12 V. To do this, buy switching regulator, while even Chinese variants, which differ democratic price, work without problems.
 The power supply is a must, do not let water get on it
Lamp under cabinets in the apron area
For its manufacture, the same components are used - an LED strip, a power supply, a dimmer. Only the aesthetic issue with the case should be solved. You can use blanks cut out of plastic, on which the tape is glued, or an aluminum corner. And you can attach the SDL to the crossbar, on which coat hangers are hung in cabinets. Perfect flat chrome profile. As an option - make a double lamp from an LED strip with your own hands. To do this, you need to connect two pieces of the crossbar with each other and stick two pieces of SDL in parallel.
Dining table and countertop with backlight
The decorative qualities of the SDL will be used here. The table is assembled on the basis of the old table, so as not to attach legs and use the existing tabletop. You will need glass 8 mm thick according to the size of the old table, wooden planks for the frame of the new tabletop, a metal strip under the SDL, a low-power LED strip - the table should have a pleasant backlight, but not be a source of kitchen lighting. To make a backlit table with your own hands, you will need to follow these steps:

- Use sandpaper to frost one side of the glass.
- Assemble a frame from planks
- Glue metal strips to the old countertop to install the SDL on them - the location depends on the imagination, but you can do it simply around the perimeter
- The wires from the SDL are brought out under the table top, the power supply and dimmer are also attached there
- The frame is installed on an old countertop, covered with glass
It is important to process glass sections well so as not to get hurt.
WATCH VIDEO
Summing up
Illumination in the kitchen with LED strip is used to create basic, additional or decorative lighting. It is mounted in a special profile and installed under the ceiling or glued above the work surface. Lighting parameters are selected individually, but it should be remembered that the kitchen should not be in twilight. Saving on electricity is inappropriate here, because LEDs consume 7-10 times less electricity than incandescent lamps.