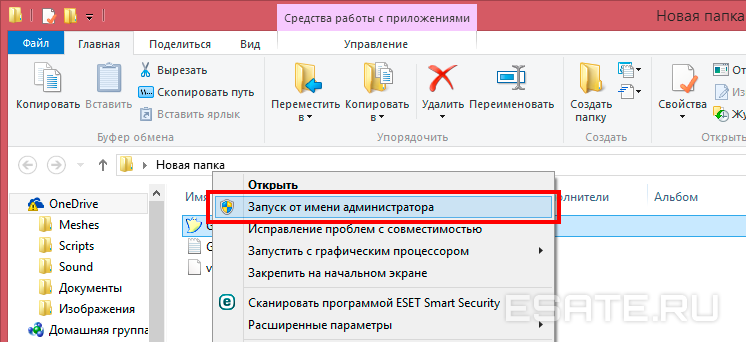
Solving problems when installing Windows 7. Problems with specific error codes. Replacing the image did not help. Less common general problems
I have good friend Ruslan, he had a normal desire instead of Windows XP on his home computer use . He is an advanced user, why not, the computer is powerful, the hardware is 100% suitable. Buying a seven in our time is naturally not a problem, which is what we did, we decided to carry out the installation process together.
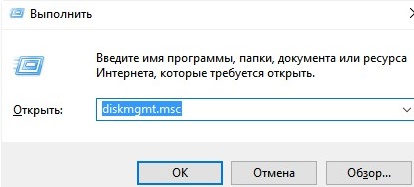
We came to him, took out a beautiful disc from a bright box, and inserted it into the drive. My friend’s hard drive is divided into two partitions, the first drive (C:) has a capacity of 120 GB, the minimum for installing the seven is 20 GB. Windows XP is installed on it, there is also a disk (D:) with personal data, we decided to install Windows 7 on (C:) and everything that was valuable on it was copied to (D:). Everything is ready for installation. Just in case, I went to Disk Management and made sure that the disk was converted to , since the seven will not work on dynamic without general formatting.
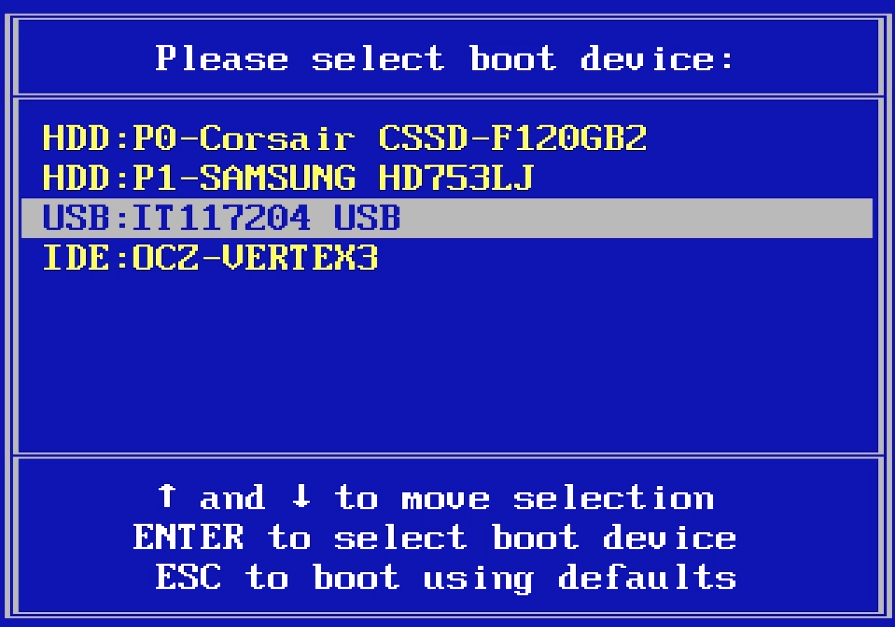
Rebooted, went to . Nominated first boot device the disk drive, the second hard drive, I turned off the floppy drive completely, since the computer often wants to boot from it, everyone has nostalgia.
- Note: Friends, if you are, then you should know that Windows 7 does not support USB 3.0 (ports are usually colored blue), if your USB flash drive 3.0, insert it into USB port 2.0.
- And some more information for you, if this article still doesn’t help you, try going all-in and read our article.
The Windows 7 installation process has begun, which does not foretell any problems, my friend’s computer is good and still under warranty. In the window - Select the partition to install Windows, select the first partition with Windows XP, delete it and click next, copying begins Windows files, then the computer reboots, services start, the installation program updates the registry settings, files are copied again, and in the place where you need to enter the user name, a black screen appears and does not disappear.
- After 5 minutes of useless waiting, we repeat the installation process during which all existing partitions on the hard drive are deleted ( personal files previously copied to a USB flash drive) and Windows 7 is installed directly into the unallocated space, but to no avail.
- Rechecking BIOS settings, repeat the installation a third time, Windows 7 won't install not at all. Booted using bootloader Acronis disk Disk Director, I look at the hard drive, everything is fine with the partitions, there are no shifts, there are only two partitions. The first suspicion, as usual, falls on installation disk Windows 7 and disk drive.
- I’m going home and bringing my seven and my disk drive, changing the SATA cables for the hard drive and DVD-ROM, repeating everything again with my disk drive, as well as my installation Windows disk 7 and to no avail.
- We decide to replace the hard drive for a while, since I always carry a simple one with me hard drive SATA interface for 240 GB. We completely format it, repeat the installation process and imagine everything ends in the same place, User Choice.
- We sit and think badly about the motherboard, suspicion of south bridge, it is he who participates in data exchange with peripheral devices, in particular with a disk drive. Maybe RAM? By the way, the computer is under warranty and there are stickers on all components that cannot be removed or disassembled. I downloaded Acronis Disk Director again, deleted it and created new partitions using it, everything is useless.
We disconnected the system unit and went to the store of my friends from whom we bought the computer, we arrived and said: so they say, so, Windows 7 won't install. They listened to us carefully, took our installation disk with seven and installed the operating system on our computer in 25 minutes and with a grin they pushed the system unit back to us, saying one zero in our favor.
We arrived home not at all happy and decided: we will sort it out. We did it just in case backup of installed Windows 7 in the program and hid it away, decisively removed the installed Windows 7 and started the installation process again. After some time, in a painfully familiar place, Malevich’s black square appeared. What are your thoughts friends?
- To agree to turn it around and never find out what’s going on, no, I won’t be able to live with that, I won’t sleep.
Why did everything work out in the store? There was another monitor and all the cables, I have everything in my bag, we change the cables and admire the black screen for the tenth time. What about the monitor? Here we have a guess. How come we didn't figure it out earlier? My friend’s system unit is connected to the monitor, but also to the TV, via hdmi cable. The video card has HDMI output and on the TV too, which means during installation, Windows 7 sees two monitors and two screens and makes the TV the main screen. Then, naturally, you need to look for the image of the continuation of the installation of the seven, no matter how funny it sounds, on TV. We didn’t look for anything, but simply disconnected the HDMI cable from system unit and for the eleventh time we repeated the installation of Windows 7 and that’s it, my dears, the seven was installed without problems, and it was installed before, only you had to select a user name on the TV, which, by the way, was working all this time.
After successful installation, we connected the system unit and the TV, then went to NVidia panel and adjusted the screen resolution, that's all.
Friends! Read detailed instructions on our website.
Problems with installing Windows 7 arise unexpectedly, and at the wrong time. All of us have faced similar troubles before, so we all know how unpleasant it is. Our post today suggests studying the most popular errors when installing 7, and of course, we will look at the appropriate methods for resolving this problem.
Top faults and how to deal with them.
So, I propose to get straight to the point without any introductory complaints or lectures. Problems with installing Windows 7 usually begin after BIOS problems occur. Most often, 7 is not given for one simple reason - BIOS is too outdated. Owners of dinosaur computers, and myself, once observed such disgrace back in 2009, when 7 was just born. As you may have guessed, only updating the BIOS can save this situation. At the first opportunity, I recommend checking for updates for motherboard. Of course, all this needs to be done in advance.
List of top problems early stage Also replenish faults in ISO image, which copies its files to the system disk - that is, in the Windows 7 itself that you are going to install.
Also, if in the process of establishing the system computer turns off— most likely it’s time to think about a major cleaning inside the system unit or inside the laptop case. The PC simply overheats due to dust accumulated in it.
If the system gives an error during the installation process - possibly damaged itself installation flash drive or disk. This also happens often, although you should check the functionality of the drive itself and the USB port. If users are caught off guard by the latest “trouble,” then they will have to visit the nearest store where they can buy new devices. By the way, here's one useful advice for fans of DVD drives: Even the most old disk You can slightly “reanimate” it, just wipe it with a soft cloth, then check again. In the case of a flash drive: try rewriting it again. If it doesn't work out, sign up for another one.
It may also give an error during installation faulty or dusty equipment. For example, RAM does not like dust very much and is one of the first to stop working. To fix this - You need to do a thorough cleaning of your PC. But it also happens that The RAM stick has completely failed. You can check it using the memtest 86 program. But first you need to download its image and correctly write it to a flash drive or disk. For more information on checking, watch the video below:
Problems with installing Windows 7 can also arise due to hard drive malfunction disk. Perhaps it has already become unusable and it is not possible to write an operating system onto it. To check this, I recommend downloading and burning an image of the Victoria 4.46 program. You can find out how to use the program in the video below:
- the process is simple. But sometimes there are problems that can interfere with the installation procedure. This article will help you understand the most common errors.
In the content you can quickly find solutions certain problems caused by specific error codes.
What should I do if there is an error during installation?
When installing Windows 7, you may experience various problems: The process may be interrupted at different stages and at specific steps (when copying/unpacking files, formatting HDD/SSD, etc.).
If you cannot understand the reason for a particular error, be sure to start by checking the image of your copy of the OS for integrity.
If after at least two attempts you are unable to successfully complete the system installation, pay attention to the error code that appears during installation. The following article discusses the most common of similar mistakes, and also provides methods for correcting them.
Damaged Windows 7 image. What does this mean and how to identify it?
Let's start with obvious signs:
- The file size of your OS image does not match the size of the image file downloaded from the network;
- The image cannot be opened/mounted by programs WinRar, Daemoon Tools;
- When reading or copying an image using a program to write a system file to a disk or flash drive, errors occur.
If at Windows entries 7 per disk at least 1 If the symbol is damaged and written incorrectly, you will get another unique string of 32 characters (this string is called the MD5 hash sum). Thus, checking checksum MD5, we determine if there are any errors in the captured Windows 7 image. For this check we will use the MD5 Checker () program.
It's simple: download the required version, unpack it to any place (for example, on the Desktop), open it.
Now we just need to move our times Windows 7 into the program window, where you compare the MD5 of the downloaded file with the initially correct MD5, which is usually indicated on the page of the selected original system assembly.
Checking executable file integrity programs:
As you can see in the picture below, the value from the column Current MD5
fully complies with MD5 on the website. 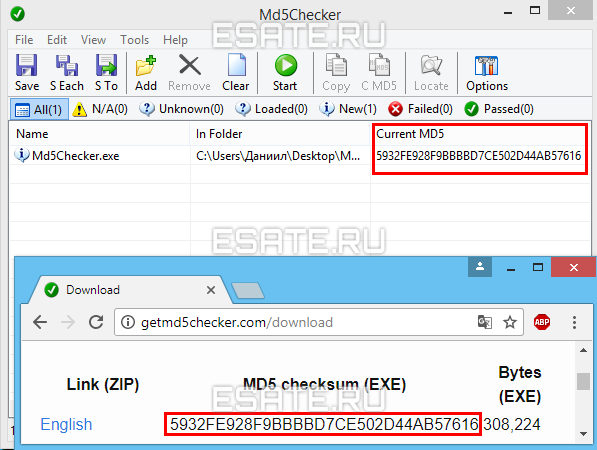 Figure 1. Checking MD5 with the original.
Therefore, our file is “not broken” and the contents are completely corresponds the original image of the installation disk, i.e. his original content.
Now that we are confident that our image is intact, we can re-write it.
Preferably on another drive and with a minimum speed (in the case of a CD) to completely eliminate the problem with installation files.
It is also highly recommended to try different image the OS of interest (Operating System (our Windows 7)).
This point may help:
- Solve errors with unpacking and copying files from a possibly non-working flash drive or damagedCD;
- If some other problems arise during the initial stages of the wizard’s work (driver error optical drive, absenceHDDin the installation menu, etc.).
Replacing the image did not help. Less common general problems.
"Windows 7 cannot be installed (GPT standard)"
(Windows Setup unexpected error)
New models of computers (mostly laptops) may have drives - it doesn’t matter SSD or HDD - with markings incompatible With installation program a number of builds of 32-bit versions of Windows.
The most reasonable solution in this situation would be to download and then install Windows 7 x64. So, if your computer has more than 2GB RAM, it is recommended to install a 64-bit OS. But if you need exactly the x32 version of the system (for example, when transferring a new HDD to an old computer), you need change markup disk WithGPTonMBR.
Change the layout of the HDD/SSD drive (volume Necessarily
less than 2 TB) is possible only after completely formatting it. This will result in complete data loss. So, before proceeding, make sure that all important data is transferred to the backup storage.
How to find out what markup is on your drive?
Very simple. For this you will need:
- Call command line CMD by pressing a keyboard shortcut Shift+ F10 (after an error in the window for selecting a disk for installation);
- Enter "diskpart » → press "Enter" → then "list disk » (see below);
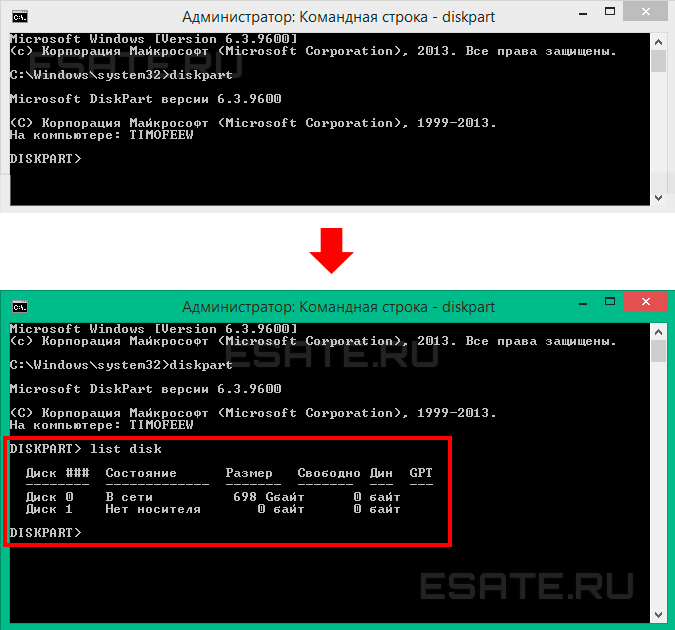 Figure 2. Working with the CMD console.
IN columnGPT the symbol will be indicated asterisk "*", if the corresponding drive has GPTmarkings
As can be seen in Figure 2, none of the drives have this marking, and therefore perform the following steps NO NEED! In this case, the problem should be looked for elsewhere.
But if you still see an asterisk next to the drive you are interested in, go to step 3.
- Now we need to determine the disk we are interested in by volume and select it with the command "select disk 0» (in your case this may be a different number);
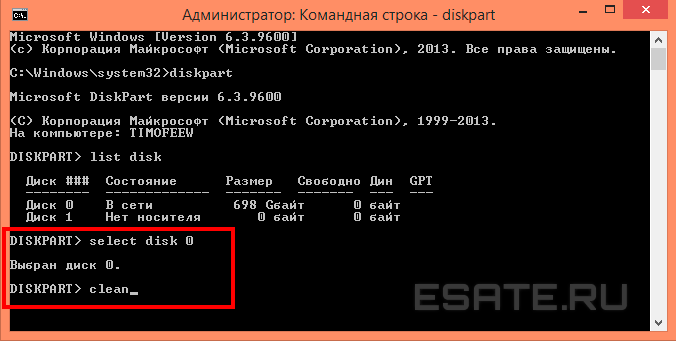
- Dial a command "clean » (see figure above), thereby formatting the drive;
- Enter « convert mbr".
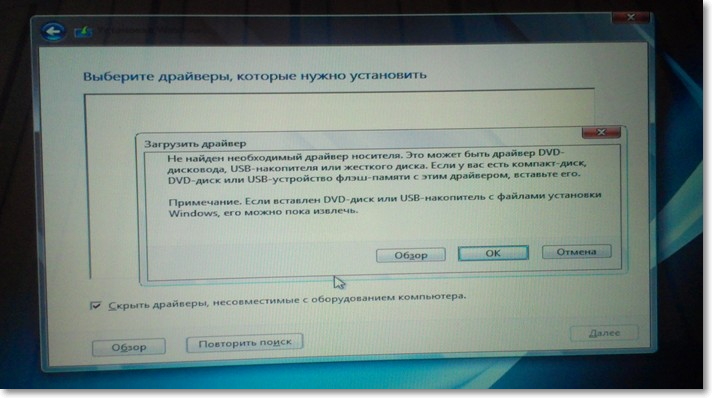
Driver error when installing Windows 7
This error can be caused by one of two problems:
- The required media driver was not found;
- The required driver for the floppy drive was not found optical disks.
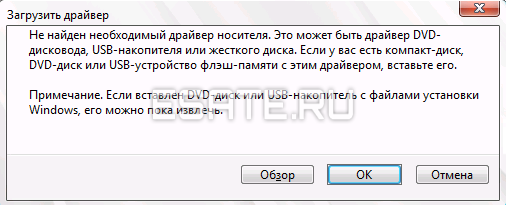 Figure 3. Entering commands into DISKPART utility, open in the command line (cmd.exe)
The simplest thing you can do in case of lack of media driver, This is to move the USB flash drive with Windows 7 from a USB 3.0 port (blue) to a USB 2.0 port (gray-black). Usually after this the installation proceeds without problems.
There is another way in which you need to download the drivers for your motherboard (or chipset laptop driver) from the manufacturer’s official website and drop them into the root of the flash drive in unpacked form. Then when reinstallation when it arises this error, you need to click on the “Browse” button and select the flash drive on which the unpacked files are located.
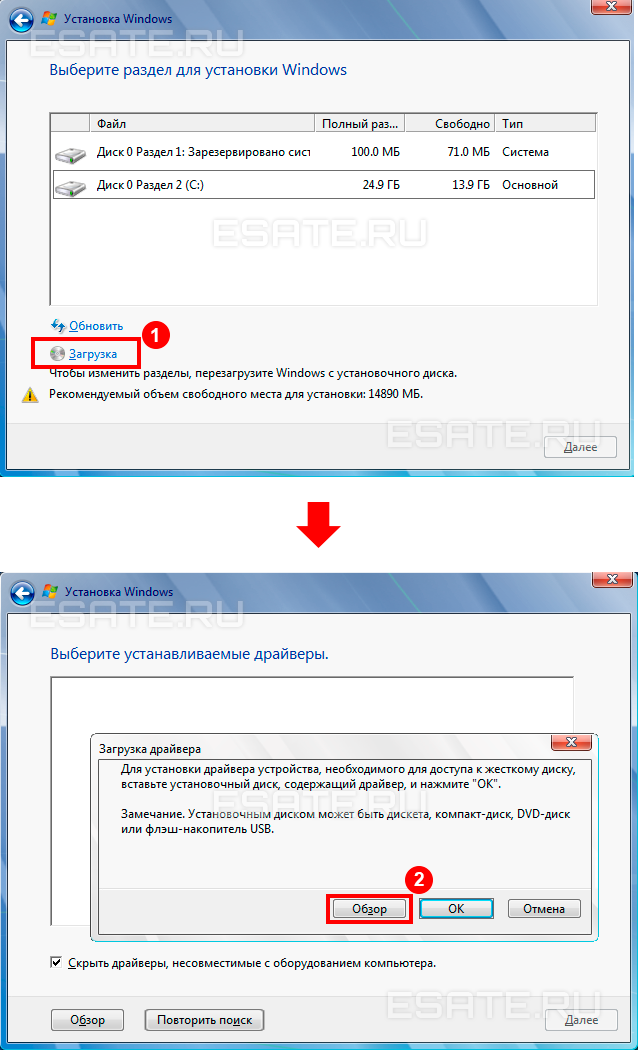 Figure 5. Window for selecting a disk with drivers.
The drivers will be installed automatically (if suitable) and the process will continue.
Solving the error "no driver found for the optical drive": 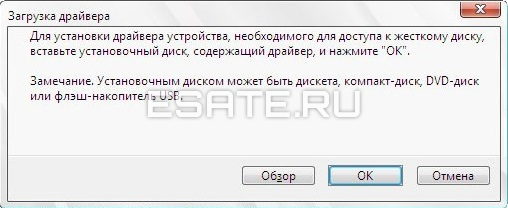 Figure 6. Error window about missing optical drive driver.
This problem may occur if you are using a CD with a system image stored on it. Basic possible reasons this error:
- The installation disk with Windows 7 is poorly written;
- The DVD drive does not read the disc well.
When burning a new disc, pay attention to the following points:
- Be sure to check installation image, as described in the chapter Damaged Windows image 7;
- Use a low (preferably minimum) disc writing speed, because... The CD drive may malfunction especially high values burning speed.
Problems with specific error codes
Error 0x80070570 when installing Windows 7
This error can be triggered in several cases:
- Faulty image (how to check, see heading No. 1);
- Problem with HDD connection and/or in the drives themselves;
- Problem with the sticks (one/all) of RAM.
Step 1:
Check the Windows 7 image as described above ().
Step 2:
First of all, be sure to check all connections and cables of your HDD and SSD mounts, after unplugging the computer from the outlet. After all, SATA cables (especially inexpensive ones) tend to wear out, fray, i.e. break down and become unusable.
Next, if this does not help, you need to check the surface of the hard drive: first, use the built-in tool chkdsk, then (as a last resort) Victoria programs or MHDD (see the point about checking hardware).
Step 3:
Check the hardware of the disk or computer as described in the chapter.
Error 0x80070017 when installing Windows 7
Diagnosis of this problem is done in exactly the same way as shown in the example above.
But code 0x80070017 may also appear after malfunctions Update center already completely installed system.
And if the methods described above did not help for error 0x80070570, we try to solve the problem by restarting "Update Center" through command console. To launch the command line (cmd.exe), you need to do the following:
To do this, enter the commands presented below sequentially:
- net stop wuauserv ;
- CD %systemroot%\SoftwareDistribution ;
- Ren Download Download.old(make sure the Internet is connected);
- net start wuauserv .
Error 0x80070057 when installing Windows 7
The main methods to solve this problem: To disable backup BIOS image to system drive:
- Restart your computer and sign inBIOS.
For this in the menuSetup you need to press a specific key (Delete, F2, F1, F12 depending on the motherboard) ; - Find the option « Backup BIOS image to HDD" ;
- Change the value « Enabled" on « "Disabled" (if possible) → Save changes→ Restart your PC.
Error 0x8007025d or 0x8007045d when installing Windows 7
If these errors occur, you should also not rush to fully check the hardware of your PC. The main methods to solve this problem: And only after that you can start full diagnostics.
Error 0x80300024 or 0x80300001 when installing Windows 7
« Windows installation cannot be performed to this location»These errors can occur in two cases:
- The drive already contains old copy Windows 7, and installation is performed on incorrect section;
- Incorrectly installed controller modeSATA in BIOS.
Necessary delete partitions created on HDD/SSD, install OS on "Unallocated space"(see picture below): Attention. Next steps include entering a command to clean the drive. Make sure that all important data is transferred to backup storage. 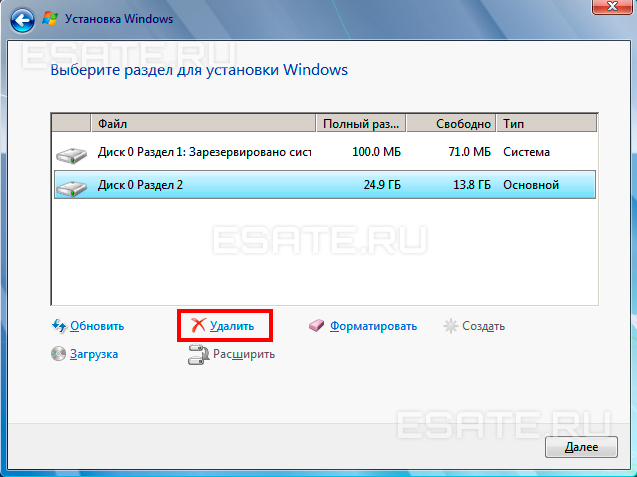 Figure 7. Removing disk partitions.
All information needs to be clarified on the forum of your motherboard manufacturer.
In most cases the problem will be resolved. Otherwise, check the hardware (see chapter).Error 0x000000a5 when installing Windows 7 (accompanied by a BSOD or blue screen of death)
This problem is mainly related to the BIOS or computer hardware and occurs mainly due to a non-working RAM stick (or all of them at once). Therefore you need: If no hardware problems were found, try using another installation OS image.
Error 0xc00000e9 when installing Windows 7
This error is related to computer peripherals. It is possible that during the installation wizard, you accidentally touched the flash drive, and it came out of the USB port for a short time, interfering with the process. In this situation, the first thing you need to do is:
- Disable unnecessary hardware in BIOS;
- Move the boot drive to another USB connector (preferably 2.0, i.e. a gray USB connector).
Error code 0x0000000a
Error with code 0x0000000a can occur both during the installation of Windows 7, and simply during operation installed windows.
Detailed description The solution to the problem with this error is included in a separate article: Error code 0x0000000a.
The operating system image is intact, but using other images does not help. Quick hardware check (Chkdsk, Memtest, Victoria (MHDD))
You should only skip to this part of the article if you:
- We verified the integrity of the image of the system files (the image is correct, writing to other drives did not fix the problem);
- We followed all the steps regarding your specific error code, but it did not yield any results.
Step 1 – verificationHDDby usingchkdsk:
- Call the command line with the combination "Shift + F10" at any stage of system installation;
- Enter the command "chkdsk with: /r" → we are waiting full check and restoration of “broken” sectors on our HDD;
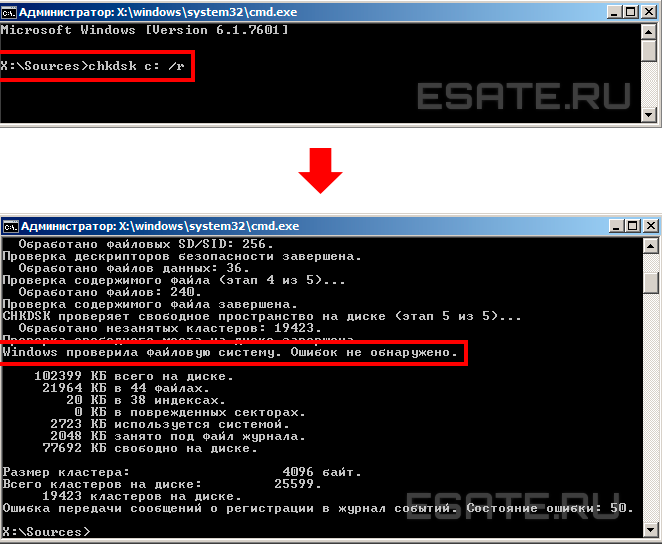 Figure 8. Results of the chkdsk command.
- Closing CMD, we are trying to install the system again.
Step 2– checking RAM:
To begin with, it is advisable to disassemble your computer (laptop), carefully remove RAM, blow off any dust and put it back in place.
If no changes are observed, try starting the computer alternately with one of the strips (if there is more than one). A completely broken RAM strip will simply not allow the startup process to even get to the start Motherboard BIOS fees.
These programs will help you install (and Victoria, perhaps, solve) some hardware problems with HDD and RAM. First, let's install them on a flash drive:
 ;
;
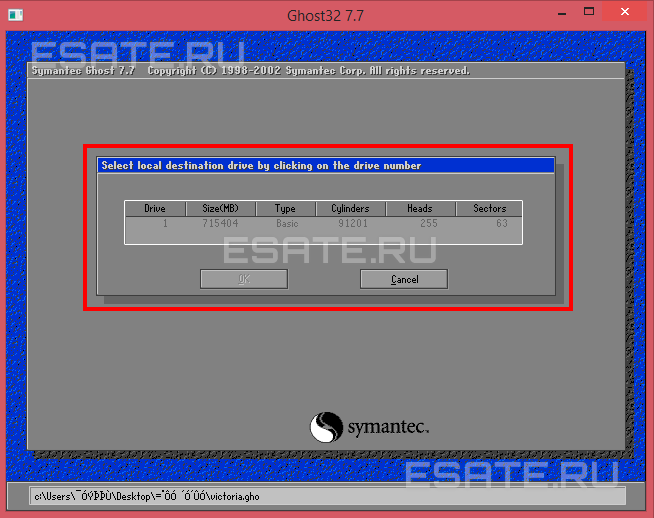 Figure 11. Selecting a device (flash drive) in the Ghost32 program window.
The flash drive is ready. We insert it into the PC that gives an error, boot, check the RAM and HDD for errors and bad sectors, selecting accordingly Memtest or Victoria.
These programs should identify problems with components. The programs can help identify problems with the hardware of your computer (hardware malfunction), after which you will need to seek help from a specialist.
Microsoft takes a thorough approach to the issue of releasing new versions of its operating systems. Their advantages are very significant and sooner or later even the most conservative users switch to fresh ones Windows versions. The problem is that some features replace others, and some old programs may simply not work on the new operating system. In such situations, it is useful to know how to return to more old version Windows, and how to install several systems on one computer at the same time.
Rolling back Windows 10 to previous versions
First you need to figure out how to roll back from the most new system Microsoft to Windows 7, which is still very popular. The first step is to carry out some very important preparatory processes. They should also be carried out during any reinstallation of Windows:
- prepare disks with necessary drivers devices - if Windows 10 and 8 most of downloads drivers independently from the network, whereas previous operating systems required installing them manually. And it’s good if the Internet works, but it also requires a driver network card. It is worth making sure that the most necessary drivers your devices were saved to a convenient storage device;
- throw everything off necessary documents And installation files programs: despite the fact that Windows can be installed without formatting hard drive, there is always some risk of losing valuable information. In addition, you will need to reinstall all games and programs, choosing their versions for a different operating system. Make sure you have this option;
- If the installation is performed on a laptop, connect the device to the network. You will need it to work consistently throughout the installation, otherwise you may encounter a number of problems.
After all the preparatory steps are completed, you can begin the installation itself. The method to return to Windows 7 depends on how long ago you installed Windows 10. If you installed Windows 10 over the previous one operating system no more than a month has passed, then all the files necessary for return are still on your computer. Otherwise, you will need a system image to install it and license key to activate.
Installing Windows 7 using saved files
At Windows update files from the operating system remain, they are stored in the windows.old folder and can be deleted by you at any time. But if they remain, returning to Windows 7 will be very simple:
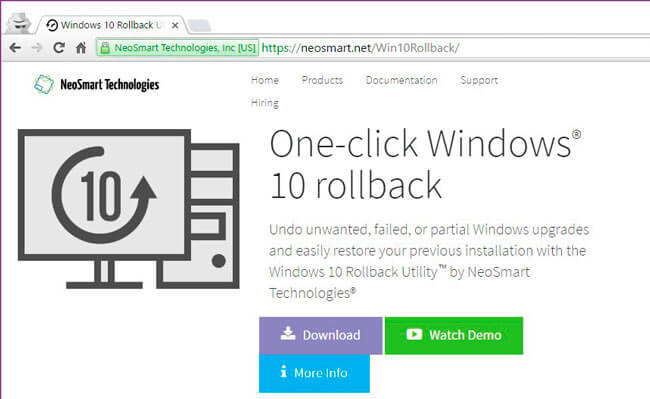
There are situations when, despite the presence of a folder with files previous version Windows, there is no button to roll back to it. In this case, you should use a special program for this. Do the following:
Video: how to quickly return from Windows 10 to Windows 7
Increased file storage time
Recovery using system tools allows you to rollback within one month after installing the system. But what if you want to extend this period? This can be done very simply. It is enough to change the names of the folders in which the data necessary for the rollback is stored. These folders are called:
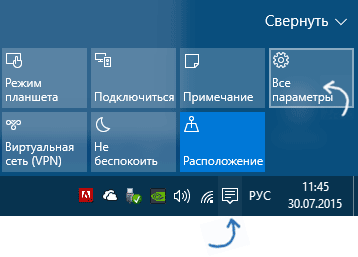
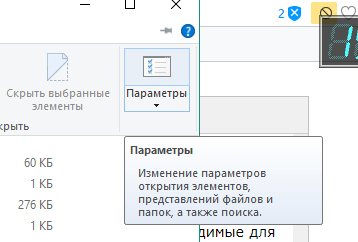
Two of them will be hidden by default. To display them, do the following:
You can change the names as you wish. It is enough to add the inscription “copy” to each of the names and the system will no longer detect these folders. Later, when you want to use them, just return the folder names to old look and they will become available for restoration.
Downgrading Windows 10 to Windows XP
If you decide to return to an even older operating system than Windows 7, you cannot do without complete reinstallation systems. There is no way to roll back to this OS without fully installing it.
Installing Windows 7 or Windows XP instead of Windows 10
The process of reinstalling Windows 7 or Windows XP differs from a rollback in that it does not use backup copy operating system, but installs it from boot image or using special programs. This will remove Windows 10 from your system.
Uninstalling Windows 10
You can uninstall Windows 10 right during the installation of a new operating system. To do this, just select the command to format partitions during the installation process.
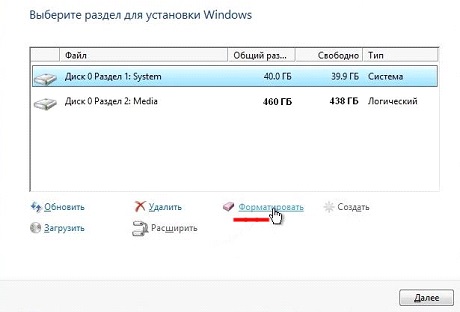
You can remove Windows 10 by formatting the partition during installation
But you can completely remove the operating system without this. Just remember that if no operating system is installed on the computer, it simply will not start.
To completely remove Windows 10, you will need to write the GParted LiveCD program to a bootable drive - for example, a flash drive.
Burning a bootable USB flash drive using Rufus
Rufus is one of many programs that you can use to create boot drive. Let's consider the recording process using this program, because it is very easy to use.

Once the recording is complete, you can use the created boot drive. Thus, you can record both the installation image of the operating system and various utilities you need to work with your computer.
Complete system removal using GParted LiveCD
Now that you have created a bootable drive with an image of this program, it's time to use it. But before that, make sure you save everything necessary files With system disk- after all, you will format it and the disk will be completely cleaned. And then follow these steps:
Wait until formatting is complete and the operating system will be completely removed from the computer.
Video: instructions for completely removing Windows from your computer
Installing Windows 7
To install Windows 7, you will need an operating system image in ISO format. You can download it from the Internet, although, of course, you will need to purchase a license key to activate it. The image must be written to the bootable drive - you can use the recording method given in the previous section. After creating the boot drive, insert it into your computer and do the following:
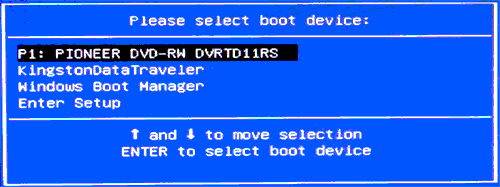
Starting the operating room installation Windows systems XP will be no different from installing Windows 7. You also need to burn the system image to boot disk or flash drive, and then change the boot priority to BOOT Menu. But the next steps will look a little different:
Installing Windows 7 or Windows XP along with Windows 10
The ability to install multiple operating systems at once and switch between them is very useful. It is especially in demand if you use old system only from time to time to run specific programs.
The process of installing an operating system next to another is no different from a simple installation. The only difference is what you need additional section, on which the system will be installed. The easiest way is to create it in advance using system tools.
The partition has been created and when installing Windows 7 or Windows XP you will only need to select it among other partitions. After the processes are completed, when you start the computer, you will see a choice between the operating systems installed on the hard drive.
Video: installing a second operating system on a computer
Problems installing Windows 7
When installing Windows 7, various problems may also arise. Let's look at a few common ones.
Windows 10 does not start after installing Windows 7 as a second system
Have you installed Windows 7 next to Windows 10, but at startup you are not prompted to select the old operating system? In this case, make sure that you do not mix up the partitions during installation. If you installed Windows 7 on top of Windows 10 or on the same partition, the reason for the malfunction is clear. If everything is correct with the partitions, then do the following:

Video: how to restore Windows 10 boot after installing a second operating system
Can't install Windows 7 after Windows 10
Most of the reasons for the impossibility of installation are due to user inattention. It's worth doing the following:
The release of a modern and high-quality operating system is certainly important. But it is much more important that the user has a choice. Knowing how to install Windows 7 or Windows XP both instead of Windows 10 and next to it, you get the opportunity to organize work on your computer in a convenient way.


