How to remove system applications. Cleaning your smartphone from unnecessary software using Root Uninstaller
The user of a new Android device, regardless of manufacturer, discovers pre-installed programs that he will never use, but cannot remove. In this material, we will tell you how to remove unnecessary applications on Android in order to rid the system of useless “garbage”.
Types of Applications
OS Android, in the form in which you receive it on your new device, contains applications that can be divided into several large groups:
- Custom. Everything is clear with this category. It includes programs that are installed and used by the device user. They can be removed, updated, or reinstalled at any time.
- Manufacturer installed or factory installed. Present at the time of purchase of the device. The user can update them, but cannot delete them without root rights.
- System. These include Google services and standard Android programs. Applications in this category cannot be uninstalled without the risk of damaging the device's operating system.
Root
The term root or superuser came to Android from Linux. In this OS, this is an account whose owner has the rights to perform any operations, including with system partitions. There are more than 30 ways to obtain administrative rights on Android. They differ depending on the device manufacturer, installed processor and even OS version. On smartphones of the same brand, for Android 5.0 and Android 6.0 these can be completely different procedures. For example, for Meizu MX 4Pro, which runs on Android 4.4.2, it all comes down to a simple registration on the manufacturer’s website, during which you accept an agreement about responsibility for your actions.
For this reason, we will not dwell on obtaining root rights, implying that you will find a way for your device. We have a separate article for this.
Required programs
It's painless to remove built-in applications; it's safer to use third-party programs. You can download them from the Google Play store after receiving administrative access to the device.
ES Explorer
After installation, to ensure full access to the smartphone’s file system, you will need to enable root explorer in the settings.

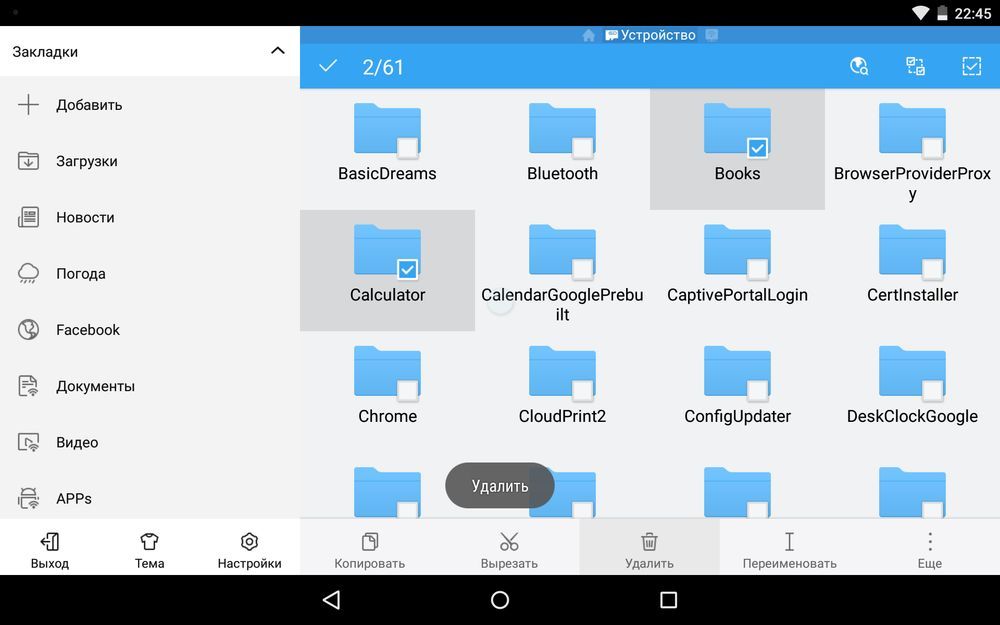
The next step is to directly remove interfering applications. Let's use a file manager with administrative rights to go to the system partition /system/app. It stores all installed programs in the form of apk files.

A long press will bring up an additional menu at the bottom of the screen and a selection position next to application icons. At this stage, using administrative rights, you can remove previously uninstallable programs, including those related to Google services.

The system will warn you that these actions are irreversible. By confirming your choice, you will use your root rights. Any action performed using them is perceived by the OS as unconditionally correct, so be careful and remove truly “unnecessary” applications.
This program can not only clean the system, but also remove standard applications on Android after you give it the appropriate access. The choice fell on CCleaner due to the fact that it has versions for all popular operating systems and is familiar to users. The program has the ability to clear the software cache and batch uninstall.

Using the built-in application manager, you can disable or remove them as you wish.

When working with system services, you will receive a warning. Any program that uses root access when working with Android-related files will warn you to be careful.

Warnings issued by the system provide the time necessary to convince you that the actions being taken are correct. With the ability to uninstall applications that are not otherwise uninstallable, the user must be careful and careful not to cause breaking changes.
Another free manager, specially created to work with the system after obtaining root rights. Its main purpose, unlike previous programs in our review, is to remove applications built into the device by manufacturers.

As you can see, Jumobile's functionality allows you to perform all types of operations. By moving built-in applications to the memory card, you can free up space on your device without deleting them.

An attempt to remove Facebook Lite pre-installed on the system raises a familiar warning about a possible violation of the integrity and stability of the system.
A useful feature implemented by Jumobile developers is the ability to batch work with deleted files. The selection can be made alphabetically or by installation date in the system, as is more convenient for the user. By checking the boxes for the program to be uninstalled, you confirm that you understand the consequences of the actions being performed and clear the device of the “garbage” in it in one click.
In conclusion
The ability to clear your smartphone of bonuses imposed by manufacturers is always present, in every version of Android, on a device of any brand. The owner's main concern will be obtaining root access and choosing the program with which these actions will be performed.
Let us remind you that obtaining root access is considered by manufacturers as an action that removes the device from warranty service. No one will refuse repairs if the protective glass on a rooted phone is broken, but if the malfunction is a consequence of the fact that native applications or services have been removed from the device, the case will not be considered under warranty. Therefore, before performing changes or modifications to the smartphone software, make sure that this will not harm the operation of the operating system.
Manufacturers of Android smartphones usually install many different applications, which are then not used by the user and consume system resources. However, such applications are considered standard and cannot be removed by ordinary means. This situation often does not suit users and they wonder how to remove standard applications on Android.
In this article we will try to answer this question. But before we get started, there are a few important points to note. Firstly, deleting standard applications can lead to unstable operation of the device. In order to reduce the likelihood of various problems and errors, do not delete applications with an Android or Play Market icon. And secondly, to remove standard applications you need ROOT rights. Without ROOT rights nothing will work, don’t even try.
Method number 1. Use the Root Uninstaller application.
The easiest way to remove standard applications on Android is the Root Uninstaller application. This application allows a user who has ROOT rights to manage standard applications as he wants. For example, with Root Uninstaller, you can uninstall stock apps, freeze stock apps, create backups of uninstalled apps, restore deleted apps, and hide apps.
The first thing you need to do is configure ES Explorer to work with ROOT rights. To do this, launch ES Explorer and swipe right to open the side menu of the application. Once the menu is open, go to the Tools section. Here you need to click on the “Root Explorer” menu item and turn it on.

As a result, a request to grant root rights will appear. Click “Ok” to grant root rights to the application. And after root rights are granted, click on the “Root Explorer” menu item again and do not release your finger until a menu with additional settings appears on the screen. In this window you need to select “Connect as R/W”.

And then, check the boxes next to the “RW” option and click on the “Ok” button.

This completes the setup of ES Explorer and you can proceed directly to removing unnecessary standard applications on your Android device. To do this, use ES Explorer to open the internal memory of your Android device and go to the folder /system/app. Here you just need to mark the APK files of standard applications and click on the “Delete” button. In addition to APK files, you also need to delete files with the application name and ODEX extension (if any).

If your device is running Android 5.0 or a newer version of Android, then in the folder /system/app all applications will be in separate folders. In this case, you need to delete them along with these folders.

After deleting the applications themselves, you need to remove updates for them. To do this, go to the folder /data/app and if there are APK files with updates, then they also need to be deleted.

In Android 5.0 and newer versions of Android, updates will also be located in separate folders. As before, we simply delete them along with the folders.

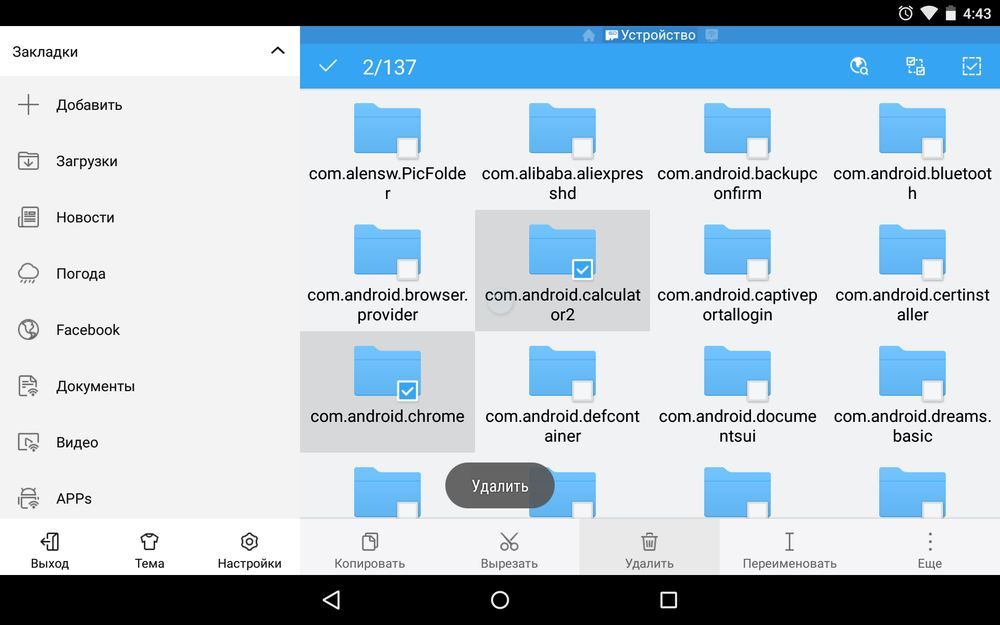
The last step in removing standard applications is to delete the databases and cache that are associated with the application. To do this, open the folder /data/data and delete the folders there associated with the standard applications you want to remove.

That's it, the removal of standard applications from Android is complete. Reboot your device for the changes to take effect.
Android comes pre-installed with a lot of different apps that you may not need at all - they just take up space and use up the device's RAM. Any of them can be removed, and how to do this is described in this manual.
First of all, you need to get root rights on your smartphone or tablet. They make it possible not only to remove standard applications, but also to easily launch specialized applications that significantly expand the capabilities of the device.
For each device, the method for obtaining Superuser rights varies, but the most universal utilities are: and also.
Then you need to install a file manager that supports access to system directories and editing system files. For example, ES Explorer, File Manager from Cheetah Mobile or . In this tutorial I will use ES Explorer.
How to remove default applications in Android. Method 1
1. First, you need to grant editing rights to the root directory to the file manager. How to do this for ES Explorer is described in.
2. In the internal memory, go to the folder "/system/app".
3. Select the .apk file of the desired application and click “Delete” in the context menu that appears.

4. In addition, you need to delete the .odex file with the same name, if it exists.
In Android 5.0 and higher along the way "/system/app" All built-in system applications are located in separate folders, so you need to select them and erase them.
5. Many system applications in the folder "/data/app" updates are stored, from where they will also have to be deleted.
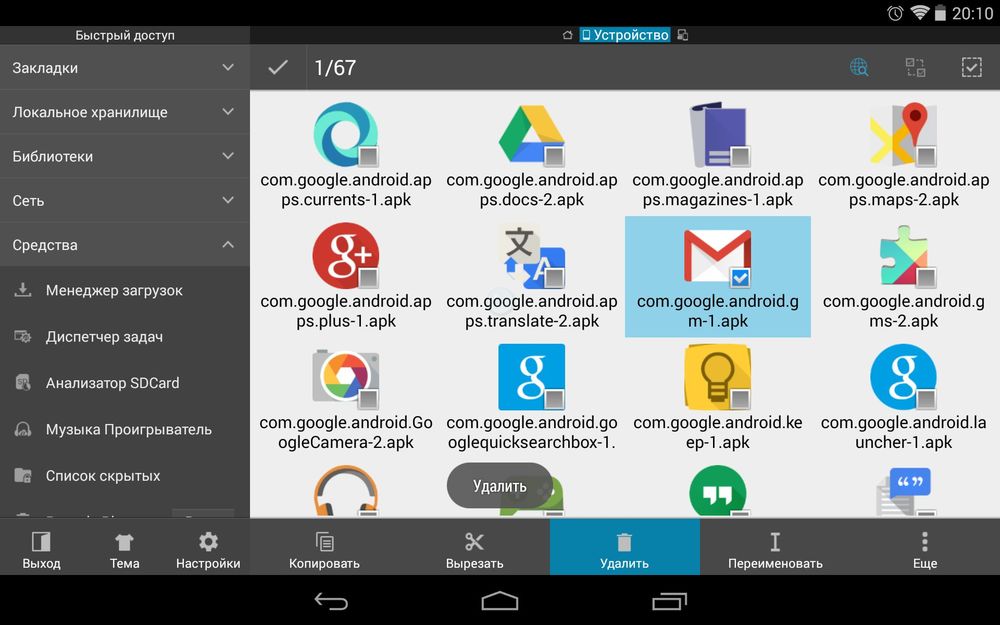
Again in Android 5.0, updates to pre-installed applications are on the way "/data/app" in separate folders. Select unnecessary ones and delete them.

6. Now all that remains is to erase the caches and databases of built-in system applications and services that are located in the folder "/data/data".
Uninstall pre-installed apps like Gmail, Google Drive or Maps. It is better not to touch system applications with the Android icon (for example, CertInstaller.apk or PackageInstaller.apk), since problems with the system may arise.
Uninstalling Android system applications using Root Uninstaller
Standard applications on Android can be uninstalled using the Root Uninstaller application. Download the .apk from our website and install.
1. After installation, open it and grant Superuser access.
2. Select the application you want to get rid of.
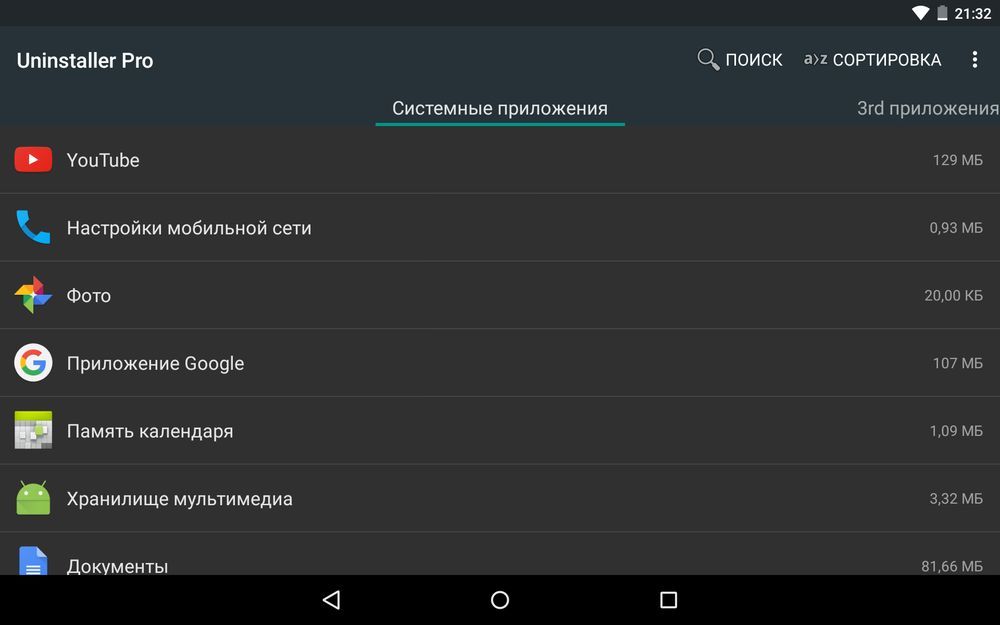
3. Click "Delete". Before deleting, you can make a backup.

In addition, applications can not be deleted, but frozen. This will stop them working and disappear from the menu, but will not be completely removed.
How to remove standard applications through ES Explorer
Some file managers have a special option for working with program files. Let's look at this function using ES Explorer as an example:
1. In the sidebar, under Libraries, select APPs.

2. At the top, click on “Custom”, thereby expanding the hidden menu. Select the “System” item in it.

3. Select programs that are no longer needed. From the list of options, select Uninstall.

I think that the methods I have proposed will be enough to remove standard Android applications. Yes, there are analogues of Root Uninstaller and other file managers that have the function of quickly removing built-in applications. But the 3 methods I talked about are the most convenient.
It's no secret that when you buy a new Android phone or tablet, the device already has many standard games and applications installed. As a rule, most pre-installed programs are marked as “system” and cannot be removed in the usual way.
For owners of expensive models with a large amount of memory, this will not create inconvenience; but for owners of cheaper budget devices, it can be a serious problem. Because due to a large number of unnecessary applications, there may be a lack of system or RAM memory, which in turn will lead to “slowdown” and “freezing” of the device itself.
In fact, you can remove standard applications on any Android device. But since these applications are part of the firmware, to remove them you will need:
1. Ruth is right(administrator rights) – if you don’t have them, you can read the instructions for getting root.
2. File manager– the most convenient for this is Es Explorer or Total Commander, but you can use another manager, the main thing is that it supports root rights.
Instructions for removing standard applications
Below are instructions based on the example of the Es Explorer application.
We will not make a description for each individual manager, since the removal process is identical and differs only in minor details.
Es Explorer is a free file manager for Android devices with root support.
1. Install the application.
2. Provide access to the root.
3. In the settings, find and enable “Root Explorer”. 
4. Go to the “system applications Apps” section.
5. Mark the applications you want to remove.
6. Click the “Uninstall” button and then “Uninstall” (the updates will be removed first, and then the APK file itself). 

7. Remove residual files from the /data/app partition. 
Many manufacturers of Android devices also make money by installing so-called bloatware - almost useless applications like a news aggregator or an office document viewer. Most of these programs can be removed in the usual way, but some of them are system programs and cannot be removed using standard means.
However, advanced users have found methods to remove such firmware using third-party tools. Today we want to introduce you to them.
Cleaning the system from unnecessary system applications
Third-party tools that have the option to remove bloatware (and system applications in general) are divided into two groups: the first do it automatically, the second require manual intervention.
To manipulate the system partition, you must obtain root rights!Method 1: Titanium Backup
The famous program backup application also allows you to remove built-in components that the user does not need. In addition, the backup function will help you avoid annoying mistakes when, instead of a garbage application, you deleted something critical.
1. Open the application. In the main window, go to the “ Backups» with a single tap.

2. In " Backups» tap on « Change filters».

4. In " Filter by type» mark only « Syst.».

4. Now in the “ Backups» Only built-in applications will be displayed. In them, find the one you want to delete or disable. Tap on it once.

5. The options menu will open. It gives you several options for what to do with the application.

Uninstalling an application (button " Delete") is a radical measure, almost irreversible. Therefore, if the application just bothers you with notifications, you can turn it off with the “ Freezing"(Please note that this feature is only available in the paid version of Titanium Backup).

If you want to free up memory or use the free version of Titanium Backup, then select the option " Delete" We recommend that you make a backup copy first so that if problems arise, you can roll back the changes. You can do this with the “ Save».

It also doesn't hurt to make a backup copy of your entire system.
6. If you chose freezing, then when it is finished, the application in the list will be highlighted in blue.

It can be defrosted or removed permanently at any time. If you decide to delete it, a warning will appear in front of you.

Press " Yes».
7. Once the application is uninstalled, it will appear crossed out in the list.

Once you exit Titanium Backup, it will disappear from the list.
Despite its simplicity and convenience, the limitations of the free version of Titanium Backup may cause you to choose another option to disable built-in applications.
Method 2: File managers with root access (uninstallation only)
This method involves manually removing software located along the path /system/app. Suitable for this purpose are, for example, Root Explorer or ES Explorer. For example, we will use the latter.
1. Once logged into the application, go to its menu. You can do this by clicking on the button with stripes in the upper left corner.

In the list that appears, scroll down and activate the switch " Root Explorer».

2. Return to the file display. Then click on the inscription to the right of the menu button - it may be called “ sdcard" or " Internal memory».

In the pop-up window, select " Device" (may also be called " root»).

3. The system root directory will open. In it, find the folder “ system" - as a rule, it is located at the very end.

Enter this folder with a single tap.
4. The next item is the folder “ app" Usually she is the first in a row.

Go to this folder.
5. Users of Android 5.0 and higher will see a list of folders containing both APK files and additional ODEX documents.

Those who use older versions of Android will see APK files and ODEX components separately.
6. To delete a built-in system application on Android 5.0+, simply select the folder with a long tap, then click on the button with the image of a trash can on the toolbar.

Then, in the warning dialog, confirm the deletion by pressing " OK».

7. On Android 4.4 and below, you need to find both APK and ODEX components. As a rule, the names of these files are identical. The sequence for removing them does not differ from that described in step 6 of this method.
8. Done – the unnecessary application has been removed.
There are others Explorer apps, which can use root privileges, so choose any appropriate option. The disadvantages of this method are the need to know exactly the technical name of the software being removed, as well as a high probability of error.
Method 3: System Tools (disable only)
If you do not intend to remove the application, you can disable it in the system settings. This is done very simply.
Open " Settings».

2. In the general settings group, look for the item “ Application Manager" (can also be called simply " Applications" or " Application Manager»).

3. In " Application Manager" go to the tab " All» and already there find the program you want to disable.

Tap on it once.
4. In the application tab that opens, press the buttons “ Stop" And " Disable».

This action is completely similar to freezing using Titanium Backup, which we mentioned above.
5. If you disabled something wrong - in “ Application Manager" go to the tab " Disabled"(not present in all firmwares).

There, find the incorrectly disabled one and enable it by pressing the corresponding button.

Naturally, this method does not require interfering with the operation of the system by installing Root rights and the consequences of an error when using it are less. However, it can hardly be called a complete solution to the problem.
As you can see, the task of removing system applications is completely solvable, even if it is associated with a number of difficulties.


