Foobar2000 what is this program and is it needed? Foobar2000 - music without embellishment.
The foobar2000 player is popular among experienced users due to its low demands on resources and enormous possibilities for configuration and customization. Alas, the distribution kit itself does not please with the convenience of the interface, and many are frightened by its asceticism, not realizing that there are many add-ons and ready-made themes registration
 |
 |
In fact, there are no themes as such for foobar2000. This term refers to ready-made configurations with a set of plugins and a configuration file that is imported into the player. As a result, the user receives a usable product that is completely different from the standard foobar2000.
Initial setup
In principle, adding configurations other than the standard one is not at all necessary. The player already comes with a component called Default User Interface, which allows you to format the interface at your discretion right at the first launch. In this case, do not miss the Quick Appearance Setup window, where you can choose from 9 design options. You can change settings at any time by going to the menu View→Layout→Quick Setup.
After you decide on the interface, you need to create a library of multimedia files. To do this, open the Configure item in the menu Library. Press the button Add and specify the folder with music files. Foobar2000 is notable for the fact that it allows you to enter multiple paths and automatically monitors changes in directories.
If you have a high-quality sound card with ASIO support installed (for example, on a Creative X-Fi chip), it is worth downloading an additional component to be able to output sound through this module. To do this, find in the list at the address www.foobar2000.org/?page=Download ASIO Support plugin and place it after downloading in the components folder inside the foobar2000 directory.
 |
Then in settings Preferences→Playback→Output→ASIO Virtual Devices add a new device, where in the list select Creative ASIO.
After in the parent menu Output specify as Output Device paragraph ASIO: Creative ASIO.
For owners of built-in sound cards or inexpensive products without ASIO support, we recommend that you play sound bypassing Windows software mixers by using a component called Kernel Streaming Support. You can download it from the same link and select a device with a set-top box in the Output Device list KS:.
Changing the layout
 |
For more detailed settings There are three ways to display blocks in the foobar player, based on different components. The first is the Default User Interface, built into the latest version of the player. Two more are ColumnsUI and PanelsUI. We'll use the standard one.
First, you need to decide on the number of required panels inside the player window. Calculate the necessary ones (playlist, window with an image of the album cover, etc.), then use View→Layout→Quick Setup choose the most suitable layout. Next you need to enable the diagram editing mode View→Layout→Enable Layout Editing Mode. Now, when you right-click on any panel, a special menu will appear that allows you to replace blocks.
Installing a new theme
 |
 |
 |
If in the end appearance and the functionality of foobar2000 does not suit you, try using a variety of themes, of which there are plenty on the Internet. Unfortunately, there is no transparent mechanism for installing them, and compatibility problems may arise, since most existing schemes use the PanelsUI component, which is not supported by the latest version of the player. There is only one way out - look for themes built on the ColumnsUI plugin. One of these schemes, distinguished by its excellent interface and functionality, can be called the work of a Frenchman with the nickname Br3tt, who posted it on his page on Deviantart.
To install, download the package ( br3tt. devia-ntart.com/art/Xchange-v1-0-0-121967506), as well as the necessary components ( br3tt.online.fr/files/X/components-xchange.7z) and fonts ( br3tt.online.fr/files/X/fonts-xchange.7z). The contents of the archive with fonts must be copied to a folder WindowsFonts, and place the components inside the components directory (in the folder where foobar2000 is installed). Note that you need to copy the files themselves, without folders fonts-xchange And components-xchange.
Next, create a directory foobar2000skins, where we copy the folder xchange from the main archive. Then launch the player and in the dialog window that opens, select the item Columns UI. Now you need to import configuration file, why do we go to File→Preferences→Display→Columns UI and in the section FCL importing and exporting press the button Import. Specify the path to the file foobar2000skinsxchangexchange1.0.1.fcl and click on OK.
Since many additional components are installed into the player along with Xchange, foobar's functionality is greatly enhanced. In addition to the ability to download song lyrics from the Internet, the option to display biographies and photos of performers has appeared, the approach to displaying blocks in the interface has changed - now the owner independently chooses what to show in the main player window, and this is done literally with one click.
Where can I get themes for foobar2000?
Useful plugins
customize.org/foobar/skins
Huge base add-ons designed for latest version foobar2000. The archive is divided into subsections for easier searching.
pelit.koillismaa.fi/plugins/index.php
A small selection of add-ons, a link to which is even posted on the player’s official website.
wiki.hydrogenaudio.org/index.php?title=Foobar2000:Components_0.9
The wiki resource of the popular website Hydrogenaudio contains links to the most required plugins for the audiophile.
Description of the basic principles of setting up the foobar2000 converter.
2013-06-11T14:40
2013-06-11T14:40
Audiophile's Software
PLEASE NOTE: at the moment the information in this article is relevant for foobar2000 v1.3.7
Copyright 2017, Taras Kovrijenko
Full or partial copying of the text is allowed only with the written permission of the author.
Operating principle
To better understand the information presented here, it will be useful to know how the converter works. An approximate diagram of it is shown in the figure below.
The source is most often a container file (FLAC, MP3, etc.) containing compressed (lossy or uncompressed) audio, with the exception of WAV and AIFF containers often containing uncompressed audio. The stream of frames (and some other information) from the source goes to the decoder, which produces an uncompressed digital stream at the output.
In the case of lossy, the stream has a 32-bit floating point format and is immediately transmitted to digital processors - DSP, ReplayGain. For such lossless formats, like FLAC and WavPack, can be post-processed - if an HDCD layer is detected, the uncompressed 16-bit data is passed directly to the HDCD decoder, which results in effectively 20-bit audio, but as 32-bit floating dot; Then the stream, just like for lossy, goes to the handlers.
After processing, the bit depth is converted: for lossless encoding - to the value specified on the last tab of the converter settings (it is also possible to use dithering and noise shaping when lowering the bit depth, see below), for lossy - to the value specified as the maximum supported by the codec bit depth of input audio data.
If the encoder supports input via STDIN, the data is transferred to it on the fly, right during decoding and processing. Otherwise, all data from the source is first decoded and processed, then written to a temporary WAV container, and only after the process is completed, this file, along with the encoding parameters, is transferred to the encoder.
Having received the parameters and input data, the encoder begins encoding, independently writing the output file to the address specified in the parameters. Once encoding is complete, foobar2000 copies the metadata (tags) from the source to new file. After all this, with ReplayGain scanning enabled, the resulting file is decoded again, the uncompressed data is analyzed by the RG scanner, which then transmits the calculated values to the tagger to write this data to our file.
1. Pre-setting

On the main panel of the player, select File->.

From the tree menu (on the left), select Advanced->Tools->Converter. In the input field Additional command-line encoder paths please indicate full paths to folders with executable files (exe) of encoders separated by semicolons. Remember that foobar2000 can independently add paths to this line - when manually selecting an encoder (see below).
Notes:
- if the encoders are in a subfolder foobar2000/encoders, you don’t have to specify the path to this folder - the player itself looks for encoders at this address; - relative paths to each encoder, if necessary (for example, for portable versions), can be specified directly in the converter profile (see below).
2. Setting up the converter (using LAME MP3 as an example)

Right-click on any file from the playlist or library, select Convert->Convert...

2.1 Configuring the encoder (Output format)

Here we see a list of encoder profiles. Pay attention to the bit depth and Dithering settings for lossless encoders:
Output bit depth - quantization depth when decoding input files: Auto, 8/16/24 (fixed point), or 32 bit (floating point). Recommended value Auto. But it must be taken into account that in this case, a depth of 16 bits will be selected for lossy sources.
Dither - use of Dithering + Noise Shaping: never (not use), lossy sources only (only for lossy sources), always (always use). The use of this technology is recommended only when the source quantization depth is greater than the output one; in other cases, you should set the value never.
For clarity, let's create new profile via button Add New.

A window with encoder settings will appear. Initially, the converter will offer you a standard settings dialog using a regular slider, which can be used to adjust the quality from -V 9 (VBR) to -b 320 (CBR). For more fine-tuning, as well as the use of additional keys, I highly recommend selecting from the drop-down list Custom.

Now you can go directly to setting up the encoder parameters.
Encoder - here you set parameters that directly affect encoding. Select from the list at the top Custom and enter the parameters:
Encoder - specify the path to the encoder file. Full path can be specified by clicking the "..." button. You can also specify a path relative to foobar2000.exe, for example: ./encoders/lame.exe . The most in a simple way will indicate the name of the encoder file (for LAME this is usually lame.exe), but this method will only work if the encoder with this name is located in one of the folders specified in the foobar2000 settings (see point 1)
Extension - extension of output files. Specify mp3
Parameters
- encoding parameters that are transmitted to the encoder. For maximum quality let's write:
--silent -b 320 -q 0 --noreplaygain - %d
Do not convert in multiple threads - by checking this box, you can prohibit parallel encoding of several tracks when using this preset.
Bit Depth Control - parameters responsible for the type of codec and the maximum quantization depth of input files it supports.Format is - codec type. Can be lossy (with losses) or lossless/hybrid (lossless/hybrid). The option affects the format of the data transmitted to the encoder. For lossy encoders, the stream is transmitted with the maximum supported bit depth (see below), for lossless the bit depth used when decoding the source is preserved (see below). For LAME install lossy.
Highest BPS mode supported - maximum bit depth of input audio data supported by the codec. Can be 8, 16, 24 (fixed point), or 32 bit (floating point). Since our LAME encoder has support for the floating point format, let's install 32 bit.
Display Info - setting the information displayed in the encoder profile name to the encoding process itself no effect.
Encoder name - indicate the name of the encoder. Let's indicate MP3 (LAME)
Bitrate (kbps) - specify the bitrate. For the current preset - 320 kbps
Settings - specify encoding parameters (does not affect encoding, only for display in the list of encoder profiles). We indicate the parameters that affect quality - in in this case these are just the keys -b 320 -q 0
Click OK. 
Now our profile will appear in the list - MP3 (LAME).5 320 kbps -b 320 -q 0. Click the button Back. Let's move on to next group settings...
2.2 Output files (Destination).
Here are the output file settings.
Output path - specify where the output files will be placed:
Ask me later (useful for saving preset)- the program will ask you to specify the folder every time
Source folder each track will be saved to the folder of the corresponding source file.
Specify folder- all files will be saved to the folder you specified in the input field (if there is none, the folder will be created automatically).
If file already exists - if a file with the output file name already exists:
Ask- ask what to do.
Skip- skip encoding of this track.
Overwrite- overwrite existing file new.
Output style and filename formatting - select the formatting method for the output files:
Convert each track to an individual file- each track will be saved in a separate file, in the input field Name format You can specify the file name format. It is advisable to indicate "%track% %artist% - %title% (<номер трека> <исполнитель> - <название трека>), see the page for detailed information. Please note that full name(including extension) of the output files must not match the name of the source files, otherwise you will see an error.
Generate multi-track files- combining separate groups of files into corresponding files. The “Name format & grouping pattern” field specifies the method for grouping/formatting the name of the output files.
Merge all tracks into one output file- all tracks will be combined into one output file called "Image" (the extension depends on the encoder specified in the settings).
2.3 Processing
Here you can specify the parameters for processing tracks before encoding them.
Enable decode postprocessing - the option is only available when installed plugins foo_dts and/or foo_hdcd. With its help, the DTS or HDCD decoder is turned on, as a result of which the original PCM stream is irreversibly converted (for example, to 5.1 format for DTS CD, or to 24-bit audio for HDCD). For lossy encoding, it is advisable to keep this option enabled.
ReplayGain - You can use this function if the input tracks have ReplayGain tags, but please note that its use in the case of a lossless source is highly not recommended.
DSP - includes the ability to apply DSP effects without having to do not include.
DSP chain presets - You can save DSP chains into separate presets, and later load the one that is needed.
Don't reset DSP between tracks - do not start processing again for each track - the function is necessary, for example, for crossfading (when the end of the previous track is mixed with the beginning of the next), etc.
2.4 Other converter settings (Other)

Preview generation - You can output short sections of input tracks (for example, for preliminary listening):
Length percentage- set the duration of segments as a percentage of the original track (from 3 to 30%).
Fixed track length- set a fixed duration of segments (from 10 to 60 seconds).
When done - this column indicates the actions that will be performed upon completion of coding.
Show full status report - enable reporting of encoding results. If this option turn off, the report will be displayed only if there are errors.
ReplayGain-scan output files as albums - automatic scanning files created by the ReplayGain scanner. Recommended turn on with lossy coding.
Transfer attached pictures - copying pictures embedded in the tags of the source tracks into the tags of the resulting tracks.
Copy files to destination folder - copy files with the specified extension from source folder to the target (for example, “*.CUE;*.JPG”)
2.5 Completing the setup.

Now return to the main converter window. Click the button Save to save the profile, enter the profile name - LAME MP3, 320 kbps. After pressing the button Convert File conversion will begin, click to exit Cancel.
Foobar 2000 is the software needed to organize high-quality audio output to personal computer. Using this program, you can make all the required settings and guarantee improved sound quality. The developer, offering new versions of the program, guarantees improvement functional characteristics and modifying the proposed application based on user needs. So what features should you expect? What settings are there? V new version Foobar 2000?
- Track allows you to maintain the volume balance only for a specific musical composition.
- Album is a mode for creating a volume balance between all the songs in an album.
- Prevent clipping according to peak - best option, which allows you to prevent the level at which the volume is reduced, making listening to songs as comfortable as possible. To configure, a calculation is made using album peak, track, depending on which option was selected.
- Apply gain - mode allows you to equalize the volume of listening musical compositions. It should be noted that generally perceived loudness has no connection with peak levels, since it depends on individual perception. This mode is not recommended as there is a risk of serious changes in the volume of the tracks.
- Apply gain and prevent clipping according to peak - a mode that can analyze the track and consider it very quiet, as a result of which the value will be amplified. This mode allows you not only to analyze track, album, but also to guarantee an increase in the volume level.
- Pre-amp allows you to adjust the volume, but the individual preferences of the program user are taken into account. The function only works if apply gain is enabled. In this case, summation from track/album occurs. Despite the inclusion of this function, it is advisable to disable it, since the quality becomes significantly worse.
The developer has provided the ability to digitally process sounds using DSP. These processors allow you to transform the audio stream. Ideally, there should be no audio processing of any kind, but sometimes innovative processors have to be used to improve quality.
Each version of the Foobar 2000 program gains new features and capabilities, some of which are worthy options, and some of which are ineffective offerings. Now you know how to configure Foobar 2000. In any case, new dimensions of sound will be open.
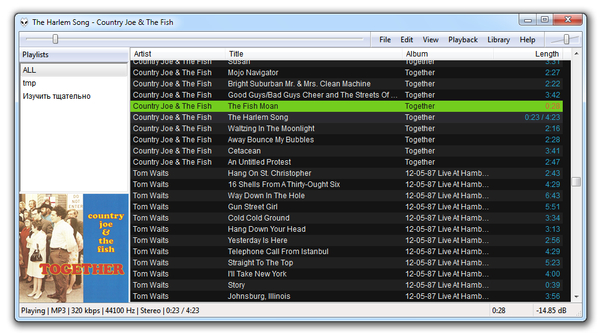
Foobar2000 is an audio player for Windows, free, minimalistic, but at the same time flexible in configuration. At first glance, it is not very friendly to the average user, who tends to “install and forget” any software. However, in the case of Foobar, it is advisable to be patient - and the player will deservedly be included in your list of “must have” applications. This article will cover key features Foobar and tips on setting it up.
Acquaintance
The first version of Foobar was released 10 years ago, in December 2002. It is known that the developer Peter Pawlowski previously worked for Nullsoft, a company that, in turn, develops the player.

Tags also help keep things organized, and Foobar2000 doesn't shy away from them. ID3v1/ID3v2 and APE formats are recognized. Tags can be changed either individually for the composition or en masse using the “Properties” item in the context menu. Using file templates, you can fill in the data automatically: “Tools → Automatically fill values...”. An alternative is the freedb service.
Settings
Let’s open the settings (“File → Preferences”) and go through the main sections.
Components
List installed components. Those indicated in gray font are included in the core of the program and cannot be deleted.
I note that compared to Foobar2000 versions up to 1.x, the management of extensions has been simplified, they have become easier to install (“Install button...”) and delete using the context menu. Check updates - “Get updates...” button.
The components significantly expand the functionality of the player, we will talk about this separately.
Display
Default User Interface - Foobar2000's default interface. Along with it, Columns UI and Panels UI are popular, which are installed as extensions and accessible from the Display menu.
One way or another, any interface (in my case it’s Columns UI) allows you to widely customize the display - from panels to colors and fonts. The “lazy” method is to call Quick Setup, export or import presets, which, by the way, are regularly posted on .
Keyboard Shortcuts
The list of commands already has keyboard shortcuts assigned to commands; you can add new ones using the “Add New” button, selecting an action (“Action”) and holding down the desired keyboard shortcut in the “Key” field. I also advise you to activate the “Global Hotkey” option so that the shortcuts work when working in other applications. This will eliminate the need to open the Foobar2000 window every time in order, for example, to change the composition or pause the current one.
Playback
The ReplayGain function is noteworthy. In simple words, is a technology that allows all files in a media library to be played at the same volume. Unlike the similar and more well-known normalization function, the result does not change the original contents of the file: loudness information is stored in metadata.
ReplayGain settings are controlled by the “Source mode” and “Processing” options. In fact, working with them is a topic for a separate article, which, meanwhile,...
DSP Manager
DSP (Digital signal processing) - digital processing signals. One of the well-known processors present in almost any software player is an equalizer. To activate it in Foobar2000, you need to move Equalizer using the arrow from the Available DSPs list to Active DSPs.

Other DSPs include “Resampler” for converting the audio sampling frequency, “Convert mono to stereo” and “Reverse stereo channels”. Other types of transformations are also available using extensions.
However, keep in mind that the same resampler can load your CPU by 50%, not to mention other DSPs. It is also believed that any converters, including an equalizer, are undesirable for sound. Therefore, as you noticed, in Foobar2000 the equalizer, unlike Winamp or AIMP, is not placed in a prominent place, but is “hidden” - as a non-main function.
Output
Audio output settings physical device. For standard configuration(built-in sound card, budget acoustics) there is no need to change the settings, but if you have, say, a good sound card at your disposal, you can change the settings and change the standard DirectSound output (DS: primary sound driver). It is recommended to install an extension to output audio in a more “direct” way, bypassing the Windows mixer - for example, through ASIO, WASAPI or Kernel Streaming.

Output - audio output settings
Shell Integration
Player integration settings with Windows: context menu, file associations, setting Foobar2000 as the default player.
Tools
Tools - Library Tree, Lyric Show Panel, etc., which were installed as modules and require additional configuration.
Advanced
IN this section There are settings that are minor or experimental and may negatively affect performance. On the other hand, only here you can change the transparency of windows, the sampling rate (strangely, the option is not available in Converter) or select the tag format for MP3/MP4.
Additional tools
Converter
A tool that quite conveniently converts audio files into another format of your choice deserves special attention. You can use it by selecting files in the playlist and selecting “Convert | ..." in the context menu. Next, specify the output format, destination folder, DSP processor (for example, resampling or conversion from stereo to mono) and the action at the end of the process (generating a report, etc.).
Support for audio formats is partially “native” (WAV, Wave64, AIFF, AU/SND); for remaining formats, such as FLAC, MP3, AAC, etc., you need the corresponding exe codec files, which are easy to find on the website.
In the future, in order not to waste time on settings, save them in presets on the left side of the converter window.

CD grabber
Ripping discs is not much more difficult than converting from one format to another. It can be done in just a few clicks: “File | Open Audio CD..." In the “Drive Settings” settings, pre-specify the drive settings. Click the “Rip” button, check the names of the tracks in the “Rip Audio CD” window, or fill in the fields yourself. Next, go to the converter settings (“Proceed to the Converter Setup dialog”), specify the output format, apply the settings and wait for the process to complete.
Components
Many add-ons have been written for Foobar2000. To verify this, just open the page and look at the list. The components are grouped by tags: DSP, format support, interface, visualization, etc.
As an option, you can visit with a thematic (read: audiophile) set of add-ons in Russian.
Let's look at a few of the most useful components.
iPod manager- adds iPod support to Foobar2000. Considering that Apple players are not mounted in Windows as a disk and require mandatory iTunes installations, this extension some may find it more convenient.
Audioscrobbler- player integration with Last.fm. Sends statistics to the server - in other words, scrobbles each song.
TagBox- advanced tag editor. The advantage over the built-in editor in Foobar2000 is that the list of fields can be edited at your discretion, and data about the composition can be selected from a drop-down list - artist, album, genre.

Album list panel- the list of albums is displayed by analogy with Columns UI, in columns, which is much more convenient when searching for the desired composition.
Shpeck- support for Winamp visualizations, as in separate window, and in the form of a toolbar.
ASIO support- support for ASIO output, which provides the most direct music output, bypassing the Windows mixer.
Podcatcher- subscribe to podcasts and play them directly in Foobar2000.
Audio CD Writer- burn audio CD directly from the context menu. The extension was written by Foobar2000. Recording occurs in the same way as converting formats; you just need to select the playlist to record and select “Convert | Write audio CD...". The only caveat is that the recording duration should not exceed 80 minutes. This can be easily checked by selecting the tracks and looking at the lower right corner of the Foobar2000 status bar.
Conclusion
Foobar2000 does not officially support localization. At crash The playlist is not saved. Unfortunately, some old extensions are not compatible with new versions of the player. You will have to deal with this if, for example, you want to install a plugin to support a specific format, and its latest version was released 2 years ago. But, as a rule, such situations are rare.
A modest interface out of the box? Don't forget that this is an audio player, and it performs its main functions with 5 points.
Thus, no significant deficiencies were found. Over the years of use, there was no desire to find an alternative. Foobar2000 is lightweight (3 megabytes - it hasn't gotten any heavier over 10 years of development), free and open for developers, a fast and functional player.
Foobar2000 is one of the most useful and convenient free audio players for Windows. He has a very wide possibilities settings and use of plugins, which creates a certain complexity in setting it up, especially for not very advanced users.
In this material I will not touch on interface modifications and other decorations. Therefore, please do not ask questions about them in the comments - that is not what the material is about. Here we describe how to configure the player for the highest quality reproduction of stereo music. Multichannel issues are also not covered.
And yet, I am in no way claiming that playing music from a computer without a high-quality external DAC can be compared with a normal CD player. Even with a good sound card. Receivers smoke... they just smoke quietly on the sidelines and have nothing to do with stereo music. Therefore, the point of this article is to make maximum use of the computer’s capabilities when circumstances do not allow the use of a normal audio system (work, office, etc.) or when you need to listen to a freshly downloaded lossless disk image in high quality.
The setup is designed for everyday use and is suitable for any computer and audio system connection type, which greatly simplifies the task. The latest version of the program can be downloaded from. The same site also contains the components you will need:
- Monkey's Audio decoder- decoder for files in Monkey Audio (.APE) format;
- WASAPI output support- adding support for audio output via WASAPI;
- ASIO support- adding support for audio output via ASIO.
The remaining components are more difficult to find, so I provide direct links:
George Yohng's VST wrapper - a component that allows you to use professional VST plugins when playing music in foobar2000;
SOX resampler (first link on the page) - fast and high-quality resampler (changes the signal sampling frequency);
And finally, you can install support for reading SACD (reads directly from the image): ;
If you don’t want to go through all these sites, you can download a selection of components. The versions correspond to the ones I use myself. Download all components.
A little more detail about the purpose of the components. When playing sound through standard interfaces(DirectSound or Wave Output) uses the built-in Windows mixer, which generates an output stream from several sources (for example, music, OS sounds, game sounds, etc.). Accordingly, the signal undergoes distortion. Worse yet, if we want to output the signal in digital form, then Windows will resample (change the sampling frequency and quantization depth) of the signal to the values set in the Default format parameter (sound device settings in Windows).
A natural way to get around these limitations is to output audio directly, bypassing the Windows mixer. The most appropriate interfaces for this are ASIO and WASAPI, a pleasant feature of which is also the presence of an “automatic” signal parameters when outputting digital signal. In other words, it is transmitted “as is”, without changes to the sampling frequency and quantization depth.
So, let's start the installation. First, install foobar2000 in the desired directory. Previously downloaded components need to be placed in the folder components, located in the directory with foobar2000 installed. VST plugins often also require installation. It's better to install them all in one folder.
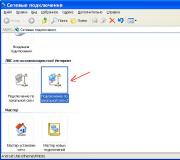
Now let's launch foobar. The main menu is located in File -> Prefences. For ease of use, let's set up file associations, which are not so easy to find in new versions: the button for calling up association settings is located in the Shell Integration section and is called "Open Set Program Associations: Foobar2000" control panel(see screenshot).
Calling the menu for setting file associations
It calls up the standard Windows OS menu))) You need to install associations for the following extensions:
.APE .FLA .FLAC .CUE .FPL .M3U .M3U8 .MP3 .OGG .WAVE .WAV .WV
After this, the player will load to play the main audio formats.
If you are not going to use ASIO and intend to output audio via WASAPI, then you can skip the corresponding setting. To indicate the ASIO device to the program, go to the "Asio virtual devices" menu section (the location in the tree is visible in the previous screenshot), which exists thanks to the plugin ASIO support. There we have a blank field, so click the “Add new” button and get into the following menu:

Adding an ASIO4ALL device
In the example (screenshot), only ASIO4ALL is installed in the system, which is why it is selected in the drop-down list of drivers. Here you need to do mapping of audio channels. For convenience, a test signal and a button to call up the ASIO configuration menu are provided.

Setting up ASIO4ALL
The ASIO4ALL setup menu is quite extensive, especially in terms of output control (if it's empty, click on the "wrench"). You can turn off unnecessary outputs that you do not intend to use. The main setting is the buffer size. If you use ASIO only for sound playback, then you can safely install maximum value. If you use this interface for its intended purpose, i.e., for example, to connect musical instruments, then a large buffer will cause a signal delay. In any case, if you hear distortion (clicks, dropouts), increase the buffer size.
For a stereo sound card with ASIO support with its own drivers, adding a device to foobar is much simpler. There are only two channels in the list and no additional settings are needed.

Adding a device with native ASIO support
Now you need to set the sound output method. To do this, go to the "Output" menu and select from the drop-down list desired device:

Specifying an Output Device
We indicate our ASIO or WASAPI device. For wasapi, select digital (digital) or analog (speakers) options.
If ASIO is used rather than WASAPI, the automatic selection of quantization depth (16 or 24 bits) will be activated. It is advisable to specify 24 or 32 bit pin sizes when adding an asio device for this feature to make sense.
In the output settings menu, after selecting an ASIO device, the bitness selector becomes disabled and the message “Output data format will be chosen automatically for the selected device” appears:
All that remains is to configure the DSP. In our case, these include SOX Resampler, if it is needed at all (more on that later), and George Yohng's VST wrapper. Adding additional sound processors is in the Playback -> DSP Manager section of the main configuration menu.

Adding DSP
The right column contains all available plugins, both standard “Fubar” ones and those located in the “components” folder. In the left column we add what we want to use.
A little about choosing whether to use Resampler or not. By and large, it converts the sampling frequency standard for CD (44100 Hz) to any other (48000 - 192000), as long as it is supported by the sound card. If you have a sound card with honest hardware support for the 44100 frequency, then you may not need a resampler. But usually there are 96 or 192 kHz DACs, and the question is what will make resampling better: a card or a plugin. This also applies to the option with digital audio output to an external receiver, DAC, processor, etc. If you plan to use vst plugins (for example, an equalizer), then a resampler is highly recommended, because processing will occur with greater accuracy (the vst plugin will receive a signal with an increased sampling rate).
If we still use resampler, then go to its configuration (select the desired DSP in the left column and click Configure selected). In its settings menu, just select the supported frequency. Start with 48000 to see if foobar's setup works at all, then try 192000 and 96000. Keep it at the highest supported frequency.
 If foobar2000 works after the described setup, then we can congratulate you on the main part. If you use ASIO, then there should be a nice icon in the tray that displays the playback status (play, stop, pause). When you hover over it the mouse is displayed current parameters output.
All that remains is to connect the previously installed VST equalizer plugin (if you need it, of course). In the picture above you see in the tray, next to the ASIO icon, a blue icon with the inscription VST. Our VST Wrapper proves its combat readiness. Clicking on it brings up a context menu; Select VST Setup in it. In the menu that appears, add the folder where your VST plugins are installed.
Now the VST plugin used can be selected through the same context menu, the "Use VST Effect" item. There you can also select the "Bypass" mode, which allows sound to bypass the plugin.

Selecting a VST plugin.
An unpleasant bug was noticed with the use of VST plugins: when you call the plugin configuration window, its settings are reset, and you have to reselect the saved preset. But for everyday use this doesn't matter.
This completes the setup. Have a nice listening or something))))