Errors when installing programs from the Windows Installer “.msi” package. Determining the nature of the error
A fairly common problem among operating room users. Windows systems any versions - msi error when installing programs from a file with the .msi extension. In this article I will describe common problems with Windows installer 7/10/XP and options for solving them, and I will also make a video on the current issue.
Files with the .msi extension are regular installation packages (distributions) from which the program is installed. Unlike the usual “setup.exe”, the system uses a service to launch the msi file Windows Installer(process msiexec.exe). Speaking in simple words, Windows Installer will unzip and run the files from the distribution. When Windows Installer does not work, various errors appear.
In general, this really infuriates me, because... After a stupid error message, it’s completely unclear what to do next. Microsoft specifically developed the Windows Installer to expand the capabilities of installing programs (mainly for system administrators), but did not take proper care to ensure that the service would run smoothly or even adequately report problems. Now we have to clean it up
Problems may be with the operation of the service itself or may arise during the installation of programs, when everything is configured, in principle, correctly. In the first case, you need to tinker with the installer service, and in the second, solve the problem with specific file. Let's consider both options, but first the second one.
msi file errors
Very often errors appear due to insufficient rights system into files or folders. This is not to say that Windows Installer does not work, in this case it is enough to simply add necessary rights and everything will work. Just yesterday I was faced with the fact that the downloaded distribution kit.msi did not want to be installed, the installation wizard starts successfully, the parameters are selected, but then the system thinks for a few seconds and gives an error:

"Error reading from file "file name" verify that the file exists and that you can access it" (Error 1305). Translated: “Error reading from file...check if the file exists and if you have access to it.” Well, aren't you stupid? Naturally, the “Retry” button does not help, and canceling stops the entire installation. The message also does not carry any special meaning, because the file definitely exists and I have access to it, otherwise I simply wouldn’t be able to run it and receive this message, and for some reason it’s in English
And the mistake is that it is not I who should have access to the file, but the Windows installer, or rather the System itself. The solution is very simple:

Now the installer error will not appear! You can add access to the entire folder from which you usually install programs, for example, to the “Downloads” folder, like mine. Watch a video on solving problems with access rights:
In Windows XP, the Security tab will not appear if simple general access to files. To turn it off, you need to go to “Start -> Control Panel -> Folder Options -> View” and turn off the “Use simple file sharing” option. In stripped-down versions of Windows 7/10 and XP, there is no “Security” tab at all. To see it, you need to boot Windows into safe mode and log into it as an administrator.
More ways to solve the problem

The described method will help with different messages, With different numbers. For example, you may see msi file errors like this:
- Error 1723
- Internal Error 2203
- System error 2147287035
- Error: "This installation package cannot be opened"
- Error 1603: A fatal error occurred during installation
In all these cases, setting permissions on the file and/or on some system folders should help. Check if the "system" has access to the temporary files folder (you may receive the error "The system cannot open the specified device or file"). To do this:


After pressing “Enter” the path will change to “normal” and you will be moved to the real temporary folder. The rights to it need to be checked. I also recommend clearing temporary folders of everything that has accumulated there, or even better, deleting them and creating new ones with the same names. If you can’t delete a folder, read, but it’s not necessary.
If the Windows Installer service still does not want to work, then check the rights to the folder "C:\Config.Msi", here the “system” must also have full access. In this case, you might have seen the error “Error 1310”. Just in case, make sure that the folder WHERE you are installing the software also has all rights.
Registry and service settings
The next way to resolve the error is to restore operating parameters in the Windows Installer registry.
To do this, download the archive and run two reg files from there, according to your Windows versions. Agree to import settings.
Important! Before last action desirable! If the method does not help or gets worse, you can recover to your previous state.
In Windows XP or Windows Server install 2000 latest version installer 4.5.
If it doesn’t help, then re-register the components:
- Press "Win + R" and enter " cmd". Then in the black window enter the following commands in sequence:
MSIExec /unregister
MSIExec /regserver - The answer should be empty, no errors. If the problem is not solved, enter another command
regsvr32 msi.dll - Close the black window
If it says that you do not have enough rights, then you need to run .
If the commands were executed, but did not help, then run msi_error.bat from the archive and check the result.
The last option is to download the Kerish Doctor program, it has a function for fixing the installer service and many others common problems Windows.
Also, many programs use. NET Framework, so it would be a good idea to install the latest version of this package. And finally, one more piece of advice: if in the path to the distribution file there is at least one folder with a space at the beginning of the name, then remove the space. This simple trick will solve your problem
Summing up
Errors with the Windows installer are very unpleasant, there are a lot of them and it’s not immediately clear where to look. One thing is clear - the system has failed and needs to be restored to working condition. Sometimes nothing helps and you have to. However, do not rush to do this, try asking for help on this forum. Describe your problem exactly, tell us what you have already done, what messages you have received, and perhaps they will help you! After all, the world is not without good people
Error ISDone.dll usually occurs during the installation of games on Windows 10 and its predecessors. The main reason for this problem is that there is not enough memory to process the application, or DLL files missing or damaged. Large computer games often fall prey to this problem due to lack of free space in RAM. Therefore, to fix ISDone.dll error in Windows 10, you need to focus on two areas: 1. Memory, 2. DLL files. There are 2 possible situations in the RAM, it is too small to run the game or damaged during crashes. On the other hand, if a dll file is the cause, then a damaged or missing file is the reason you should focus on. In most cases, the ISDone.dll error occurs due to a faulty file Unarc.dll located in the System32 folder on 32-bit operating systems and the SysWOW64 folder on 64-bit systems and produces the following error message:
An error occurred during unpacking: The archive is damaged! Unarc.dll returned error code - 1, 11, 12, 7...
So, if you see this error message, it means your computer was unable to read the installation archive files. Let’s first look at the method that has helped most users to fix the isdone.dll problem with the Unarc.dll error code when unpacking, and then we’ll look at workarounds for this error.
How to fix ISDone.dll error with code Unarc.dll in Windows 10
First, let's look at a method that helps in most cases - this installing the game in safe mode. Big games have a huge collection of files and they create conflicts with pre-installed drivers and third-party software. Once you enter safe mode, all these apps will not load, so there is a free space. Therefore, installing the game in safe mode will save you from all unnecessary processes and memory. To do this, let's follow some steps.
Step 1. Press and hold " Shift" on your keyboard. Now restart your computer. To do this, click " Start"on the taskbar, then on the icon" Shutdown" select "". You can read the full manual, .

Step 2. After restarting the computer, install the game in safe mode that displays the error.
Step 3. After installing the game, you need to exit safe mode. To do this, press the button combination Win+R and enter msconfig.
Step 4. in the window that opens " system configuration", go to the "Boot" tab and uncheck "Safe Mode". Click apply and "OK", then restart your computer or laptop and enjoy the game without ISDone.dll and Unarc.dll errors in Windows 10. If this method does not help , then consider below 2 methods related to RAM and DLL.

1. Solutions related to RAM (RAM)
Let's consider the method with RAM, which is the culprit of the ISDone.dll error with the code Unarc.dll in Windows 10.
Increase paging file size
Large games take up GB, so the RAM does not have enough space to fill the required space. Windows uses part hard drive as virtual memory is called. Hence, increase its capacity and make sure that the RAM matches the requirements of the game.
Step 1. Click the buttons Win+R and enter sysdm.cpl to open system properties.

Step 2. In the new window that opens, go to the " tab Additionally" and in the performance section, click " parameters".

Step 3. Click on the " tab Additionally" and below in the section virtual memory click on " Change".

Step 4. In the Virtual Memory window, uncheck " automatically select the size of the paging file". Next, select the dot " Specify size" and specify in the columns minimum 100 And maximum 3000 size. Please note that you can increase the size if the game requires more. Now click OK and the system will ask you to restart your computer to make the changes effective. After rebooting, run the game installation to check if the isdone.dll error is fixed when unpacking the game and if the Unarc.dll code is returned.

Delete Temp files
Step 1. Press the button combination Win+R and type in the field %TEMP% to reveal the location of hidden temporary files.

Step 2. Select all files that are in the folder temp and delete them.

Run the Windows Memory Diagnostic Tool
After increasing the page file size, a persistent error indicates that there may be something wrong with the RAM. The Windows Memory Diagnostic Tool will clear your doubts, so run it on your computer. We will briefly discuss how to run diagnostics, but you can look at the link in more detail.
Step 1. Click "start", type mdsched.exe and run it.

Step 2. In the Checker dialog box windows memory, select " Reboot and check (recommended)". After restarting, it will appear blue screen with RAM test. If in the test there are serious mistakes, then most likely you will have to replace RAM stick. See the link above for more details, it describes how to fix the errors and what they relate to.

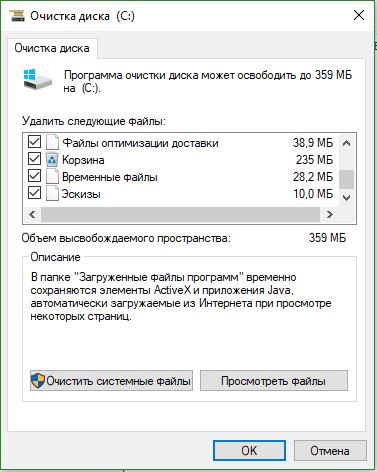
Run Disk Cleanup
Files Windows installations Many times they add garbage in addition to system files. The game installation process may be interrupted by a clutter of junk, old files, so running Disk Cleanup would be a good idea. Although a guide already exists, we will look at it briefly here.
Step 1. Click Win+R and dial cleanmgr to launch the Disk Cleanup tool.

Step 2. In the new window select system disk to clean it of debris.

Step 3. Check the box next to everything on the list and click below " clean system files". In the next window, also mark the entire list of files to be deleted and click OK to remove junk from the system disk.
2. Solutions related to DLL files
DLL shows dynamic library links that helps you perform multiple tasks on the Windows operating system. To the System32 folder installation disk includes all the DLL files that are assigned to various functions. Games usually contain everything necessary dlls files, but when you have a pirated or corrupted game, this causes various errors, usually with missing libraries. If you find ISDone.dll error on Windows 10 PC, then here are some working solutions.
Disable antivirus
Windows Firewall and Windows Defender protect your system from malicious files, but sometimes they prevent the installation of a genuine game due to certain restrictions. After that, disable both security applications to check if the error when installing the game is resolved.
Third-party antivirus also creates conflicts with game installation files, so disable or uninstall it if present.
Step 1. Go to Security Center settings and disable your antivirus. To do this, follow the following path All parameters > Updates and Security > windows defender > Open Windows Defender Security Center. Next, click on the icon " Protection against viruses and threats" and select " Antivirus and other threat protection settings". Drag the sliders to the mode Off. Thus, Windows Defender disabled, so now focus on disabling the firewall.

Step 2. In the same Security Center window, click on the " house"cabinet and select" firewall and network security".

Step 3. You'll see" Community Network", "Private network" and "Domain Network". Click on each of them and drag the slider to the mode shutdowns. Now make sure that the ISDone.dll error in Windows 10 does not occur during the installation of the game and the Unarc.dll code is not returned.

Run System File Checker
Running the SFC tool to repair damaged system files is also in a great way, if the above solutions did not help. SFS will scan system files and, if possible, restore damaged ones if it detects them. Look complete guide By .
Step 1. Run Command Prompt as Administrator.

Step 2. At the command line, type sfc /scannow and press Enter. The process may take a long period of time, you can drink a cup of coffee. Restart your PC and make sure that the ISDone.dll error when installing the game disappears and the Unarc.dll code disappears.

Re-register the ISDone.dll file
A damaged ISDone.dll or Unarc.dll file is the root cause of this problem, so you need to re-register it. In the previous process, you have already learned how to run the “command prompt” with administrator rights.
Step 1. Issue the command on the command line regsvr32 Isdone.dll to re-register the ISDone.dll file.
If you find that an error occurred during unpacking: The archive is damaged unarc.dll returned the code ERROR errors: archive data corrupted (decompression fails), then also run the following command in CMD regsvr32 unarc.dll .

Download the ISDone.dll and unarc.dll files
This is a proven solution if DLL files are missing or not working properly.
Step 2. Go to the page https://www.dllme.com/dll/files/unarc_dll.html if you receive an error message unarc.dll and download the file.
Step 3. Then, when the downloading of both files is finished, click on each of them right click mouse to extract or unzip.
Step 4. Open the system drive along the path C:/Windows/System32 and copy these files there.
I hope that you have fixed this ISDone.dll error with the code Unarc.dll when installing the game on Windows 10.
3. Solution to launch the game or program installer from the TEMP folder
In the comments, one user under the nickname Pavel Panchenko shared in an interesting way. If the above methods did not help you, then we will look at another solution to this problem. The bottom line is that you need to throw the game installer itself into a temporary windows folder "TEMP", let's figure out how to do this.
- Press a combination of buttons Win+R and enter %TEMP% or follow the path by enabling C:\users\username\Appdata\Local\Temp
- Copy the installer ".exe" of the game or program and place it in open folder temp. Next, simply run the installation of the game with a temporary temp folders. If it gives errors, try running the installation as an administrator by right-clicking on the installer itself. After successful installation, you can delete the installer itself so that it does not take up precious space on the system disk.

The installation of an application or program on a computer is not always successful.
When I try to install software product, on a computer, under control operating system Windows 7, error appears Windows package Installer.
Reasons for the error
Read also: Everything about the NET Framework for Windows 10 Download methods, installation methods and common errors
Before you try to fix the problem, you need to find out the exact cause of its occurrence. The main reason for the error is the restriction of access rights.
In other words, when you run the installation file, the system cannot determine whether the user has sufficient rights to run it.

Often the message “Windows Installer package error” is accompanied by numbers and letters. This data indicates those folders to which the PC user does not have access.
The error may also be caused by the absence of several files in the installation program.
Some files can be destroyed by an antivirus program, mistaking them for malicious ones.
If the application was downloaded from a pirated resource, then it is quite possible that a number of files necessary for correct installation were initially missing.
When installing any application on your computer, you must disable or configure your antivirus program. It is recommended to perform these actions only when there is one hundred percent confidence that the installed file will not harm the computer.
When installing which programs do you most often receive an error message?
Read also: How to change the Windows network type: Instructions for all versions (7/8/10)
A Windows Installer package error appears when installing files with the MSI extension, as well as programs such as iTunes, and Java emulators.
In a message containing an error text, when Java installation, there is a numeric code - 1721. It reports that there was a failure during the installation of the program.

The reason may be hidden either in the lack of rights for installation or in the antivirus program. In order for the installation of files to become feasible, they must be added to the exclusion list in the antivirus settings.
If after this, the error remains the same, the problem lies precisely in the system’s permission to install the file.
Installation iTunes apps, has its own characteristics, which will be discussed below.
Unable to install iTunes - Windows Installer package error
Read also: iMyFone TunesFix: solving all kinds of errors and problems when working with iTunes without losing data!
This error may occur when you try to install iTunes on a computer running the Windows 7 operating system.
To fix it, you can reinstall the operating system. Or, install iTunes correctly.
Correct installation of the program is carried out in the following sequence:
- On your computer keyboard, you need to hold down the “Windows” + “S” keys.
- In the program search window that appears, you need to enter the word “programs and components” and click on the result.

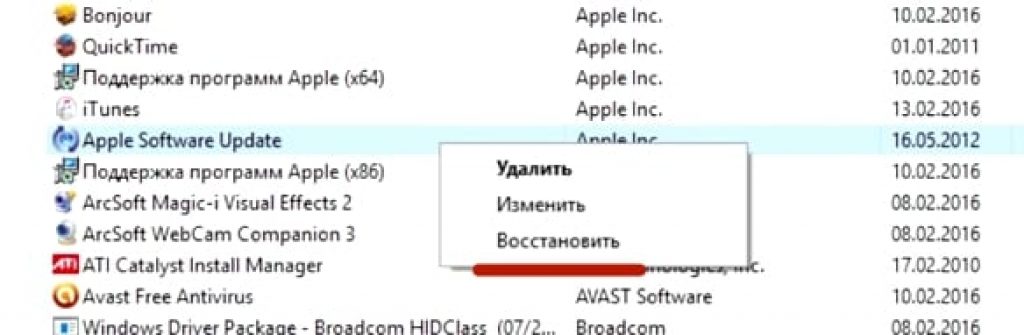
- In the list of programs, you need to find “ Apple Software Update".
- By right-clicking on the program, select the sub-item context menu"Restore". If you click “delete”, then during uninstallation the message “ iTunes error Windows Installer package." Then all you have to do is follow the on-screen prompts.

- After completing all steps to restore the program, it should be uninstalled. To do this, you need to return to the list of programs and click on the “delete” button.
- After uninstalling the program, the computer should be restarted.
- After rebooting, iTunes is installed again.
What to do if the problem remains?
Read also: TOP 3 Simple ways to clear RAM on a computer or laptop running Windows 7/10
However, the above actions do not always prevent a malfunction.
If after performing the above operations the error remains, then you should perform next row actions:
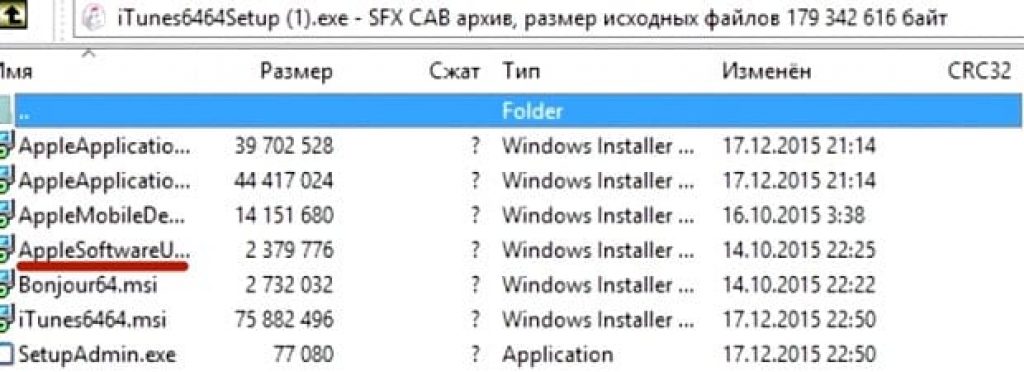
1 Right-click on the installation file and select the “open with” sub-item.
2 Select the archiver program from the list that appears.
3 In the window that opens, run the fourth file from the top.
4 Close the archive and try installing iTunes again.
5 The program can be easily installed on your computer.
The iTunes program must be downloaded from the official website.
When installing iTunes, the Windows Installer package error crashes. To resolve this issue, you should follow the steps above.
At the same time, you should not install system updates via the Internet. They must be downloaded from a flash drive or disk.
This will prevent Windows Installer package errors from appearing when iTunes installation on Windows 7.
Error when installing files with MSI extension
As mentioned above, an error can occur not only when installing iTunes, but also when trying to install any programs whose installation file has MSI extension.
Files with the .exe extension are installed without any problems. This is explained by the fact that when working with MSI files, the utility is used to download msiexec.exe.
Its failure to work may be the cause of the error.
If an error occurs during installation, then the reason lies in the installation file. The utility works as it should.
The error message can take two forms:


Before fixing the problem, it is necessary to diagnose the operation of the installation utility.
Diagnostics of the utility for installing files
Read also: [Instructions] How to enter Safe Mode in the Windows operating system (XP/7/8/10)
Diagnostics of the functioning of the installation utility is carried out as follows:
- Using the key combination “Win” + “R” you need to open a system window intended for executing commands;

- In the field you need to enter the command services.msc, and confirm with the OK button;
- In the service display window that opens, you need to find the installation Windows service(V in this case, this is Windows 7);

- After double click on the service, the service configuration window should appear. All parameters must be set exactly as shown in the screenshot;

The above problems can be resolved by re-registering the installation utility in the Windows operating system. Process re-registration carried out in the following way:
You need to open the command line, it can be opened in several ways: using the keyboard shortcut: “Windows” + “X”, or by launching the command line utility, which is located in the “standard programs” folder.
In addition to these methods, the command line can be launched using the cmd.exe command in the “Run” window.

The following commands fit into the 32-bit version of the operating system:

Commands for 32-bit version
In the 64-bit version of the system, you need to enter:

After completing entering commands, they must be confirmed by pressing the Enter key. After confirmation, the computer should be restarted.
The command line is launched as an administrator. Command Prompt doesn't just scan your computer for damaged files, but also replaces them with integers. To do this, the PC must be connected to the Internet.
After scanning the files and replacing them has been completed, you should restart your computer. After rebooting, you need to try running the installation file with the MSI extension.
In addition to the utilities built into the system for installer recovery, Microsoft company offers third party utility. It can be downloaded from the official website of the corporation.
It is worth noting that it works on Windows 7, XP, Vista.
Some users of AMD products experience error 1603 when installing drivers, which causes the installation process to fail. Everything would be fine, but after this incident, the installation of new updates for the Windows operating system also ceases to occur normally. This error mainly occurs among Windows 10 users.
Similar errors during driver installation may occur due to interference antivirus program, damaged system files or delayed system updates. In this article, we have compiled a list of several potential methods for resolving error 1603. This list includes fixing system files, performing a clean installation of drivers, and some manipulation of antivirus software. Accordingly, if one method did not work for you, then try some other one present.
The first method would be to use system utility SFC, the abbreviation of which translates as System File Checker or checking system files in Russian. To run it, you need to use the Command Line functionality.
Right-click on Start and select “Command Prompt (Administrator)” from the context menu - this is important! Once the command line opens, enter the command /scannow and press Enter.
After entering the command, the SFC program will begin performing an operation to check the system files of your Windows. The process may take quite a long time (depending on your system), and at the end of the scan you will be given a result indicating the damage found and whether it was fixed.
After the SFC utility has finished running, close Command line and restart your computer. Try the installation again AMD drivers and make sure that error 1603 has been fixed. If not, then let's move on.
Method #2 Setting default locations
Some users with error 1603 issue claim that the location for their system folders was incorrect. Exhibition correct location for system folders such as Documents, Pictures, Downloads and others, it can resolve error 1603.
First, you need to open your File Explorer. Once logged in, click on the “This PC” drop-down menu on the left side of the window. In this drop-down menu you can see those same system folders. Right-click on a folder, such as Documents, and select Properties.
After opening the folder properties, go to the “Location” tab. In this tab you should clearly see the location of the folder whose properties you are currently in. If you realize that the location is incorrect, then click on the “Default” button to restore the standard location.
Repeat the same steps for other system folders in Windows Explorer. Once you're done setting the system folders to default locations, try installing the AMD drivers again to check for error 1603.
Method No. 3 Clean installation of drivers
There is a possibility that you are unable to install AMD drivers due to previous version driver has been corrupted and is now in conflict with new version you are trying to install. This often happens on Windows OS. However, this problem can be solved quite simply - clean install drivers.
First you will need to download the installer official drivers AMD from their official website. Next, remove any existing parts of the old AMD drivers on your computer using the AMD Clean Uninstall Utility.
Double click on the executive AMD file Clean Uninstall Utility and follow the on-screen instructions to remove unwanted AMD drivers from your computer. Alternatively, you can use the utility Display Driver Uninstaller in safe mode. There you will need to select the manufacturer of your video card and the action option. We recommend that you select "Clean and Reboot".
Once you log back in, run the AMD Driver Installer that you should have downloaded at the very beginning of the method. If the problem was with the previous drivers on the computer, then error 1603 should be resolved, since nothing else creates conflicts.
Method No. 4 Disabling the antivirus
Antivirus software exists to protect users' computers from various types of external threats. However, it often happens that antiviruses can also create problems, for example, error 1603 during the installation of AMD drivers. Try disabling your antivirus, be it Windows Defender or any other third party antivirus, and then try to install drivers from AMD. Perhaps this time there will be no error 1603.
Method #5 Deleting the AMD installation folder
When you begin the process of installing drivers from AMD, they should be extracted to your computer in the C:\AMD directory. If this folder contains some old files from previous installation drivers, they may conflict with new files and, as a result, cause error 1603.
Open Windows Explorer, or a key combination Windows+E, or simply by clicking on desired icon in the Start taskbar. Then go to the C:\AMD directory. Having opened the AMD folder, select all the files that will be located there (combination Ctrl+A) and press the combination Shift+Delete to permanently remove them.
After deleting the files in the C:\AMD folder, try installing the AMD drivers again and see if error 1063 appears this time. If not, then for the future you will know that this folder It's best to always clean before installing new drivers.
Method #6 Updating the Windows operating system
Not all PC users know about this, but installers various types require certain updates to your OS from time to time in order to function properly. If you have not installed updates for your Windows OS for a long time, then try this to check whether error 1603 during the installation of AMD drivers is related to the required update.
To install the update, you can simply press the combination Windows+S, enter search query“Check for updates” and select it. A settings window with Windows Update will appear in front of you. Click on the “Check for updates” button.
After clicking the button, the process of checking for available updates will begin, and then automatically download and install them. Once the installation of available updates is complete, restart your computer and try installing the AMD drivers again. If it was a matter of missing update, then error 1603 will be successfully fixed.
Found a typo? Select the text and press Ctrl + Enter


