Check the integrity of files on the disk. Algorithm for restoring a damaged file manually
Whenever something goes wrong with your computer or laptop, there are a number of troubleshooting tools you can run to try and fix the problem. Windows 10/8/7 has several built-in commands that you can use to check and repair damaged system files, which cause problems when changed over time. One way to troubleshoot Windows problems is to scan your system and repair system files. It can help with all types of problems such as slow system, blue screen deaths, sudden power failures and system crashes.
Let's take a look at how to run System File Checker in Windows using CMD command line And PowerShell, such teams as sfc /scannow and tools DISM. I would like to note that for the Anniversary update Update Windows 10, it will be better to use methods with PowerShell.
Check and Restore system files via CMD
System File Checker scans your computer for any damage or changes to system files that might otherwise interfere normal operation your PC. From there it replaces the file correct version to provide uninterrupted operation. Using the command line, you can try to scan and repair system files of late operating systems like Windows 10/8/7/Vista. Let's look at two teams sfc /scannow and DISM using CMD.
1.
- Run Command Prompt (CMD) as an administrator. Click "search" and simply write "cmd" or "command line", then follow it right click mouse and run as administrator.
- Specify the command sfc /scannow and wait for the process to complete.
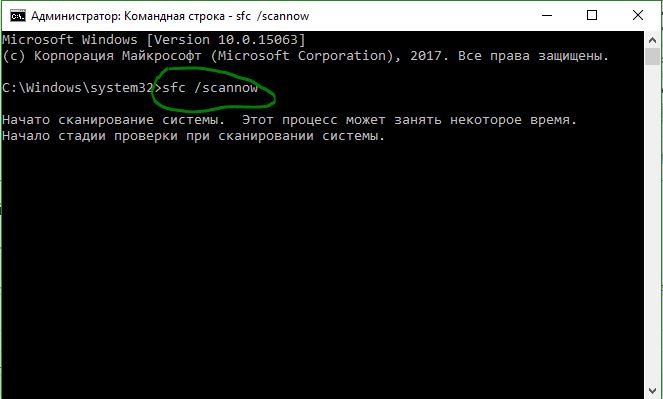
Note: After scanning your system, one of three results will be returned:
- There will be no system file errors.
- There will be system file errors and Windows will repair them automatically.
- Windows has detected errors but cannot repair some of them.
If option 3 shows you that an error has been detected and the system cannot recover, then repeat the procedure. I advise you to disable encryption and if they are available at the time of checking. Nothing worked out? Let's move lower.

2. (DISM)
If the above doesn't work in safe mode, there is one last method check for corruption in system files and fix them. We use the Deployment Image and Service Management (DISM) tool. The team works with Windows systems 8/8.1/10. Open it back and use the following command:
The process may take long time with the percentage scale freezing. When finished, restart your computer and start it back sfc /scannow to make sure there are no errors or the error has disappeared.

Check and Restore system files viaPowerShell
We will use Windows PowerShell to show how to use the Maintenance and Management Service DISM to scan and fix damaged system files in Windows 10. This method will be more effective for updating Anniversary windows 10 than the command line.
1. Using the System File Checker (SFC) tool
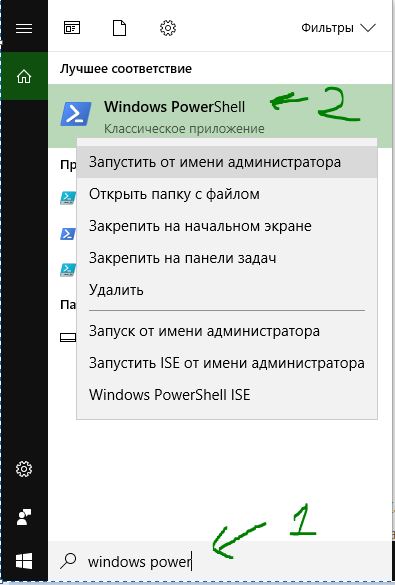
- Run PowerShell on behalf of the administrator. Click "search" and type windows powershell, then right-click and select as admin.
- Enter the command in the PowerShell window sfc /scannow. If the scan finds any problems, Windows will try to fix them. If Windows can't fix them, it will warn you that further investigation and action is needed. Move below if errors are found.

2. Using the Deployment Image and Service Management tool (DISM)
The DISM scan detects corrupted system files and Windows will try to fix them and give you a progress report at the end. If Windows is unable to find the files needed to repair damaged system files, you will also be provided with information on what to do next, with a link to Microsoft's website and troubleshooting options. Enter the below command into the PowerShell window.
DISM /ONLINE /CLEANUP-IMAGE /RESTOREHEALTH
If DISM fixed everything or did not reveal any errors, then restart your laptop or computer and run it back to check sfc /scannow.

Utility SFC.EXE (S system F iles C hecker) exists in all Windows versions, starting with Windows 2000, and is designed to check the status and restore system files. Protection Mechanisms important files V different versions Windows are implemented differently, but they all take into account the fact that some system files (usually executable files.exe, library files.dll, driver files) can be modified by third-party software, and there must be a mechanism to verify their integrity and discard detected changes.
Command line format:
SFC
Command line options:
/SCANNOW- Checking the integrity of all protected system files and, if possible, restoring problematic files.
/VERIFYONLY- Checking the integrity of all protected system files. File recovery is not possible.
/SCANFILE- Integrity check specified file and its restoration when problems are detected. In the parameter file should be specified full path
/VERIFYFILE- Checking the integrity of the file, the full path to which is specified in the parameter file. File recovery is not possible.
/OFFBOOTDIR- Offline download directory location for offline recovery
/OFFWINDIR- Location offline Windows directory for offline recovery
Examples of using the SFC command:
sfc/?- display a hint for use.
sfc /scannow- check the integrity of system files and restore damaged ones. The results of the work are recorded in the utility log \Windows\Logs\CBS\CBS.log.
sfc /verifyonly- perform only a scan of system files without fixing.
sfc /VERIFYFILE=c:\windows\system32\cmd.exe- scan only the file cmd.exe
sfc /SCANFILE=d:\windows\system32\kernel32.dll /OFFBOOTDIR=d:\ /OFFWINDIR=d:\windows- scan only the file kernel32.dll from the operating system installed on logical drive D:. When scanning files standalone Windows, Log file logging is not currently supported.
While the program is running, information about the scanning progress and work results is displayed on the screen. Example output when using scan with repair command sfc /scannow:
System scan has started. This process may take some time.
Beginning of the verification stage of a system scan.
Verification is 100% complete.
Protection program Windows resources discovered damaged files and successfully restored them. For details, see the CBS.Log file, which is located in the following path: windir\Logs\CBS\CBS.log. For example, C:\Windows\Logs\CBS\CBS.log. Please note that logging is not currently supported for offline maintenance.
Starting from Windows Vista, the operating system component is used as a maintenance tool Component-Based Servicing (CBS) - special set software to ensure its integrity. CBS is part Component Servicing Infrastructure (CSI), providing the necessary changes to the current Windows status, for example, when updating the system (Windows Update), installing or removing programs and components, updating device drivers, etc. In fact, CBS provides software interface(API) for installers to correctly change the current state of the system. The Windows servicing system logs many events related to monitoring this state, including: special file C:\Windows\Logs\CBS\CBS.log
The log file CBS.log, among other things, contains detailed information about the progress of the utility scan sfc.exe and its results. For each scanned file, the date, time and additional information about verification. After every 100 checks, summary information is displayed, accompanied by a tag , which allows you to select from a rather voluminous text only those entries that contain this sign, using the command to find a string in a text file findstr:
findstr /c:"" %windir%\logs\cbs\cbs.log >sfcdetails.txt- find lines containing and output them to a file sfcdetails.txt current directory.
An example of the contents of a log file containing only lines with the tag :
00004b78 Verifying 100 (0x00000000000000064) components
00004b79 Beginning Verify and Repair transaction
00004be0 Verify complete
00004be1 Verifying 100 (0x00000000000000064) components
00004be2 Beginning Verify and Repair transaction
00004c30 Repairing corrupted file "\??\C:\WINDOWS\System32\cmd.exe" from store
00004c5a Verify complete
. . . .
00005594 Committing transaction
00005599 Verify and Repair Transaction completed. All files and registry keys listed
in this transaction have been successfully repaired
IN in this example, 100 files were checked in which no deviations were found, and in the next portion the file was detected and successfully corrected msprivs.dll.mui. The last 2 lines indicate that the work has completed and that all files and registry keys have been successfully restored.
In cases where the damaged file could not be recovered, the log will contain a line containing:
Cannot repair member file Filename Detailed information about the file
The reason for the impossibility of recovering files may be a hardware malfunction, a violation of the integrity of file system, storage damage reference files etc. In most cases, except for hardware failure, knowing the name of the damaged file, you can perform recovery using copying from the distribution kit or directories of a similar operating system.
To search for information in the text of magazines cbs.log conveniently filter records by characteristic features events recorded in the log:
findstr /c:"Cannot repair" %windir%\logs\cbs\cbs.log >sfcnotrepair.txt sfcnotrepair.txt only those log lines cbs.log, which contain the string Cannot repair, i.e. At the output we will receive a list of system files that could not be restored.
findstr /c:"succsessfylly repaired" %windir%\logs\cbs\cbs.log >sfcnotrepair.txt- write to text file sfcnotrepair.txt only those log lines cbs.log, which contain the string succsessfylly repaired, i.e. At the output we will receive a list of system files that were recovered.
In the catalog \Windows\Logs\CBS\ except the current log file cbs.log outdated copies of logs may be stored in the form compressed files with name CbsPersist_YYYYMMDDnnnnnn.cab, which, if necessary, can be unpacked for further in-depth analysis.
IN Windows environment 8-10 for recovery system components Windows, it is possible to use the utility Dism.exe, which supports (which did not exist in Windows Vista/Windows 7) the parameter RestoreHealth:
dism /Online /Cleanup-Image /RestoreHealth- to restore system files of the current Windows OS.
For Windows 7 parameter /RestoreHealth is not applicable and the recovery functions are combined with the scanning functions specified by the parameter /ScanHealth:
dism /Online /Cleanup-Image /ScanHealth- to restore system files of the current Windows 7 OS.
What to do when for some reason system files have sunk into oblivion and the computer cannot work normally? There is no need to worry, as the situation can be corrected.
Reasons for disappearing system files
It often happens that Windows system files disappear. Their absence interferes with the normal operation of the system or, even worse, prevents Windows from starting. The reasons for this may be different:
- the system file was deleted by a virus or blocked by an antivirus;
- accidentally, due to the fault of the computer user himself;
- due to Windows updates (if updates occur constantly over a long time, they begin to block each other).
Of course you can go to extreme measures and reinstall the system. But this is not a solution if there are working documents saved on the desktop or folders on the system drive that cannot be lost, because after reinstallation they will definitely disappear. Before doing this, you should still try to run Windows 7 files.
How viruses work
It often happens that a virus got on the computer, after which the system file became damaged and was deleted. In this case, you need to look at the antivirus logs. It will indicate how the file was deleted, when and what virus it was infected with.
Sometimes it happens that the antivirus itself blocks important data after updating the OS. In this case, you need to go to the "Quarantine" section of the antivirus and find the missing files, then restore them and add them to whitelist or change your antivirus program.
Recuva
On Windows 7, system file recovery can be performed third party program, for example, Recuva. It is completely free and easy to use even for those who will be doing it for the first time. Download it and install it. Having launched it, the first thing you need to do is go to advanced mode (the button on the top right), and then select the directory to scan ( Windows folder) and start scanning.
After the system file check is finished, files with multi-colored circles nearby (green - yellow - damaged, red - cannot be restored). If the check shows that desired object in excellent condition, it can be easily restored by selecting the checkbox and clicking on “Restore”.
Let's rollback
A rollback restores the operating system using control point, which was created before the error occurred. The operating algorithm is as follows: Start / All Programs / Accessories / System Tools / System Restore. Select an OS restore point that was created before the loss of important data. We launch a rollback, after which Windows system files and folders will be restored. However installed programs will be deleted afterwards. You can view the estimated losses by clicking on the “Search for affected programs” button.

Troubleshooting
If on Windows 7 restoring system files using third party program is impossible and a rollback cannot be done, you need to scan your computer for damaged and missing data. It will help in this matter
Open it as an administrator. You can do this in several ways:
- Start / All Programs / Accessories, right mouse button on cmd (command line) -
- Go to the system drive, Windows folder, System32, right mouse button on cmd - “Run as administrator”.
- In the Start search, enter cmd and press Shift+Ctrl+Enter.
In the window that appears, write sfc /scannow, after which the system scan will begin Windows files 7 for integrity and restoration in case of failure of some of them.

After recovery, you need to make a point to restore the OS so that next time you can rollback it, rather than restore individual data. The algorithm is as follows: open the "Properties" section in "My Computer", with right side Select the “System Protection” section. In the “Protection Settings” section on system disk protection must be enabled. If it’s not there, select it, click “Configure” and put a dot next to “Restore system parameters and previous versions files". Choosing a place for disk space(1.5-2 GB is enough). Click OK. Next, click “Create” and give it a name.

Now you can make files on Windows 7.
system file recovery
While loading the OS, you need to constantly press F8 until a list appears and the words “Last good configuration" Click on it, after which the system should start from the moment Windows successfully loaded into last time. If that doesn’t work, select “Troubleshoot computer problems.” In the list, click on “Startup Repair”. Windows 7 system files will begin checking for errors and faulty data, after which we restore them by clicking “Fix and restart”.

Also, if a restore point was previously created, return the OS previous state you can use a rollback.
Boot disk
If the operating system does not load due to data loss, you can return it to normal using boot disk or flash drives. We insert the disk or flash drive into the computer and reboot it. Next bootable media needs to be prioritized first. You can do it like this:
- IN BIOS settings. Go to the BIOS (F2, F11 or del key) and look for Boot Manager. There we set the flash drive or disk drive to first place as a priority. If the flash drive is not displayed, you need to activate it in the settings USB support. For each BIOS version these settings look different.
- Before starting the OS, press the boot menu key (F8, F11 or F12), after which Boot Manager will appear with a list of drives, from which we select the one we need. If bootable Windows is on a flash drive and it is not displayed, you need to activate USB support in the BIOS settings.

If selected required drive, will start Windows installation 7. After selecting the language, click “Next”, and then select “System Restore” at the bottom left side. In the window that appears, select “Startup Repair” or “System Restore”. The next steps are already familiar.
Whenever something goes wrong with your computer or laptop, there are a number of troubleshooting tools you can run to try and fix the problem. Windows 10/8/7 has several built-in commands that you can use to check and repair corrupted system files that cause problems when modified over time. One way to troubleshoot Windows problems is to scan your system and repair system files. It can help in all types of problems such as slow system, blue screen of death, sudden power failures and system crashes.
Let's take a look at how to run System File Checker in Windows using CMD command line And PowerShell, such teams as sfc /scannow and tools DISM. I would like to note that to update the Anniversary Update of Windows 10, it would be better to use methods specifically with PowerShell.
Check and Restore system files via CMD
System File Checker scans your computer for any damage or changes to system files that might otherwise interfere with the normal operation of your PC. From there, it replaces the file with the correct version to ensure smooth operation. Using the command line, you can try to scan and restore system files of later operating systems like Windows 10/8/7/Vista. Let's look at two teams sfc /scannow and DISM using CMD.
1.
- Run Command Prompt (CMD) as an administrator. Click "search" and simply write "cmd" or "command line", then right-click on it and run as administrator.
- Specify the command sfc /scannow and wait for the process to complete.
Note: After scanning your system, one of three results will be returned:
- There will be no system file errors.
- There will be system file errors and Windows will repair them automatically.
- Windows has detected errors but cannot repair some of them.
If option 3 shows you that an error has been detected and the system cannot recover, then repeat the procedure. I advise you to disable encryption and if they are available at the time of checking. Nothing worked out? Let's move lower.
2. (DISM)
If the above doesn't work in Safe Mode, there is one last way to check for corruption in system files and fix them. We use the Deployment Image and Service Management (DISM) tool. The team works with Windows 8/8.1/10 systems. Open it back and use the following command:
The process may take a long time and the percentage scale may freeze. When finished, restart your computer and start it back sfc /scannow to make sure there are no errors or the error has disappeared.
Check and Restore system files viaPowerShell
We will use Windows PowerShell to show how to use the Maintenance and Management Service DISM to scan and fix damaged system files in Windows 10. This method will be more effective for updating Anniversary windows 10 than the command line.
1. Using the System File Checker (SFC) tool
- Run PowerShell on behalf of the administrator. Click "search" and type windows powershell, then right-click and select as admin.
- Enter the command in the PowerShell window sfc /scannow. If the scan finds any problems, Windows will try to fix them. If Windows can't fix them, it will warn you that further investigation and action is needed. Move below if errors are found.
2. Using the Deployment Image and Service Management tool (DISM)
The DISM scan detects corrupted system files and Windows will try to fix them and give you a progress report at the end. If Windows is unable to find the files needed to repair damaged system files, you will also be provided with information on what to do next, with a link to Microsoft's website and troubleshooting options. Enter the below command into the PowerShell window.
DISM /ONLINE /CLEANUP-IMAGE /RESTOREHEALTH
If DISM fixed everything or did not reveal any errors, then restart your laptop or computer and run it back to check sfc /scannow.
Just like hardware, software also deteriorates because it is subjected to significant loads from the user. Therefore, checking the integrity of system files in Windows 10 should be performed periodically, and, if necessary, damaged areas should be repaired.
Examination
The OS has a built-in utility that identifies damaged files and replaces them with working versions.
Good to know! The original OS files are stored on the system disk in the folder Windows\WinSxS.
Possible problems
Restoring the OS using sfc /scannow will fail if the source storage itself has been damaged. In this case, you must first restore the original image using the utility Deployment Image & Servicing Management (DSIM). It is designed to work with Windows images.

Good to know! When restoring storage with the DISM utility, the Update Center is used.
Recovery
After running the utility DISM and restore source codes, run in command line re-command sfc /scannow. This will happen full recovery integrity of the system. For further work restart your computer. If for some reason the correction failed and you use radical method reinstalling the OS, read how to create bootable USB flash drive in the article “Creating a Windows 10 installation flash drive in various ways.”
Conclusion
Windows 10 file integrity is compromised after malfunction with them, frequent reinstallation of programs or rewriting of information. To restore, use the built-in utility sfc /scannow, which will do everything automatically using the original file storage. If the original image is damaged, restore it using Deployment Image & Servicing Management.


