Download a program to recover hidden files from a flash drive. How to recover missing (hidden) files after a virus
A new type of virus has appeared on the Internet that infects flash drives and external drives. I first encountered a similar virus about six months ago, when one of my clients had a similar virus hide all folders on flash drives and create shortcuts in their place. Since this was an isolated incident, I thought there was no need to worry and describe this problem. But very soon there were calls for help “help me recover data from a flash drive” and this virus turned out to be the cause of everything!
If you notice that folders on the flash drive have become shortcuts
Let's assume that you notice that when opening folders on flash drives, a system error occurs and only then does the folder open. See if the folders have a shortcut icon - it's a small arrow on the folder icon in the lower left corner.
If there are many or even all of these shortcut folders, then the system is probably infected with a virus, and your flash drive serves as its distributor.
Cleaning a flash drive from viruses
1. To search for and remove such a virus, I recommend using several antiviruses: first, do a full scan of your computer with the installed antivirus. In my case it is Avast (see Fig. 2). Scan the system drive C: and removable media, i.e. inserted flash drive.

If viruses are found, remove them. Of course, infected files from the Windows system folder must be handled carefully: treat it first or place it in quarantine. All others can be safely deleted.
2. Regardless of whether a virus was found or not, check the system with any other anti-virus utility. I recommend using CureIt. (http://www.freedrweb.com/download+cureit+free/).
Scan your system drive C and flash drive with this utility. Other logical drives can be scanned another time, otherwise removing a simple virus may take a long time.

3. After the system has been analyzed by several anti-virus programs and something may or may not have been found, it’s time to move on to restoring hidden folders on the flash drive, and at the same time clean the flash drive of viruses that might have been missed by anti-virus scanners.
How to show hidden files and folders on a flash drive
I’ll tell you in two words what’s going on here and why folders become hidden and invisible, and shortcuts take their place.
The logic of such a virus is simple, but at the same time extraordinary. Once on the flash drive through an infected computer, it registers itself in the hidden RECYCLER folder, which it hides using the “Hide” system attribute. It places an instance of malicious code (virus) under any name. This is how he camouflages himself. The virus assigns the “hidden and system” attribute to all files and folders that are on the flash drive, as a result of which they become invisible, i.e. hidden.
Then, the virus creates shortcuts to all hidden files and folders and makes them visible, substituting them instead of the originals. Not a bad idea, right?
As soon as you insert such an infected flash drive into your computer, open it and click on the shortcut folder, the system command will trigger to launch the virus from the RECYCLER folder, and then to open the hidden original folder. If the antivirus does not respond to the virus, your computer will be infected and the consequences can be different: from stealing passwords to installing a backdoor to control your computer.
There are several options for how to remove a virus from a flash drive and make hidden files visible:
- Using the command line
- Using a bootable Live DVD (or bootable USB flash drive)
- Using file managers (Total Commander, Far, etc.)
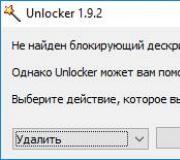
Personally, I use a boot disk and a flash drive in my work. But since this method requires a special disk or a special flash drive that needs to be mounted, it is a bit difficult for the average user.
Therefore, I will show you another easier way - using the Total Commander file manager.
Restoring the previous appearance of folders on a flash drive
1. Go to the website http://www.ghisler.com/850_b15.php and download the 32+64-bit version of the program (Combined installer Windows 95 up to Windows 8, 32-bit AND 64-bit!).

2. Install it. Even if you already have a similar program installed, update it. Its icon will appear on the desktop (in some cases as many as two).

3. Open the program by clicking on its icon. In the program window, click on the start button at the desired number (1, 2 or 3). This small inconvenience allows us to use this program for free.

4. In the left window of the program, select your flash drive from the drop-down list.

5. At first glance, everything is in order with the flash drive, the folders are in place, the files are just missing, but it only seems so. If you look carefully, you will notice that folders are shortcuts because they have the extension .Ink, but in fact folders do not have an extension.

Open the section In the settings window, select the Panel Contents section and on the right side, check the boxes next to the following parameters:
- Show system files


Now the picture has changed. Hidden system files were displayed (they may not even be system files, because they were simply given such an attribute).

6. Delete all shortcut folders with the Ink extension. To do this, hold down the CTRL key and select the desired files with the mouse. Press the DELETE key on your keyboard. Agree to deletion.

7. It remains to restore the previous appearance of the folders. To do this, it is enough to remove the “hidden, system, etc.” attributes from them. This cannot be done using the standard tools of the Windows XP, 7 or 8 operating system, but with the help of the Total Commander file manager it is easy.
Point (one-time click on the file with the left mouse button) to any file and select all folders and files using the keyboard shortcut CTRL+A.

Open the section. Remove all points opposite the values:
- Archival
- Read-only
- Hidden
- System


And click on the OK button. Now the files on the flash drive can be viewed using a simple Explorer.

8. One more small detail. All that remains is to delete the RECYCLER folder, which may contain the virus. Select the RECYCLER folder using the right mouse button and press the DELETE button on your keyboard. Agree to delete all files in this folder. If, when deleting, a warning appears that the file cannot be easily deleted, then select the “with administrator rights” button.

That's it! The virus will be removed and the files will be safely restored.
At the end of this review, I want to warn you in advance, if you suddenly notice that files have disappeared on the flash drive or, as in this example, shortcuts have appeared instead of folders and files, DO NOT HURRY TO FORMAT your flash drive! Try using this method to return everything to its place.
USB Disk Security is a free application that provides complete protection against all kinds of malware distributed via removable USB drives. The application works with external hard drives, memory cards, digital cameras, flash drives, as well as other devices that can be connected via a USB connector. Disk Security is based on special threat detection technology; Like an antivirus program, the utility is able to work in hidden mode, only making its existence known only if malware is detected.
Basically, a personal computer is infected with viruses while using the global Internet; a little less often this happens during the installation of a dubious or unverified program. An infected file can also enter a PC through the most ordinary flash drive.
When an infected flash drive is connected to a personal computer, malicious software penetrates the hard drive, and most importantly, this happens so quickly that installed anti-virus programs do not always have time to react in time. Especially for such cases, it is necessary to use programs that can easily cope with this type of threat. Today, Disk Security is one of the best programs for protecting against infected files distributed via USB drives.
When viruses are detected, the application, depending on the settings, will delete or block them, thereby preventing them from launching automatically. In addition, the utility is able to restore the system after it has been infected with malware, clear the hard drive of temporary files, prohibit copying files from the computer’s hard drive, check URLs, completely block USB ports, manage startup, force scan hard drives.
The program is equipped with a convenient and simple user interface in Russian. The control panel is located on the left side of the working window, consisting of seven main points. The following sections deserve special attention: data protection, scanning and USB shield.
The last section is responsible for displaying a full report on all detected threats. You also need to take into account that by default the utility automatically removes any malicious application. So, in order to avoid deleting important documents, it is better to disable this option, for example, after deleting the boot file, your USB drive will not be able to start. After disabling, Disk Security will act as follows - it will automatically move the infected file to quarantine or simply mark it.
In addition to tools for automatically checking flash media, the “Scanning” section is equipped with a vaccination function. Vaccination can be carried out both on removable media and on the personal computer itself. In this case, a special file is created on a flash drive or hard drive that prevents some malicious applications from launching. If desired, vaccination can be turned off.
The “Data Protection” section is able to provide devices with higher protection; for example, you can set a ban on moving data from a computer to a memory card or even block access to a PC via a USB port. To close access, you will need to restart the computer, only after this the settings will take effect.
Key features of USB Disk Security:
- Perform a more thorough scan of external drives. If malware is detected, it is either deleted or quarantined.
- The presence of a resident anti-virus scanner that is triggered when a new USB drive is connected. Without making changes to the settings, infected files will be automatically deleted.
- If necessary, you can completely disable automatic startup on your PC.
- When using the utility, you can view the content without the risk of infecting your personal computer.
- Sites are scanned for infected applications. The following services are used during the scan: Trend Micro, McAfee, VirusTotal, Symantec and Google.
- The search service linkzb.com provides the opportunity to safely use the Internet.
- The application is able to prevent unauthorized connection of a USB storage device to the PC.
- Blocking the copying of unauthorized data to USB is done by using the Access Control tool.
- Using a system for cleaning temporary files, if the virus is located in temporary directories, it will be deleted immediately.
- You can set a password in the program settings.
- Full control over applications included in startup.
- Availability of a built-in system for restoring important directories in the registry that were affected by malware.
- You can download Disk Security completely free of charge.
- Works on Windows XP, 7 and 8.
- Automatically checks for updates.
- The application does not need to update the virus database, since it does not work like a standard anti-virus program.
- Due to its small size, the utility can be installed even on a weak personal computer.
- Seems to be fully compatible with many modern antivirus programs.
- Using a multilingual interface, a total of 12 languages are available.
USB Disk Security is a simple and effective program to use to provide complete protection against malware distributed through removable media.
Some users are faced with an unpleasant situation: the files that were on the flash drive disappear after connecting to the computer. If the user did not erase them himself, then there is only one conclusion - there is a virus on the flash drive that did not delete, but only hid the data. Information can be recovered in several ways.
Show hidden files
After detecting missing information, the first thing you need to do is configure the system to display hidden files.
Open the removable drive and see what data is now displayed on the flash drive. Most likely you will see shortcuts and unknown executable files of the virus.
Virus removal
After setting up the display, you need to remove the virus from the flash drive that hides the data. To scan the drive, use an installed antivirus or healing utilities such as Dr. Web CureIT and Kaspersky Virus Removal Tool.

You can also clean the flash drive manually by removing unknown files with the *.exe extension and shortcuts from the media.
Data recovery
After setting up the system and removing the virus, you can begin to recover lost data. Typically, a virus simply changes the attributes of files, making them hidden. Your task is to restore the attributes to their original state or reset them completely so that the data is displayed in Windows Explorer. Let's try to restore attributes via the command line:

The process can be automated by creating a BAT file. Copy text like this into notepad:
echo Please wait...
attrib -s -h -r -a /s /d
Name the text document view and save it with the *.bat extension - you will get view.bat. Transfer the resulting file to the removable disk from which the data has disappeared. Launch the Bat file. After changing the attributes, the data that the virus allegedly deleted will be returned to the removable disk.
Working with FAT32
If the flash drive has a FAT32 file system, then the virus could go further and not only hide the data, but move it to the hidden directory E2E2~1. In this case, the procedure for restoring information after its loss will change slightly:

After completing these steps, the Folder folder will appear on the flash drive; it will contain the files that you were able to recover.
Recovering through file managers
If after working with the command line you could not recover the data on the flash drive, then try to find it through file managers. First use Total Commander:

If Total Commander does not help, use the Far Manager program to change attributes. It does not have such a user-friendly interface, but it performs its functions properly:

After disabling unnecessary attributes, the data in the file manager window will change color from dark blue to white. This means that the files are no longer hidden and you can open them on the flash drive.
Special utilities
Since the problem of missing files after a virus is quite common among users, there is special software that allows you to quickly recover information. 
Some users, while working on the Internet, encounter special virus programs that modify files on removable media, making them invisible. In some cases, they are replaced by various scripts or shortcuts with similar names and shortcuts that infect your computer. This article describes in detail how you can open hidden files and folders on your flash drive and return them to their original attributes.
First of all, it is worth noting that under no circumstances should you open or run duplicate files created by a virus, as this will lead to infection of your personal computer, even with an antivirus program enabled. Scan your entire PC and removable device with an antivirus, and then you can start troubleshooting.
Setting up Windows Explorer
In order for users to be able to view hidden files located on a flash drive, it is necessary to correctly configure the parameters for displaying objects in Explorer (a program for working with files and folders). To do this you will need to do the following:
Now you will see all files that have the “Hide” attribute. You can open the root directory of the flash drive and continue working with the necessary information.
Changing Attributes
So that hidden files can be seen by other users on other computers, you need to change their properties. To do this, you need to right-click on the desired object to bring up the context menu and select “Properties”.
In the window that opens, you need to uncheck the boxes next to the “System” and “Hidden” parameters. Click "Apply" to save the changes and "Ok" to close the window and display the files. This way you can edit the parameters of all the data you need.
However, if there are a lot of objects on the flash drive, changing all the files one by one will be inconvenient and time-consuming.
Creating a bat file
You can create a simple script with your own hands that will independently “repair” all the data on the removable media. Follow a few simple steps indicated in the instructions:


If you use a flash drive not only on your home computer, then you have probably encountered a situation where the USB drive had to be cleaned of viruses. You could have brought it in at work, a friend’s computer, school, college, and so on. And having connected it to a computer or laptop on which an antivirus was installed, alarming messages began to appear that the removable storage device was infected.
But what should you do if, after scanning with an antivirus program and removing viruses, there is nothing on your removable media? This situation can be easily corrected if you caught a virus that hid all files and folders on the flash drive.
Not only a virus could have hidden everything on the USB, but also, for example, your friend, who knows a little about this, and decided to play a joke on you.
In general, let's figure out how to display all hidden files and folders on a flash drive so that you can work with them again.
First of all, connect your device to a computer or laptop that has an antivirus program installed. Then scan it for viruses and, if necessary, cure it. This will prevent you from infecting your computer through a connected USB device.
How to return everything through Explorer
There are several ways to find and display all documents. The easiest one is to use Windows Explorer.
If you have the Windows 7 operating system installed, then go to the “My Computer” or “Computer” folder and open the flash drive. Then go to the Tools tab and select Folder Options from the menu.

In the next window, open the “View” tab. In the “Advanced options” section, find the “Show hidden files, folders and drives” field and check the box next to it. Click "Apply" and "OK".

After this, all recorded files will be displayed, but they will be muted and you will not be able to work with them. Select them - press Ctrl+A. Next, right-click on any selection and select “Properties” from the context menu.

On the “General” tab, in the “Attributes” section, you need to uncheck the “Hidden” field. Then click "Apply".

A window like this will appear. In it, put a checkmark in the “To selected items and to all subfolders and files” field and click “OK”.
Then click “OK” in the “Properties” window.
After this, all files and folders will become visible.

If you have the Windows 10 operating system installed, then go to the “This PC” folder and go to the “View” tab. Next, click on the “Options” button – “Change folder and search settings.”

On the “View” tab, uncheck the “Hide protected system files” box and put a checkmark next to “Show hidden files, folders and drives”. Then click “Apply” and “OK”.

Right-click on the muted file and select "Properties". In the properties window, uncheck the “Hidden” box and click “Apply” and “OK”. This way, make all the necessary documents visible.
When everything is ready, go to “Folder Options” again and change everything back - select “Do not show hidden files, folders and drives.”

Using Total Commander
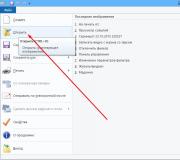
If you are used to using Total Commander instead of the standard Windows Explorer, then it can also help us. Go into it and select the letter that corresponds to the flash drive. Then click on the “Configuration” tab and select “Settings” from the list.

Further in the list on the left, go to “Panel Contents” and check the “Show hidden/system files” box in the main window. If you have two different fields, then check the boxes in both: “show hidden” and “show system”. Click Apply and OK.

Once everything on the device is displayed, you need to make them visible. To do this, select everything, then click on the “Files” tab and select “Change Attributes” from the list.

In the next window, uncheck the “Hidden” and “System” boxes and click “OK.”
Now you can work with everything that you have recorded on USB. This method, unlike the first, will allow you to display not only hidden files, but also system ones.

Restoring a flash drive after a virus via the command line
To restore hidden files after a virus, you can also use the command line. To get started, insert the drive into your computer, go to the “My Computer” folder and see which letter corresponds to the removable device. In the example, this is M:


If you have Windows 10, then you can start the command line like this: right-click on the “Start” button and select “Command Prompt (Administrator)” from the menu.

In the Command Prompt window, enter the drive letter followed by a colon:
m:
and press "Enter".

Then press "Enter". When the process is completed, all documents on your device will become visible.

Choose one of the described methods to display all hidden files on the flash drive. I hope everything works out and you will be able to work with important and necessary documents again.