Restore Windows 10 to standard start. Actions with tiles
In most cases it will help normal reboot Windows. To do this, switch to the Desktop and press the + key combination, and then select “ Reboot Windows" and click on "OK".
Reason unstable work the start menu can also be an antivirus. To check this feature, uninstall the antivirus and check the operation of the Start menu. If the menu works fine, you can install it again antivirus program. The antivirus version must be the latest.

Windows Explorer may also negatively affect the functioning of the start menu. You can restart Explorer by opening Task Manager using the ++ hotkeys. Click "More details" in the lower left corner and then go to the "Processes" tab and scroll to the "File Explorer" line. Click on a line right click mouse and select in context menu"Restart" command.
In addition, working in tablet mode may help you. Use the +[A] key combination to exit the Windows 10 Info Center and switch to tablet mode. After clicking on "Start" in full screen mode start menu should appear again. Tapping “Tablet Mode” again will switch you back to desktop mode.
 In some cases, a specific log file is responsible for such problems. You can delete it as follows: open Explorer and go to the path “C:\Users\*Username*\AppData\Local\TileDataLayer\Database” (instead of the words *Username* you need to enter your username).
In the folder that opens, find the EDB00001.log file and delete it. Instead of the number "1" in the file name there can be any other number. To perform this operation, you may have to go to “Manage | Services and Applications" find the service "tiledatamodelsvc" and stop it.
Photo: manufacturing company
Good day!
I don’t know how many people do, but in my opinion, for working on a laptop/PC with with a regular mouse the menus that were in Windows 7 are much more convenient (classical formation) rather than a tiled interface. Classic is more compact, less overloads the visual space, and easier to navigate.
Of course, the issue is debatable. Much depends on your screen and type of device; the same “tile” is more convenient when controlled from the screen (for example, on tablets). In general, why doesn’t Microsoft make a custom menu (whatever is more convenient for you)?..
Windows 7 START menu in new Windows 8/10
To immediately clearly demonstrate what we're talking about, I’ll give you a screenshot below: on the left is tiled menu(before it was changed using the utility), on the right is what has become. The menu is almost identical to the one that was in Windows 7 (convenient, more informative, and more responsive (in my humble opinion)).

One small utility allows you to do this Start Menu 8 (link to it is given below).
Start Menu 8
![]()
The utility is intended for those users who can’t get used to the new tiled interface. Allows you to go to the classic START menu in 2-3 mouse clicks.
In addition, it has quite a lot of settings in its arsenal, which allow you to flexibly customize it for yourself.
Downloading and installing the utility I'm omitting (everything is standard, nothing interesting). After installation, the first menu (main) will appear in front of you, in which you are asked to return to the classic interface: just select the “Flat” style and click OK. See screenshot below.

In principle, everything basic has already been done: now, when you enter START, you will see an interface very close to the classics. But I can’t help but note that Start Menu 8 allows for significantly more...

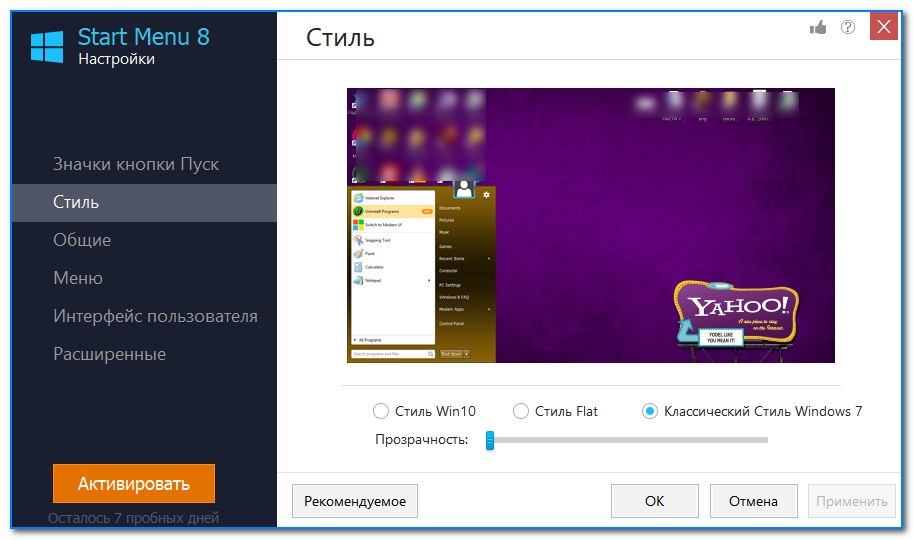
For the thin utility Start Menu 8 - open the START menu and go to its settings (for this there is a small “gear” in the corner of the menu, see example below).

In the "Style" section, in addition to "Flat", there is another alternative style: "classic" (exactly the same one that is in Windows 7). See the example below.
By the way, you can also change the icons and the START button - but I decided not to consider this, because... It’s unlikely that anyone would want to get confused again...
In the "General" section you can configure the size of icons, sorting of programs, the number of shortcuts displayed when opening a menu, etc. (if you have big screen- it is quite possible to install 15-25 pieces).

Also in the "User Interface" section you can specify the font size, set your photo, background color, etc.

For example, I slightly changed the background color in my menu (made it darker), and set the classic sorting of programs (when everything goes in order). The screenshot below shows what it looks like: quite convenient, without unnecessary advertising and clutter that was in Windows menu 10...

Disadvantage of the Start Menu 8 utility: all features and features are available only in paid version(but in principle, everything basic is free).
That's all for now...
Additions are welcome.
After updating to new version operating system Some users are faced with an unpleasant situation - the Start button does not work in Windows 10. But you can get rid of this problem on your own.
Why doesn't the Start button work?
The main reason why the Start button does not work is reset functional settings in the OS registry editor. The Administrator settings may also be reset. But such a problem arises due to the user’s fault, and not due to OS defects (it’s useful to read “”).
Restoring functionality
Even if you don't professional user, you can still restore the functionality of the Start menu on your own.
Restarting Explorer
An easy way to fix this problem is to restart Explorer.
Fixing the situation using PowerShell

Changing Registry Editor settings

Creating a new user on the device


Video
Watch the video for more details on how to use the above methods, and also learn about alternative ways to solve this problem.
Conclusion
Restore the Start button after Windows updates possible in several ways. If none of these help, restore your system through the Settings app using bootable flash drive or disk.
After upgrading to Windows 10, many users were disappointed with the redesigned Start menu. In Windows 7, it consisted of two parts: the left - previously used programs, the right - My Computer, Control Panel, and other elements for setting up and managing the system. To return classic look Start menu in Windows 10, just use some tips.
Ways to return the classic Start menu in Windows 10
In order to make the Start menu in Windows 10 look like the classic Windows 7 menu, you should remove all Metro tiles. To do this, perform the following steps.
- Right-click on the element and select “Delete”.
- In this way, we remove all the tiles until we get the classic menu look.

You can return the classic view of the Start menu in Windows 10 using the ClassicShell program, which runs in compatibility mode.
- Download and install the program. Selecting components to install. IN in this case we need "Classic Start Menu" and "Classic Explorer". The latter modifies the Explorer. You can also return old look Control Panel, which in Windows 10 is not too different from the IE browser. Choosing a storage location program folder and click “Next”.

- Follow the prompts of the installation wizard. After completion, click on the Start button. A new settings window will appear. Select the element model.

- The Start menu will look like this.

- All elements on such a menu can be swapped, size and other parameters can be adjusted.
- The explorer will appear as follows.

- The control panel will not be too different from previous versions Windows.

You can also use the Settings menu to make the Start button and menu look classic. To do this, we do the following.
At the request of workers and for those who do not like the fact that in Windows 8 the developers abandoned the Start menu we were familiar with in Windows 98, this article was written. Still, Windows 8 has become extensive and can be seen not only in PCs, netbooks and laptops, but also in tablets and all-in-one PCs. And since they provide touch input, such a Start menu would only complicate the work (IMHO). It was simply replaced with a new one Metro interface. In this article, I will look at ways to return the Start menu to Windows 8, and also, “sweet” - how to return the toolbar =)
Here's what Microsoft senior program manager Chaitanya Sareen said about it - Data collected through the program Customer Experience Improvement Program allowed the company to conclude that the use of the Start menu has been steadily declining. Users no longer open Start to launch a program - they pin everything at the bottom to the bottom bar and quickly get to everything else through search. "We're on a path to opening up a whole new set of use cases," Sarin added, describing the Metro screen in Windows 8.
Still standard means There is no way around this, you need to resort to the help of utilities. In this case, I will only consider 4, but they are worthwhile.
And although I lied a little - return using standard methods You can do it without the help of Start menu programs, but only if you have the first version Windows 8 Developer Preview (preliminary version Windows 8), and in subsequent versions of the operating system this can no longer be done, since Metro is now included in Explorer.exe.
So, in Developer version Preview Metro it was possible to remove the Metro interface only by deleting the shsxs.dll file, or rather disabling it. Now I will describe how to do this.
1 - Launch the Run utility by pressing the key combination WIN+R.
We agree to a warning from Account Control

2 - Then open the editor by typing regedit in the field Open and pressing the Enter key.

3 - Go to the registry branch HKEY_CURRENT_USER\Software\Microsoft\Windows\CurrentVersion\Explorer and double-click on Explorer.

4 - B right panel In the registry editor, find the RPEnabled item, right-click on it and select the Modify... item from the menu.

If this item is not there, then look under the spoiler.
Well, of course - if it doesn’t exist, then you need to create it

Then you need to change it

Specify the value 0 and Click OK

Go to point 6
5 - In the dialog box that opens, change the field Value Data from 1 to 0 and press the button OK to save changes.

6 - Reboot the PC and after this the Start menu in Windows 8 should change to classic.

In order to return the Start menu to the previous Metro style, you need to perform the same operation, but in step 5 return the value 1 in the dialog box.
Well, if you don’t have this Windows version 8, but you want to return the familiar classic Start menu, then let's look at ways using utilities.
By the way, the famous columnist computer world- Paul Tarrott, opined that Microsoft company is negative about the fact that some applications artificially return the Start button in Windows 8. But this does not bother us
1)
Installing the classic Start menu using the ViStart utility
This application was originally developed for those who wanted to add a Start button to Windows XP. Windows style 7, and now it works on Windows 8.
Please note that during installation ViStart will prompt you to change in your browser search engine, home page and wants to install various advertising modules from Yandex. I recommend refusing this by unchecking all three boxes.


At the next stage, ViStart will again offer to install some third-party software (RegClean) - we refuse by clicking on the button Decline

Once the installation is complete, you will see the Start button return to the taskbar.


Clicking on it will open the familiar Start menu. The menu even displays your most frequently used programs. But there is one nuance - it has not yet been rksified. To do it in Russian, go to the folder with the program and run Language Changer and select Russian:

Restart the program and the language should change to Russian

Another nice bonus ViStart is that pressing the keyboard on Windows button opens the Start menu rather than start screen in Metro style. However, the Start screen can still be opened by moving the cursor to the bottom left corner of the screen or through the Charm bar that appears when you hover the cursor at the top or bottom right corners of the screen.
.
2)
Installing the classic Start menu using the Start8 utility

The utility has an interface and design that most closely matches the Start button - it feels as if this button never went away, and only needed to be activated. After installing the utility, a button appears in its usual place, completely repeating the functionality of the Start button from Windows 7, only adapted for Windows design 8. To get to the settings, you need to right-click on the icon and select the appropriate item in the menu that appears. Commands are also available by right click Execute And Shutdown.

In the settings you can specify one of two menu design styles, you can disable/enable its transparency, and set an icon.

Stardock Start8 provides the opportunity full customization all Start menu options:
- You can choose large or small icon size
- Allow display of recently used applications
- Highlighting installed programs
- Display various shortcuts indicating user data (Audio, Video, Documents, Downloads, Images, Games, Favorites, and many others)
- Define what action the power button should perform (shutdown, exit, change user, lock, reboot, hibernate, sleep).

You can set the behavior of the button - open the standard start Windows screen 8 or Start menu. You can combine these functions, for example, by pressing a button, open a menu, and by pressing Ctrl + button open the Windows 8 start screen.
Stardock Start8 also allows you to manage new interface functions, disabling them if you do not use them (disable interactive screen corners and the charm bar, both all and each function separately). Well, in addition to everything, the utility can determine the behavior of active areas when working in different interfaces. For example, when working in full screen mode tablet computer you can leave everything Windows features 8, and when switching to desktop mode, disable them.

Well, for the most ardent enemies of the new Windows 8 interface, there are settings that regulate the display of applications running in full-screen Modern UI mode - you can hide their icons from the menu, and also immediately go to the desktop when the system boots.
Thus, Stardock Start8 is one of the most convenient programs, returning the full functionality of the Start button in Windows 8, and allowing flexible management of new interface functions, even including their disabling. Naturally, Stardock Start8 only works on Windows 8 (all versions for except Windows RT).
3)
Installing the classic Start menu using the utility Classic Shell
This program can install not only the classic Start menu, but also the one that was in Windows XP and Windows 7.

After installation, the program starts automatically, completely replacing the menu in its best “old” form, more familiar Windows interface. This replacement may be useful for owners of netbooks, whose screen sizes and resolutions are traditionally smaller than those of laptops and desktops. Also, the classic menu can save some resources on not very powerful computers. Well, the most important advantage of the program is that it satisfies the needs of accountant aunts who want everything to be as before, period!
Besides the change appearance The Classic Shell main menu also includes the classic view of the Explorer toolbar,

as well as a status line.

The last step is to run the program in automatic mode.
Right-click on the "Start" button and select "Run at startup."
After restarting the computer and going to the desktop, the "Start" button is in its usual place.

That's it. I think we have sorted out this issue. Well, now - sweetie
Create a Toolbar with programs on the taskbar
Not everyone knows this, but it turns out that in Windows you can create a toolbar with the contents of the folder with installed programs Those. we can create a pseudo start menu without installing third party software.
So let's get started. Right-click on the taskbar, in the context menu that opens, move the mouse cursor to the item Toolbars(Panels) and then select New toolbar(Create toolbar).

Copy and paste next line V address bar in the Choose a folder window:
%ProgramData%\Microsoft\Windows\Start Menu\Programs

And when you press the button Select Folder(Select folder), you will see a menu on the taskbar Programs(Programs).

If you want to move the new menu to a different location on the taskbar, simply right-click on the taskbar and uncheck Lock the taskbar, and then drag the mouse cursor to right place on the taskbar.


