How to find recently deleted files in the Recycle Bin. How to recover deleted files (after emptying the recycle bin or formatting the disk)
“I deleted an important file!” Stories with this beginning happen to users quite often. It is possible that some of our readers have already encountered a similar problem. Such stories always begin the same, but end differently. In this article I will tell you how to make the ending of this story happy. Or at least do everything to make the likelihood of a happy outcome higher.
1. What to do if an important file or folder is deleted?
Well first of all, don't panic. When you throw out garbage, you don’t immediately send it to a landfill. First a trash can, then a container, and only then a landfill. This happens in Windows too. Using the Del key, you first send the file to the Trash. Then, after emptying the recycle bin, the file can be found on disk in unused clusters for some time (this is analogous to our container from the example). And only after the area on the disk in which there were still traces of the file is occupied by other data, then the file is hopelessly lost (this is already a landfill).
1.1 Search in the Cart
It may sound trivial, but the Recycle Bin is the first means of protecting data from accidental deletion. At the same time, many Windows users automatically clean it immediately after placing files in it. Although, by and large, the Recycle Bin does not need to be emptied at all, because it does it automatically.
Searching for files in it is not at all difficult. Find its icon on your desktop and open it. If the file name is known, then simply write it in the search box. You can also sort files in the Recycle Bin by deletion date and immediately find the file you need that was just deleted.
The next time you think about using some utility that cleans out the Recycle Bin in the background to free up disk space, think carefully about whether you should trust this important process to an automatic machine. It may be easier to do it yourself and at the moment when you are sure that there is nothing valuable in it.
1.2 Searching among shadow copies
It is not necessary to use any paid programs for this purpose. The standard backup tool in Windows 7 is quite suitable and this system is turned on automatically when you install the operating system.
If “System Protection” is not disabled manually (which is often recommended by would-be optimizers), then restoring a deleted file from a shadow copy in Windows 7 is quite simple.
- In Explorer, find the folder where the deleted file was (not the Recycle Bin).
- Click on the name of this folder right mouse button and select " Properties»
- Go to the " Previous versions"(see picture below).
It contains information about all versions of files that were in this folder at different times.

We select the closest one by date and try to search for our file in it. If it is not there, we turn to an earlier version. And so on until you find the desired file.
This way, you can not only recover an accidentally deleted file, but also return to one of the previous versions of a document that was changed and saved on disk, and then its previous version was needed.
Shadow copies of user files are created automatically by the operating system during reboots and installation of various programs at system restore points. Therefore, you don’t need to do anything separately to create them. The main thing is not to turn off “System Protection”, since some “experts” recommend turning it off to save resources, keeping silent about the fact that the security of the system as a whole will decrease.
2. If standard remedies did not help
2.1 Use a third-party file recovery utility
You can use a specialized data recovery utility, which, after analyzing the disk, will display a list of files and folders that you can try to recover. One of these programs can be kept on disk in case of fire.
The chances that the file will be recovered without loss are not so great, but there can be luck. Here, a very important point that influences the “success of the concession” is the minimum number of disk operations from the moment the file is deleted. Some sources even tell us to urgently turn off the computer and boot from a flash drive or disk. To me, this is pure paranoia. It is much easier to follow the simple rules that I will give below and not needlessly risk your nerves.

I will immediately upset the happy owners of SSD drives - they do not have this chance of salvation! The fact is that the system for such disks regularly performs the TRIM function, which resets sectors with deleted files.
2.2 Don't forget about the professionals
There are people who can help with recovering deleted files on a disk. There is a chance of running into a charlatan or an inexperienced specialist, as in any other type of service. But if the file is really valuable, then it may make sense to pay professionals.
3. What can I do to prevent files from disappearing without a trace?
3.1 Do not disable standard protection measures - they are very effective
The operating system developers have come up with a multi-level protection system against problems associated with accidental data deletion. Do not neglect them and disable them, as well as empty the Recycle Bin every time immediately after deleting a document. Make sure that “System Protection” is activated and that the Recycle Bin is working properly. With these system components, it is possible to lose a file irretrievably unless on purpose. To prevent data loss associated with disk failure, use the recommendations in the following paragraphs.
3.2 Use cloud storage
Despite the chance of information disclosure, synchronize your folder of important documents with cloud storage. I have not seen a user whose documents would take up 10 GB, which is how much cloud disks are willing to offer for free. They also offer their own applications that will synchronize your document folder with the cloud. For example, I use . But there are also such products as Google Drive, Yandex.Disk and, of course, the famous .
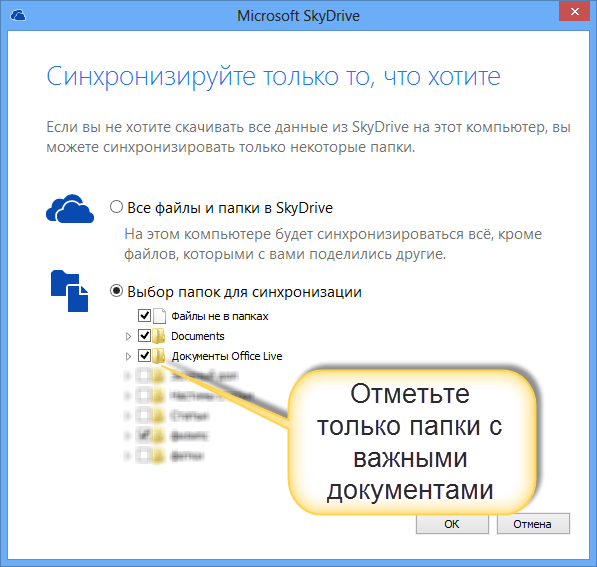
Yes, it is very important that cloud storages also have their own basket! Don't forget to look there too if your local copy of the file is irretrievably lost.

3.3 Make regular backups
If you have an operating system other than Windows 7, 8 or 10 installed, we advise you to make backup copies using a special utility.
Windows 7
Windows 7 has its own utility for backing up versions of important files, “Backup or Restore,” which is located in the “Control Panel.”

To create backup copies, you will need a separate hard drive (external or internal) that has enough free space to accommodate an image of the entire system disk, as well as to create backup copies of user files.
Windows 8/10
This version of the operating system has a more advanced feature called File History, which is turned off by default. If you have really important documents, take the trouble to enable version control for them. Just type “res” in the control panel search box, as shown in the picture.

Then, in the “File History” window, make the necessary settings. By default, the system suggests storing versions of all documents and drawings. If you have large folders with home photos in your documents, then it is better to make backup copies of them yourself, as I described in. And in “File History” it is better to place these folders in “excluded” folders.

Now you will have copies of the document for each change option. Your dissertation or thesis will be safe. Even if you deleted an entire chapter by mistake and wrote down the document.
File History requires the use of a removable storage device. This is in case the main hard drive fails. So don’t spare money and buy a flash drive for a hundred or two rubles (for example, 8 GB), so that you don’t have to shell out a thousand or two later to restore files bit by bit from the body of a dead hard drive.
Probably, this has happened to every PC user at least once when you are writing some very important article, making a presentation, processing a photo in Photoshop or something else very important, and then you delete the document without noticing it. By chance, automatically... And when you suddenly remember that a file has disappeared somewhere, you start looking for it in all the folders, but you can’t find it anywhere. Then you look in the basket, and it is empty. It turns out you have already managed to clean it...
What to do in this case, how to recover deleted files from the recycle bin?
A huge variety of special programs and utilities are designed for these purposes (this will be discussed below). But not many people know that Recovering deleted files from the Recycle Bin is possible using Windows 7 itself and higher.
How to recover deleted files from your computer using Windows
To use the recovery of deleted folders and files using Windows itself, you must:
- Open “My Computer”;
- Right-click on Local Disk C;
- Select “Properties” from the menu that appears;
- In the “Properties” window that opens, go to the “Previous Versions” tab.
In this tab you will see all previously saved versions of folders and the files they contain. If the date is indicated earlier than the date of loss of the desired file, then open the corresponding folder, find your valuable document in it and copy it to a flash drive or any other external drive.
It should be noted that by default, backup is enabled only for the drive on which Windows is installed. As a rule, this is Local Disk C. To activate the backup feature for other disks, you need to:
- Go to “Control Panel”, open “System”;
- Then, in the menu on the right side, click “System Protection”;
- In the window that opens, you can enable backup for other drives. To do this, you need to select a disk, and then click the “configure” button, specify the recovery type and that’s it.

Of course, this method does not provide a 100% guarantee, but trying is not torture, it’s definitely worth a try.
Programs for recovering deleted files
You can also restore files using special utilities. There are both paid, more powerful and advanced programs, and free ones with little functionality. Paid ones include: Recover My Files (capable of recovery even after formatting the hard drive) and R-Studio. And among the free ones, the most famous is Recuva.

To recover deleted pictures, music, documents, etc. using Recuva you need:
- Open the program. When you launch the utility for the first time, a wizard will open to help you get started right away. If necessary, you can always turn it off.
- Select the disk (hard drive or flash drive) on which you want to search and restore files. You can also launch the program from the context menu of the recycle bin or any folder.
- Start the analysis and wait for it to finish. If “deep analysis” is enabled in the settings, the search by time may take longer.
Then all that remains is to view the list of found files, mark them and restore them, saving them to the specified location on your hard drive.
In this guide, you will learn about 2 ways to recover data on your hard drive using popular recovery programs Recuva, EaseUS Data Recovery Wizard and Handy Recovery. In detail, you will find out:
- how to recover deleted files using the EaseUS Data Recovery Wizard;
- how to return the trash can to the desktop;
- what is the most reliable way to restore a deleted folder to your hard drive;
- how to recover files deleted by an antivirus after resetting settings, reinstalling Windows 7, from the lost dir folder, etc.
- How to recover all deleted files from the recycle bin area to your computer.
- Is it possible to restore the contents of the Recycle Bin after emptying it?
What is a Cart?
When you delete a file through Explorer or another file manager, it is placed in a special staging area in Windows - the Recycle Bin. Generally speaking, this area is present in any normal operating system with a graphical interface: not only Windows, but also Mac OS or Linux. The recycle bin (or Recycle Bin, as it is called in the original version) can even be installed on a mobile phone running Android or iOS.
One way or another, deleted files are stored in the Recycle Bin for a certain time, until one of two situations occurs:
- You are emptying the system Recycle Bin because there is no free space left on your hard drive
- The Recycle Bin uses limited space to store “erased” data. When there is not enough space, old files are simply overwritten by newer ones on top of existing information without the user's knowledge
Thus, the Windows Recycle Bin plays the role of a kind of intermediate clipboard, backup space on the HDD. If you decide that you still need some files, you can rummage through the system Recycle Bin, dig out directories, folders, and erased items from there, and quickly restore them.
Sometimes you look in the Windows Recycle Bin - and the most necessary things are no longer there: in fact, only useless “garbage” remains! Most likely, you simply emptied the Windows system Recycle Bin and your valuable files have actually disappeared. We will look at ways to restore the Recycle Bin in other ways. A video version of the article is available here:
How to recover files placed in the Recycle Bin
Before the worst happens, you still have a chance to restore and reanimate files from the destroyed directory, from the emptied Recycle Bin. The process of returning erased data is quite simple.
- To begin, you find the file or folder by going to the Trash
- Then find the remote file or folder you are looking for
- Right-click on the element and select the “Restore” option through the context menu.
Is it possible to recover files deleted from the Recycle Bin?
From time to time, you can empty the Recycle Bin to free up disk space. But do you think that files cleaned in this way will be quite difficult to get back? So the question arises: how to restore the Trash after emptying? To do this, you will need special programs for file recovery, and not two mouse clicks. Therefore, I advise you to always think about what actions you are taking, especially when it comes to emptying the Trash.
When a file is erased from the Recycle Bin, many users think that it is sent to /dev/null and that deleted files cannot be recovered in the future even with the help of recovery programs. Even the Windows operating system displays a message saying, “Deleting a file from the Recycle Bin will permanently delete the file/folder from your computer.” However, in reality this is far from the case. I think that my article is also read by experienced users who do not believe what the operating system tells them and can do things that are incomprehensible to mere mortals. So listen to me carefully.
"Window" (or another OS) changes one character in the file table, after which the file and folders are simply not displayed in Explorer, My Computer or another file manager. However, now we can get any file recovery program using the functionality for its intended purpose. In principle, any recovery program from this category will be able to scan your hard drive and effectively recover deleted files from the Recycle Bin. I will recommend you a time-tested effective toolkit. First of all, we are talking about such a well-known utility as EaseUS Data Recovery Wizard.
How to Recover a Recycle Bin or Deleted Folder Using EaseUS Data Recovery Wizard
Data Recovery Wizard is an excellent, effective program that has helped me more than once restore the Recycle Bin and find files deleted after it was emptied. In addition, it will help you recover a deleted folder. I used it under Windows and it actually restored everything that I stupidly cleared. One of the key features of this program is that you can quickly look at the files, that is, preview them, before the actual recovery. This can save you a lot of time, especially if there were a lot of files in the Recycle Bin and they all ended up, as they say, being distributed. Next, read my guide on how to recover erased files from the Recycle Bin using EaseUS Data Recovery Wizard.
The Recycle Bin is the area from which you can recover a deleted file or folder
Step 1. Download Data Recovery Wizard
You can download the program from the catalog on this site, on torrents or, of course, on the manufacturer’s website Recovery Wizard. Only there it is paid; but if you have some money, then why not support the guys who have made a good recovery program? The free version is also capable of recovering files in demo mode, so feel free to download it, and then decide for yourself whether it’s worth your dollars or not.
Step 2. Launch the program to recover deleted files
Launch the EaseUS Data Recovery Wizard, select the types of deleted files you want to recover from the Recycle Bin. Then click “Next” to continue the file and folder recovery procedure in the next step.

Step 3. Select a drive to scan deleted data in EaseUS Data Recovery
Select the disk, hard drive partition where you lost the file, click the “Scan” button. The program will quickly scan the selected source in search of files deleted from the Recycle Bin (everything here depends on the size of the source; be patient). By the way, if you have erased an entire disk partition, you can use the “Search for lost disks” software option. Then click “Scan” and wait.
 Selecting a disk with erased files and folders in the Easeus Data Recovery Wizard application
 Step 4. Recovering files and saving the resulting data to disk
After scanning, you can preview the deleted files you are looking for in the Recycle Bin for recovery and then select one or more items to save to disk.
Tip of the day. I strongly advise you to save files and directories NOT on the disk where the files for resurrection from the Recycle Bin are located. Copy them to another partition: this will avoid overwriting data that, in fact, is still at the recovery stage (and it’s not a fact that you will be able to recover a deleted file - although let’s not talk about sad things). It is very easy to mistakenly erase information needed for reconstruction. However, it is not always possible to return deleted files from the recycle bin back to the storage source.
 Application EaseUS Data Recovery Wizard: He who seeks will always find
 I hope this lesson helped some of the readers answer the question: “How to recover deleted files or folders from the Recycle Bin”: photos of kittens, favorite love films, or an essay on the topic of finding erased files in the Recycle Bin.
Let me tell you that there are a lot of other ways to get back deleted files from the Recycle Bin. As a last resort, if the EaseUS Data Recovery Wizard utility did not help you, try any recovery program from the Recovery Software Catalog, which I compiled specifically for website visitors. Take a look at other sections of the site: I have already repeatedly told you how to restore the Trash.
How to recover all files deleted from the Recycle Bin using the Handy Recovery utility
If you've emptied the Recycle Bin or deleted some files from it, you still have the option to get those trashed, deleted, or accidentally erased files back. To do this, follow a few simple steps in the Handy Recovery application.
 The Handy Recovery application will help you learn how to get back deleted folders and files from the Recycle Bin in Windows
 When selecting a drive, select the one that contained the files before they were moved to the Windows Recycle Bin. Explorer will only display the system Recycle Bin, but in fact, files that were moved from another drive are stored in different system directories. This is why it is so important to specify the correct drive to recover data from the Recycle Bin.
Once you select the desired drive, click the "Analyze" button. Upon completion, select the "Recycle Bin" folder in the Handy Recovery program window that appears. It contains files and folders that you can recover deleted files in the usual way using the "Recover" button on the toolbar or a similar reconstruction command from the context menu. You can restore a deleted folder using the same principle as a file.
If you do not see files in the specified directory, you can go to Handy Recovery for an advanced analysis of the hard drive file system. Let's move on. If you still don't find the items you're looking for after extensive analysis, try looking for files in the system folder related to the Recycle Bin. The folder name depends on the OS and the theme of the disk file system. Let's say, in Windows 2000 and XP, the folder will be named "$RECYCLE.BIN".
Advice: even if the deleted file is located inside these folders, not corresponding to its original name, try to identify it by its extension (it always remains), size, or its internals (which can be found out through the preview).
Answers to readers' questions
The Recycle Bin icon on the desktop was deleted, and now I don’t know how to restore it. Please help me return the Trash icon to the screen! Operating system - Windows 10.
Answer. In fact, returning the Recycle Bin to the Desktop is not difficult, although Windows, as usual, hid this feature somewhere deep in the Control Panel. So, to return your cart, follow these steps:
- Open Start - Control Panel.
- Find the Appearance and Personalization section in the Control Panel, then Personalization, and click on Change desktop icons.
- In the window that appears, select the Recycle Bin checkbox and apply the changes by clicking OK.
After this, the Recycle Bin will appear on the Desktop.
I play strategy games on the Android platform. Today there was an application update... I updated it - after which there are bugs in the game, I can’t even write to support. Question: Is it possible to return the settings a day earlier like on Windows in order to return the old application file or not?
Answer. There is no such function on Android, although you can restore the previous version of the application (but not the settings) through the Android Application Manager.
You can always write to technical support. Look for the official website of the mobile application or page on Google Play with contacts.
Hello, videos and photos weighing 19 GB were deleted from the computer, bypassing the recycle bin. Is it possible to restore them and what program is better to use.
I realized that it is possible to recover files deleted from the PC recycle bin. But is it possible, on the contrary, to make recovery impossible? Or under what circumstances is recovery impossible? Is there any statute of limitations? Does it depend on the volume of subsequent deleted information? Thanks in advance!
Read, how to recover deleted files from the Recycle Bin. And also how to restore them after emptying the recycle bin, or if files were deleted past it. What tools to use for this. How can I retrieve my files from the Windows Recycle Bin? I accidentally deleted some files and want to get them back, what should I do? Can I recover my files that were permanently deleted? Quite often, users mistakenly delete their files and want to know how to restore them back from the Windows Recycle Bin, and what to do if they are not there. In our article we will try to answer such questions and offer possible options for returning deleted data.
Personal desktop computers, laptops (as well as their derivatives: netbooks, ultrabooks, convertible laptops), tablets, mobile smartphones, etc., each of them is designed and aimed at solving specific problems, depending on the need and specific need of the user for certain moment.
Personal computers and laptops have the highest speed information processing capabilities, are unified for the use of various third-party applications, have high performance and have the largest data storage devices. They help users complete any difficult and costly task quickly and easily, without delays or errors.
Tablets, which are small portable computers with a touch screen, are largely designed to access the international computer information network "Internet", as well as for entertainment (games, watching video files, listening to music, etc.) and solving simple uncomplicated tasks (checking email messages, processing text documents and spreadsheets, etc.).
Smartphones are small in size and have similar capabilities to tablets. But they were created, first of all, to connect users with each other through various methods: mobile communications, instant messengers, email, instant messages, social networks, video calls, etc. Additionally, they have high-definition screens that allow you to view any video in the best quality without delay, and also have high-resolution cameras with which users can create various images of excellent quality for storage and subsequent sharing.
Regardless of the choice of computer device for everyday use, their common unifying factor is the use of information, its storage and provision of access to it to users at any time.
Information is of paramount importance, therefore special attention is paid to its safety. For complete management of both the computer device itself and the information used, its secure storage and control, various types of software have been developed. Software from the corporation fully meets all stated requirements "Microsoft"- operating system "Windows".
The latest version of the system available for installation today "Windows 10", includes all the basic functions that have been tested by previous versions of the program and new developments that greatly facilitate its daily use and increase the internal capabilities of the system.
One of the important tools developed and introduced from the very first versions of the operating system is "Windows Recycle Bin". It is an integral part of the system "Windows" and is present in every version of the operating system.
What is the Windows Recycle Bin?
To understand the possible ways to recover files from "Windows Recycle Bins" or after its purification, it is first necessary to consider the concept "Windows Recycle Bin".
Operating system tool "Windows Recycle Bin" is a graphical interface element and is a system-allocated area of disk space reserved by the system for deleting and temporarily storing deleted user data before its final destruction. It can have various internal settings that allow you to manage the reserved space and data storage methods.
In all versions of the operating system "Windows Recycle Bin" located in the main root directory, and is a hidden system folder, which allows you to limit access to it by inexperienced users and protect them from actions that could lead to undesirable consequences.
After files are deleted, they are moved to the tool area "Windows Recycle Bin", and remain there until certain conditions are met. Also, deleted files can be restored back or erased completely, depending on the properties set.
"Windows Recycle Bin" offers users secure temporary storage for all deleted files and folders. When you delete any item from the hard drive of a personal computer or laptop, the operating system "Windows" puts it in "Basket", and her icon image changes from blank to full.
If you have multiple hard drives, partitions, or an external hard drive connected to your personal computer, then each of them will have its own recycle bin "$Recycle.Bin" and its settings. Removable drives such as "USB drives" and memory cards, have "Windows Recycle Bin" they won't. Therefore, files deleted from removable storage media are immediately deleted permanently.
"Windows Recycle Bin" will retain deleted files until they reach the maximum storage size set for "Windows Recycle Bins". When this happens "Windows Recycle Bin" will automatically delete old (previously deleted) files located in it to make room for storing new files that were recently deleted.
If you use storage of all your deleted files in "Windows Recycle Bin" As a protective feature, you can increase the maximum storage size reserved for its needs and set your own disk space limit.
More detailed system tool settings "Windows Recycle Bin" we'll look at in the next section.
Configuring Recycle Bin options
Setting internal parameters "Windows Recycle Bins" It’s quite simple and won’t require much of your time. Basically, it comes down to setting two main settings: setting the maximum size of disk space allocated for servicing deleted files, and setting the instant deletion option.
Usually "Windows Recycle Bin" has a shortcut created during the initial installation of the operating system, located on the desktop. To access the settings window, click on the shortcut "Windows Recycle Bins" and call the pop-up context menu. Then, from the list of suggested action options, select the section "Properties".

If there is a shortcut on the desktop "Windows Recycle Bin" is missing (you may have forcibly changed the settings when installing the operating system), then follow these steps to enable its display. There are several ways to perform this procedure. For example, right-click on an empty space on the desktop and call up the pop-up context menu, and then select section from the list "Personalization".

The main operating system settings application window will open. "Options" on the page "Personalization". In the left pane of the window, go to the section "Themes", and in the right panel, using the scroll bar, move the slider to the bottom of the page and find the section "Related Options". Now click on the text link.
The corresponding settings window will open, in which, in the section "Desktop Icons" You must check the box "Basket", to display the shortcut later "Windows Recycle Bin" on the desktop. Then press the buttons "Apply" And "OK" to save the settings.
In the window "Properties: Cart" select location "Windows Recycle Bins"(for example, Local Disk "WITH:"), the maximum storage size of which you want to change.

Now in the section, set an indicator (dot) opposite the cell "Set size: Maximum size (MB):". Then, in the appropriate cell, enter the amount of disk space (1024 MB = 1 GB) you allocate for your needs "Baskets". Then press the buttons "Apply" And "OK" to save specified size values "Windows Recycle Bins".

Note: Typically, the default maximum storage size for "Windows Recycle Bins", is about five percent of the free disk space.
You can change the size limits "Windows Recycle Bins" for all local drives displayed in the properties window. Select the desired drive and repeat the procedure for resizing the storage.
If, for some reason, you do not intend to set the final size "Windows Recycle Bins" or you want to disable it (for example, there is not enough free disk space to store user information), then you can activate the function of permanently deleting files.
To do this in the window "Properties: Cart" in section "Options for the selected location" set the indicator in the cell “Shred files immediately after deletion, without putting them in the trash”. Then press the buttons "Apply" And "OK" for the changes to take effect.

Now any files and folders you delete will bypass the reserved storage area "Windows Recycle Bins" and erased immediately directly.
This means that you can recover such files using the internal capabilities of the tool "Windows Recycle Bin", which we will talk about later in our article, you will no longer be able to.
Methods for deleting files and "Basket"
In the operating system "Windows" There are two main ways to delete files: regular and permanent.
In the first case, the user deletes files using the key "Delete" on the keyboard, or from the file explorer "Windows", using the contextual pop-up menu. If "Windows Recycle Bin" is configured to store deleted files and has a reserved maximum size, then all files are moved there after deletion. Therefore, the user, if deleted by mistake or for another reason, decides to restore such files, can use the internal capabilities "Windows Recycle Bins" for their return.
In the second case, when the user deletes files in other possible ways (for example, using the key combination "Shift + Delete", or in properties "Windows Recycle Bins" the mode of deleting files immediately after deletion is activated, etc.), then such files are erased immediately directly. They will not be reflected in "Windows Recycle Bin" and to restore them you will have to resort to third-party software.
You can find out more about methods for regular and permanent file deletion in our earlier article: .
Three methods to recover deleted files from "Baskets"
As we described earlier in our article, depending on the method of deleting files, you can use various methods to restore them. We will dwell in more detail on the three main methods for recovering deleted files, which the user can use at his own discretion.
- "Windows Recycle Bins" to their original location.
- Recover deleted files using free software.
- "Windows Recycle Bins" .
Below we will describe each of the proposed methods and indicate possible reasons influencing the choice of their use in a particular case.
Recovering deleted files from "Baskets" to their original location
This method of recovering deleted files is suitable when the user performs normal deletion of files and folders with the specified size option active "Windows Recycle Bins".
Open "Windows Recycle Bin" by double-clicking the desktop shortcut. Or right-click on it and bring up a pop-up context menu. Select a section from the list of possible actions "Open".

Select the files you want to recover from the list of deleted files and folders using standard selection methods. Then right-click on the selected files and open the pop-up menu. From the list of available actions, select a section "Restore". The marked files will be immediately returned to their previous location where they were located immediately before deletion.

Or, to achieve a similar result, after selecting files, click on the button on the main menu ribbon "Restore selected objects".

If you are interested in recovering all deleted items, then click the button "Restore all objects" to instantly return deleted data to the original location from where it was previously deleted.
Now go to the location of your recovered files and folders and open each of them to make sure they are fully functional.
Recover deleted files using free software
When files and folders are permanently deleted, as well as when data is deleted from "USB" flash drives and memory cards, they are erased immediately without being placed in "Windows Recycle Bin", and it is not possible to restore them using the previous method. In this case, the user needs to use other methods for recovering deleted data. One possible method that you can use to recover such files is described in this section.
In the international information computer network "Internet" You can find, through a search service or on specialized forums, several offers of free software for recovering deleted data.
Their main advantage is the fact that immediately after installation they are ready for use and do not require any financial costs from the user.
However, free software has a number of significant limitations that significantly affect the final result when recovering deleted files.
This type of program may contain individual restrictions or include a whole set of them. For example, they have reduced functionality; the program lacks most of the important functions compared to other types of programs. Additionally, free programs have a serious limitation on the number of files or the total amount of data they can recover, the percentage of recovered files that are usable is very small, and manufacturers do not provide any guarantees for the successful recovery of deleted data.
Therefore, if you need to recover one or more small files, then you can try using this type of program. But if you are planning to recover large files or a lot of time has passed since your files were deleted, then you need to use another method presented in the next section.
Recovering permanently deleted files from "Baskets" with powerful software
If you restore files from "Windows Recycle Bins" the standard method did not work, and free recovery programs did not give the required result, then you need to use professional software to recover deleted data.
One of the most popular programs can be safely called from the company Hetman Software.
The program easily recovers deleted data from various types of storage media: hard drives and external connected drives, "USB" flash drives, memory cards and other devices.
Using deep analysis capabilities, it finds all previously created disk partitions and restores deleted information, presenting it to the user for further processing. Supporting all major file systems used in the operating system "Windows", the program corrects any errors in the logical structure of the hard drive and recovers deleted content even from inaccessible and damaged partitions, regardless of what caused its loss.
It belongs to the category of shareware programs, when the user gets at his disposal the entire powerful functional set of program tools, recovers deleted files with their help and views the contents of each of them to make sure that they are in full working order. The preview function allows you to familiarize yourself with the contents of text documents, tables, databases, displays any image formats, helps you listen to audio files and view any video files, etc. Only after the user is convinced of the presence and serviceability of the required files that were recovered by the program, does he buy a key and save his data. The program has no additional restrictions and will serve the user for a long time.
Download the installation file from the company's official website and run it. A step-by-step program installation wizard will appear, following the instructions of which you can easily install the program on your computer or laptop.
Note: Install the program on a disk that does not contain the data that you plan to recover, to prevent their possible overwriting by files of the installed program.

Once the installation process is complete, run . The program will perform an initial scan of the system and identify all data storage devices connected to the personal computer. The program interface is identical to the appearance of the operating system windows "Windows", thanks to which the user will not have any difficulties when using it.

In the main program window, select the desired partition on which your deleted files were located and double-click on it. The program will launch the File Recovery Wizard and prompt you to choose the required type of analysis that will be used to search and recover deleted files. You can choose one of two proposed options: quick scan and full analysis. The first option can be used to recover recently deleted files. During a full analysis, the program will search for any information on the disk and perform a file system recovery of the selected partition. As a result, all possible files will be restored. Place the indicator (dot) opposite the corresponding cell and click the button "Next" to continue.

Depending on the selected option, storage capacity and other additional parameters, partition analysis may take from several minutes to several hours. The entire analysis process will be reflected in real time and the user can track the progress of the analysis until the very end.

When the partition analysis process is complete, click the button "Ready" to go to the recovered files window.

Find the files and folders you are looking for among the recovered files and folders, and then click the button "Restore", located on the main ribbon of the window.

At the user's choice, the recovery wizard will offer the following methods for saving selected files: saving to the hard drive of the user's computer, recording to an optical storage medium "CD/DVD", create a virtual image "ISO" or download data via "FTP". Mark one of the methods by placing an indicator next to the selected cell and click the button "Next" to go to the next page.

Then you need to specify additional options for saving files, for example, select the folder where you want to save the recovered files. You can specify your own folder or leave the default option. Or additionally restore the structure of the directories in which the deleted files are located, to display them in the same folders in which they were located before they were deleted, etc.

Then press the button "Restore" and save your files in accordance with the settings specified earlier.
Check your saved files and make sure they are fully recovered and working properly.
A full overview of the program’s capabilities for recovering deleted data is presented on our video channel in the following guide: “Recovering deleted files in 2018 with Hetman Partition Recovery”
Conclusion
Operating system developers "Windows" We have tried to fully protect users from unintentional errors, and as a result, deletion of files that are of great importance to users. For this purpose, they used in the system "Windows" a certain mechanism for controlling deleted elements, creating "Windows Recycle Bin", as a buffer area before the file is finally erased from system memory. Thanks to internal settings "Windows Recycle Bin" can contain a huge amount of data and store it for a long time until the user is finally convinced of the correctness of his actions and empties the trash, thereby completely erasing the data.
Performing various actions in the operating system "Windows", the user can be sure that his files, even after deletion, will remain available for recovery using internal capabilities "Windows Recycle Bins", provided it is configured correctly.
But if, due to the passage of time or other reason, the user's files have been permanently erased, then even in such a case, the user can get his files back by using powerful third-party deleted data recovery software.
Using the file recovery methods described in this article, the user can be sure that his work will not be lost due to an error or careless deletion. And any data can be easily restored, almost completely.
Learn more about ways to recover accidentally deleted data from a computer using the built-in tools of the operating system. "Windows"
As you know, small files deleted from the hard drive are first moved to the trash, and only then, after emptying it, disappear from view forever. In this article we will look at a situation where you deleted a file from the recycle bin through negligence and now want to get it back. First, let's look at the process of deleting such a file.
Right-click on the file and select “Delete”.
We are asked if we really want to move this file, we agree, and it ends up in the trash.

In order to recover deleted file from recycle bin, we go into it, find the desired file, right-click on it and select “Recover” from the drop-down menu.

The file is restored to the location from which it was placed in the trash. If you click on the “Empty Trash” button, the file will disappear from the Trash forever. If after some time you want to restore such a file, you will have to rely on luck and perform some actions.

If System Restore () is running on your Windows OS, then you can try the following. Right-click on the folder in which the deleted file was located and select “Restore previous version.”

I clicked on the “Desktop” folder and, as you can see, early versions of this folder opened. If you open the folder data, you can easily find and copy a previously deleted file, or click on the “Restore” button and completely restore the previous contents of the entire folder.

Attention! This method only works on system drives that have System Restore enabled.
Let's look at the next method, which involves using a backup (Windows 7 backup), if you have one.
Go to “Start – Control Panel”, set View: “Category”. Click on “System and Security”.

Find the archiving and recovery section and click on the “Recover files from archive” link. Let me remind you that you will only get the file if archiving is configured and if you have the archive itself:

Recovering deleted files using programs
Recovery program Recuva
Another way to recover files deleted from the Recycle Bin is to use the program Recuva. Download it from the official website: http://www.piriform.com/recuva, or look for it yourself on the Internet.
Here I will give you some tips. If you want to restore a file using this method, then:
1. Do not install or remove anything from the partition from which the required file was deleted.
2. Disable all processes related to using the hard drive directly, such as defragmentation.
3. If possible, disconnect the hard drive from the computer and search for the lost file on it from another computer.
And so, launch the program, select the file type - “All files” and click the “Next” button.

Select “In Trash” to place the file and click on the “Next” button.

You can enable in-depth search and click on the “Start” button

The program finds the files, look for the date and file size we need, highlight it with a bird and click on the “Recover” button

Select the location where you want to restore the deleted file.
Advice! Don't choose the same place he was in, otherwise you risk losing him. It’s better to create a separate folder for it and restore it there, and create the folder on another partition of the hard drive.
Specify the location and click the “OK” button.

File restored:

Disk Drill recovery software

A program with a large set of functions, but still the main purpose when created was Recovering deleted files. The interface is simple and clear, anyone can figure it out without any problems. Available in different languages.
Disk Drill is released for two operating systems: Mac OS and Windows; take this into account when choosing the program version.
In some cases, it allows you to recover files even after formatting, unless, of course, multi-pass deep formatting of the disk was used.
Recovering deleted files on Windows 10
Windows 10, inherited from its predecessors, has received a powerful set of functions aimed at protecting the user and preserving his data as much as possible. Of course, there are situations when not even every recovery program can recover data, but for the average user a standard set of tools may be quite sufficient.
What methods are there?
The set of built-in Windows 10 tools for backing up and restoring data and the operating system consists of the following:
- file history;
- system backup and recovery;
- oneDrive;
- returning the computer to its original state;
- system image;
- special loading options;
- recovery disk.
Each of them has its own function and purpose. But if we talk about restoring files and folders specifically, then the File History tool is designed for this. Using File History, you can recover both damaged and accidentally deleted files.
Setting up File History
To be able to recover files using File History, this feature must be configured and enabled.

How to run the recovery function
The easiest way to use the File History function is to simply go to the folder where you want to restore files. In the Home tab, find the Open section and click the Journal button. As a result, File History will enter recovery mode. 
Recovering file versions
Let's assume that changes were made and saved to the file, after which it became necessary to return the previous saved version of the file. To do this, select the required file and click the Log button described earlier. In the File History window that opens, all previously saved versions of files and folders will be displayed, sorted by date of saving.

Recovering individual files
Another recovery method provided by File History is to recover files or folders if they are deleted.
To do this, as already stated earlier, go to the folder from which the file (folder or group of files) that needs to be restored was deleted and click Log.
The File History window that opens will display previously saved versions of the folder’s contents. Find the one that contains the desired file, select it and press the green button. 
The file will be restored to the folder from which it was deleted.
To restore a deleted folder, you need to perform the same steps.
Recovery in case of hard drive failure
If your hard drive fails or fails, you can restore all files from File History. To do this, after replacing the hard drive and installing Windows 10 on it:
- connect to the computer the external hard drive on which the File History was saved;
- go to Settings (from the Start menu) / Update & Security / Backup;
- Click the “Add Disk” button described earlier and add a disk from the File History previously saved to it.
From this moment on, the user will have access to the File History that was saved before the hard drive failed. It can be restored using the method described above.
Windows 10 file recovery programs
If File History is not configured on your computer and you learned about its existence from this article, then you should not be upset either.
Today there are a sufficient number of programs for recovering deleted files and folders. With their help, you can recover both accidentally deleted files and those lost after formatting the hard drive or reinstalling the operating system.
Their operating principle is approximately the same. They differ from each other in the presence or absence of individual functions and interface.
As an example, we can consider the process of recovering data from a hard drive using Hetman Partition Recovery.

As you can see, data loss today has ceased to be a global problem for PC users. Microsoft has provided a number of functions in its operating system, using which correctly, the user’s files will always be protected. But in case you didn’t worry about this in advance, there are other developers of data recovery programs with which you can recover them.


