How to roll back the Android version. How to roll back Android to a previous version
The need to reset settings on Android may arise completely different situations: Your device has started to freeze, or you simply cannot unlock it. And if no action helps solve the problem, Hard Reset- This real opportunity restore the functionality of the device. From the article you will learn what to do.
(!) If you forgot graphic key, PIN or password, please read these instructions first: and .
Well, if after these manuals you still need help with unlocking or you have other problems with the device, read carefully this article. It is worth noting that after a Hard Reset, only data from the internal memory will be deleted from the phone or tablet. SD files, photos, music, videos, etc. will remain untouched.
Method 1. How to reset settings on Android via Recovery
The first method is relevant for those whose device does not turn on at all, is malfunctioning, or needs to regain access to the smartphone system:
1. Turn off the device.
2. Now you need to get into Recovery mode. To do this, you need to press and hold a certain key combination until the screen lights up. Depending on the device manufacturer, the combination may differ:
- Volume down + power button
- Volume up + power button
- Volume up/down + power button + home button
- Volume up + volume down + power button
How to enter Recovery Mode on phones of various brands is written in.

Using the volume up and down buttons you can move up and down respectively, and confirm your choice with the power/lock button. In newer devices Recovery menu may be sensory.
3. Select “wipe data/factory reset”.

This way you agree to clear the internal memory of your smartphone/tablet.

5. And at the end “reboot system now”.

The whole process will take no more than a minute. After all Android actions the phone or tablet will reboot and factory settings will be restored. You will receive the device as it was when you first started it.
Meizu Recovery Mode
Meizu made their own recovery mode instead of the classic Recovery. To get into it, use the combination “ON” + Volume “UP”. Check only the “Clear data” item and click “Start”.

Executing Wipe from Recovery on Xiaomi
Engineering Xiaomi menu loads when you hold down the Power and Volume “+” keys. It is available in several languages - to switch from Chinese to English, click:

1. Select "Recovery"

2. Click “OK” if you are going to enter Recovery mode.

3. Click " Wipe data" Here the sensor does not work, use the Power and Volume keys to select and move.


5. Confirm by clicking "Confirm".

6. The device will inform you that Wipe has been successfully completed. Open the main menu.
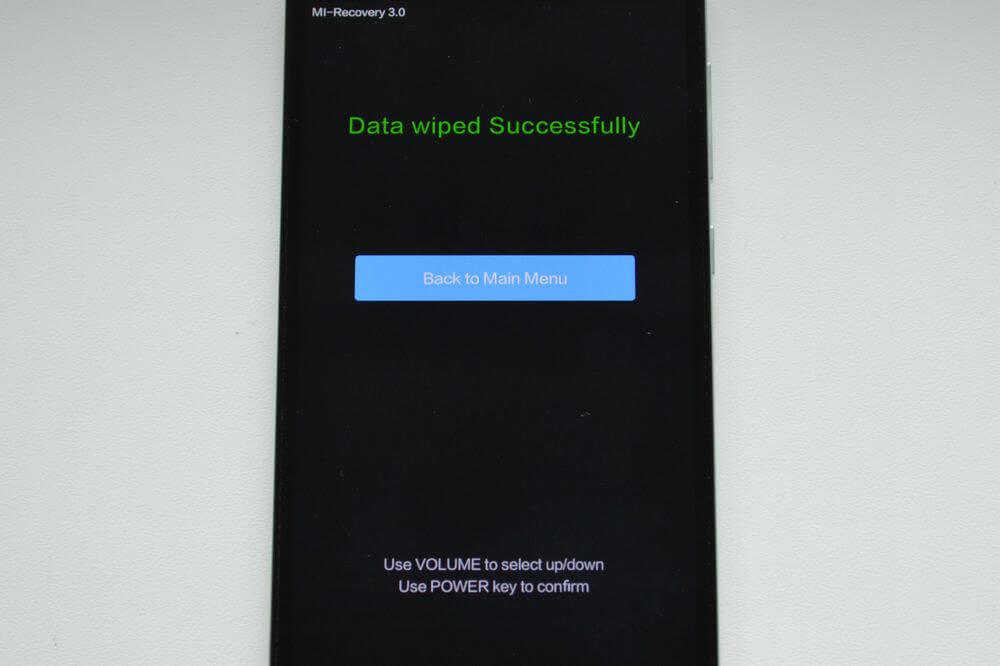
7. To reboot your smartphone, select “Reboot”.

8. Then “Reboot to System”.

Method 2. How to do a Hard Reset through settings
1. Go to Android settings.
2. Open the “Backup and Reset” item. Don't forget to complete.

3. Select Factory Reset.

4. Then click "Reset phone (tablet)".

5. If a pattern or password is installed, you need to enter it.

6. Finally, click “Erase everything.”
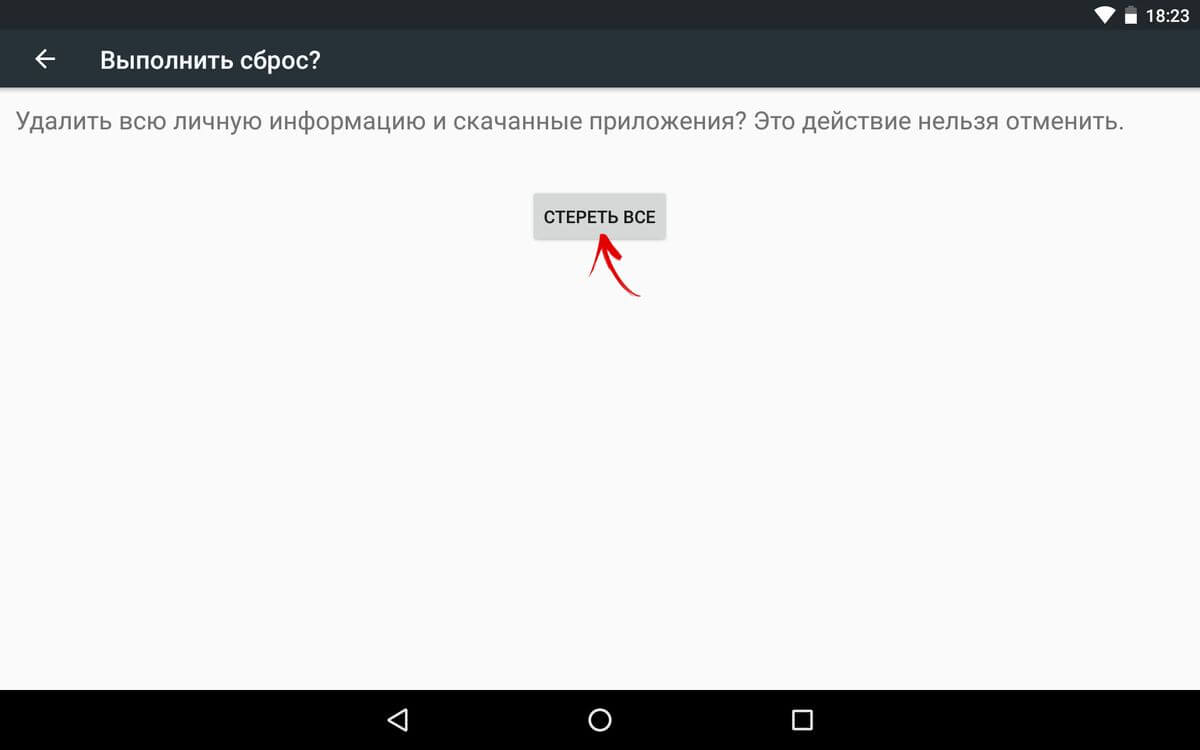
After this, all data from the internal memory of the device will be reset.
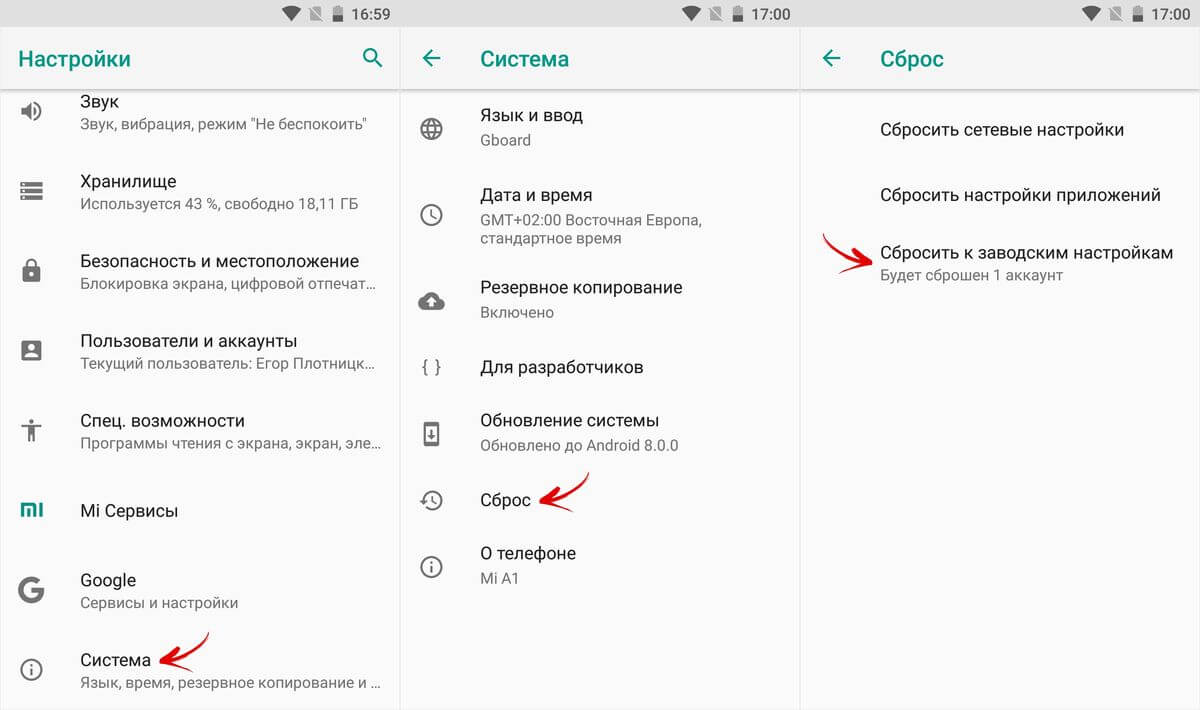
On Android 8.0 Oreo and higher
The Settings menu in Android 8.0 has undergone major changes. Now the “Reset to factory settings” function is located in the “System” → “Reset” section.
On Meizu
In Flyme OS, the path to the function is different from stock Android: Go to Settings → About phone → Storage → Reset settings.
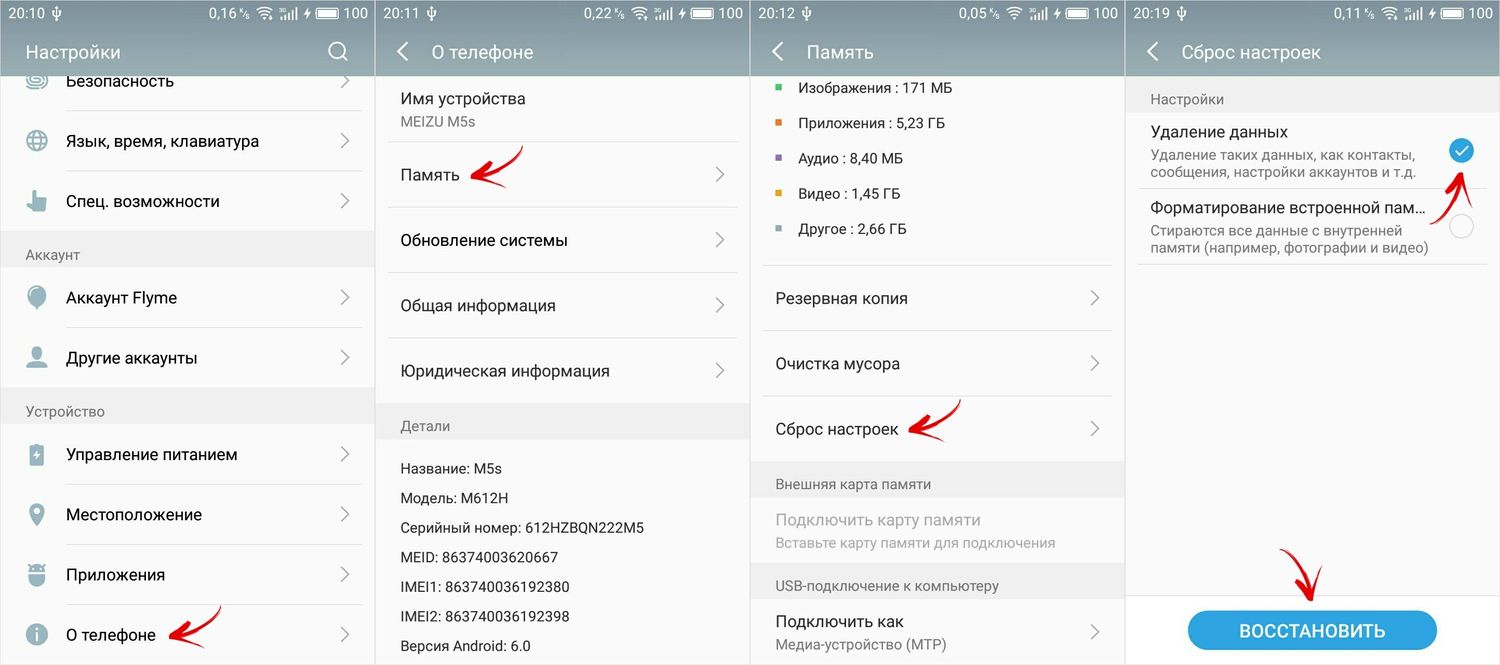
Check "Delete data" and click "Restore".
On Xiaomi
IN MIUI feature Factory Reset the developers hid it in " Additional settings» – watch the video instructions:
On Xiaomi smartphones The USB drive is also cleared, so make sure to create a backup in advance if you want to save photos, audio and other files.
Method 3: Factory reset on Android
This method is even simpler than the previous ones. In the dialer, dial one of the following. Perhaps none of them will work, it all depends on the manufacturer:
- *2767*3855#
- *#*#7780#*#*
- *#*#7378423#*#*
Also try entering these codes into “Emergency Call”.
4. Perform Hard Reset from Fastboot mode
Clear internal Android memory devices can be used using Fastboot utilities for a PC, when the device is loaded in the mode of the same name (if there is one on the smartphone). About installing and launching the program, as well as ADB and USB drivers, told in. On devices such as Nexus, Pixel, Huawei, HTC, Sony, Motorola, the latest LG, you must first unlock the bootloader:
- On Nexus - with fastboot oem unlock command
- On Nexus 5X, 6P and Pixel – enable the “OEM unlock” option in the “For Developer” settings, apply fastboot command flashing unlock
- For others, you additionally need to obtain an individual code on the manufacturer’s website
(!) Unlocking Bootloader is done via Fastboot and immediately makes Wipe. In the future, to reset the phone, just follow the steps in the instructions.
Place the device in Fastboot mode. There are 2 ways:
First. Turn off your smartphone. Then press and hold the “ON” + Volume Down buttons until Fastboot mode. This combination keys may vary depending on the manufacturer.

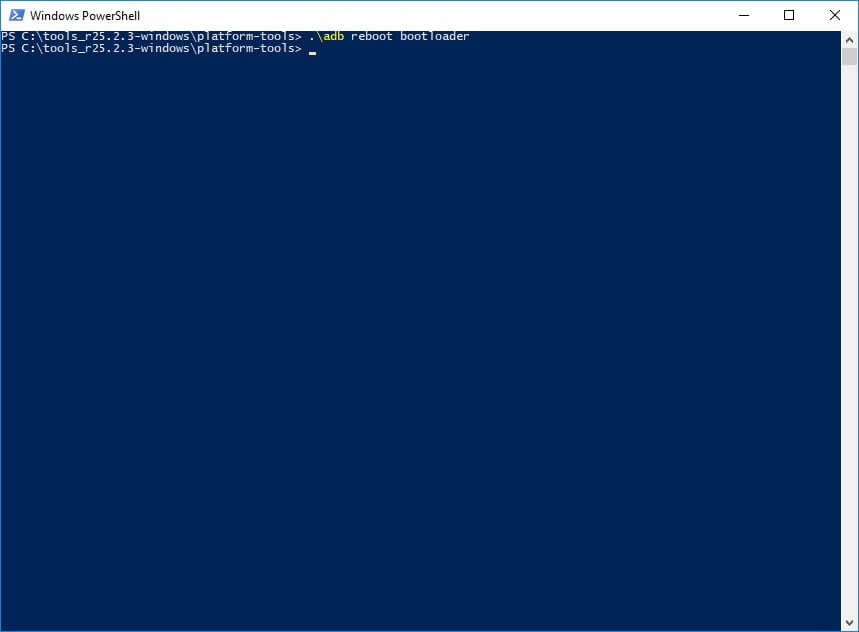
Second. Carefully study how to work with ADB and Fastboot, the link to the article is above. Connect your phone to your computer by activating USB debugging (see). Then enter adb command through command line(or PowerShell on Windows 10) running as administrator and press “Enter”:
To Windows PowerShell completed this command, add at the beginning:
It will turn out like this:
The device is loaded in firmware mode. To erase data, just run one of the commands (don't forget to add .\ when using PowerShell):
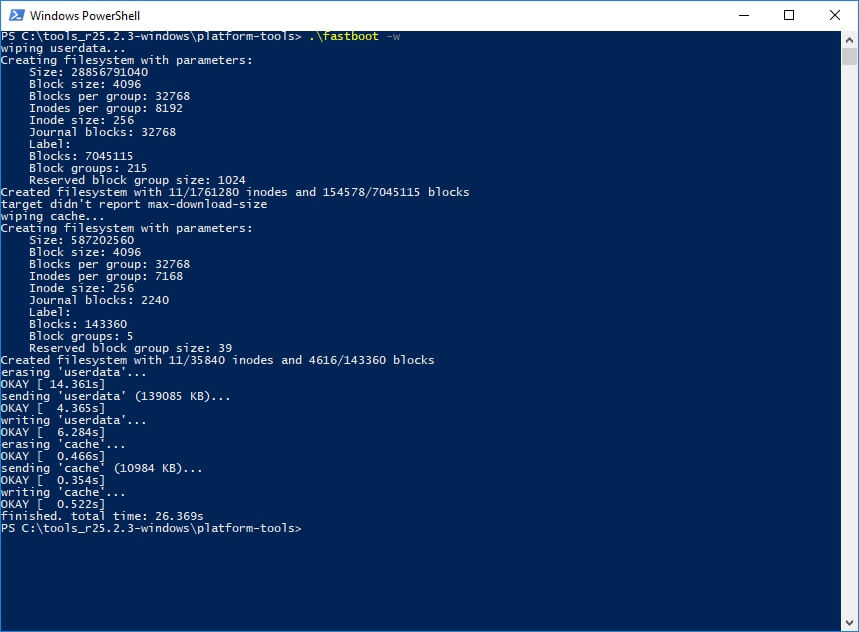
To reboot the device use:

5. How to delete data from your phone using the Find Device service
Google developed special service "Find device", with which you can not only track your phone, but also reset its settings. To do this, the device must be connected to the Internet.

2. Google will find devices linked to this account. Click Erase Data.


4. Confirm your selection by clicking Clear.

As a result, the internal memory on the smartphone or tablet will be cleared.
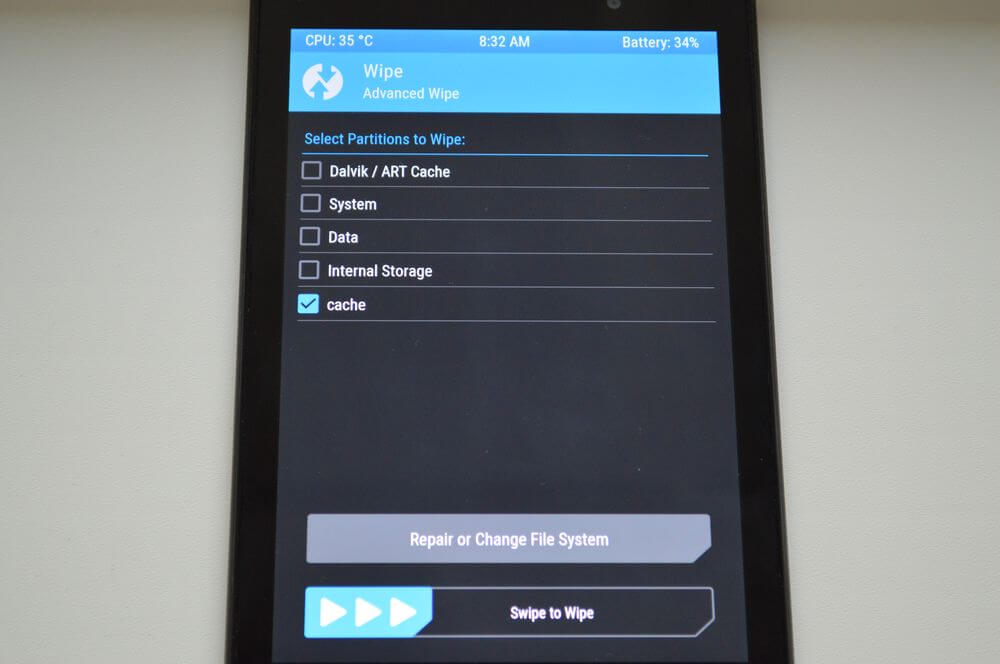
6. If TWRP Recovery is installed
Unlike standard mode recovery, custom allows you to reset specific partitions, and not all settings at once.
To do this, open “Wipe” in the main menu.

If you just want to do a Factory Reset, drag the slider to the right.

If you want to format specific sections, select "Advanced Wipe".

Mark the sections that need to be cleaned and swipe to the right.
For reboot Android Click "Reboot system".

That's it. In fact, there shouldn’t be any difficulties with resetting settings on Android; the whole process will take no more than 5 minutes.
(4,80 out of 5, rated: 25 )
Thanks to the service Google Play application developers for Android phones and tablets are able to efficiently distribute updates to their products. Should they update the app? Google service Play, as it is automatically updated on all Android devices where it is installed. In most cases, this is very convenient. For both developers and users.
But updates are not always successful. Sometimes after updating the application is not stable or contains errors. In such situations, the problem arises of how to remove an application update on Android and return it old version.
Uninstalling updates for Android applications
Fortunately, the Android operating system provides a mechanism using which you can remove an update that was installed on your phone using the Google Play service. To do this, you need to open the Android settings and go to the “ Application Manager" or simply " Applications" if you have a standard shell.
After this, you will see a list of all installed applications on your Android smartphone. Here you need to find the application whose update you want to remove.

Opening the right application, you will see a screen with information. Here you need to click on the “Uninstall updates” button, which will be located immediately below the name of your application.

After this, a warning will appear indicating that the system is about to remove updates and restore the original application. Click on the “Yes” button to continue.

After this update, the applications will be removed and the application information screen will appear in front of you again. Here you can see which version you have rolled back to.

How to disable app updates in the future
In order to this application has not been updated again, it needs to be in the Google Play service. To do this, go to Google app Play on your Android phone and use the search to find the page for the application you need. After opening the application page, click on the button with three dots. It should be at the very top of the screen.

After clicking on this button, a small pop-up menu will appear in which you can disable the update for this application.

Once app updates are disabled, only your grandchild can update the app.
Updates operating system this is always an expected event. Some phone owners find it difficult to wait for official patch releases from developers, so they choose more affordable option– installation of custom firmware, which is not always successful. There are also users who are frightened by innovations of this kind. This is understandable, because updates do not always help, they can even be worse than older versions. Sometimes fixes for certain programs load the system significantly, making the user experience more difficult, or are so useless that it becomes a little alarming. But the most disastrous result awaits users when the user interface, naturally, not for the better.
It's probably worth starting with Nexus smartphones. Installation process new firmware simple as hell: save everything necessary information; On the Internet we find the required image of the version to which we want to upgrade, and carry out the installation. It is necessary to take into account that if you do not open root rights, then create a backup current version operating systems, as well as extremely important system data, will be impossible. The market also provides the opportunity to download applications that can be used to save almost all the information, but they require additional rights.
For Nexus smartphones it is much easier to return the old version of the application if you don’t like the new one. Just find an older version apk file, we completely remove the new application, and, using Explorer, install the old version. The main thing is not to forget to open access to install applications from other sources.
Regarding other devices (except Nexus), in particular, in matters of Android rollback to previous firmware versions, the situation is somewhat different. Some even most, devices running on the Android system are not designed to change the firmware manually. Factory settings limit the possibility of user intervention in system files smartphone. These restrictions also need to be lifted independently. For example, first you need to unlock the bootloader. The installation of the old firmware version itself takes a little time, but preparing for the entire procedure may even take several hours.
Looking at all the nuances, the most reliable option for updating the system to a more recent build is to use custom firmware. A little higher in context we have already indicated this method, now we will try to justify the fact why this option is much better android rollbacks systems to older versions. First of all, reliable assemblies are free of inaccuracies and errors, because huge teams of professionals work to create these updates. Secondly, you have the opportunity to choose the most suitable firmware. Thirdly, if you make every effort, you can always find an update with a better design.
How to reset on Android?


When the smartphone starts to work slowly, launch applications for 10 minutes and does not open files at all for unknown reasons, maybe it's time to reset it to factory settings. This procedure returns the phone to the same condition in which you took it out of the box after purchase. All your personal data, such as applications, accounts V various services etc. will be erased. But problems in the operation of the device will also disappear.
To learn how to reset on Android, read this article.
Preparing for a rollback
It is necessary to understand that it is impossible to restore factory settings without losing data, so before performing a reset on any device, we recommend that you perform backup all data available on the phone to an alternative storage device. Otherwise, you risk losing them forever.
- to save the data that is stored on your MicroSD card, inserted into the device, you just need to remove it from the phone;
- if you stored important data directly in the memory of the smartphone itself, then you will need to first connect the phone to the computer using a USB cable, wait until the devices are synchronized, and then copy all necessary files V separate folder on the computer;
- if you don't have any device at hand to which you could copy necessary files, you can use one specially designed for such purposes. virtual storage Google data Drive, the application for which is available on Google Play.
Now let's move directly to the procedure for performing a device rollback.
First method
The algorithm for resetting a tablet or smartphone to factory settings is identical:
- Go to your phone menu and open Settings.
- Find Backup and reset.
- Click on Reset settings.
- At the same time, you can clear the phone’s memory by checking the appropriate box (relevant for smartphones). This way you can simultaneously delete all your photos, audio and video recordings and other materials that you have ever downloaded to your phone.
- Confirm the action by clicking the Reset phone settings button (or simply “reset settings” for a tablet).
As you can see, there is nothing complicated about this. Now let's move on to the second method of performing a rollback to the factory settings of the device.
Second method
A hard reset is a forced reset of a device if the operating system is completely out of order and the tablet/smartphone refuses to turn on. By using certain combination keys, the device can be started in mode Recovery mode and use it to perform a rollback.
In other words, if the first method does not suit you, then it’s time to move on to plan B.
- Turn off your phone. If your smartphone is frozen, just remove it back cover, remove the battery and after a few seconds insert it back.
- Press the key combination that the manufacturer has programmed to perform a factory reset. U different models This key combination differs between manufacturers. You can find out how a hard reset is performed specifically on your phone model in the instructions for it or on the Internet. The most commonly used combinations are: volume up button+menu+lock/power button; volume down+lock/unmute; menu+lock/shutdown.
These key combinations must be pressed and held until Recovery mode starts.
- After you manage to select the required key combination, a menu will open in front of you. You need to navigate through it using the volume buttons. Select wipe data/factory reset by pressing the lock/power button or the call button context menu. Then use the same button to confirm the selected action.
- After the reset process is complete, reboot your phone by selecting Reboot System.
- Wait until the phone turns on with factory settings.
If you want to resort to such a thing as a hard reset of an Android tablet, then the algorithm of actions will not be much different from resetting the settings on a smartphone:
- If the tablet refuses to turn on, then press two buttons at the same time: Home/power (depending on the device model) and the volume control button (depending on the model, you must press either volume up or volume down).
- Keep the buttons pressed until the operating system logo appears on the screen. After that, release the buttons and wait until the tablet enters Recovery mode.
- A menu will open in front of you. Select "wipe data/factory reset" using the volume control and confirm with the Home/Power button.
Third method
In some phone models, factory reset can be done by entering engineering, or as they are also called, secret codes. They are used by developers and testers software to reduce the time required to perform simple operations.
To reset settings using this code, try using the following combinations:
- *# * # 7780 # * # *;
- *2767 * 3855 #;
- *#*#7378423#*#*.
There are probably several people who would delve into this issue after they tried to independently return the version of the operating system to the previously installed one. But, if faced with any difficulties, we would decide to read on the Internet to figure out what these difficulties might be associated with. And then it turns out that there are many nuances that need to be foreseen in advance.
In addition from huge amount foreign names and abbreviations, instead of understanding the process, the information in the head turns into mush. And every sentence you read adds more and more misunderstanding to the overall picture.
Well, let's figure it out together!
Brief educational program
- There is no universal algorithm of actions! This is the first thing you need to know about the return of Android OS to more earlier version. Each brand (and even model!) of a device may have its own characteristics
- Reverting the OS version is a process that affects the system kernel. Consequently, manufacturers make sure that only “advanced” users in this matter can get there. Root rights were invented for this. They are intended to give you administrator rights. There are both pros and cons to their use. Before you start doing anything, find out how to get them and what the use of Root rights on your device can promise!
- If you are not scared by everything you read about Root rights and you are also full of confidence to return Android version 4.4, then another concept that you need to understand before starting the process is Backup. Speaking in Russian - .

After returning the system, you can easily restore all contacts, applications, settings, and more. The main thing is to choose the right program that will perform Backup on your device as correctly as possible.
How to return Nexus
Operating room developer Android systems and manufacturer Nexus devices is one company - Google. Therefore, for Nexus devices, the return process remains as simple as possible and consists of 4 simple steps:
- Download and install the image on your device Android firmware, which you need;
- Run this firmware directly from the device and wait for the installation to complete;
- Load data from a backup.
How to return everything else
Devices from other manufacturers have their own characteristics when performing a system reset. But despite this, there are still general manipulations.
 You will need a PC or laptop
 Typically, to downgrade Android from version 5.0 to version 4.4 or similar, you will need:
- Required firmware;
- Program for creating a backup copy;
- Program for establishing Root rights;
- Personal computer or laptop;
- The device (tablet, phone) on which you want to make a return;
- USB cable.
Firmware
The first thing you need to take care of is, of course, the firmware itself. You need to clearly understand and imagine what you want to see as a result of manipulations with Android. Decide what firmware you want, custom or official? Official firmware can usually be downloaded from the official website of your device manufacturer. Custom - search the forums, compare and choose. It is necessary that the firmware is suitable for your device and is known to be working, that is, tested. To find out, you will have to study more than one forum, read a lot of reviews and ask a bunch of questions. But this must be done, because otherwise you risk saying goodbye to your favorite device!
 The selection of custom firmware should be approached responsibly
 Backup
The main rule of any gamer or programmer is “SAVE!!!” And in our case, this rule has the same importance.
It has the function of creating a backup copy and saving it to your Google account. But in this case, you can only save contacts. Therefore, it is necessary to acquire the necessary software. And then you can reserve almost everything: contacts, messages, system settings, and information about applications, thanks to which the system will automatically download them from Google Play and install them.
But, whatever one may say, you will again have to make a choice yourself. We will only list the most popular programs today:
- Titanium Backup
- GO Backup
- HTC backup
- Clickfree Mobile Backup.
 Can be used various programs to save data
 The backup process looks roughly the same for all devices:
- Install the memory card into your mobile device;
- Search, read reviews and download the Backup program you like on your tablet or smartphone;
- Install it and launch it;
- In the program settings, mark what you want to reserve. Don't forget to check in your settings if you have enough space to save your backup. Need this free space was on the memory card;
- You start the reservation process, wait for it to finish, and remove the card.
Now all important information is located on a flash drive and after returning your Android from version 5.0 to the previous one, it will be restored using the same program.
Root
Required on your device additional program. You also choose, read reviews, ask questions, compare. Then download and install on your computer.

The process itself
So, you are all ready to start the process. Let us remind you that this process is individual for each device, so we will focus on manipulations that are the same in most cases. We present you the procedure:
- We do Backup (see above);
- We put the device into programming mode (may be called differently; see instructions);
- Connect the device to the computer;
- Launch the Root program;
- Launch the downloaded program and select its version;
- We start the installation process, wait;
- When finished, it is advisable to reset the settings to factory settings;
- Reinstall the program you used to make Backup, insert the memory card with backup copy, we start the data recovery process.
Conclusion
In conclusion, I would like to examine one more concept that you will definitely come across while studying the forums. This is the concept of "brick". A “brick” is a device that, after returning from Lollipop to Kitkat, stopped working altogether. To prevent this from happening to your Android device, you need to approach the matter as carefully as possible and carefully study all aspects. Only after the whole picture of the planned actions is clear and understandable can you be sure of a successful result.


