How to prevent it from going out. Why the screen goes blank, or how to change the auto-lock time of iPhone or iPad
When is it necessary to unlock your iPhone? Despite the fact that most iPhone models have fingerprint scanners, many people continue to use digital passwords out of habit. There are also owners of phone models 4 and 4s, in which the fingerprint scanner is not built in at all. Plus, there is a possibility of glitches in the scanner. This is why thousands of people are still faced with the problem of a forgotten password.
After the tenth attempt, your favorite iPhone is blocked forever. The company tries to protect phone owners as much as possible from data hacking, so it is quite difficult to recover the password, but it is possible. This article contains seven ways to unlock your iPhone if you forgot your password.
How to unlock an iPhone via iCloud
This method only works if you have the Find My iPhone feature set up and activated. If you are still wondering how to recover your iPhone password, use any of the other five methods.
1. First of all, you need to go to the link https://www.icloud.com/#find from any device, no matter whether it is a smartphone or a computer.
2. If you have not previously logged into the site and saved a password, at this stage you need to enter your Apple ID profile information. If you have forgotten your account password, go to the last section of the article regarding how to reset your iPhone password for Apple ID.
3. At the top of the screen you will see a list of “All devices”. Click on it and select the device you need, if there are several of them.

4. Click “Erase (device name)”, this will erase all the phone data along with its password.

5. Now the phone is available to you. You can restore it from an iTunes or iCloud backup, or re-set it up as if you just bought it.
Important! Even if the service is activated, but access to Wi-Fi or mobile Internet is disabled on the phone, you will not be able to use this method.
Without an Internet connection, most methods for hacking an iPhone password will not work.
How to Unlock iPhone Using Recovery Mode
This method will work even if you have never synced with iTunes or enabled the feature to find your iPhone. When you use it, both the device data and its password will be deleted.
Connect your iPhone via USB to any computer and open iTunes.
2. After this, you need to hold down two buttons at the same time: “Sleep mode” and “Home”. Keep them on for a long time, even when the device starts to reboot. You need to wait for the recovery mode window. On iPhone 7 and 7s, hold down two buttons: Sleep and Volume Down. Hold them for the same long time.

3. You will be prompted to restore or update your phone. Select recovery. The device may exit recovery mode if the process takes too long, then repeat all the steps again 3-4 times.
4. Once the recovery is complete, the password will be reset.
How to Unlock iPhone Using iTunes from Previous Sync
If the owner has forgotten the password on the iPhone, this method is recommended. Forethought in recovery is very important and if you are lucky enough to have a backup copy of your data, there should be no problems.
For this method, you will need a computer on which synchronization with the device was previously carried out.
Using a USB cable, connect your phone to your computer and wait until it appears in the list of devices.
2. Open iTunes. If at this step the phone starts asking for a password again, try connecting it to another computer or use recovery mode. In the latter case, you will have to postpone the question of how to unlock your iPhone and first recover the access password. More details about it in method 4. Don't forget to check if you have the latest version of the program, if necessary, update the program here - http://www.apple.com/ru/itunes/.
3. Now you need to wait, iTunes will synchronize the data for some time. This process may take a few hours, but it's worth it if you need the data.
4. When iTunes reports that synchronization is complete, select "Recover data from iTunes backup." Using backups is the easiest thing you can do if you forgot your iPhone password.

5. The program will display a list of your devices (if there are several of them) and backup copies with their creation date and size. The creation date and size determine how much of the information will remain on the iPhone; changes made since the last backup will also be reset. Therefore, choose the latest backup.
If you are not lucky enough to have a backup of your phone in advance or you do not need the data, read on and choose another method.
How to Unlock an iPhone by Resetting the Failure Counter
If your gadget is locked after the sixth attempt to enter the password, and you hope to remember the password, try resetting the counter of incorrect attempts.
Connect your phone to your computer via a USB cable and turn on iTunes. It is important that Wi-Fi or mobile Internet is turned on on your mobile phone.
2. Wait a little while the program “sees” the phone and select the “Devices” menu item. Then click “Sync with (name of your iPhone).”
3. Immediately after synchronization begins, the counter will reset to zero. You can continue to try to enter the correct password.
Do not forget that the counter cannot be reset simply by rebooting the device.
How to unlock iPhone by installing new firmware
This method is reliable and works for the vast majority of users, but requires selecting and downloading firmware, which weighs 1-2 Gigabytes.
Attention! Carefully select the source for downloading the firmware. If there is a virus inside it, it can completely break your iPhone. You will no longer be able to find out how to unlock it. Do not ignore antivirus program warnings and do not download files with the .exe extension.
Using a computer, find and download the firmware for your iPhone model with the .IPSW extension. This extension is the same for all models. For example, almost all official firmware can be found here.
2. Go to Explorer and move the firmware file to the folder located at C:\Documents and Settings\username you are using\Application Data\Apple Computer\iTunes\iPhone Software Updates.
3. Now connect your device to your computer via USB cable and log into iTunes. Go to your phone section (if you have multiple devices). Each model will have a full technical name and you can easily find yours.
4. Press CTRL and "Restore iPhone". You will be able to select the firmware file that you downloaded. Click on it and click “Open”.

5. Now all we have to do is wait. Eventually the password will be reset along with your data.
How to unlock iPhone using a special program (only after jailbreak)
If your favorite phone was hacked by you or the previous owner, all the methods above will not work for you. They will lead you to install the official firmware. You will have to download a separate program called Semi-Restore for this. It won't work if you don't have the OpenSSH file and the Cydia store on your phone.

Attention! At the moment the program only works on 64-bit systems.
Download the program from https://semi-restore.com/ and install it on your computer.
2. Connect the device to the computer via a USB cable, after a while the program will recognize it.
This is a great way to turn your old LCD LCD monitor into a personal display. Only you will be able to see the image on it, while everyone else will see just a white screen. Convenient to use at work and in other places where you want to have a piece of something personal that no one will guess about.
After the detailed tutorial, if you do everything correctly, it will look like this.
To make a personal monitor like this you will need:
1. An LCD monitor that you don't mind;
2. Old unnecessary glasses;
3. Stationery knife;
4 . A little solvent.

Take a monitor that you are willing to sacrifice

Unscrew the screws

Back cover removed

You need to turn it over and remove the plastic frame from the front of the monitor.

Then carefully cut off the polarized film along the edges of the monitor with a stationery knife; if your arms are straight and well bent at the elbows, then everything will work out.

After you've run the edges of the knife well, you'll need to peel off the polarized film. Most monitors have 2 polarized films: one to filter out light you shouldn't see, and a second layer of anti-reflective coating, which has a matte finish.

The matte film can be peeled off with pleasure and without being careful, we will no longer need it, which cannot be said about the second polarized layer

We tear off the top layer and save the second one. The second polarized layer contains the whole secret of the monitor's operation. The second layer is quite difficult to peel off.

At this stage, a solvent comes into play, which we need in order to remove the glue remaining from the films. You can wipe with a piece of cloth or a paper towel soaked in solvent, but this takes quite a long time.

It is easier to soak the layer of glue in solvent by simply placing paper towels pre-soaked in solvent on top. Do this carefully, it is important that the solvent does not get anywhere else except the display itself.

Then simply remove the solvent-soaked layer of glue from the display surface.

Put the monitor back together

If you did everything correctly, then when you apply the second polarized layer to a monitor connected to the computer, you will get this effect.

Stage two, “confidential”. Take old sunglasses or any used 3D glasses

Using simple movements we disassemble it into several parts.

Like this

You can either measure it yourself or scan the plates that you took out of the glasses.
With solar control glass this will be a little more difficult. But there is a way here too. You can simply glue the polarized layer on top of the glass and then just trim off the excess.

If you scanned it, you can make a pattern according to which you will cut the film

We place our carefully cut pieces of the polarized layer of the monitor on the front of the glasses.

Then we simply glue the second part.

We have to wait a little

And everything is ready! Enjoy watching your personal monitor, which will show the image just for you! Good luck!
By default, after installing Windows 7, it is configured so that after 5-10 minutes of inactivity, when the user does not press any buttons or touch the mouse, the screen first dims, and after a few moments turns off completely.
This was done to save energy and resources of your monitor. But this function is not always convenient and often turns off the monitor at the most inopportune moment.
Now we will learn how to prevent the screen from going dark in Windows 7.
First you need to go to the control panel in any way known to you. For example, through the Start menu.
Go to the control panel
In the control panel window that opens, look for the “Power Options” icon.

Power Options in Windows 7 Control Panel
On laptops, you can get to power management easier by right-clicking on the battery charge icon and selecting “Power Options” from the menu that opens.

Setting the display to turn off in Windows 7
The last thing you need to do to prevent the screen from going dark on Windows 7 is in the newly opened window, in the “Turn off display” line, select “Never” and click the “Save changes” button at the bottom.

How to prevent the screen from going dark in Windows 7
The best way to thank the author of the article is to repost it on your page
So, many users encounter certain inconveniences associated with Windows energy saving settings, such as unacceptable or simply inconvenient times for turning off the display or even putting the computer into sleep mode.
Some people would like the computer to turn off the display and go to sleep earlier than the default setting, while others don't like the display to go dark or the computer to go to sleep too quickly. And someone would just like to adjust the brightness of the laptop or computer display.
Setting up all this is quite simple, therefore, after reading these instructions, you will never have any difficulties with this kind of settings again.
- The first thing we need is to simply right-click on any empty space on the desktop. A list of context menus will appear:
- Choose paragraph "personalization". The following window appears:

- Click left mouse button on the word "saver"" in the lower right corner. We see the following:

- press left mouse button on the inscription "change power settings". A new window appears:

- now we need press on the inscription “setting up a power plan"exactly in the line whose beginning is marked with a tick (black circle, indicated by an arrow in the screenshot). The energy management system settings window appears:

- In this window, by clicking the small arrows opposite the values, you select the desired time for dimming the display, turning it off and putting the PC into sleep mode. You set yourself when the display will go dark or go dark, choose the time when the monitor will turn off and go dark, and determine the time after which the computer can go into sleep mode. Here you can adjust the brightness of your laptop display, by dragging the slider located opposite the inscription “adjust the brightness of the plan.”
- When everything is configured, press the button "save changes"
Ready! Now your PC behaves the way you would like it to.
After installing Windows 10, you may find something not entirely pleasant - after some short time, the system turns off the monitor. But not all monitors immediately return to working condition.
This was personally inconvenient for me and I had to disable this automatic screen turning off in Windows 10, if this is also interesting to you, then this note is for you.
But why does the system turn off the screen? This is all done in order to save money, because the monitor in standby mode consumes much less than if it were working.
Therefore, it makes sense not to even disable this behavior, but simply change the interval after which the monitor should turn off.
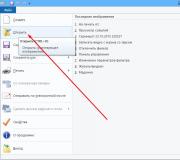
Let's look at how to do this - right-click on the Start icon and select there Power management:

Then click on the item that is responsible for setting up your power supply scheme:

And the opportunity will become available to either change the time or even prohibit turning off the monitor; to do this, select the appropriate value in the menu: