Set up computers on a local network. Local network - what is it? How to create and configure a local network
Good afternoon, Friends! I am very pleased to welcome you to our educational Internet portal http://site. We continue our conversation about setting up a home network. The topic is broad, but interesting and very important.
Today we will be engaged in network education or network settings. In order to be able to set up a home network yourself, you need to gain a minimum understanding of how a local area network works.
We will talk about the terminology of local networks, setting up network adapters, and also take a detailed look at connecting two or more computers to a network.

Let's look at the network connection settings:
1. For Windows XP: Go to the “Start” menu -> “Control Panel” -> “Network Connections”. If your computer has a network card, a network connection icon will appear in the window that opens. Right-click on it and select “Properties” from the menu that opens.
2. For Windows 7: Go to the “Start” menu -> “Control Panel” -> “Network and Internet” -> in the first item “Network and Sharing Center” select the sub-item “View network status and tasks” –> click on the “Local Area Connection” link and then the “Properties” button.

In the list box that appears, select “Internet Protocol (TCP/IP) (version 4, if specified)” and click on the “Properties” button.

A window will open in which the main ones will be displayed.
adapter network settings
– a certain formal designation of your computer in the global or local information space. Most likely, the network we create will operate using TCP/IP (Transmission Control Protocol/Internet Protocol).
A protocol is a set of standard algorithms and rules in accordance with which data is exchanged on a network.
In accordance with the operation of the TCP/IP protocol, each network device is assigned a unique IP address. It consists of 32 bits (or 4 bytes), which are written as four decimal numbers in the range 0-255, separated by dots, for example: 192.168.0.10.

Please note that addresses 0.0.0.0, 127.0.0.1 and addresses ending in 0 and 255 are reserved for service purposes and cannot be assigned to network devices.
When setting up an Internet connection, pay attention to the IP address input field: if your provider has provided you with an IP address, then enter it in the appropriate field, but if it was not provided to you, then simply select “Obtain an IP address automatically.
2. Subnet mask. As a rule, a large network is divided into subnets, each of which is assigned its own unique address, like a separate computer. The full IP address, which we discussed above, contains information about both the address of a specific host and the subnet address.
To separate these sections from one IP address, you need to know the subnet mask. It also consists of 32 bits and takes the value 0 or 1. If you superimpose a subnet mask on an IP address, then the numbers under the ones will mean the subnet address, and under the zeros the address of a specific node. The subnet mask is written the same way as an IP address, four numbers separated by dots, for example: 255.255.255.0.
For reference, computers can only be connected to a network without the help of a router if they are on the same subnet (or have the same subnet address). If the subnet addresses differ by at least one, then information will not be transferred between them.
3. Types of IP addresses and default gateway. As you already understand, the number of unique IP addresses on the Internet is limited, and the number of computers wishing to access the World Wide Web is growing every day. It was decided to divide the addresses into private and public.
- Public IP addresses can be connected to the Internet directly. They are visible to every computer on the Internet. To get a public IP address, you need to pay money. Pleasure is not cheap. As a rule, such addresses are distributed to providers and dedicated servers, and sometimes to clients.
- Private IP addresses are addresses that are not visible from the Internet. They are assigned to computers located on subnets connected to the Internet through a router. A router is a device that connects two subnets: local and global (Internet), and therefore has at least two network ports (IP addresses): public (for connecting to the Internet) and private (for working within the local network). Because Since subnets do not interact with each other, the same addresses can be repeated many times in different subnets.
To create a home network, it is best to use private IP addresses. A common option is to use an address like 192.168.x.x, where x is a number from 0 to 254.
 4. DNS servers. We looked at what an IP address is. But everyone will probably agree that it is difficult to remember so many numbers. Which is easier to remember: 94.100.191.204 or mail.ru? Of course, it is easier to remember the letter address of the site (domain name). To replace IP addresses with understandable nominal values, special servers were invented - DNS servers. If the IP address changes, the DNS server is immediately informed about this, and your access to the site remains under the same domain name.
To set up Internet access, you must specify the IP address of the DNS server (usually it is issued by your provider or is assigned automatically). If this is not done (or the DNS server stops working), then to access sites you will have to specify their IP addresses.
home network for two
If you need to quickly connect two computers to a network (for example, to transfer information, create a backup copy, or just to play), then it is not at all necessary to buy a router or switch. We will consider two connection options:

I will not consider setting up wireless access in this article. We will dwell on this option later, when considering the settings of routers.
Having selected the type of cable connection, you can proceed to the network adapter settings.
First of all, make sure that the computers are in the same workgroup, in the same address range and with different network names. Let's see how it's done:

Next, you need to set IP addresses and a subnet mask (the subnet mask is set automatically when the IP address is specified) for each computer. We discussed how to choose IP addresses above. Let's see how the IP address is configured:

If you connect several computers to a network using a switch (network switch), then repeat the above settings on each computer on the network.
network troubleshooting
1. The first thing you should pay attention to when troubleshooting a network is whether the network connection is established. Those. is there a physical connection between the computers (are the network cables connected to the network adapters and network devices such as a router, is the Wi-Fi wireless adapter turned on, for example on laptops it is turned off with a special key combination). It is also necessary to determine whether the network adapter is working properly. As a rule, sometimes it is enough to see if the yellow-orange diodes of the network connector blink when the cable is connected.
2. It is necessary to check that IP addresses are not repeated in a given subnet. All computers must have different addresses so that there are no conflicts when exchanging data.
3. Make sure the subnet address is correct. Those. you need to check that the subnet mask on all network adapters is set to the same.
4. Check that the same group is specified in the computer properties (we talked about this above).
5. If a specific site has become unavailable, this does not mean that the network has disappeared; perhaps the DNS server has failed. Check other sites. To control the operation of the DNS server, enter 94.100.191.204 in the address bar of the browser instead of mail.ru. If the site loads, then the DNS is definitely faulty.
In this article we will set up a local network between two or more computers with Windows 7 (Windows 8) installed, which are connected via a Wi-Fi router. In fact, setting up a local network in Windows 7, Windows 8, and Windows 10 is practically no different. Windows XP does have its own nuances; there are always some problems when setting up a network between Windows 7 and XP. But, more on this in a separate article, and it’s time to switch from Windows XP, it’s outdated.
It is clear that in order to set up a local network and share files, computers need to be somehow connected to each other. This can be done using a network cable; I will introduce a direct connection between two computers. But it is much more interesting to connect all computers through a router, which is now installed in almost every home and office. When connecting via a router, you can already set up a local network not only between two computers. You can connect all computers, and even mobile devices that are connected to one router, into a local network
For example, desktop computers can be connected to the router via a network cable, and laptops can be connected via a Wi-Fi network. It’s up to you what’s more convenient for you, and how it works out for you. It doesn’t matter whether the computer is connected to the router via Wi-Fi or cable, the local network will work. And it doesn’t matter what operating system you have installed, but I will show you using Windows 7 as an example.
And I will configure and display the network through a router, to which I have a laptop and a desktop computer connected via Wi-Fi. Both run on Windows 7. Now we will set up a local network between these two computers. We will also open shared access to folders and files. What is a local network between computers for? Mainly for file sharing. If you often need to transfer some files from one computer to another, then rather than running around with a flash drive, you can do this over the network. Well, you can play games online.
If your network also has a Smart TV, then you can set up access to movies on your computer from the TV. More details in the article.
Instructions for setting up a local network in Windows 7
Let me remind you that the computers that you want to connect to the network must be connected to the same router, or connected directly with a cable. Also, all the actions that I will show in this section must be performed on both computers.
Important point! If you want to set up a network through a Wi-Fi router to which some third-party devices are connected (for example, your neighbor), then after setup, he will be able to access those folders on your computer that you set up shared access to. Install a good one to protect your network. If you still need to connect third-party devices to your router, but want to set up a home network, then you can create a “guest network” for guests, as we did on the Zyxel router in .
One more thing. If you are setting up a network by connecting computers directly, without a router, then you will also need to set static IP addresses in the properties of the local network connection. If you are connected through a router, then you do not need to do anything additional, continue to follow the instructions.
1 First of all, we need to check that all computers are working in the same workgroup. This needs to be checked on all computers that will be connected to the local network.
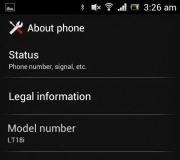
We do this: press the key combination Win+R, and in the window that appears, specify the command sysdm.cpl. Click Ok.
Against Working group, most likely it will be written WORKGROUP. You can leave it. The main thing is that on other computers the workgroup should also be WORKGROUP.

If you want to change it, for example to MSHOME, then click the button Change, and specify a new group. Save the changes and restart your computer.
2 The second step is to change the sharing settings. We also perform these settings on all computers on the network. Now I'll show you what needs to be included.
Right-click on the Internet connection icon in the notification bar and open Network and Sharing Center. In the new window select Change advanced sharing options.

There will be two profiles. Home or Work, and General. Let's change the one that says current profile. You can make these settings for both profiles.
First of all, put the switch near Enable network discovery. Also, we turn on File and Printer Sharing, and turn on folder sharing. See screenshot below.

Scroll through the settings page, find and open the tab All networks, or General, and definitely disable Password Protected Sharing.

After these steps, it is advisable to restart the computer. These are all the settings, the local network should already be working. To check, you need to go to Explorer (My Computer) on one of the computers and open the tab on the left Net. All computers on the network will be displayed there. In the screenshot, you can see my computer, and another one from the network.

We can already log into a computer on our home network, there will be access to shared folders.

If you do not have computers on the network, or do not have access to a computer, then see the solutions at the end of this article.
Setting up file and folder sharing
As I wrote above, access to shared folders is already available. But, we may need to share access to some other folder, which is located, for example, on local drive D. This can be done without any problems. After we open shared access to the folder, all computers on the local network will be able to view the files in it, change them, and add new files to this folder (though this depends on what permissions we enable).
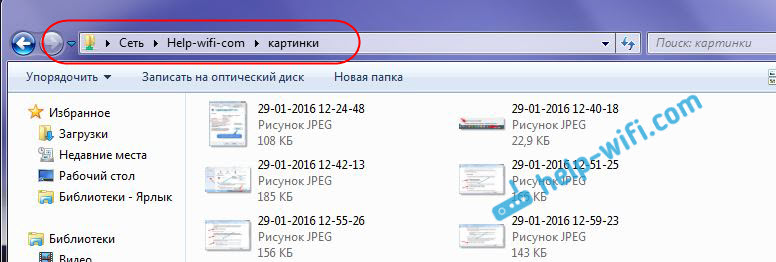
For example, I want to share the "Pictures" folder. To do this, right-click on it and select Properties. Go to the tab Access, and press the button Advanced setup. Place a tick next to the item Share this folder, and press the button Permissions.

In the window that opens after clicking the button Permissions, we need to set access rights to this folder. To ensure that network users can only view files, leave the checkbox next to Reading only. Well, for full access to the folder, with the ability to change files, check all three boxes.

Click Apply And Ok. In the window Advanced sharing setup, also press the buttons Apply And Ok.
In folder properties, go to the tab Safety, and click on the button Change. Another window will open in which we click on the button Add. We write in the field "All" and press Ok.

Selecting a group All, and below we tick off the access points we need for this folder.

That's it, after these steps, this folder will be shared with all computers on the network. It starts working without rebooting, I checked. Open this folder from another computer:
It's all confusing, it'll take a while to figure it out... It was possible to somehow make these settings simpler and more understandable. But everything works. It turns out that I have access to a folder that is located on another computer. And this is all over the air, since both computers are connected to the router via Wi-Fi.
By the way, this folder will also be accessible from smartphones and tablets that are connected to this Wi-Fi router. To view network folders on Android, I recommend installing ES Explorer, or using standard Explorer. Everything works:

Now we will also look at possible problems and errors that can very often be encountered during the setup process.
Possible problems and errors when setting up a home local network
If any errors or problems appear during the setup process, then first of all disable your antivirus, and other programs that may block the connection. If the problem is in the antivirus, then you will need to add your connection to the exceptions.
- Computers from the local network do not appear on the Network tab. In this case, we check the workgroup and sharing settings on all computers. Open a tab in Explorer Net, right-click on an empty area, and select Update. Another important point is that very often antiviruses and firewalls block access to the local network. Try disabling your antivirus for a while. You also need to make sure that there is a connection to the router.
- No access to the shared folder. Another problem is when we seem to have everything set up and shared access, but when we try to open a folder on a computer on the network, a message appears that we do not have access, do not have rights to access this folder, could not open the network folder, etc. Or, a username and password prompt appears.
Be sure to check the sharing settings in the properties of this folder. There are a lot of settings, everything is confusing, perhaps something was missed. Well, again, disable the antivirus, it may block. - A computer connected via Wi-Fi cannot be seen by other computers on the local network. Or vice versa. If your network is built from computers and laptops that are connected both wirelessly and via cable, then problems may arise with a certain connection. For example, laptops connected via Wi-Fi may not appear on the local network.
In this case, pay attention to which profile you enabled network discovery for (settings at the beginning of the article). It is also advisable to assign home network status to connect to your Wi-Fi network. Well, be sure to try disabling your antivirus.
I think you succeeded. If you couldn’t configure something, then ask in the comments. Also, don’t forget to share your tips on this topic.
LAN Configuration
Local network configuration is a method of connecting computers to each other. The term "network topology" is sometimes used. Most often, one of three main connection types is used.
- 1. Bus - all computers are, as it were, built in one line, i.e. from one cable there are branches to each of the computers on the network, and the ends of the cable are open. Most often, this scheme is used to connect several computers installed in the same room, for which a thin or thick coaxial cable is used. The most striking drawback of this topology is that with any break in the cable, communication between all computers is lost.
- This topology is used for Ethernet type networks, when all computers on the network are connected to each other in parallel with serial connection to the main backbone, and the ends of the backbone are closed by “terminators”. If a T-shaped connector is already connected to the network card, then the cable can be connected to it using a BNC connector (Bayonet Nut Connector).
- When using this topology, be aware that connecting new computers may require a complete reorganization of the network.
- 2. Ring - all computers, as in the previous case, are connected to each other using one cable, the ends of which are connected to each other. This scheme is primarily used to create IBM Token Ring networks. Now any cable break no longer leads to loss of communication between computers. Special devices are used to connect several rings.
- 3. Star - each computer on the network is connected by a separate cable to one PC, which plays the role of a file server. The most common scheme is a local network created on the basis of a “twisted pair” with the use of a hub. A break in the cable leads to loss of contact with only one computer or network segment, but to create a network using this topology, you must have a special distributor (the connection of computers to each other is completely parallel).
Depending on the size of the local network, the location of computers and their role in this network, a combined connection scheme may be encountered.
Before purchasing network equipment, you should carefully study the conditions in which the local network will be operated in order to accurately calculate both the cable length required to create it and the bandwidth, which determines the type of cable used and the need to purchase additional devices. It is better to even display on paper a diagram of the future network with all its parameters - the length of segments, the location of computers, etc.
Based on the physical location of each computer, you should create a detailed cable routing plan, taking into account the architectural features of the room, such as corners, protrusions, bends (you don't want to throw a wire in the middle of the room, because it will take a long time to lay). It should be noted that the total length of the cable (from computer to computer) should not exceed 100 m, otherwise you will have to use a device that amplifies the signal, the so-called “repeater” (repeater), which in turn allows you to create networks of any length .
It is worth noting that the price of the entire kit usually consists of the following components:
- cable required to cover the distance between computers and all additional devices (hub, switch, repeater) plus 20-30 cm for each connection additionally, so that it remains possible to move the system unit or the same hub, if the need arises;
- connectors at each end of the cable, both on the computer side and on the side of additional devices (hub, switch, repeater);
- cable fasteners, which can be either plastic boxes or ordinary “squiggles” with nails;
- a special crimping tool, without which, most likely, you will not be able to get a stable working local network. You can, of course, get by with pliers, but in this case you will have to try very hard to ensure that the quality of crimping is sufficient.
When laying a network, you should adhere to the rule that the cable must be well protected from any external influences (heels, animals, precipitation), which is usually achieved by laying it in a special plastic casing. When laying cables outdoors, it should be borne in mind that it is highly not recommended that the cable sag under its own weight, i.e. when laying cables, for example, from the roof of one house to another, steel wire should be used. At the same time, when laying cables outdoors, it should be borne in mind that in winter, due to temperature differences, a break may occur with strong tension. It is worth noting that due to some sagging of the cable when throwing it, for example, from the roof of one building to the roof of another building, its length in calculations should be increased by approximately 1.5 times.
Before attaching connectors to the ends of the cable, pay attention to the features of its routing. For example, if you have to pull a cable through holes drilled somewhere, it is better to stretch it first and then install the connectors, otherwise you will have to widen the holes.
Here we will talk about how you can configure local network a small organization consisting of 20-30 computers ( you can do more, you can do less). More specifically, how to configure client computers so that the local network functions normally.
As you already understand, here we will not raise the domain ( we don't need it), but simply connect the computers into one workgroup and assign them IP addresses.
1) First, decide which computer will serve as a server (preferably with good power). Install Windows Server 2003/2008 on it so that many computers can connect to it ( for example, to use shared documents or to connect to a remote desktop). If this operating system is not available, then install the one that is available.
2) Purchase the necessary equipment and cable so that you can physically connect the computers. The equipment includes a so-called hub (switch), which will serve as the bridge through which data will be exchanged between computers. Calculate how many computers you will connect and choose the hub that suits you ( 16 port or maybe 48). Also calculate how much cable is needed to connect the computers to each other. Cable - twisted pair, RJ-45 cable, UTP category 5 and higher, having named such concepts in a computer store, specialists will immediately understand what we are talking about. And, of course, don't forget to purchase RJ-45 connectors and crimping tools.
3) The connection diagram is simple, all computers must be connected to the hub in order for them to see each other, so lay a cable from each computer to the hub and crimp the connectors with the computer-hub wiring, i.e. The wiring must be the same from different ends of the cable. If we connected a computer to a computer, the wiring would be different at different ends. You can use the following wiring ( works exactly, I use it all the time), connector with the foot up, from left to right.
Network cable layout example
Blue
White-blue
Green
Orange
White-orange
White-green
Brown
White-brown
4) After we have physically connected all the computers, we need to configure the operating system for this, firstly, we need to add all the computers to one workgroup, for example – ITGRUP. To do this, right-click on “ My computer", go to properties, the window " System property", go to the tab " Computer name" and click change ( The example uses the Windows XP operating system) .
And, secondly, write down the IP addresses in the network card, to do this, open “ Network connections» ( Control Panel ->Network Connections), if you connected everything correctly, then you will have a network there marked obtaining a network address or something like the network is limited, but it doesn’t matter. You need to right-click on this connection and go to properties, where you will need to select “ Internet Protocol TCP/IP" and click properties.

Next, choose to use the following IP address and write the IP address, for example, I wrote 192.168.0.1 and, accordingly, each computer must have its own IP address that is different from the others, but they must be on the same subnet ( You can read more about IP addresses in the article “Design and basic concepts of local networks"), for example like this: 192.168.0.1 next 192.168.0.2 .....192.168.0.35 and so on.

You can also set the default gateway and DNS here if you use the Internet.
And if you use a DHSP server in the future ( on Windows Server operating system), then you can leave receiving the IP address automatically.
After all the above steps, all your computers will be connected to the local network; to check this, you can go to Network Neighborhood and click “ Display workgroup computers"or is it better to ping some other computer, i.e. its IP address, to do this, click “ Start->Run (we write the CMD command)"this utility will start and write the command in it ping space and the IP address of the computer you want to check the availability of, press enter, and if you did everything correctly, then you will exchange packets as in the picture.

That's basically all, these are the basics that a novice system administrator should know.
The problem often arises, how to transfer files from one computer to another? You can use various flash drives, disks, etc., but the most convenient and fastest way is to create a network. Let's look at how to quickly create a network between two computers using Windows XP and Windows Vista/7 as an example. There is no difference in setup between a computer and a laptop.
To organize file sharing, you must first create a network between devices, and then set up sharing. Let's begin...

To transfer files, the most convenient and fastest way is to connect using a network cable. RJ45 network cables for creating a network are either straight or Crossover. We need a crossover cable. You can buy it in a store or make it yourself. It is easy to distinguish the desired cable if you put the ends of one cable together, then the color markings inside the connector of the crossover cable should not match.

It is worth noting that modern network cards are able to automatically detect the type of cable and adapt to it. In other words, if you don't have a crossover cable, you can use a straight cable. With a high degree of probability the network will work.
If for some reason using a wired network is not possible, then you can create wireless Wi-Fi. The procedure for setting up access is similar.
When we have taken out the RJ45 cable, connect it to the network connectors. If everything is in order, the green lights near the connector should light up.

If your lights do not light up, then proceed as follows:
- We check whether there are any lights at all and whether the devices are turned on
- Checking whether the interfaces are enabled in Network Connections
Checking the cable. We pay attention to the order in which the wiring in the connector goes and whether the RJ45 cable itself is damaged.
Setting up a network between two computers.
Setting up a network in Windows XP
Go to Control Panel -> Network Connections

Click on Connect to local network. Notice that the connection says Connected. Right-click and click on Properties

Select Internet Protocol (TCP/IP) and click on Properties

Click OK. Network setup on one device (PC or laptop) is complete.
Let's look at how the network will be configured in Windows Vista/7.
Network setup in Windows Vista/7
Go to Control Panel -> Network and Sharing Center -> Manage network connections

Right-click on the local network connection and go to Properties:


We indicate the IP address. You can specify any of the range 192.168.xxx.xxx. The main thing is that they do not repeat on two computers. That is, if on one it is 192.168.1.1, then on the other it is 192.168.1.2. If on one it is 192.168.100.10, then on the second it is 192.168.100.20.
It should look something like this:

Now let's go to the Network and Sharing Center and look at our network. It must be private. If it is not, then click on Settings


Click Close:


That's it. We are done with setting up the network on Vista/7. Now let's move on to setting up Sharing.
Setting up sharing in Windows XP
First, go to Tools -> Folder Options:

On the View tab, enable simple file sharing:


Click the Change button on the Computer name tab and enter the name of the workgroup.
Two computers on the network must have the same Workgroup name.
On the same tab you can specify the name of the computer on the network.

Now go to My Computer and click on the folder that you want to provide access to from the network, and select Sharing and Security from the menu.... In my example, I open general access to the entire D:\ partition, that is, on another computer there will be display the entire D:\ partition of the first one (on which access was opened)

Click on the warning:

We indicate the name of the shared resource and allow (or not allow) modification of files over the network:

That's all...
Setting up sharing in Windows 7
First of all, go to Control Panel -> Folder Options and check the box:


Click on Change:

Enter the name of the computer and workgroup. The Workgroup name must be the same on all computers on the network:

Now go to Computer and click on the folder that you want to provide access to from the network, and select Sharing from the menu.... In my example, I share the entire D:\ partition, that is, the entire partition will be displayed on another computer D:\ first (where access was opened)

Click on Advanced access settings:

Specify the name of the share and click on Permissions

On this tab we can specify which users will be able to open and change files on this computer from the network:

This is what it should look like:

We are done with sharing on Windows Vista/7.
How to access shared resources on another computer
Once you have set up the network and file sharing, you can already transfer files from one computer to another.
To do this, open Computer and enter \\computer_name\ in the address bar. For example: \\ASPIRE\ or \\Athlon\. You can also use Network Neighborhood or Network. If this does not work, then you can enter the IP address of another computer on the network:


If you need to constantly work with shared files that are located on another computer, then right-click on the shared folder and select Map network drive. In this case, the folder with files on another computer will appear as a partition (disk)
Connection via router
We have organized a simple network between two computers. If you need to connect more than two PCs to the network, you should buy a router from the store. A router connects several PCs to a network and allows you to use one Internet connection for all computers.
To connect the router we use a straight RJ45 cable, not a cross cable.

The router connects to the Internet via a WAN connector. The remaining connectors on the rear wall are LAN, we connect each PC1-2-3-PC4 to them separately with a straight RJ45 cable:

Setting up routers is described in detail in the model manufacturer's manual.
The general steps are as follows:
1. In the WAN parameters we indicate the data from the InterZet provider agreement - static IP type.
2. In the LAN parameters, select the dynamic IP type, that is, each connected PC will automatically be assigned an address.

3. Set up Windows XP/Vista/7, as already described above.
Select Internet Protocol version 4 (TCP/IP) and click on Properties:


select Obtain an IP address automatically and click OK.
We repeat the remaining sharing settings for the selected Windows.
Solving possible problems
If you are unable to access files on another computer, then you need to do the following:
1) See if the network connection is working, if the lights are on
2) Launch Command Prompt and enter the command ping the ip address of another computer on the network. For example, ping 192.168.1.1:

If you have pings (0% loss), then you need to check the sharing settings, otherwise check the network connection and firewall settings.