Can't sign in to Google Play. Google Play Market, I can’t log in (You need to log in to your account)
What should I do if I can’t log in or log into my Play Market or Google Play Store account? The main developer and creator of Android is the well-known company Google. Along with the numerous advantages of the program, sometimes it also contains errors. This article will discuss the problem with logging into Google Play and possible solutions to it.
In order to synchronize data, go to the Google Play application store. To download applications or games for Android OS on your phone, smartphone or tablet, you also need to register in the Google Play Market and log in to your account.
First, you need to create a Google account in the Play Market; this can be done either from a laptop, tablet, or from a mobile phone or Android smartphone, for example from Samsung. If you already have a Google account, you will not need to register. For all Google services, for example Google Mail, Google Plus (+), Google Docs, YouTube, Google Adwords, account login is unified, that is, by creating an account in any of them, you can log in to others.
But sometimes difficulties may arise, problems with logging into your Google account. This is mainly due to the fact that users often forget their password and cannot recover it. Difficulties also arise when another person registered, and not the user himself personally.
For example, it often happens that girls do not know their login and password because the guy created it). The situation worsens sharply if that beautiful stranger breaks up with the guy), in general, cases are different. There are several ways out of the Play Market situation on Android. Firstly, you can try to recover your username and password through the password recovery system.
How to recover your account in the play store? To do this, you will need to enter your email address, you may need to provide a secret phrase, etc. If you can’t restore your account, there is an option to create an account in the play store again.
After that, you can change it in the settings. How to change an account in the play market on Android, how to add, change an account in the play market (google play market), we already wrote in one of the previous articles. I couldn’t log into my account on my Samsung for quite a long time; perhaps there were some problems with the authorization server.
It doesn’t work, I can’t log in, I can’t log into my Google Play Market account, what should I do?
If you can’t get the Play Market to work, even though you’ve used every possible combination of login and password, Google’s password reset service can help. In order to reset your password and then restore it, you need to follow the link: or and fill in the required data.
If collecting the password does not help, try resetting your Android smartphone or tablet to factory settings via Hard Reset, Wipe. Logging in or creating an account on YouTube, a website, or an app can also help. If this does not help, try installing the Add Account application, which will allow you to add a new Google account to your Android system.
If that doesn't help, do the following:
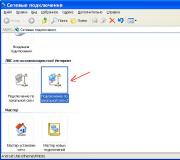
- Go to “Settings/Applications/All”, for Google Play Store services, Google Services Framework and Google Play Services, click stop, delete data, delete updates, clear cache.
- Next, in the “Settings/Accounts/Google” menu, you need to uncheck all the checkboxes in the synchronization settings.
- Let's reboot.
- After the reboot, go to “Settings/Accounts/Google” and put everything back (if a synchronization error pops up, don’t pay attention to it).
- We reboot again.
- Let's check.
You can also try to log into your account using your application password. You can use this method only if you have previously enabled two-step verification in your Google account settings. To obtain your application password, follow the link and follow the instructions. You can also change the password in the settings.
To enter the Google Play Store, you can also use the pin code (PIN) received during registration from your mobile phone or smartphone. This authentication method is only available if you have specified your cell phone number in the settings. It can also be changed if necessary.
Creating a Google account, registering in the Play Market
How to create an account in the play market for android phones, smartphones, tablets? To register, you must follow the link https://accounts.google.com/SignUp?continue=https%3A%2F%2Faccounts.google.com%2FManageAccount. Enter reliable and accurate data, so you will avoid many troubles in the future.
Once registration is complete, you must confirm your details with Google to complete account activation. To do this, you need to log in to the email address specified during registration and follow the link.
You can view the activation and confirmation status of your account in its settings. If, when registering in the play store, you specified an email address on Gmail, then you do not need to confirm or activate it. If you haven't received an email with confirmation details, check your Spam folder; the spam filter may have accidentally triggered.
How to delete a Google account if necessary? If you do need to delete your account, remember that you will no longer be able to use any of Google's services. If you do delete it, it will be quite difficult to restore it, but it is possible.
Account recovery in Google Play Market
In order to protect your Google Play Market account from hacking, you must follow some recommendations. First, use a unique and complex password. To do this, use letters, numbers and symbols at the same time; it must consist of at least 8 characters. Once you've come up with a password to log in to, write it down or save it in a password storage app on Android.
In your account settings, use an additional email address and indicate your mobile number to send data via SMS. If you use a secret question, you need to choose only those that you can definitely answer after a while. All this will help you recover your Google account password in the Play Store in the future and help you avoid many problems.
Additionally, to increase security, use the following recommendations when creating an account:
- Conduct a full scan of your computer, laptop, smartphone, tablet for viruses and malware.
- Check your account security by going to the appropriate settings item and following further instructions.
- Keep your browser and operating system version up to date.
- It is highly not advisable to use your Google account password on any other sites.
- Never enter your account information on suspicious, dubious sites.
- If you use any other computer, laptop, tablet or Android smartphone to log into your account, do not forget to log out of it and delete the entire cache. Never save your password information on other people's devices.
- I recommend disabling the “Unknown Sources” feature, which allows you to download applications and games for Android not from the Google Play Store, in your account settings.
Some users often experience google android account synchronization errors. The account stops syncing due to the incorrect login and password being entered.
Possible errors in logging into your Google Play account and their solutions
When logging into your Google Play Store account, the following problems are possible:
- "Sign in to the Play Store on your mobile device using this email address." If you try to install an application or game for Android on your laptop, computer, phone, smartphone or tablet that is not associated with a Google account, or other unsupported device, this error will appear.
- "Invalid username or password." Most problems with logging into the play market are related to this error. Quite often it is caused by so-called two-step authentication. Its purpose is to increase the protection of your data through the use of a two-step verification system. In addition to the username and password, a code is also used to log in, which the user receives in the form of a voice message or text (SMS, Email). You can enable or disable double authentication in your account settings at.
- Problems with Internet connection (“No network connection”). It often happens that after updating the device to Android, some settings are lost, for example WiFi and the Internet stops working. That's why I can't connect to my account. Check your connection, try opening a website, social network, or viewing a file from the network.
If the article did not help solve the problem, you have comments or suggestions - write in the comments, we will sort it out.
An error with the system message “could not contact the Google servers, please try again later” often occurs when you try to either add a new Google account, or simply go to Google Play or Play Market.
The solution to most of these errors (for example, from the same “test”) is approximately the same, while the fact remains unchanged that the error lies in the device itself and is not related to Google servers.
What should I do if I couldn't contact the google server?
So, a little later we will look at the main methods that almost always help fix this error.
However, first it is necessary to mention the obvious, but at the same time important things:
- 1. Yes, it’s funny and unlikely, but there are still cases when a user tries to add an account that is not related to Google services: for example, “mail” or “yandex”.
- 2. Check if the Internet works at all: open your browser and go to any website.
- 3. Check that the set date and time are correct.
If no such obvious problems are observed, but the device persistently writes “could not contact Google servers, try again later,” then in most cases the culprit for errors with Google services is an application called “Freedom”.
There are two possible options:
- 1. If the application was installed and subsequently deleted, try installing it again and checking the functionality of Google Play (if this helped resolve the error, it means that the application was previously uninstalled incorrectly).
- 2. If the application is already installed, delete it. However, simple uninstallation will not help here: you need to completely clear your device of this “useful” application. To do this:
- A. Launch the application and click Stop in the pop-up menu.
- B. Close it using either “Device Manager” or “Task Manager”.
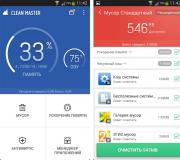
- B. To remove, use one of the “killer utilities” (“Clean Master” or “History Eraser”): run the program and remove everything related to “Freedom”;
- D. Reboot the device and check its functionality again.
How else can I fix the “failed to contact Google servers” error?
- 1. Using the same application, clear the cache, but not only of the Google Play service, but comprehensively of the entire device. Perhaps this will help fix not only this error, but also prevent new ones from appearing.

- 2. As with the “RH-01” error, the reason that a smartphone or tablet with Android OS was unable to contact Google servers often lies in the absence or incorrect operation of the “Google Services Framework”: either enable this service or install it again.
In addition, check the “GoogleContactsSyncAdapter.apk” file: try updating it or deleting it, and then installing it again (but, accordingly, using third-party devices).
- 3. It is possible that “Two-Step Verification” is installed on your account. To check, you need to log in to “gmail.com” on the official Google website, go to the “Authorization of applications and sites” section and check what parameters are set.

- 4. There may be a block in the “host” file (located in the /system/etc/ directory). Using an application (for example, “Root Explorer”) and using “root” rights, check what is specified in the file after the line “127.0.0.1 localhost”: ideally, if you did not install anything yourself, there should be nothing after this line .
- 5. Remove “Always active mobile transmission” in the wireless network settings: this is especially true for older versions of the operating system.

- 6. Before entering personal data in your account, you can call up the context menu in the upper right corner: here you will need to select “Log in via browser” or “Login in browser” - accordingly, you will be redirected to the browser to enter data.
- 7. Reset the settings to factory defaults and use the “Initial Setup Wizard”.
- 8. As a last method, you can use third-party applications to create or add an account manually: for example, “Android /Add Account”.
Thus, there are quite a lot of possible solutions to the “failed to contact Google servers” error. In any case, we strongly recommend that you delete the “Freedom” application and not use it in the future: sooner or later this application will “bring” various kinds of errors to your device. In addition, you should at least occasionally clear the device cache, since cached errors will make themselves felt.
Many owners of modern Androids complain about problems with account activation after a “hard reset” or flashing. So, the phone writes that “The device has been restored to its default settings.” And if you try to enter your password, you will receive a notification “We were unable to log into your account due to an unknown error. Please try again in 24 hours." In most cases, this applies to models with Android Lollipop and higher operating systems installed. Today we will tell you what to do in this case and how to quickly bypass the blocking.
Cause of unknown error
The reason for the message is the “Google FRP Lock” function used in the latest versions of Android. This is a protection mechanism designed to protect the owner’s data and the phone itself from theft. Thus, the smartphone remains protected even if all settings are completely reset. After a reset or firmware update, you must specify the previously linked account and enter the password for it. According to the developers, this mechanism prevents attackers from obtaining the owner’s data after returning to its original state.
Since a hard reset is often done before and after selling a used phone, the problem remains relevant. Google representatives say that FRP-Lock is valid for up to three days from the moment it is turned on, but, alas, the protection is not always turned off after the period has expired.
Despite the improvement of the security system, the blocker is already obsolete and experienced users can bypass it without problems. As practice shows, it is the owners of the device who have the greatest difficulties in bypassing the protection.
How to prevent future blocking
As a rule, the first time they learn about a problem is when a block has already occurred. However, you need to know how to avoid blocking so you don't step on the rake twice.
- Firstly, if you did a hard reset on your phone, it is not recommended to change the password for your account. Many, after entering incorrectly, immediately rush to the browser, where they change the password for their account. This will lead to the blocking being activated with almost 100% probability.
- Secondly, to avoid blocking, you must always unlink your Google account, which is located in the settings menu, before performing a reset.
Bypass FRP-Lock
If you don’t have time to wait three days or you don’t want to pay decent money for unlocking at a service center, then you can try to disable the phone binding yourself, that is, delete your Google account from Android.
What you will need to do:
- First of all, we need to access the Settings menu.
- In the “Security” menu, disable all activated functions.
- In the “Restore and reset” menu, reset the DRM licenses.
- In the same menu, perform “Reset settings”.
- Wait for completion.
So, now we know what needs to be done and where, but how to get to the “Settings” menu on a locked phone? The use of custom firmware, launchers, as well as shells supplied with the main operating system greatly change the functionality of the device. Standard options will be discussed below, but they do not work on all models.
No. 1 Using a flash drive or SD card
For these purposes, you can use memory cards standard for phones, but if the device does not have a slot for them, then an OTG cable and a traditional flash drive of any size can help.

Procedure:
- Turn on the phone.
- Connect the drive. Remember that the phone can take up to 1 hour to recognize a flash drive.
- In the window that appears, select “OK”, after which you will go to the storage settings.
- Select "Application Data", select "All" and find "Settings".
- At the bottom of the window that opens, select “Launch”.
- Well, then everything is according to the standard.
If you have the ability to insert a regular micro SD without disconnecting, then you can connect it. You can find out what it looks like in practice here:
No. 2 Using a SIM card
This method assumes that the device can be reached.
Procedure.
- Insert the SIM card into the switched off device and turn it on. Wait for the network to appear.
- Call this SIM card.
- During a call, select to add a call and interrupt the call. We are left with a menu with a numeric keypad.
- Dial the combination *#*#4636#*#*.
- In the advanced settings window, click the “Back” arrow, which will take you to the desired menu.
This solution is relevant only in rare cases.
No. 3 Through the virtual keyboard
In this case, a lot depends on the keyboard used. In this regard, the input to its configuration is quite diverse.
Procedure.
- When selecting available Wi-Fi networks, click on the password field so that the keyboard appears.
- Call up the keyboard settings menu.
- In the additional menu, which is hidden under the three dots icon in the upper right corner, select “Help/Feedback”.
- Press the “Recent applications” key (square).
- Find the search line, and if it is not there, then in the third step go to any other window.
- In the search bar, type the word: Settings. Select the appropriate menu from the drop-down menu.
The methods described above are universal, but they do not always help in case of blocking “We were unable to log into our account due to an unknown error.” If they did not help, then you will have to look for a solution suitable for a specific device. Experienced users can use various tools to remove the lock. One of these methods is described in the video tutorial below. Let me note right away that the described option is only suitable for MTK processors.
Error " You must be signed in to a Google account" is a very common problem on Android devices. When it occurs, you are fully aware of how much you have become accustomed to Google products for working with your smartphone, especially those that you download from Google Play. The good news is that fixing the situation is a super easy task even for novice users. Let's see how to fix this Play Store error in three easy steps.
1. Simply delete your Google account
The error may be a normal check that is sometimes triggered after a Google Play update. The first method is to enter the main menu of the device, go to “Settings”, and then “Accounts” and simply delete Google account, which you registered is the one that receives the message “you need to sign in to your Google account.” After this you can re-add the account and everything should work fine. However, you may have to take one more step, described below.
2. Erase Google Play data
To erase Google Play Store app data, you need to go to Settings -> Apps and find Play Store. Select this item, then find the “Erase data” function (click on it). You can try just clearing the cache first, but clearing the data will also clear the cache. If the previous method did not work for your smartphone, you can repeat the steps described there after clearing Google Play data and get the desired result.

3. Uninstall Play Store updates
Sometimes the problem is not with your credentials, but with Google Play itself. More precisely, in the service software. One of the effective ways to fix an error in Google Play is to remove updates. Go to "Settings" -> "Applications" -> Play Store and click "Uninstall updates". This will allow you to revert to the original version of Google Play that was originally installed on your device. Then all you need to do afterwards to fix the error is to install the latest version of Google Play and log into the market again.
If after using all three methods described above you still have problems, try doing all the steps again, restarting your Android smartphone after each sequence of actions: “Remove Google account” -> reboot -> “Remove update, install new Google Play” - > reboot - "Adding an account" -> reboot, etc. Just keep trying until the error goes away.
Do you know how to get rid of the “You must be signed in to a Google account” error in another way? Share it in the comments with other users.
One of the most popular operating systems for mobile devices today is Android. It has a number of huge advantages over its competitors and is an almost undisputed leader. However, relatively recently, reports began to arrive about problems with one of the main services of Android devices, namely Google Play. When logging in, the application began to display an error: “A reliable connection cannot be established.” The system help provided by the suppliers does not help. Then how to solve the problem that has arisen?
Fast and easy
To begin with, we will present a method that will not require you to perform any complex or dangerous operations with the gadget. The simplest solution to the “Unable to establish a reliable connection” error is based on system settings. You just need to check the system date and time in your Android device. They must coincide with the real ones within one minute. This is due to restrictions on the validity of program certificates. If the date is incorrect, the phone will consider that the validity period of the certificate has not yet arrived or has already passed.
Clean up
This method is suitable for those who do not have any important data saved on their device. Although, in fact, you can always transfer photos and videos to your computer and download applications again, especially if you have synchronized your data with your Google account. Then, even if you reinstall, all application data should be preserved. So, there are two ways to resolve the “Unable to establish a reliable connection to the server” error.

- Reset your phone to factory settings. You can use special programs offered by application developers, or find instructions that are specific to your Android device model. After all, each manufacturer has its own tricks and protection mechanisms.
- Add a new account. As you understand, old data will not be copied to new versions of applications, but you can avoid problems with transferring other information that needs to be saved when completely wiping the phone. To add a new account, do the following:
- Download the AddAccount application via your computer or phone browser.
- Write the downloaded apk file to the initial directory on your phone's memory card.
- In a standard browser, enter: content://com.android.htmlfileprovider/sdcard/add_account.apk.
- Follow the link.
- Launch the program. Enter your email on Google and click Add Account.
- If you are prompted with an incorrect password message, enter it and continue. That's it, you have a new account.
In addition to drastic methods, there is also a less dangerous solution. “A reliable connection to the server could not be established” is an error that is related to temporary and personal application data. Therefore, possible solutions to the problem situation can be looked for in another area.
Freedom
Statistics show that sometimes problems with Google Play can be related to other applications. In particular, the Freedom program. She is responsible for purchases in the application we are considering. An issue where you cannot establish a reliable connection to the server may occur if you downloaded and uninstalled Freedom without first forgetting to turn it off. As is clear from the above, to return everything back, download and install this utility. After that, enter it and stop it by clicking on the Stop button. Then you can safely delete it.

Internet
If the previous method did not help you, you should check your Internet connection settings. Problems like “Cannot establish a reliable connection to the server” may occur with some providers, but before trying to solve the problem using this method, try opening Google Play by connecting to another Internet source. If you still need to return to the initial option, download the Set DNS application. Set the DNS address to 8.8.8.8. This should help in cases where Wi-Fi is used to connect to the Internet. In any case, first try to test your device on a different connection.
Another possibility as to why a reliable connection to the server cannot be established is that the server may be blocked. In order to test this method, you will need superuser rights on your device. Open Explorer and find the file /system/ect/hosts. We need to open it with any text editor. By default, the file should only contain - 127.0.0.1 localhost. We delete any remaining data.

YouTube
The last method to solve the problem lies in additional programs. It is assumed that the user cannot log into Google Play due to incorrect addressing settings in the Google account.
A utility pre-installed on many Android devices for viewing videos from YouTube (or any other program that uses a Google account for registration) will help you cope with this problem. The bottom line is that you just need to launch the application and go through it to your GMail account.
Other ways
And finally, it is worth mentioning two more extreme measures. The first of them is “Hard Reset”. Complete device reset. To do this, go to the application menu, select "Settings" - "Backup and reset". After that, in the last window, click "Reset". And delete everything. After which the device should return to its original state. You will have to download all the programs again and set up an account.
Flashing. Update the operating system or reflash the device. The second option is undesirable, since after it you may well be denied warranty service. It's best to just update the OS. Many manufacturers try to independently correct errors encountered by users.
That’s probably all that we could tell you and advise you to do when the error “Unable to establish a reliable connection to the server” occurs. We hope our article helped you.