Upload configuration to files 8.3.
Data transfer is a very important process in any accounting system, the 1C 8.3 and 8.2 platform is no exception. Below we will look at instructions on the easiest way to transfer data from one system to another that has a similar configuration (for different configurations, you can use a tool for programmers - or).
Before any action is necessary, the changes are irreversible!
The easiest and most convenient way to transfer data from 1C 8.3 to 1C 8.3 Accounting 3.0 is to use the processing Upload and load data in XML format (download - for 8.2 or for 1C 8.3 or on ITS). The treatment is universal and suitable for any configuration.
We will not go into details, but consider step-by-step instructions for migrating data using this processing using the example of a simple transfer of goods.
Uploading data to XML
First of all, let’s open processing in the source database (from where we will unload goods) and look at the interface:
Get 267 video lessons on 1C for free:

You must immediately fill in the “File name” field - a new data file will be created along this path, which we will upload to the receiver database. Just below, in the tabular section “Data for uploading”, you need to select the data that we want to upload from the database.
After selecting an object from the left table part, you can apply selection in the right table part:

In our example, I want to unload all products with the name “Rake”.
Once all the settings have been completed, the data can be uploaded. To do this, click on the “Upload data” button:

Loading data from xml into 1s 8.3
The data has been unloaded from the source database; now it needs to be transferred to the destination database.
To do this, you need to start processing already in the database into which you need to load the data, and go to the “Download” tab, select the downloaded file on disk and click on the “Load data” button:

This example is only suitable for transferring data between identical configurations on the 1C platform. To understand the exchange mechanism for programmers, we wrote an article -.
We continue our acquaintance with the new functionality of 1C:Enterprise, which we started in the previous article of the series. After studying the materials in this article, you will learn:
- What are defined types and how to use them?
- What is the “Primary Roles” configuration property used for?
- How to use the helper to create client event handlers for a form?
- How and why is uploading configuration to XML files used?
Applicability
The article discusses the 1C:Enterprise platform version 8.3.4.437, but its materials may also be useful for those who work on older releases.
How to make development easier in 1C:Enterprise 8.3
We continue to consider innovations in the 1C:Enterprise 8 platform aimed at facilitating configuration.
Defined types
In platform 8.3, a new object has been added to the configuration branch “General” - Defined types.
This is a special configuration object that is designed to define a data type that describes a frequently used entity or is likely to change when an application solution is implemented.
For example, consider a composite type that includes a link to the directories “Counterparties” and “Individuals”.
And this type, in some developed configuration, is often used as a dimension in the information register describing contact information, as a detail in the document “Cash outgoing order”, etc.
During the implementation of such a configuration, the composition of this type can change - new objects can be added to it, and also vice versa - unnecessary types can be excluded.
If instead of our new “defined type” we use a composite type in every place where such an entity is used, then we will have to change the composition of types everywhere. It is long, difficult, labor-intensive, and there is a possibility of forgetting about some props.
If you use a defined type, then during the process of finalizing the application solution, only the definition of this type (and the program code that processes such fields) will need to be changed.
All details for which the defined type is specified as the type will be changed automatically.
Here's another example of using a defined type.
For some details there is a typing standard within the configuration. For example, we define a quantity as a number of length 15 with a precision of 3, and a sum as a number of length 15 with a precision of 2.
Suppose that an enterprise needed to keep records of expensive goods with high accuracy of their weight.
Accordingly, we needed to increase the accuracy of the details to account for quantity to 4 decimal places. These changes must be made simultaneously to all document details and register resources.
This is not a difficult task, but it is very labor-intensive and requires great care and perseverance of the developer.

When you create a new defined type, you only need to specify its type. Then, when creating document details and register resources, you can select a link to the created defined type.

This approach allows us to guarantee the same data type (same length, precision, same composition for fields of a composite type, etc.) in all places where it is used.
Then, if you need to change the data type of all details, you do not need to manually correct each attribute separately; it is enough to make changes to the corresponding defined type.
A defined type can be created as a composite type. However, there are restrictions on the use of this configuration object. Thus, the type being defined cannot be part of the value type of the characteristic type plan, and also cannot be part of the composite data type of another attribute.
Note that in platform version 8.3.5, the possibilities for using defined types were increased by expanding the set of types that can be part of a defined type.
There were no further changes in working with the defined type until the current versions of the platform 8.3.10/8.3.11.
Configuration property “Primary roles”
In platform 8.2, the root configuration element had the “Primary role” property, in which the developer defined the role that would be used if there were no users in the infobase.
In platform 8.3, it became possible to specify multiple roles that will be used to determine access rights when the list of users is empty. Accordingly, the property was renamed “Main Roles”.

To enlarge, click on the image.
Creating Form Client Event Handlers
When configuring a managed application, the developer must carefully monitor the code execution context by using appropriate preprocessor directives.
Because a limited set of data types and methods are available on the client, the developer often needs to create a client procedure from which to transfer control to the server.
In platform 8.3, an assistant for creating handlers for client form events appeared.

To enlarge, click on the image.

Now the developer does not need to manually create a server method and specify its call inside a client procedure, but can concentrate entirely on implementing the application logic of the system.
Uploading configuration to files
Another innovation of the 8.3 platform is the ability to upload the entire configuration to disk in the form of a set of files of a certain structure.
The configuration is always uploaded in its entirety, without the possibility of filtering the uploaded objects.
To upload the configuration to files, you need to select Configuration – Upload configuration to files in the menu, and in the dialog that opens, select the directory in which the files will be saved.

Configuration objects are uploaded as a set of XML files. Modules and text layouts are saved as TXT files. Pictures from the configuration are saved as image files (BMP, PNG, etc.). Help information is uploaded to HTML files.

To enlarge, click on the image.
As you can see, the resulting files have commonly used universal formats. There are a large number of different software products for editing them.
You can also use third-party version control systems. They allow you to store several versions of the same document, return to earlier versions if necessary, and determine who made a particular change and when.
Edited files can be loaded back into the configuration using the menu item Configuration – Load configuration from files.

Working with the new loading/unloading functionality is also available using the LoadConfigFromFiles and DumpConfigToFiles command line parameters. For example, like this:
“c:\Program Files (x86)\1cv8\8.3.4.437\bin\1cv8.exe” DESIGNER /F “X:\Platform8Demo” /N “Administrator” /DumpConfigToFiles “X:\1\”
Previously, back in platform 8.2, there was a mechanism for uploading/downloading configuration files, which allowed selective uploading/downloading of some properties of configuration objects (modules, layouts and reference information).
It was noted that by default the “Upload configuration files” and “Load configuration files” commands are excluded from the configurator in platform 8.3.
However, by customizing the main menu, you can display these commands in the menu and use them.

The new mechanism for uploading configurations to files always uploads the entire configuration data; the ability to configure objects for uploading is not provided, thereby ensuring the integrity of the configuration.
Regular forms and interfaces are uploaded in binary form (internal) and cannot be edited. The provider configuration is also not intended to be edited.
The remaining objects are uploaded to files of universal formats. Essentially, the mechanism is focused on the managed application.
The new mechanism provides the developer with the ability to automatically process the configuration by launching the configurator in batch mode.
Also now the configuration can be edited by external software using, for example, the XML format.
When unloading, additional configuration processing is performed: frozen links are deleted, unused information is also not unloaded (for example, help for a non-existent language).
And when loading a configuration, its integrity is checked; it is not allowed to load files with non-unique identifiers, metadata objects, incorrect data type names, etc.
Note that since version 8.3.7, a new upload format has appeared, which is called “hierarchical”. The old format became known as “linear”. The format selection is available in the file upload window:

Starting with version 8.3.11, the “hierarchical” format became the only one available for selection during interactive uploading:

If you use this functionality, we recommend:
- firstly, use a “hierarchical” upload format;
- secondly, use a platform no lower than version 8.3.8+, because starting with it, the speed of loading/uploading XML files has been significantly increased.
In version 8.3.10, partial uploading of configuration to XML files began to be supported. As a result of this, it became possible to use configuration upload in XML in conjunction with Git.
Backing up a 1C Enterprise 8.3 database allows you to protect the user from data loss when performing “dangerous” operations that can significantly change credentials (for example, correcting accounting registers, group changes to documents) or spoil the database (operations to update configurations, etc.). It may also be necessary to copy the database in order to transfer it to someone, and in this case the most compact size is required.
Uploading the 1C Enterprise 8.3 database to a backup copy
Backing up a 1C database can be done in several ways, the most universal is through the infobase upload utility in the 1C configurator. This method is suitable for both file and client-server applications of 1C Enterprise. To create a backup copy, you need to go to the configurator and select Administration - Upload infobase...
 Menu “Configurator - Upload infobase...”
 A standard file saving panel will appear, where we indicate the directory in which we will save the backup copy. Enter the name of the upload file (the default is “1CV8”) and click the “Save” button. As an example, I'll change the default name to "1CV8-MyUpload". After this, wait until the backup procedure is completed.

After the upload is completed, a message will appear indicating that the upload of the infobase to the file has been completed, indicating the path and name of the upload.
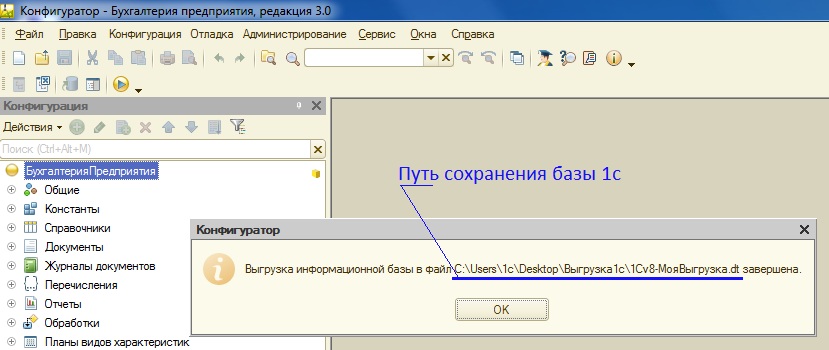
Now you can find the upload file in the directory you specified. Let's go to the specified directory and see the file in it 1CV8-MyUpload.dt. I'll add one useful note
The 1c backup upload file has the extension .dt
Now you can copy this file to media, send it, save it... the only thing is! — most likely, it will not be possible to send the download file by mail due to its volume.
Your upload file is ready, suppose you copied the file to a flash drive, brought it to a friend to show the status of your accounting, and then there is a need to restore the 1c database from your upload file.
Restoring a 1C Enterprise 8.3 database from a backup copy
To restore a database from a backup, the action plan is as follows:
- Create a new database 1C Enterprise 8.3
- Upload the 1C Enterprise 8.3 file into an empty database
Let's get started!
The process of creating a new 1C Enterprise 8.3 information database is described in detail in the article. After creating a new database, you need to load the upload file 1CV8-MyUpload.dt into it.
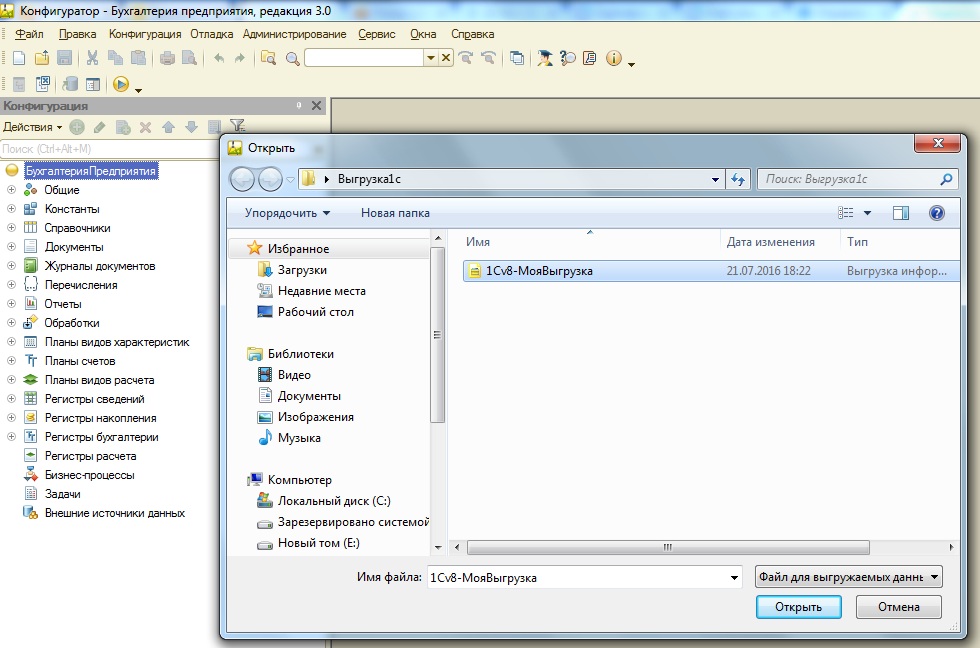
To load the 1C Enterprise 8.3 database from a backup copy, enter the created new configuration in the “Configurator” mode and select the menu item “Administration” - “Load information base...”

In the form that opens, select the 1c infobase upload file (has the extension *.dt)
and agree to the proposal to lose all data if the operation continues. The database loading operation will begin, the time depending on the volume of the loaded database.

As a result, we will receive a message that the information base has been successfully loaded. Next, we can agree to restart the configurator in order to see the loaded configuration objects, or we can choose not to do this, click “No” and close the configurator.

By entering the created database after downloading the 1c upload file in the “Enterprise” mode, you will see an identical copy of the previously uploaded 1c database.
Direct copying of the 1C Enterprise 8.3 database
After publishing this post, one of the clients received a request that he could not download the *.dt file to restore the backup. Having tried all the standard methods and interrupted all the popular queries on the Internet on this topic, we came across Recommendations for backing up 1C databases, which states that in the event of a failure in the 1C Enterprise 8.3 database, some information may not be uploaded to the *.dt file, while direct copying will save all the information. Therefore, in order to fully disclose the information, I decided to add this subsection.
Unlike uploading to a file using the 1C Enterprise 8.3 platform, direct copying involves direct copying of database files.
To copy a 1C Enterprise 8.3 file database, you need to go to the folder with the created database. The path to the database can be seen when you place the pointer to the desired infobase in the list of connected 1C Enterprise 8.3 databases. It will be located under the database selection window and will look like File = "Path to the 1C Enterprise database."

We follow the specified path and see the working files of 1C Enterprise 8.3.

The main data file is called 1Cv8.cd (type - File infobase), this is what you need to copy. The remaining files are auxiliary; they will be created anew when you launch the 1C Enterprise 8.3 configuration.
Accordingly, to launch the database you do not need to restore anything - copy the 1Cv8.cd file to the folder and .
Backing up a 1C Enterprise 8.3 database to a client-server version is more complex and requires special scripts or applications for working with relational databases on which the 1C Enterprise 8.3 database is deployed. This is a separate topic for discussion, so we'll talk about it next time.
If you have any questions, you can ask them in the comments to the article or on the website.
Don’t lose this useful article - save it on social networks using the buttons below:
Backing up the 1C Enterprise 8.3 database and restoring it
21.07.2017
How to make a clean copy of an existing 1C:Enterprise infobase using a cf file
Get access to the 1C:Fresh cloud for free for 30 days!Sometimes there is a need to create a new clean information base based on an existing one.
This may be required, for example, in the case when you are using some atypical 1C configuration with unique changes and you need to create a clean information base with exactly the same configuration, but without data.
Naturally, in this way you can make a copy of the standard configuration, but when creating a new database from a cf file, as a result you get an absolutely clean configuration, even the data that is filled in automatically when creating a new database with a standard installation from a template, for example, in a standard configuration, will be empty "Enterprise Accounting" nomenclature groups are not filled in.
We do not recommend using this option for creating an information base by untrained users. To create new information bases of standard configurations, we recommend installing using standard methods from a template.
How to add a new clean 1C:Enterprise database from a configuration template.
Where can I get distributions?
Registered users of the basic versions of the configurations "1C: Salary and Personnel Management" (rev. 3), "1C: Trade Management" (rev. 11) can for free download current versions of complete installation distributions of configurations on the technical support website https://releases.1c.ru. Users of the basic versions of "1C: Enterprise Accounting", "1C: Management of Our Company", "1C: Retail, etc. can request installation distributions by email directly from the 1C company (free of charge) or contact 1C partners, but in this case the service may be paid. For example, in our company, the cost of sending the current distribution kit of the basic version to the user’s email costs 500 rubles (confirmation of the software product’s licensing will be required). For users of PROF versions of 1C programs, current installation distribution kits of standard configurations are provided only if there is a valid agreement for information technology support (ITS Agreement).
The minimum option for an ITS agreement for 1 month is RUB 5,493.
You can subscribe to ITS in our company even if you are in another region of the Russian Federation and purchased the 1C program itself elsewhere! The only condition is that the program must be licensed.
So let's get started.
There is an initial working information base for the "Enterprise Accounting" configuration, edition 3.0 (3.0.46.16).
It is necessary to create a copy of this database, with exactly the same configuration, but clean without any data.
The procedure consists of three main stages:
1. Saving the configuration to the file 1Cv8.cf
2. Creating a new infobase without configurationStage 1. Saving the configuration to the 1Cv8.cf file
We launch the source database in the "Configurator" mode.
If this line is not available, then first execute “Configuration” > “Open configuration”.
Using Explorer, select the location on the computer where we will save the 1Cv8.cf configuration file. We remember where.
After a few seconds, we receive confirmation that saving the configuration to the 1Cv8.cf file was completed successfully.
We launch a new clean database in the "Configurator" mode.
Select "Configuration" > "Load configuration from file". If this line is not available, then first execute “Configuration” > “Open configuration”.
Using Explorer, select the file 1Cv8.cf, which was saved at the first stage.
The information reorganization procedure will be launched, and a list of new configuration objects will appear in the “Changes in the structure of configuration information” window. Click "Accept".
Press F5 or the "Start debugging" button (see figure).
The program runs in "1C:Enterprise" mode.
After filling out the initial information, a standard home page will open, on which you will be asked to enter your login and password on the 1C portal.
We check in the properties "About the program" - Configuration "Enterprise accounting edition 3.0 (3.0.46.16)", which is what we needed.
If this information was useful to you, then like the article on social networks and share the link on your favorite forums))).
Online Company, 2017