Adsense account login. How to register with Google AdSense? Creation and placement of advertising blocks
Hello, dear readers of the blog site. In today’s article on the topic (remember that the best option would be to legalize your business activity through) we will talk about the contextual advertising system from Google.
For beginner webmasters making money on Adsense has one undeniable advantage over making money on Yandex contextual advertising - you do not need to have 500 unique visitors per day in order to be accepted into this system (in the Yandex advertising network this is the main condition for entry).
It is this limitation that is a stumbling block for those who want to. Google's context system is more democratic in this regard, and almost any site can make money from displaying contextual advertising, even those located on .
True, Google is very sensitive to and quite often bans accounts where sites with plagiarism of one kind or another are added (even descriptions of the possibilities of plagiarism are prohibited - for example, I was warned a couple of times, after which I had to remove several articles from the site). Read very carefully Rules for posting ads in Google AdSense or watch the old but useful webinar “How to place ads without violations” (created by and).
Registering and creating an account with Google AdSense
What’s noteworthy is that if you have already registered your main site in Google’s contextual advertising system (and it has passed moderation), then on your other sites you will be able to place AdSense advertisements without their prior moderation. This is very convenient and greatly simplifies the process, and also provides an opportunity for young sites (with virtually no traffic) to make money.
But for all its democracy, Adsense takes its cheating and fake clicks(an action performed by a person or a program that simulates a click by a real visitor on a contextual advertising ad). The punishment will be very severe and immediate. If you notice that your CTP has increased sharply and there are suspicions of clicks, then use the Contact form for invalid clicks to avoid problems.
To get started and make money on this contextual advertising you will need registration in the Google Adsense system. You can create your account by going to Google.com/AdSense and clicking on the “Register” button (now their home page is a typical one):

You will be greeted by a registration wizard who will suggest in the first step, if there is one (left blue button at the bottom of the screenshot):

If you do not have an account in this search engine, you will have to create one. I have already described in some detail how exactly this is done in the article about, so it will be unnecessary to repeat. We will assume that you already have an account and you will only need to log into it by clicking the appropriate button.
After successfully logging into your Google account, you will be redirected to second step of registration in AdSense, where you will need to enter the URL address of your main site (if it doesn’t exist, that is) and indicate its language:

In the third step of the Adsense registration wizard, you will need to carefully fill out all the proposed fields:

Personal data (full name, city and address) previously had to be entered in Latin letters (read about, and also about use for these purposes), but I don’t know exactly how now. And, naturally, they must correspond to reality, otherwise you will not be able to receive the money you earned (cash a check, although now there are alternative options for receiving money - Rapida and bank transfer).
After that, the one you specified during registration the site will be sent for moderation and in about a couple of days you will receive a letter (by email) stating that your project has been moderated and you have been accepted into the Google contextual advertising system.
Creating and setting up ads in Google Adsense

Well, should we boom to increase the number of ads on the page or let it remain as it is?
If you want do without plugins and not lose in functionality, then I dare to offer several solutions that I use (not exactly mine, but borrowed).
I probably won’t open America by saying that WordPress is a wonderful engine that is developed by professionals. Thanks to the wonderful , it’s quite easy to find the file that would allow you to insert a Google AdSense block into the right place in the template. I'm in WordPress When inserting Adsense code, I prefer to do without plugins, because they unnecessarily load the engine, which is already quite heavy for hosting (although, of course, I can’t do it at all).
- Do you want to insert advertisements inside articles?? No problem. Short codes will help you. To do this, go to the folder with the theme files (by , of course), which is currently used on your blog (/wp-content/themes/Name_of_the_folder_with_your_theme_), find the file there, and if it is not there, then create it.
True, I did all this a year and a half ago, but I hope that nothing has changed since then.

This is exactly the version of the code I used (blocks of the most suitable sizes will be shown on different devices). True, I inserted the code through function.php and at first I forgot to remove all the spaces in the code, which led to some distortions. But you won’t repeat mine?
Setting up payments and withdrawing money from Google AdSense
In short, in addition to receiving a check from Google, Russians now have the opportunity to receive cash through Rapida (it allows, for example, to receive money by mail, transfer your hard-earned money to the system, to a bank or card account, etc. using own service.
In your account settings in Google Adsense (“gear” - “Payments” - “Payment settings”) you can select one of three types of payments (for Russia) by clicking on the “add payment method” button:

In the window that opens Three methods will be offered for Russians withdrawal of funds earned in Adsense through back-breaking labor - , account or Rapida:

When the amount of money you earned on the context will exceed 10$, in your account you will see a notification that you will need to confirm the address specified during registration (I do not have more recent screenshots, unfortunately, but this does not change the essence).

This is done using entering a PIN code (pin), which will be sent to you by mail. When you enter the PIN code, you will be able to receive your first payment from Google AdSense:

Quite often the problem arises that Pin code does not arrive to the address specified during registration. Google's help on this matter says that if you have requested a PIN code three times and a month has passed since the last request, then on the Adsense main page you will have a link to a form where you can upload, for example, a scan of your passport to confirm your address.
Withdrawal of earned funds through Rapida Online
It is clear that withdrawal through Rapida will be much preferable, because then the money can be sent manually or automatically to real life in dozens of different ways. In theory, in this case you have several ways withdrawing money from Google AdSense to Rapida Online:
In any of the cases described above, your money will have to go into rapid online. Several years ago, AdSense made changes to the rules for withdrawing funds through Rapida, which you can read more about.
Previously, you could simply register with Rapida Online and receive funds from Google by mail (not electronically, of course). Now you must identify yourself in Rapid(show them your passport in their office or choose one of the impersonal methods), and also create a template for withdrawal, the ID of which will then need to be entered in the payment settings in Adsense.
Now let's see how we can create a template in Rapid, for example, to automatically redirect money from Adsense to your WebMoney wallet. To do this, you will need to go to the “Payment” - “Payment systems” tabs and select the desired payee:

Rapida Online has certain commissions, which the payment system may deduct from you. In the case of withdrawal to a WebMoney wallet, it will be 1.4 percent of the transfer amount:

Next, indicate your login (cell phone number), ruble wallet number in WebMoney and the maximum amount for withdrawal (15,000). After you click the button "Save as template", an SMS with a code (session PIN) will be sent to your cell phone, which you will need to enter in the next step of creating a template in Rapida.
Well, at the last step you will be asked to come up with a name for the template (no more than 8 Latin numbers and letters, and you cannot start the name with a number) and a description (you can also use it in Russian).
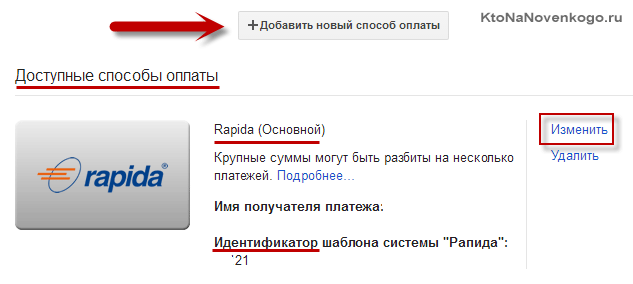
After you click “Save template”, it will be saved to the database and accessible from the “Templates” menu item. After viewing the data for this template, you will see its unique number, which you will need to link it to your Google Adsense account:

That’s it, all that remains now is to enter this number in your Adsense account and save the changes made. As a result, you will receive your next payment through Rapida.
Lately, I’ve been withdrawing from Rapida directly to the current account of an individual entrepreneur (I set up a payment template using free details in Rapida) and they take a smaller commission (only 0.9 percent). True, the last few payments in Rapid were stuck quite stubbornly and had to be pushed through through polite communication with the service’s technical support. Before this, everything generally worked like clockwork. By the way, this search thread may be useful in this regard, where you can get a lot of useful information.
Google AdSense is a popular and widely known worldwide contextual advertising network from google.com. With the help of Google AdSense, owners of websites and blogs on the Internet can earn money by placing a special Google AdSense code on the pages of their websites, which allows them to broadcast ads with contextual advertising to website visitors. In this article, we will understand in detail how to register with Google AdSense step by step.
AdSense registration instructions

On the next page you need to provide your contact information - this is what will be used when creating an account and subsequently sending money payments. 
- In the “Country” field, select your country of residence, in this case we select Russia.
- Select your time zone - depending on the region in which you live.
- In the “Account Type” field, you must correctly specify the account category. In the future, you will not be able to change this data; it will determine what type of taxation will apply to you, and depending on the selected type, forms for withdrawing funds from the account may be available.
- In the “Payment recipient's name” field, you must enter your first and last name in Latin characters. The symbols that are available for use can be viewed by clicking on the “Help Center” button, which is located just above the input window. The name you provide must match the owner of the bank account, as it may be difficult to change the name of the payee in the future.
- In the Address field, enter your home address.
- In the “City” field, enter your city of residence.
- In the “Region” field, select your region from those suggested in the list.
- In the “Index” field, enter your index.
- In the “Phone” field, enter your cell phone number.
- Below, select the source from which you learned about Google AdSense and click on the blue “Submit Application” button.
This completes registration with Google AdSense, now you need to wait some time until the site you specified is moderated. In the event that your site does not contain any enlightened content and has natural traffic, i.e. it is visited by users from search engines, then most likely the decision on your site will be positive. After some time, you will receive a notification that your site has been successfully moderated and now you can log into your AdSense account with your username and password and add contextual advertising blocks to the site. Read more about this in a separate article.
Login to your AdSense account
Login to Google AdSense account is only possible for registered users. If you do not yet have a registered Google AdSense account, then you need to follow the steps described above in this article to register your account. If you have already completed all these steps and are a registered user, then to log into your account you need to:
After authorization, the main window with all current data will open in front of you. In it you can see all the earnings received for today, yesterday, the last 7 days, and also for the last 28 days. You can also see your current balance here, as well as information about the last payment received from Google AdSense. All this data will be visible only to those users who have already placed the Google AdSense code on their website and earned at least the first few cents.
How to withdraw money from AdSense
In order to receive earned money from Google AdSense you need to accumulate more than $100 on your Current balance. Only in this case can you receive payment. Current balance shows the amount of money earned on the last day of the previous month. Every month Current balance is filled in with the amount of earnings in the current month. As soon as the amount on Current balance is equal to or exceeds $100, you will be able to receive all the money you earned to your payment details automatically.
Money from Google AdSense is transferred after the 20th of the next month. For example, on May 1, the Current balance exceeded $100 - this means that from June 20 to June 28, Google AdSense will transfer this money to your account.
In order to receive money, you must correctly fill out your payment details:
When setting up the withdrawal of funds to the Rapid system, you need to keep in mind that this payment can only be made for those Individual Google AdSense accounts. If you indicated your account type as “Business”, then in this case payments to the Rapid wallet will not be available.
Google AdSense is a contextual advertising service with which website owners can place advertising blocks on their resource, making a profit from it. Google AdSense rewards can be awarded based on ad clicks (conversions) or impressions. The cost of clicks varies - from a few cents to hundreds of dollars.
The Google AdSense service is mainly used by information sites, news portals, and blogs. In this case, advertising becomes the main source of income for resource owners. Sometimes you can find AdSense ad units on commercial websites. However, Internet marketers recommend not to abuse the capabilities of the service, because promotional materials can distract potential buyers from performing targeted actions or redirect them to a competitor’s website.
Google AdSense requirements for websites
To use Google AdSense, you must ensure that your site is eligible for monetization and meets the minimum requirements. Before applying for participation, Google recommends thoroughly assessing the quality of the content and ease of navigation. Texts on the site should arouse interest among users and be easy to understand, and interaction with the interface should be as clear and convenient as possible. Otherwise, the system will impose penalties on the resource or completely exclude it from the program.
Content and quality of posted content
Google AdSense has a number of requirements for the content of text content that is posted on the sites of system participants. The list is quite impressive, but you should familiarize yourself with it before applying.
- Adult content - materials with pornographic and/or erotic content;
- Dangerous and/or offensive content - propaganda of violence, calls for suicide, discrimination against certain segments of the population by nationality, gender, religion, etc.;
- Content promoting the use of drugs, tobacco products and alcohol - advertising of prohibited substances, alcohol and cigarettes, thematic discussions;
- Content related to gambling - advertising of casinos and bookmakers, calls for the purchase of scratch cards and lottery tickets, registration of online bets;
- Medical and pharmaceutical content - sale of prescription drugs, prohibited dietary supplements, dietary supplements. An exception is the offer of drugs that are dispensed in pharmacies without a prescription, as well as information materials about prescription drugs and supplements posted for the purpose of familiarizing/educating users (without a call for purchase);
- Materials promoting hacking and distribution of malware - instructions for installing equipment for hacking systems, advertising of virus programs, etc.;
- Content about making money on the Internet - sites that offer to make money on clicks, page views, instructions for making money on the Internet;
- Content that misleads users - contradictory or deliberately false information about persons and/or companies;
- Shock content - materials demonstrating acts of violence, photographs from crime scenes, accidents, etc.;
- Weapon-related content - advertising of firearms and bladed weapons, calls for purchase, instructions for making explosive devices yourself, propaganda of harm to health;
- Illegal content - photos, videos and text materials that violate US laws;
- Materials calling for dishonest activities - advertising the production of counterfeit documents, selling coursework, promoting fraudulent activities.
Google AdSense places demands not only on the content, but also on the quality of the content. Materials on sites where advertisements will be displayed must be of interest to users. You must post original content that does not violate copyright. Copy-pasting texts from other resources may lead to account blocking in the service.
Ease of navigation
An important criterion for any sites that plan to connect to Google AdSense is a convenient menu. Users must quickly find answers to their questions and interact with all interface elements. Future Google AdSense partners will find useful tips and recommendations for resource design inwebsite optimization guide .
Penalties from Google AdSense for non-compliant content
If a site connected to the Google AdSense service starts posting non-compliant materials, the webmaster will receive a warning notification. They will appear in your system account and will be sent to the email address you specified during registration. Ignoring the service’s recommendations may result in limited ad displays or complete account blocking. More information about violations and penalties can be found inHelp Center Google AdSense.
When you are sure that the site meets the service requirements, apply for registration. To do this, click on the “Register” button on the main page of the service.
In the window that opens, you will have to fill out a program participation form. It consists of two fields - the site URL and the webmaster's email.

After entering the data, you need to agree or refuse the Google AdSense mailing list and click on the “Save and Continue” button.

In the new form, you can change the previously specified information - link your Google AdSense account to another Gmail account, or unsubscribe from the service. After selecting the country, the text “Terms of Use” will open, which you need to read and agree to. Then you should click on the “Create an account” button and proceed to a detailed study of the capabilities of the service.

After registration, the service will ask you to fill in your payment address. It is necessary to receive rewards in the system.

In the fields you need to indicate the type of account - “Personal” or “Business”. The first is intended for individuals, and the second - for individual entrepreneurs and legal entities. When choosing a business account, you will have to fill out one more line of the form - the address of the organization (actual or legal). Owners of personal accounts must provide the full address of their actual place of residence.
After filling out your payment profile, the service will generate a code. It needs to be placed on the site between tags
And.
When changes are made to the HTML code of the page, you need to check the box next to “Code added to the site” and click on the “Finish” button.

The display of advertisements will begin immediately after activating the account, unless other settings are specified - the checkbox next to the item “Start displaying advertisements immediately after activating the account” is unchecked. It will take about a day to check the site. After this time, you will have the opportunity to add advertising units to the site, receiving a reward for displaying ads.
Settings
Before you start using Google AdSense, you should carefully review the Terms of Participation in the program. Advertising will be refused if the site has been operating for less than 6 months and its owner has not reached the age of majority (18 years) and does not have ownership rights to the resource.
To confirm ownership of the site, you need to have access to edit the code. The service will check for the presence of Google AdSense code on the site and provide access to the full set of functions.
In the settings menu of an activated account, you can add other users with different access rights - with read-only access, for reading and editing, for registration and making purchases, for management. This service feature should be used by owners of large resources with several administrators. In addition to users with limited access, Google AdSense allows you to add account administrators, who can change payment profile information, specify new users, etc. Both administrators and the account owner can delete an added user.
In “Settings” you can also specify the types of notifications that you want to receive in the mailing list. To do this, go to the “Alert Settings” - “Personal Settings” section and select the necessary items. You can also opt out of receiving notifications there.
Types of ad units
Google Adsense implements four types of ad units, which differ from each other in content and placement. Among them:
- Block of text and media ads. The most convenient and easiest way to display advertising on the site. A block is formed from several ads with standard or special sizes. There are also so-called adaptive blocks, which change their sizes in accordance with the page layout.
- Native ads. There are three types - ads in articles, in feeds and in blocks of recommended content. Native ads in articles are installed between paragraphs of text, complementing the design of the pages. Ads in feeds are organically integrated into lists of products or articles. A block of recommended content is placed under the publication and is formed from site pages with similar content. Native advertisements make a good impression on visitors, since the style of the blocks is automatically selected taking into account the design of the site.
- Link blocks. They are a list of topics that correspond to the content of the page. There are adaptive and standard ones.
- Special advertising blocks. They are manually configured by the site owner.
Advertising units should be selected taking into account the design and type of site. For example, on large-scale information portals it is better to use native ads and link blocks. They will complement the content of the pages and direct users to other sections of the site. This way, you can not only earn income from advertising, but also improve behavioral factors - session duration, viewing depth.
Advertising channels
In Google AdSense, there is such a thing as advertising (client) channels. This feature allows you to group ad units and track their effectiveness. Website owners can configure up to 2,000 channels.
The grouping of blocks in a channel can be different:
- by size and colors of advertisements;
- by location on the page;
- by topic.
Site owners can add a customer channel to a new or edited ad unit, or create a channel first and then attach tracking ad units to it. Performance reports will be collected for each channel. They can be found in the “Reports” - “Advanced Reports” - “Client Channels” section in the Google AdSense account menu. After clicking on the selected channel, extended statistics will open. Data can be segmented by adding different parameters, combining several geolocation reports, etc.
Advertising on the site will begin after automated ads are enabled or ad units are created. In the first case, you will not have to configure anything - the service will independently determine the places to place advertising content and the need to display advertising on certain pages. Website owners will be able to enable or disable advertising with one button in their Google AdSense account settings.
If you want to independently determine places for advertising, you will have to create ad units. Each block must be configured and added to the site manually. Places for placement must comply with the Service Rules.


To ensure that promotional materials are displayed correctly on the page, you should enable the “Recommended ad sizes” option. In the “Ad Type” menu, you need to specify what kind of advertising will be displayed on the site. Text ad style is optional. To track the effectiveness of an ad unit, you need to set up a client channel.
When the advertising unit is created, you need to click on the “Save and get code” button, set its settings - “Asynchronous” or “Synchronous” - in the “Advertising code” window that opens. After this, the code needs to be copied and pasted into the HTML code of the site pages where the created advertising unit will be displayed. Ads will appear on the site within 10 minutes after installing the code.
How to withdraw money
To receive rewards from displaying advertisements on Google AdSense, you must specify tax information, the name and address of the recipient, and payment details in your profile. The service offers several withdrawal methods - transfers to a bank account, checks and transfers in the Western Union Quick Cash system. The last two methods are not available in all countries, so it is better to withdraw the reward to a bank account.
To receive a bank transfer, you must provide full details. Enter in the form fields:
- Full name of the account owner;
- full name of the bank;
- BIC;
- SWIFT/BIC and IBAN.
The relevance of the details is verified by a trial payment. Google will send a symbolic amount to the recipient's account - up to 1 US dollar. It may take 2-5 days for the transaction information to appear on your statement. When the trial payment arrives, you need to log into your Google AdSense account, select “Payments” - “Manage payment methods” in the settings, click on the “Confirm” button and indicate the amount of the trial payment in the form that opens. After saving the data, the system will confirm your payment details, and you will be able to receive funds from displaying advertisements.
When your balance reaches the threshold amount, you will be able to withdraw money.When withdrawing funds for the first time, site owners need to confirm the address with a PIN code, which Google AdSense will send to the email address associated with the account. The secret code must be specified on the “Account Information” page.
Remuneration payments are made according to the established schedule - from the 21st to the 26th of each month. Payments take up to 21 days to process, after which the money will be sent to your bank account. If the balance does not reach the threshold amount by the end of the month, the payment will be postponed to the next billing period.
Problems with withdrawals
You may experience problems withdrawing rewards from your Google AdSense account. Sometimes site owners do not receive a PIN code confirming payment details. In this case, you need to request a new code in the “Settings” - “Account Information” section. Remember that an incorrect PIN code entered three times will block the display of advertisements on the site. After this you will have to contact technical support.
Sometimes the service may temporarily block receiving payments. This problem occurs in several cases:
- tax information has not been sent;
- payment method is not configured;
- the address and/or identity of the recipient is not confirmed;
- The account is verified to meet system requirements.
If payments were manually suspended by the account owner, you need to resume them in the settings.
More information about the problems that arise when withdrawing funds from your Google AdSense account can be found in the correspondingHelp Center section.
Recommendations for increasing earnings in Google AdSense
To receive maximum income from displaying advertisements on the site, you should use the service’s recommendations:
- Experiment with styles. Change the background color and frame of your ads to make them more visible and clickable. Tryadhere to principlesfusion, addition or contrast.
- Make the most of your advertising space. Place advertisements in voluminous materials, breaking up the text with advertising blocks, place advertisements in discussions on forums. Follow the principle of the ratio of main content and advertising - the latter should be several times less.
- Determine effective ad sizes. Analyze the conversion rate of ad units and identify the types of ads that bring the most profit.
- Follow advertising guidelines. Analyze the needs of your website visitors and identify places on the pages where the audience concentrates their attention the most. Make sure that advertising does not interfere with viewing the main content.
- Increase your cost per click. Use text and display advertising, and do not set ad display filtering too strictly.
- Follow Google AdSense guidelines and receive more income from advertising on the site.
- Fill the resource with quality content and
Hello, dear friends. Today will be the first article devoted to site monetization using Google AdSense contextual advertising. In this article, we will analyze the process of registering with Adsense, creating and setting up advertising units and installing an advertising code on the site.
It's no secret that every website owner can make money on their resource. There are a lot of ways, one of which is contextual advertising. Perhaps everyone dreams of such passive income. The main thing is to develop your website and think first of all about the benefits for visitors, and the more visitors you have on your website, the higher your income from contextual advertising.
So, Google AdSense offers to make money on your own websites, YouTube channels and AdMob mobile applications. Moreover, unlike other advertising networks, Adsense does not have an entry threshold for traffic to your site. You can start making money on the site from the first day of its existence. Of course, if your site is made for people and does not contain prohibited content (terrorism, calls for violence, copyright infringement, etc.).
Registering with Google AdSense
In general, registration with AdSense is not necessary as such, since Google allows you to use a single account for all of its services. It is enough to create a mailbox on Gmail once and then use this mailbox (as a login) and password to log in to any Google service.
I'm sure you already have a Google account. If not, then my article about there is a detailed account registration scheme.
Apply now possible on the main page Google AdSense. To do this, follow the link and click on the button « Getstartednow."
Don't worry that everything is in English. In the next step you will have the option to select a language.

Here, at this step, you will be asked to log in under your single account or register a new one. Since we already have an account, click on the button "Yes, sign in to your Google account".

By clicking on the button, you will be asked to enter the password for your account (this is your Gmail mailbox password). Enter your password.

Next, in the second step, you need to specify the url of your site and select the main language. Even if you have several sites, now you indicate one of them. The rest can be added after your application is confirmed. Language, you also choose the main one, even if you have translated versions.
Read the rules and click on the button "Continue".

The next step is to fill out your contact information. The data you can select from the drop-down list will be in Russian. But the fields that you will fill out yourself (first and last name, address) must be entered only in Latin letters. Fill out everything correctly, since in the future a PIN code will be sent to this address, which is necessary to confirm the address and.
As soon as the data is filled in, click on the button "Apply".

Now we just have to wait. Your site has been sent for moderation. In about a couple of days you will receive an email confirming your application and your next steps. By the way, I received the letter the very next day.

Creating an AdSense ad unit
Having received the letter, you need to move on to the next step - creating an advertising unit. Until you create this block and place it on the site, your account will not be confirmed.
To do this, you need to go to your Google Adsense account, you can do this by clicking on the button "Begin" in a letter or via a link http://www.google.com/adsense/.
By going to your account, you are automatically taken to the section "My advertisements". Where, to create a new ad you need to click on the button "New ad unit."

First, you need to assign a name to the ad unit, select the size and determine the type. The name can be assigned according to the size of the block or the location where it will be located. This will make it easier to carry out analysis in the future. The block size is perhaps the only correct one - adaptive. Since if you are creating your site for mobile users, then the ads should also fit harmoniously into the design. Next to the block sizes, which are adapted for mobile devices, there is a phone icon. Choose only such blocks; their size will adapt itself depending on the size of the parent container.
Select ad type "Text and display ads", since the system’s help itself states that this type is the most profitable.

For text ads, you can customize the style so that these ads fit neatly into the design of your site. To do this, you can choose one of the proposed options, you can copy it and edit it, or create your own style.
All necessary tinctures are available in the subsection.

The next important point is setting up client channels. This will allow you to group advertising blocks by size, name, and location on the page. And the most interesting thing is that by specifying the client channel as the ad placement location, advertisers will be able to target ad units on your site. Which helps increase your cost per click.
To configure, click on the tab - “Create a new customer channel”.

Then you need to fill out several fields and check the checkbox in the item "Targeting".

The final step in setting up an ad unit is setting up a backup ad. By default this is an empty area. But you can make a single-color fill or connect a graphic splash screen from the site. For example, a banner. Just make sure it matches the size of the ad unit.
And after you understand this point, click on the button "Save and get code".


Note: By default, all ad serving categories on your site are enabled. But, you can make the necessary changes in the section "Allow/block ads".
Inserting AdSense advertising code into the sitebar and articles of WordPress sites
So, open the WordPress admin panel - "Appearance" – "Widgets"– widget type "Text" and place an advertising code in it.


And in your mailbox, you will receive a letter confirming the full activation of your Google AdSense account.

From now on, your website will display ads from the Google advertising network.
To do this, add the theme function file at the very end, before closing ?> paste this code:
Function block1() (return " AdSense Ad Code"; ) add_shortcode("adsense1 ", "block1 ");
If you intend to insert several advertising blocks in an article, then paste this code into the file again and change adsense1 and block1 on adsense2 and block2.
In the article itself, in the place where you want to display a block with advertising, insert this code:
And soon I will prepare an article about methods on the site using both manual and automatic methods. Believe me, it makes life a lot easier.
I also recommend watching the video version of the article.
Well, friends, that’s all for me today. Try it, register and monetize your sites. If you have any questions, ask them in the comments, I will be happy to help. I wish you all good luck and see you in new articles and video tutorials.
P.S. By the way, you can also install the AdSense mobile application on your smartphone and you will always have all the statistics at your fingertips.

And in conclusion, I want to congratulate all of you, friends, on Victory Day! War is grief. And the day it ends is truly a holiday! My grandparents went through the entire war. Grandmother is still alive, she is already 93 years old. The horror that they and millions of people had to endure will never be forgotten. It’s hard for her to look at what’s happening in the world, how angry people have become. They forgot what our ancestors fought for.
I wish you and your families good health and peaceful skies above your heads! And so that the mistakes of the past are never repeated again. So that there is no war!
", today I will take the time to describe how to add Google Adsense advertising to your blog. We have already discussed why this service was invented and how to make money from it. Today we’ll look at how registration in Google Adsense takes place, the main options of the service and types of ads. Let's look at the options for adding Adsense to a WordPress site using a special plugin and by manually inserting the code.
How to register with Adsense?
When you go to google.com/adsense, you will see a page in English. To go to the registration form in Russian, you need to click “ Sign in» and select your account (email gmail.com) in Google, or create one.
After that, in the pop-up window, select “sign up for an AdSense account today”

Then, select the language " Russian" and proceed to registration.

Using the created Google account, go to the “ Describe your content" Here you will need to indicate the url of your blog and the language of its content. It's also important to pay attention to the AdSense program rules. Failure to comply with these rules in the future may result in the site being excluded from the program. For example, you should not click on advertisements on your site yourself. More detailed Adsense rules can be found here.
The next step is to fill out your contact information.

To create an AdSense account, you need to provide reliable data in Latin letters. This will determine whether you can subsequently receive the money you earned.
Within a week after Once you have completed the registration procedure, you should receive confirmation by email that your site has been accepted into the program.
Google AdSense: how to set it up? Creating an ad unit
Once your blog has been moderated, you can log into your AdSense account. The main page will show statistics of your income, views, clicks, etc.


Here you can specify the name of the block, its size, ad type, and create a client channel.

You indicate the name for your convenience. Ad sizes can vary greatly. Based on Google's recommendations, horizontal blocks that work best include a large rectangle (336 x 280), a medium rectangle (300 x 250), a full-size banner (728 x 90), and a wide skyscraper (160 x 600). But depending on the design and structure of your site, you can select formats that are convenient for you, and then track statistics on them. When analyzing reviews of GoogleAdsense, it is better to choose “Text and graphic” ad type, this will increase your income. Another useful feature is customer channels. It allows you to group advertising blocks according to different criteria: by location, size, page theme. This way, you can track the effectiveness of channels (in the “Reports” section), as well as enable targeting for them. Those. you'll be able to give the advertiser the ability to choose the placement you created using the customer channel.
In addition to the “Client Channels” column, when creating a new advertising unit, this section is also placed in a separate tab. Those. you can configure it after you have created an ad group. To enable targeting, you need to check the appropriate box.

You can also apply appearance settings to text ads.

Here you choose either ready-made templates (as shown in the picture), or you can create your own style by changing the color of the text, frame, background, etc.

WordPress Adsense Plugin
There are a sufficient number of plugins for working with Adsense. I'll tell you about the plugin that seems to me the most convenient. This is Easy Adsense. It is convenient primarily because it is translated into Russian. Additionally, it will allow you to place advertisements anywhere on your blog. The Adsense plugin is installed via the installer, or by adding it to the wp-plugins folder. Next, activate it in the plugins section on your website. After this, select the placement location for the ad unit that you created in Adsense. In the appropriate field, paste the code you received.

However, installing a plugin is not the only way to add code to your site. Despite their convenience, plugins load the engine and if you can do without additional load, why not do it?
Inserting AdSense code without a plugin
Its code will look like this:
| 1 2 3 4 5 | function context_reklama () ( return "Google Adsense code" ; ) add_shortcode ( "adsense" , "context_reklama" ) ; |
function context_reklama () ( return "Google Adsense code"; ) add_shortcode ( "adsense", "context_reklama");
In this case, “context_reklama” is the name of the function for your convenience, “Google AdSense code” is the code you received in Adsense, “adsense” is a short code that you can insert anywhere on the page to display an advertising message.
Paste the generated code after the tag
Add adsense code after h1-h6 headers
« Ad block code" - the code you received in Adsense. This feature allows ad units to appear after each h2 tag. However, you need to keep in mind that Google AdSense has a limit on the number of ad units. There should be no more than three.
Add adsense code after
Add an adsense ad block in the middle of a WordPress post
This code will determine the middle of your article and find the end of the nearest paragraph
And insert a block after it:
Don't show on home page
For more information on Google AdSense, visit the Adsense Help Center. There you can find recommendations on how to register with Google Adsense and start working with the service, as well as many answers on working in the program.
If you suddenly decide not only to make money from contextual advertising, but also to promote something with its help, I can recommend a convenient service. Here you can advertise directly in both Yandex.Direct and Google Adwords. By the way, all operations are automated, so you will save a lot of time and devote it entirely to monetizing your blog.
I hope today's article will simplify your cooperation with Google AdSense and allow you to effectively place contextual advertising on your blog. See you!


