What are root rights? Working with root rights: obtaining and deleting
The screen rotation function very often affects the comfortable viewing of videos, photos, etc. Sometimes problems with the auto-rotate function arise, such as, for example, the screen stops rearranging, or, on the contrary, constantly changes orientation from vertical to horizontal, which is significantly depressing and interferes with the comfortable use of the device.
How to enable/disable screen rotation on iPhone
As for the standard iPhone settings, auto-rotate is enabled by default. To disable this mode, you just need to go to Control Center and disable this option there.
The iPhone 6 Plus/ 6s Plus/ 7 Plus version also has an additional option for rotating the desktop.
Why might screen rotation not work?
The most common reason for this is the accidentally enabled blocking option, which is located in the Control Center.
If this option is enabled, you will see this icon:
To disable/enable the blocking, go to the Control Center by swiping to open it.

Reboot
Rebooting your iPhone can also help in this situation. Rebooting can be done simultaneously by pressing the Power and Home buttons as shown in the image below.

As for the brand new iPhone 8, X, to turn off the gadget you need to simultaneously hold down 2 volume buttons and the power button.

iOS updates

Most system errors occur due to bugs in the iOS system itself. In particular, because of this, the device screen may not rotate. Although these cases are rare, it doesn’t hurt to check for updates and, if available, install:
- Go to the “Settings” menu;
- Select the “General” tab and tap on “Update”.
Wait for the update to install on your iPhone and restart it.
Display scaling factor
When the zoom feature is enabled, it may interfere with screen rotation. Therefore it should be disabled. Also, if you need to enable display scaling, let these settings be similar. Consider disabling the scaling option:
- In the settings section, select “Display and Brightness”;
- After clicking “Display Magnification”, tap on the view option to check the status of the Display Magnification operation;
- If the function is enabled, select the standard operating mode and click “Apply” to save the result;
- In the subsequent menu, select “Use standard” to continue;
- After this setting, the device will restart.

Gyroscope calibration
If after the above methods the screen rotation still does not work, try calibrating the gyroscope:
- Reboot your iPhone;
- Open the compass, where a pop-up request to calibrate the gyroscope will appear;
- Approve the request and complete this procedure.
Is the accelerometer working?
It should be remembered that screen rotations depend on such a detail in the gadget as the “accelerometer”. The reason that the screen rotation does not work may be a defect in this very part. In this case, you need to contact the service center for the help of a specialist.
Landscape mode
Landscape mode is the current mode for watching videos, using applications, etc.
To enable/disable it you must do the following:
- Go to “Application Settings”;
- Select "Display & Brightness";
- Select “View” from the list provided. The item is located under the “Display scaling” line.

Today we will look at how you can disable or enable screen rotation on your iPhone. This feature is quite necessary on any smartphone.
To understand exactly when this function can come in handy, let’s take the most common situation. Let's say you are lying on your side in bed and your screen begins to live its own life and change the orientation of the screen.
So that you can use the iPhone only in a vertical position, such a function as disabling screen rotation was invented.
Implementation on iOS from 4.0 to 6.0
If you are the owner of a device on which iOS is installed exactly as indicated in the title, then on your smartphone, when you press the home key twice, the multitasking panel appears.
By scrolling this panel to the right, you will be able to see a circle with an arrow. By pressing this button, your screen will always be in a vertical position.
Implementation on iOS 7.0 and higher
After the new operating system iOS 7.0 was released, the menu design completely changed, including the location of this function.
Finding it is quite simple. Swap the screen from the very bottom up and a panel with the most important functions of the smartphone will appear in front of you. 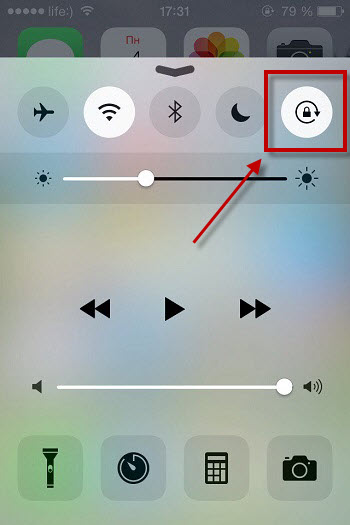
On the top right you can see a lock in a circle; this button is responsible for this ability to disable rotation.
Conclusions
No one knows how this function will be implemented in the future. How convenient it is to disable and enable screen rotation on your iPhone in the future is still unknown, but I think there will be something original.
Now you know what this strange circled lock icon on your iPhone is for.
The iPhone, like any other modern smartphone, allows you to use vertical or horizontal screen orientation. Why is this necessary? For example, to watch a movie, you should definitely use landscape orientation. To read a book, as a rule, vertical orientation is used. And in general, in life we usually use vertical screen orientation.
By default, any smartphone, including the iPhone, automatically flips the screen when the body is tilted. This, one might say, is a feature. If you want to lock the screen on your iPhone, doing so couldn't be easier.
Do it from the bottom up on your device so that “Control Center” appears. In it you will see a lock icon with an arrow. Click on it.

After this, an icon with an arrow will appear in the status bar at the top of the screen. It means that screen rotation is currently locked. No matter how you twist your iPhone in your hands, the screen will not turn over.

You can do it differently, although it will take a little longer. Find the Settings app on your desktop and open it.

In the “Basic” section, check the “Orientation lock” checkbox.

In this case, the auto-rotate screen is turned off, that is, the lock is turned on.
As you understand, to disable the screen orientation change lock, you need to do the above in reverse order. Nothing complicated.
If you want to dig into the Android system, you may find that many applications require root rights. Recently, there is practically no need to obtain superuser rights, but still some applications require root rights. This article describes how to open root rights on Android and why you might need them.
Why do you need root rights on Android?
Android is based on Linux. On Linux and other Unix-like operating systems, the root user is equivalent to the administrator on Windows. The root user has access to the entire operating system and can do anything. By default, you are not rooted on your Android device, and some apps will not work without root privileges. Like other modern mobile operating systems, Android runs applications in a sandbox for security purposes.
A root user always exists in Android, there's just no built-in way to access it. Getting root rights means that you gain access to an account with superuser rights. This process is often compared to jailbreaking an iPhone or iPad, but rooting and jailbreaking are different actions.
Root rights allow you to do many useful things. With superuser rights, you can uninstall or freeze pre-installed applications, run a firewall, enable tethering even if your carrier blocks it, create a system backup, and use many other settings that require low-level system access.
Applications that require root access are not difficult to find in the Google Play Store, but they will not work unless you have root access. Some apps have features that work on rooted devices. Therefore, you need to learn how to root Android to take advantage of these features.
Warnings
Android devices cannot be rooted for various reasons. In fact, device manufacturers are trying their best to prevent you from obtaining rights to an Android gadget. And here's why:
- Safety: On rooted devices, applications run outside the sandbox. Applications can abuse the superuser rights you have granted and break into other applications, which is usually not possible. Therefore, Google does not approve the use of Android Pay on rooted devices.
- Guarantee: Some manufacturers claim that after receiving root rights, the warranty disappears. However, gaining root privileges will not break the hardware. In many cases, you can perform the non-root procedure and the manufacturer will not be able to know whether the root rights have been obtained or not.
- Breaking: As always, you do this at your own risk. Obtaining root rights is usually a safe process, but you do it yourself. If you mess something up, you won't be able to count on free warranty service to fix it. If you are worried whether everything will go smoothly, we recommend that you first look for information about successfully obtaining superuser rights on your device to be sure that there will be no pitfalls in the process.
Additionally, rooting may void your warranty, at least for some repairs.
Several ways on how to open root rights on Android
There are many ways to root Android, and which one you should use depends on your phone. In general, rooting will involve one of these processes:
- Unlocking the bootloader: Google and device manufacturers do not officially support rooting, but they do provide an official way for low-level access to some devices, which allows you to then gain root rights. For example, Nexus devices are designed for developers and you can easily unlock the bootloader with a single command. And then get root rights to download the .zip archive containing the file to obtain rights through the recovery screen. The Nexus Root Toolkit for Nexus devices automates this process. Other manufacturers also offer bootloader unlocking methods, but only for certain devices.
- Exploiting a Security Vulnerability: Other devices are blocked. Their manufacturers do not provide an official way to unlock their bootloader and tamper with their software. These devices can only be rooted by exploiting a security vulnerability that allows the necessary file to be installed on the system partition.
- Installing CyanogenMod or other custom firmware on Android: Technically, this is an extension of one of the above methods. Unlocking the operating system's bootloader and exploiting a security vulnerability allows you to install custom ROMs, such as CyanogenMod, which are often already rooted. CyanogenMod has a simple toggle in the settings that allows you to enable or disable root access. Updating to a new version of CyanogenMod or other custom firmware will not disable root rights if the firmware is already rooted.
In this article we will primarily use the first method, which involves an unlocked bootloader. If your phone requires exploitation of a vulnerability, then we will not be able to help you as the process is different for each phone. You can search for information on how to root Android on the XDA Developers forum. You can use the Kingo Root and Towelroot applications, which allow you to gain superuser rights in one click.
Before you can root your android, you will need to unlock the bootloader using the official method and then install the TWRP recovery environment using these instructions. We will use TWRP to root your phone.
How to download SuperSU on your phone and get root access
So, your bootloader is unlocked and you have installed TWRP. Great! You've done almost everything. To root we are going to use the SuperSU program. This is the best application that can provide root access to other applications. SuperSU is also available in the Google Play Store, but this version will not give you superuser rights, it can only be used if you already have root rights. Luckily SuperSU is also available as a .zip file that we can download from TWRP. This will allow you to gain superuser rights and install the SuperSU application.
So, to get started, follow this link to download the latest version of SuperSU. Download the .zip file to your computer, connect your phone via USB cable to your PC and download SuperSU to your phone.
Next, boot your phone into TWRP mode. This is done differently on different phones, but usually you need to turn off the phone and press and hold the power button + volume up key for 10 seconds, then use the volume keys to go to “Recovery Mode” and press the power button to select it .
Once you do this you will be taken to the TWRP main screen. Click on the "Install" button.
NOTE: You must make a twrp backup before continuing.
The following screen will appear. Scroll down and navigate to the zip file you downloaded earlier.

Click on the zip file and you will see this screen. Swipe the slider to confirm installation.

When the process is complete, click on the “Wipe cache/Dalvik” button that appears and swipe the slider to confirm.

When the process is complete, click on the “Reboot System” button to reboot the Android system.
If TWRP asks whether to install SuperSU, click “Do Not Install”. Sometimes, TWRP cannot detect that you already have SuperSU installed.
Managing root rights with the SuperSU application
Now that you have learned how to open root rights on Android, you need to learn how to manage these rights.
After rebooting your phone, you should see a new SuperSU icon in the application menu. SuperSU distributes rights to applications that require them. Whenever an application wants to ask for superuser rights, it must ask your application SuperSU, which will show this request. To make sure that root rights are working, you can download the Root Checker application to check superuser rights.
For example, let's open and add the Clean Master application, which allows you to clean your device of accumulated garbage. It requires root rights for more effective cleansing. After launch, you will see a message stating that you need to provide superuser rights. Click Submit.

To manage root rights, open the application menu and click on the SuperSU icon. You will see a list of applications that have been granted or denied superuser rights. You can click on an application to change its permissions.
To remove root rights, open the SuperSU application, go to settings and select the “Complete Root removal” option. If this is applicable for your device, then root rights will be removed.
Now you know how to open root rights on Android and how to remove them. We wish you good luck!


