How to open iPhone 7 to insert SIM card. Faulty smartphone or tablet
How to use the universal slot to its fullest? Make a combined SIM card with a built-in memory card!
Hybrid slot allowing you to install or 2 SIM, or SIM and flash drive- the scourge of our time. Separate slots are steadily appearing in smartphones of the lower price segment. Most of the popular, noteworthy models force you to get out with flash drives connected via OTG.
Or purchase a device with more memory. The manufacturers' policy is clear - to profit as much as possible by offering a smartphone with increased capacity internal memory much more expensive than the memory itself costs.
Why is this necessary?

Smartphones with a minimum amount of internal memory usually cost much less than their counterparts with larger storage. Applications and content are perfectly placed on the card, so almost all brands retain the ability to install it (with the exception of some overly “principled” Chinese brands).
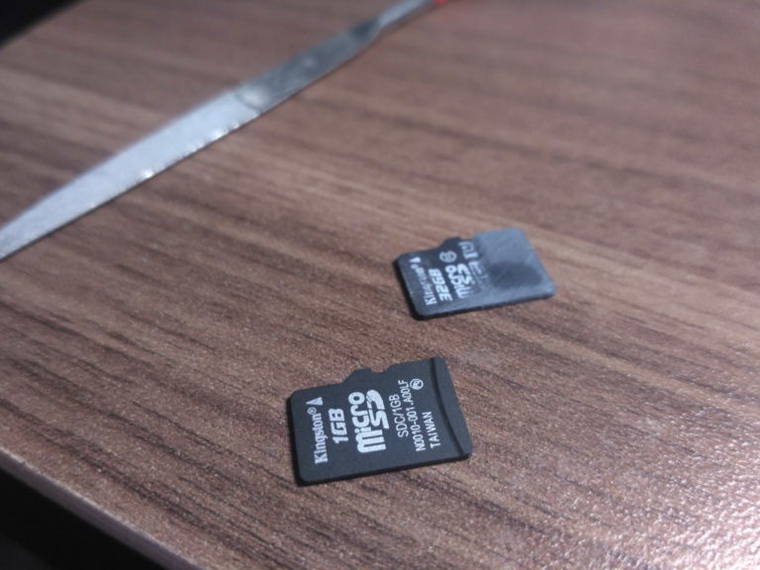
Usually in the “paired” tray there are card contacts microSD memory and the second SIM cards are in different places. If desired, they can combine- and nothing prevents them from working simultaneously. There are no software restrictions.
For which smartphones can a hybrid SIM+microSD be made?

For almost any smartphone that has a slot design similar to the one shown in the picture above. Yes, the contacts of the flash drive and SIM card are directed in the same direction. However, they use different sets of contacts with different heights to operate.
Some companies deliberately reduce the thickness of the slot, or change the direction of the elements in the tray. In such cases, you first need to turn to specialized communities dedicated to discussing the relevant smartphone.
In addition, it is worth considering that the tray and its slot are not designed for increased thickness of elements. Therefore in certain models There are problems with hybrid microSD+SIM. Only a thematic forum can provide accurate information.
ATTENTION!
You carry out all the manipulations described below at your own peril and risk. We do not accept any responsibility for any damage you may cause to your device.
The chances of damaging the SIM card are greatest. To a lesser extent - a MicroSD memory card.
Manufacturing instructions
Determining the correct position of elements

First, you will need to determine the correct position of the SIM card in the tray. Cards different operators may have different configuration contacts.
Makes sense trace the outline, which will fit into the slot - this will make it easier to trim. It is also necessary to estimate the maximum allowable thickness of the SIM card.
SIM manufacturing

After we have decided on the size, it is necessary separate the SIM card itself (chip) from the plastic base. Two methods are used for this:
1. Heating the SIM card from the plastic side at a temperature of about 200 degrees for 30-60 seconds to 1 minute. Plastic in in this case separated from the chip using a knife or blade.
2. Chemical dissolution of the plastic substrate using dichloroethane (POISON! Use only in a ventilated area!), acetone or a similar solvent - for example, 646.
The separated chip will require additional processing. First you need to get rid of any remaining glue on the back side using a knife or solvent - carefully so as not to damage the contacts.
Then you will need to carefully trim SIM card contact pad for placement on microSD in accordance with the first point. It will take 1-2 mm on each side.
Connecting SIM and microSD
After preparing the SIM card, you need to check whether there are any interferences during installation on the side of the flash drive itself. In some cases, it is necessary to file off the tubercle on the reverse side using a small (jeweler's) file.
We make sure that the combination fits flush or barely sticks out in the slot;
- glue the elements to each other using superglue based cyanoacrylate(“Moment Superglue Gel”), carefully gluing the SIM card around the edges. 
If necessary, cyanoacrylate is easily destroyed using specialized compounds from the store or nail polish remover without acetone (isopropyl alcohol).
Checking the work

Finally, you need to check that all actions have been performed correctly. If everything is done correctly, then the simultaneous work will look like this: 
If the memory card is not visible, you need to tin the contacts of the memory card with a soldering iron, or stick a strip of electrical tape with reverse side so that the contacts become a little higher.
Precautions

The thickness of the elements should be minimal. There should be no gaps between the SIM card and the flash drive. Gluing along the edge is required - if the SIM card sticks out even a little, there is a chance that when you pull out the slot, you will leave it in it.
It is recommended not to remove the tray after manufacturing and installation. Therefore it is worth taking care volume microSD cards - and don’t skimp on cards with a large capacity. As practice shows, the chance of ruining a SIM card is much greater - it is the one that gets stuck.
In addition, before manufacturing, you should contact the specialized community for information: are there any problems with using hybrid microSD+SIM. Especially when making it for the first time.
Many brands have problematic smartphone models: for example, Meizu M2 Note. “Sandwich” has every chance of breaking the universal slot.
So, your dream has finally come true: you have become the proud owner of a beautiful iPhone 4 from Apple. Such smartphones really stand apart in the mobile device market and deserve special attention. And this is thanks not only to their extraordinary functionality, but also to the special approach that this miracle requires from the user. Handling the iPhone can be a little more difficult than with devices on platforms that are more familiar to us. But after a short period of time, getting used to the device, any user is convinced of its extraordinary simplicity and practicality.
Getting Started with iPhone
The first step in using a brand new smartphone is, of course, to turn it on. This must be done before inserting the SIM card into the device. On the iPhone 4, the on and off button is located at the top of the case, like any other device from this company. The key must be pressed and held for several seconds until the company logo appears on the display. After this, you will see a message telling you that you need to make a special gesture to turn on the device. After following all the instructions, your iPhone will be activated.
Installing the card

If you have just purchased Apple device, the first question that usually arises concerns how to insert a SIM card into the iPhone 4. These smartphones are designed a little more in a cunning way, than their other technical counterparts, more familiar to us. You probably noticed that the communicator comes with a small metal key, something like a paper clip. This is the solution to installing a SIM card. Review yours new smartphone take a closer look. On the right side you will notice a small secret hole. To understand 4, you need to press the hole with this same metal key. After pressing, you will find a card slot that opens. By the way, if you lose your key, which happens quite often, you regular one will do paper clip. When opening the SIM card tray, be careful to avoid damaging it, otherwise opening it later will be very problematic. After installing the card, push the cover back until it clicks. The search must be displayed on the display mobile network. This means that the SIM card for iPhone 4 is installed correctly. If the device displays a message about the absence of a card, it may still be installed incorrectly.
The usual solution won't work

If you have already figured out how to insert a SIM card into the iPhone 4, you probably realized that for this device you need to purchase not an ordinary classic format card, but a special micro one. In any salon cellular communication you can purchase a “mini” that is suitable for iPhone 4. Some sellers offer to buy a “number” at the same time as mobile device, which will undoubtedly be the most convenient option. The micro-SIM card has dimensions of 15x12 millimeters, which is much smaller than the standard options.
Cutting off the “number”

Sometimes, when changing a device, the user does not want to change the SIM card, so to use it on a new device, it is necessary to adapt the format to micro. Of course, you can go to your operator’s salon and write an application to change the SIM card while keeping the number, but this requires a certain amount of time, so most people prefer to simply reduce the card.
You can again cut a SIM card for iPhone 4 directly when purchasing the device. Almost all sellers provide this service. You can do this yourself. In this case, you must be as careful as possible so as not to damage the chip. Otherwise, you can safely throw away the card. Pruning is a very delicate matter, so it’s still the most the right decision will turn to professionals, as they have special templates that can easily be adjusted to the size of the card.
So, if you have finally figured out how to insert a SIM card into the iPhone 4, turned on the new device and prepared a “number” in micro-SIM format, you can accept congratulations on the purchase of a wonderful smartphone. By the way, you have probably already noted a special advantage with this arrangement of the card in the phone: now, if you need to change the SIM card or remove it, you do not have to completely turn off the device and remove the battery, as is done in any other device. At subsequent iPhone operation you will discover many more positive aspects of this mobile device.
The first task the user faces after iPhone purchases, this is installing a SIM card. If you have not previously used smartphones with non-separable housings, then this may cause some difficulties. In this article we will talk about how to insert a SIM card into an iPhone 4, 4s, 5, 5c, 5s, SE, 6, 6s or 7. Also in the article you can find out about supported SIM sizes maps and some features of the iPhone 3GS, iPhone 3G and original iPhone models.
How to insert a SIM card into iPhone 4 and newer versions
Turn off your iPhone before inserting the SIM card. To do this, you need to press the power button and hold it until the screen prompts you to turn off your iPhone. Click “Turn off” and
If you have an iPhone 4 or more new version iPhone (for example, iPhone 4s, 5, 5c, 5s, SE, 6, 6s or 7), then the slot for SIM installation card is located on the right side of the device. If you look at the right side of the device, you will immediately notice it. This is a small rectangle with a hole for a paperclip.
In order to insert a SIM card, this slot must first be removed from the iPhone. To do this, you will need a regular paper clip or the paper clip that comes with your iPhone. The paperclip must be inserted into the hole in the slot and pressed gently. You need to press gently, gradually increasing the force.

When the pressing force is sufficient, you will hear a small click and the SIM card slot will slide out of the iPhone. Now you need to carefully pry the slot with your fingernail and remove it completely.

After that, carefully insert the SIM card into the slot and insert it into the iPhone. When installing a SIM card, it must be inserted in such a way that the contacts of the SIM card face down, and the cut corner of the SIM card coincides with the cut corner on the slot.

Once the SIM card is installed in the slot, it can be inserted into the iPhone. In this case, you need to make sure that the holes on the SIM card slot and on the iPhone match.

You also need to insert the SIM card into the iPhone carefully and with a little force. Once the SIM card slot is aligned with the side edge of the iPhone, the SIM card is inserted.
How to insert a SIM card into iPhone 3GS and older versions
If you have an iPhone 3GS, iPhone 3G or original iPhone first generation, then the process of installing a SIM card is exactly the same as described above. The only difference is the location of the SIM card slot.

On iPhone 3GS, iPhone 3G and first iPhone The SIM card slot is inserted from the top edge of the smartphone, and not from the side, as on more modern models.
Which SIM card can be inserted into an iPhone?
Different iPhone models support different SIM cards. Therefore, before you start inserting anything, you need to clarify which SIM card you need. To do this, you can use the table we provide below.
| Smartphone model | SIM card | SIM card sizes |
| iPhone 7, iPhone 7 Plus | 12.3 mm x 8.8 mm | |
| iPhone 6s, iPhone 6s Plus | Nano SIM | 12.3 mm x 8.8 mm |
| iPhone 6, iPhone 6 Plus | Nano SIM | 12.3 mm x 8.8 mm |
| iPhone 5 | Nano SIM | 12.3 mm x 8.8 mm |
| iPhone 5s | Nano SIM | 12.3 mm x 8.8 mm |
| iPhone SE | Nano SIM | 12.3 mm x 8.8 mm |
| iPhone 5c | Nano SIM | 12.3 mm x 8.8 mm |
| iPhone 4s | Micro SIM | 15 mm x 12 mm |
| iPhone 4 | Micro SIM | 15 mm x 12 mm |
| iPhone 3GS | Standard SIM | 25 mm x 15 mm |
| iPhone 3G | Standard SIM | 25 mm x 15 mm |
| Original iPhone | Standard SIM | 25 mm x 15 mm |
If your SIM card is more than you need, then you have two options. The first option is to cut the SIM card. You can do this yourself or go to a store with mobile equipment. The second option is to replace the SIM card. To do this, you will need to go to the office of your mobile operator.
If, on the contrary, your SIM card is smaller than the size needed for your iPhone model, then you can use a special adapter that will allow you to insert a smaller SIM card into the slot larger size. Typically, such adapters come with new SIM cards.
Design features Apple gadgets distinguish these devices from devices of other brands. The design of iPhones is focused on minimal owner intervention in the design of the phone and user safety, which is not typical for economy-class smartphones. Therefore, when they first get acquainted with the iPhone, newly minted Apple users often do not know how to insert a SIM card and start working with the device. Further instructions relevant to the length of the ruler iPhone smartphones 5 - iPhone X.
Preparing for initial launch iPhone consists of unboxing and visual inspection gadget. After unpacking the box, make sure that it contains all the kit components declared by the manufacturer, namely:
- smartphone packaged in a protective plastic form;
- sync cable and power adapter;
- an envelope made of thick white paper with a needle for opening the SIM card slot;
- Apple Airpods headphones;
- decorative elements;
- headphone adapter.
Before starting, pay attention to the gadget's controls. On models “5” and “SE”, the button responsible for locking the phone screen and turning it on/off is located on the top edge of the device. On the "six" and newer models, the lock button is located on right side smartphone.

On the left side panel there are volume controls and a selector quick transition to silent mode.

The Home button is the main one when working with the device; located at the bottom of the front part of the gadget; allows you to switch between tasks, go to the main menu, call voice assistant Siri.

On models of the “5”, “6”, “SE” families it is installed standard input for 3.5 type headphones. Starting from the “seven” there is no such connector - the headphones are adapted to the battery socket, that is, insert old Airpods or headphones third party manufacturer only possible using the original adapter included in the kit.
Now that you have completed an educational program on the controls, you can move on to tips for installing a SIM card.
Features of the SIM card format used
Starting from model “5”, iPhones are equipped with SIM card Nano-SIM– the smallest available from telecom operators. The basic size SIM card is compatible with Apple smartphones of the first two generations - iPhone 3G and 4s were equipped with Micro-SIM slots.
Nano-SIM format specification:
- length: 12.3 mm;
- width: 8.8 mm;
- thickness 0.67 mm.
You can adapt a standard subscriber module to the Micro-SIM format by cutting off part of the plastic case. A regular SIM card cannot be inserted into new iPhones, even if you cut out the plastic part as much as possible - in Nano-SIM the chip itself has smaller dimensions. Therefore, in some cases, subscribers are forced to change SIM cards in order to start using Apple products. In communication shops it is changed on the day of contact; subscriber number remains the same.

Where and how is it inserted?
The design of most smartphones involves installing a SIM card into a slot located under battery. The smartphone device does not require the owner to remove the battery. The subscriber module is installed in a special hatch in the device body. Moreover, the card is not pressed against the reading board, but is first placed in a retractable slide.

On the first Apple devices, the connector for installing the subscriber module is located at the top of the smartphone, above the head speaker. From model “5” the SIM card slot “moved” to the right sidebar, where it remains to this day.
Access to the tray is limited by the designers: to remove the SIM slide, you need to open it using the proprietary key included in the package (by default it is in an oblong white envelope).

Installation process
The general algorithm is shown in the example Apple iPhone 5S, but also relevant for newer models):
- We take the device out of the case.

- We take out the SIM card connector key from the envelope - it has a large oval eye and is similar to a paper clip.

- We find the SIM slot on the right side panel of the iPhone or the top edge (the outline and lock cylinder are clearly visible).
- We insert the key into the hole, press lightly - access is open. On most devices, the holder with the SIM card pops out of the connector on its own. On used phones, the slide may be difficult to move due to wear or contamination.

- We take out the slot and place it on a flat surface. The SIM card is simply inserted into the slot from above. Please note that it is placed on top and not below. Make sure that the position of the SIM card matches the hole in the tray.

- you need to place the card in your smartphone. It’s more convenient to do this this way: turn the phone with the right side towards you and hold it with one hand in this position. Using your other hand, insert the mount with the working position SIM, while holding the card with your index finger.

- We insert the slides into the hole, push them all the way so that they do not stick out from the body. Installation is complete.
Important!!! IN Apple gadgets The subscriber module mount is completely removed from the device. Therefore, be prepared that it may fall out of the case. Another important point: the correct position of the SIM card does not have technological markers, except for matching the contour, i.e. There are no additional latches or fasteners.
All the described manipulations are easier to carry out with the gadget turned on. If the device does not have a SIM card, then the diagnostic message “SIM card not inserted” will be displayed on the notification screen, and the network indicator will be absent (instead, the message “No network” will appear).

If all the above manipulations are performed correctly, then after a minute the message will disappear and the name will appear on the display mobile operator and signal strength indicator.

What to do if the kit does not include a paperclip to open the tray
A common problem for Yabloko. Usually the factory key is lost during use. Most relevant for those who purchase a used, incomplete iPhone: the key is missing.
In this case, you need to use a homemade analogue of a standard tool. This may include:
- thin needle;
- paper clip.
Before use, the paper clip must be straightened and when installing the module, work with the sharp end. In this case, the diameter of the paper clip should fit into the tray cylinder. It's the same with the needle. At the same time, a handicraft tool should not be brittle, because a metal fragment stuck in the hole of the tray can lead to an expensive call to a specialized service.

There is no need to abuse such substitutes - their use over time leads to breakage of the tray hole.
Possible problems with reading the SIM card and ways to solve them
When the SIM card is detected and read without errors, the device displays the name cellular network, signal strength, available type wireless connection to the Internet. If instead “SIM card not inserted” or “No network” is displayed, the subscriber module is inserted incorrectly or there is a technical fault.
Incorrect installation
In this case, the position of the tray with the SIM card is incorrect: there is a skew or the SIM is fixed in the wrong position. There are precedents when the SIM card is improperly fixed in the mount (installed with the chip facing up or the current position does not coincide with the technological hole of the tray). To troubleshoot problems, correct the position of the SIM card.
Technical problems
It is possible that the SIM is not detected by the device even when correct position subscriber module. This card is defective and will not work on smartphones from other manufacturers. The defect occurs after the owner of the gadget tries to cut the card to fit the “nano” format using a makeshift method. Physical wear of the card is also possible - kinks, breaks, etc.
Results and comments
Key priority Apple is the security of the device and user data. The design features described above make it difficult for malicious users to gain access to phone components. This technology gives developers hope that installing/removing a SIM card from a device will be under the control of the owner.
With such a locking mechanism, the SIM card does not fall out of the gadget and is not lost, even if the phone falls or receives other damage. mechanical damage. In the case of iPhones, this tray arrangement was distinctive feature companies. No one has done this before.
Video instructions
You can look detailed video instructions about how to insert a SIM card into an iPhone. The video will help users better understand how to perform all the proposed actions. To avoid problems, strictly follow the sequence of operations demonstrated in the video.
How to insert a SIM card into an iPhone 5, how to remove the SIM card tray from the iPhone case without breaking it? The answers are in this article, read to the end.
Do you want to know how to consistently earn money online from 500 rubles a day?
Download my free book
=>>
If you have become the proud owner of a fifth iPhone, you have probably encountered the question “how to insert a SIM card”? The fact is that they are not structured at all like .
It can be difficult for beginners to understand how to safely remove special building for SIM card. But dealing with this issue is not at all difficult.
How to insert a SIM card into iPhone 5 yourself
In order to insert a SIM card into an iPhone, you do not need to disassemble the phone, open the panel, or remove the battery. Everything is much simpler.
Preparing a SIM card
The first thing you need to do is prepare a SIM card. It must be the appropriate size. For the fifth iPhone, this is a nano-SIM. This type SIM cards are even smaller than micro ones.

If a user's micro-SIM can be easily cut out on their own, then it is not recommended to experiment with a nano-SIM.
To cut your SIM card, you need to use scissors and a stencil specially designed for this purpose. If you try to do this with ordinary scissors, without using a stencil, you may damage the contacts.
If you don’t have the tools necessary to cut a SIM card, order one from your operator or purchase a new one of the required format.
Installing a SIM card
When the SIM card is ready, you can proceed to install it. To do this, you need a paperclip shaped like a key, which usually comes with your iPhone.
If for some reason you don’t have one, use a regular metal paper clip. Just twist it in the required form key or in the letter “G”.
The SIM card is inserted into the right side panel. There is a special hole into which the key must be inserted. After lightly pressing, a special housing for the SIM card will appear.

Pull out the case, insert the nano-SIM into it and place the case back into the iPhone. The SIM card is inserted with the picture up, the chip down, that is, the chip should be facing the back of the smartphone. Although you won’t be able to insert it any other way.
Now your iPhone is ready to use, you can turn it on.
Bottom line
To summarize, we can say that if your SIM card matches standard sizes for iPhone 5, there are no installation difficulties. The only difficulty is to purchase a SIM card for the five in advance, but this can be solved quite simply.
Congratulations on your successful purchase, enjoy!
P.S. I am attaching a screenshot of my earnings in affiliate programs. And I remind you that anyone can earn money this way, even a beginner! The main thing is to do it correctly, which means learning from those who are already making money, that is, from Internet business professionals.


