How to connect a network adapter. Network adapter - how to choose by power, type, connection method, network standard and price
Laptop owners usually use a wireless connection to access the Internet; fortunately, a Wi-Fi adapter is available on all laptop models without exception. However, to use it, sometimes you have to figure out how to turn on wifi on a laptop.
Hotkeys or hardware switch
The first step is to physically turn on the Wi-Fi adapter. This procedure differs slightly on different laptop models, but its meaning is the same: you need to find a hardware switch or use the function keys. Let's look at a few examples:
You can continue the options for turning on Wi-Fi for a long time, citing methods for MSI, Acer, Samsung and other brands. Even different series from the same manufacturer have different ways of activating the wireless module, therefore:
- Inspect the laptop case for a hardware switch or Wi-Fi power button.
- Examine the keyboard - one of the keys in the F1-F12 row should be marked with a wireless connection icon. If you press it together with the Fn button, the adapter will turn on or off.

If you have a Sony Vaio series laptop, then there may be neither a hardware key nor an Fn button on its keyboard. For Wi-Fi to work in this case, you need a special VAIO Smart Network utility, which can be found on the manufacturer’s official website.
Fn button doesn't work
What to do if the Fn button does not work? How to turn on the adapter in this case? First you need to figure out why the key does not work. Fn operates under BIOS control and has its own utility, without which the key does not function. Therefore, if the button does not work, you first need to find a utility for enabling hot keys on the manufacturer’s website for a specific laptop model (the name should contain the word “HotKey”). 
If installing the utility did not help or the key is physically damaged, you will have to use an alternative method of turning on the adapter. On Windows 8 and Windows 10, to enable the adapter, simply click on the Wi-Fi icon in the notification panel and move the “Wireless Network” slider to the active position. If the adapter drivers are installed correctly, then the icon must be there. 
There is no such function in Windows 7, but you can try to enable the wireless connection through the window for changing adapter settings (this is discussed below). If this method does not help, then you will have to look for an external keyboard with a working Fn key and then never turn off the Wi-Fi module.
Setting up Wi-Fi on different versions of Windows
You will figure out how to physically turn on the module quite quickly. Sometimes this is where the Wi-Fi setup ends: the system performs the rest of the necessary actions on its own, displaying a list of available wireless points. But sometimes you have to establish the connection manually.
Regardless of the version of Windows, you first need to check that the Wi-Fi module drivers are installed without errors:

To be sure, it is better to go to the official website of the laptop manufacturer and find the latest version of the wireless network module driver for your model. In addition, right-click on the adapter and select “Enable” (if its operation is stopped).
Windows XP
In theory, Windows XP should have been discontinued a long time ago, but on some older Dell models and other laptops, the legendary system still continues to perform its functions. Wi-Fi in Windows XP is configured as follows:

There should be a Wireless Network Connection icon in the File Explorer window. Its presence demonstrates that the Wi-Fi module is working correctly. Right-click the icon and select Enable. Next:

If the list of available points does not include the network that your router distributes, click “Update list”. Then select the desired point by name and click “Connect”. If the network is password protected, you will be prompted to enter an access code, after which a connection will be established.
Windows 7
On Windows 7, the procedure for connecting to a wireless network has changed slightly, becoming a little easier. Now all available networks are displayed after clicking on the Wi-Fi icon in the system tray. But if there is no icon, then:
- Go to Network and Sharing Center.
- Click "Change adapter settings."
- Find your wireless connection and make sure it is turned on.

After turning on the wireless connection, the Wi-Fi icon will appear in the tray. Click on it to see a list of available points, select the network and click “Connect”.
Windows 8
On Windows 8, the procedure for connecting to Wi-Fi remains the same, but an Airplane mode has been added, which you need to know how to work with. If the adapter driver is installed and the wireless connection is working correctly, then in the notification panel you will see a Wi-Fi icon, when you click on it, a list of available networks appears.

If there is no icon, follow the same steps as on Windows 7 - open the “Change adapter settings” window and turn on the wireless connection. If there is no wireless connection itself, check the drivers and the status of the module - everything should be turned on and installed. 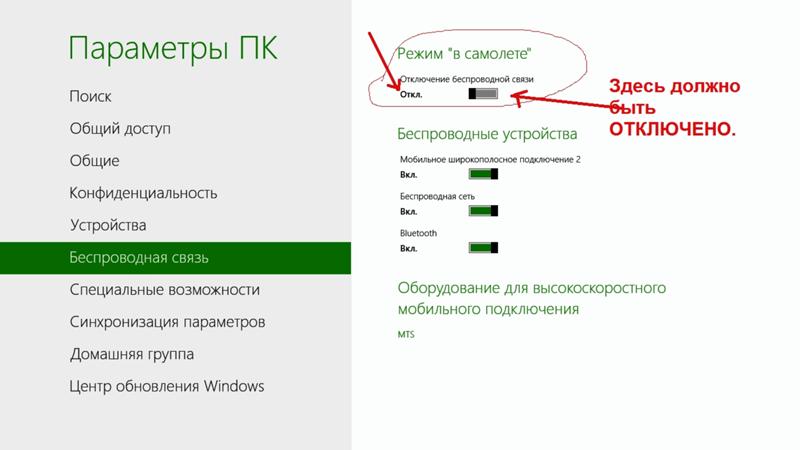
If the adapter is turned on, the drivers are installed, but no available networks are detected, check that the Airplane mode icon is not hanging on the notification panel. If it is, you need to disable this mode. To do this, click on the icon and move the slider to the “Disabled” state.
Windows 10
On Windows 10, everything remains the same with a few minor changes, so you'll quickly figure out how to connect your laptop to Wi-Fi:
- Click on the wireless connection icon in the tray.
- Select the desired network.
- Click "Connect" and enter your password.
If the access point does not appear, try adjusting your network settings. Click on the link of the same name - the “Network and Internet” section of Windows 10 settings will open. 
There are two tabs of interest here:
- Wi-Fi - Make sure your wireless network is turned on.
- Airplane mode - make sure the mode is turned off.
You can go to the section for changing adapter settings and enable the wireless connection. Simply put, on Windows 10 you have several equivalent options - you just need to choose the more convenient method for yourself.
A network adapter (also called a network card) is a device without which it is impossible to establish a connection to the World Wide Web. In some cases, disabling it and re-enabling it helps solve communication problems. Many network cards can be connected to a computer, with different network connections. However, the average user often does not need this. This article is intended for Windows 7 owners, but will be useful for almost every Win-line operating system.
To enable the network adapter in Win 7, click the “Start” button, find the “Computer” item on the right, right-click on it, bringing up the context menu. In it, select the “Properties” line by clicking on it once. In the “System” control panel window that appears, find the “Device Manager” tab on the left and go to it. A list similar to the screenshot below will open. We look for the “Network adapters” item in it, click once, getting a drop-down list. If there are no sub-items in the list, or you cannot find an item called “Network Adapters” at all, the network card may not be physically enabled or is faulty. What to do in this case? Below we will give some tips and solutions (see point 6). Let's continue with the setup. The screenshot attached above illustrates what enabled and working network adapters look like. If one of them shows an arrow (the icon is circled in red), the card just needs to be turned on. To do this, right-click on the image and select “Engage” from the context menu. The arrow should disappear and the network adapter should work.


There can be many reasons for a lack of network connection; they are not limited to a faulty network card. If after reading this guide you still have questions, ask them in the comments or contact the technical support of your Internet provider.
A network card is a necessary element for an Internet connection. Sometimes there is a need to turn it on if it does not appear in the list of devices, or turn it off if you no longer use it or want to change it. These actions can be performed in several ways - through the BIOS or directly while Windows is running. Let's look at all the options that will help you start or stop the network adapter.
The network adapter is an important element in building a local network
How to turn on the adapter?
Sometimes a network card is connected, but the system does not see it because it has been deactivated. To run it through the BIOS, follow these steps:
- Select the reboot mode and go to the BIOS - to do this, click on the F12, F1 or Esc key. The key you choose depends on your individual PC configuration, so you may have to try several options. In addition, upon startup, an inscription always appears indicating which combination you need to press to go to the settings - focus on it.
- In the settings that open, select the section containing the word “Integrated”, where there will be the line “On Board” or something close and similar to it - this is the network card.
- If you see that the value “Disabled” is applied opposite the specified line, the adapter is truly disabled. Change the status to “Enable”.
- Before you exit Settings, use the Save and Exit keyboard shortcut to make the settings take effect.
The computer will reboot again, after which the adapter will join the system.
Activation directly through Windows is performed as follows:
- Go to “Settings”, stop at the “System” section.
- Select the “Hardware” menu and find the network adapter in the drop-down lines - if it is disabled, a red cross will appear next to the name.
- To run a part, double-click on its name, check the “Hardware in use” checkbox, and click “OK” for the settings to take effect in Windows.

If there is a yellow exclamation mark next to the name, this means that the card is activated, but you need to change the drivers for it to work correctly.
Disabling a network card
If the device stops working, you need to install a new adapter or you want to disable it, this is done through the BIOS, not Windows.
To stop the equipment, follow these instructions:
- Start the PC or reboot if the computer is turned on and press the F12 or Del key when starting the BIOS. To enter the settings, use the F1, F10 and other keys. If you don’t know which one to choose, read the text “Press... to enter Setup”, where the desired combination will be indicated.
- In the parameters, open the section with the word “Integrated”, where you will need the line “On Board LAN” or something similar.
- Change the status of the line to “Disabled” to deactivate it.
- Don't forget to use the Save and Exit button to save your changes.

A network adapter for a computer/laptop is responsible for accessing the Internet, which in modern devices is connected via a USB or BNC connector. Since it is built-in, and the ability to explore the World Wide Web in most cases is set up by the wizard, the question of what it is and how to make it work arises if breakdowns occur. It's not easy to figure this out, but it's quite possible.
What is a network adapter
An additional connecting element between a PC or laptop and other devices that provide access to the Internet is called a network adapter (terminology from the Intel processor manufacturer). In most modern computers it is built into the motherboard. There are other names for the device. What is a network card, card or Ethernet adapter? These are all variant names for one device.
What function does it perform?
In the OSI system model, the network adapter is responsible for the functioning of the second, data link layer. In conjunction with the driver, it also ensures the operation of physical equipment. Each manufacturer decides for itself the task of distributing responsibilities between them. In addition, the OS (operating system) module is responsible for the data link layer. Together they perform two main operations: sending and receiving data from the network to the PC and vice versa, and also take part in:
- monitoring incoming/outgoing traffic;
- remote configuration change;
- improving network performance and prioritization;
- remote activation from a central workstation;
- encoding/decoding sent/received data;
- packet formation (transmission/reception mode).
Classification
Although most modern PCs have built-in network cards, they can break down and require replacement. To do this, it is not necessary to completely disassemble the computer, since there are two large groups of these devices:
- External. Some are connected via the PCI connector of the motherboard, others use the ISA bus.
- Built-in. They are also called integrated. The output is presented as a connector on the panel near the USB ports. Nearby there are indicators - LEDs, which are used to guide you regarding the performance of the device. Plus of the built-in device: convenience. Cons: unreliability.

3Com approached classification from a different angle. In it, all adapters are divided into generations. Varieties include:
- First generation adapters. Built on discrete logic chips. They had low performance - even if the computer memory was large, the adapter buffer could only hold one frame. There were many types, each of which needed its own driver. In addition, the OS modules were not standardized. As a result, configuring the network card was difficult. The devices were used on old computers.
- Second generation adapters. ASIC chips are used, the size of the buffer memory allows for multi-frame transmission in parallel mode. The reliability of 2nd generation adapters has been increased, and standard specifications for drivers and interfaces have been developed. In addition, the transfer speed has increased.
- Third generation. These are the latest devices to which 3com classifies its EtherLink III boards. Frame processing is conveyor-based. The adapter is configured automatically. It is connected to the network via a BNC connector (for cable type - twisted pair).
- Fourth generation. High-speed boards that support Fast Ethernet standards.
- Fifth generation. Gigabit Ethernet, supporting modern network protocols.
- Sixth generation. 400 Gigabit Ethernet, currently in development. Will begin to be used no earlier than 2020 for home PCs. Sixth generation Ethernet adapters for servers have already appeared (they are used by providers).

There are other parameters by which devices are classified. The main ones are listed below:
- by data transmission medium (wired, wireless);
- by functions performed (implementing the first two OSI levels/first four);
- by topology (similar to local networks: bus, ring, star, tree, combined);
- by type of PC (client, server);
- by bus type (ISA, EISA, PCI, MCA).

Species
Although in order to select and configure the device correctly, it is advisable to know some of the intricacies and features of adapters, it is not necessary to have all the knowledge of a system administrator. The main types of boards you need to know:
- wired;
- wireless;
- virtual.

They vary in case size and external parameters, and can be connected directly to the motherboard or via a USB socket. Otherwise they look similar, representing a cable with a corresponding key for connecting to a computer port. They provide data transmission over a wired network, connecting a PC/laptop and a router. Sometimes they are sold bundled with software (drivers) for various operating systems, but most modern operating systems find and install it automatically.

Wireless
Often a network adapter refers to a wireless type of device. It is small, mobile and universal, it is also called a modem (although they are designed for 3G), but within this variety the concepts are interchangeable. To work with wireless networks - that’s what the network card is used for in this case. It looks like a flash drive, connects to a USB port, configures itself and searches for available Wi-Fi points. A handy thing if the integrated peripheral device breaks down.

Virtual
Designed to create private and secure networks (VPN). They work using special programs and are built on the basis of physical adapters. Installation depends on the type of virtual card and the selected software. For example, in the Windows operating system there is a special “Control Panel” section for configuring the adapter. Another feature of this type of board is the possibility of remote configuration.

The two most important points regarding connection are what type of connector the network adapter uses and what drivers are needed for it to work. There may be several answers to the first question: USB slot, PCI port or ISA bus. The last two options involve connecting directly to the motherboard. In most cases, drivers are detected automatically or are included with the adapter. If not, you need to search for them on the Internet by device model. Complete instructions for connecting a wired network card:
- Buy a device in one of the stores in Moscow, St. Petersburg or any other city in the Russian Federation.
- Unpack, read the instructions, use it to determine the type of connector.
- Connect the plug to the desired port of the router and computer.
- (option a) See the automatic installation, wait for it to finish.
(option b) If there is a disk with drivers, insert and run the program.
(option c) Find the required software on the Internet (use proven services!), download and run. - Go to Control Panel - Device Manager - Network Adapters. The list should display the name of the board. If there is no exclamation mark next to it, everything is installed correctly.
Connecting a wireless device is carried out in a similar way, but in this case only a PC and a USB connector are used. Drivers are installed automatically. After this operation, the computer immediately begins to search for available Wi-Fi networks. Conflicts with the OS are possible; to avoid them, you need to choose a device with the correct parameters (will be discussed below).

If the network adapter is not listed in Device Manager, it means something went wrong during the connection. But what exactly? Main reasons and ways to solve them:
- Board fault. Unlikely cause unless there was physical damage. If there were, you need to take it for repair or replace the adapter yourself.
- Errors in the operating system. Solution: Roll back to the previous restore point. If it is not there, reinstall the system.
- Driver problems. They can be solved either similarly to the previous point, or updated manually. You need to download the software from the official website, since dubious services are the main reason why the network card for a computer does not support the driver.
- Intervention of the built-in anti-virus protection of Microsoft Windows or other. Start the system in safe mode, disable your antivirus and check the operation of the equipment.

What to do if the adapter does not work
Make sure that the computer sees the device; if not, use the instructions above. Check your system for viruses using the built-in OS protection. If the problem persists, check out the following solutions:
- Run diagnostics on the card through Device Manager. To do this, call the context menu and find the corresponding item.
- Remove all adapters from the Device Manager list. Restart your computer/laptop.
- As Administrator, open Command Prompt. Scan the system: type sfc /scannow and Enter.
- Update or roll back your drivers.
- Check the board's operation indicators. If they don’t light up or blink, it’s time to contact a service center.

Network adapter price
The higher the generation and capabilities, the higher the cost of the device. But there is no reason to chase the highest price, since the question is not what technology the adapter supports, but also what technology the computer processor can work with. The characteristics can be viewed on the packaging, checked with the seller, or read on the screen by going to the manufacturer’s official website. The price breakdown for Moscow and the region is in the table below:
| Minimum cost, rubles | Maximum price, rubles |
|
| Wired | ||
| Integrated |
Video
|
Today, regardless of the manufacturer, every laptop, for example, Asus Lenovo, HP Compaq, and so on, is equipped with a wifi interface.
Just for the Internet to appear, it must be configured correctly. It makes no difference what OS you have: windows 10, windows 7 or windows 8 - everything is done in the same way.
Second step: directly enable the wifi adapter in your laptop - of course, if it is disabled. There are no problems with this, but since the easiest way to turn it on is with the keys, it is not uncommon that the exact key you require does not work.
Therefore, here I will give three simple ways to turn on the Wi-Fi adapter in a laptop using keys and even without a keyboard.
All three methods work on all Windows - windows 10, windows 7 or windows 8 and so on.
The first way to turn on the wifi adapter in a laptop on Windows 10 - Windows 7
On a laptop keyboard there is an Fn key at the bottom left. It, in combination with the button in the top row F1 ... F12, turns on the Wi-Fi adapter.
I won’t tell you which one does this for you, since it depends on the laptop manufacturer.
For example, in Asus there is almost always a combination of fn+f2. If you wish, you can go to the “Windows” menu on this site (at the very top) and find how to do this there.
This section has a description for everyone, although there are quite a few entries (about 1000, but at the very top there is a “search”).
I won’t dwell on the keys any more, but let’s look at how to carry out such a procedure without a keyboard.
The second way to turn on the Wi-Fi adapter in a laptop is via the command line
If the required key does not work on your laptop, then try turning on the adapter
To do this, run it, enter the command below and press enter, where instead of “Your Network” write the exact name of your wifi network.
Netsh wlan connect name=”Your Network”
The third way to enable a wi-fi adapter in a laptop without a keyboard on Windows 10 - Windows 7
This option involves enabling it directly in the adapter itself.
To do this, open the device manager, select the required one in the “Network adapters” section and enable it.

If for some reason this doesn’t work, then try another good option.
To do this, go to “…” and find something like “Troubleshooting”.
Depending on the operating system, there may be the slightest differences. Next, everything you need to do will be prompted by the master.
More than once, the “master” turned on the wifi adapter on his own; if it was turned off, I think he’ll turn it on for you too. Good luck.
Category: Uncategorized


