How to create a custom dashboard in WordPress? WordPress Control Panel.
From the author: WordPress admin panel. For some of you, this is a painfully clear site control panel. Even if they wake you up at 3 am, you will have no problem showing what is there and how it works. But among our readers there are also beginners, for whom this simple panel may seem like the control panel of a space shuttle. But in reality everything is much simpler, let’s figure it out today.

WordPress admin login
But before we move on to analyzing the capabilities of the admin panel, let's look at how you can access it in general. I still remember the day when I bought my first website, it was on WordPress. The seller gave me all the necessary logins and passwords. I looked at all this for 5 minutes, and then asked him a question: “Well, how can I access the site?”
The seller laughed a little, but then took pity on the teapot and wrote a response: http://site.ru/wp-admin
Yeah, that's it! It was a complete revelation for a person who barely understands what an engine is, and who actually heard the word “Wordpress” for the first time today.
But WordPress greeted the menu in an unexpectedly friendly manner, deciding not to torment the newcomer with any complex terms and instructions, showing a menu that was quite understandable even for a complete dummie. This very menu, which is also called the admin panel, we will look at in as much detail as possible today!
But for now I’ll make a small digression. In general, aren’t you embarrassed by the fact that anyone can come into your admin area? Then he can start bombarding her with his attempts to enter a login and password. By the way, I hope that your login is not admin, and that you chose a password that is more or less complex.
But still, such protection is not enough. It is advisable for you to limit the number of attempts for incorrect input, or even move the admin panel to another address. The first option is very easy to implement using a plugin. We show an overview and configuration of such a plugin in. I advise you to take a look, because in addition to this there are a lot of useful recommendations.
Home page
So, in order to keep things simple, I’ll show you right away what the WordPress admin panel looks like:

I opened one of my sites on a local server. There are no additional plugins installed that would expand the panel, so it looks like this. What it should look like immediately after installing the engine.
By the way, you can easily change the color scheme of the panel. In the upper right corner you can see the inscription “Hello, your login”. Point and click on the “Edit Profile” button. There you can choose a different color scheme. Personally, I constantly change colors, the same thing gets boring. It's like changing your desktop image. In general, choose the most pleasant color scheme for you and we will begin to explore the admin area.
Actually, the panel itself, as you can see, is on the left. Its first point is the Console. This contains a link to the main page of the console, where we are already in the screenshot above.
What do we see on the main page? Everything that WordPress considers necessary to show you. For example, the “In Visible” block is very useful; I recommend that you leave it visible so that you can always see the number of posts and comments on the site.
The “Welcome” block will be useful only for beginners. It gives you a tour of the basics of working with the engine and helps you easily complete your first steps with the site. If you are an advanced user, you can turn this block off.
The next “quick draft” block will be very useful for those who like to make a lot of drafts of notes, and only then finish the article to a normal state, when they can collect more information.
The home page also displays the latest activity on your site - the latest posts published, as well as scheduled posts, if any. In addition, there is a news block, although everything in it is in English, but you can find out certain useful things. For example, through this block I just learned that WordPress 4.6 is coming soon. Well, let's wait!
In addition, in the Console item there is a link to the updates page. This is a general page on which the engine will notify you about all updates to the engine itself, plugins, themes and translations. On the same page you can update all the necessary components.
Posts
Great, let's go ahead and look at the “Records” item. Here you can manage everything that is somehow related to records. That is, view them, create new categories, tags, and the entries themselves, of course. On the All Posts page, you can see a complete list of published and scheduled posts, as well as your drafts and deleted posts. This list displays 20 entries per page.
I would like to note that the entry must be placed in some category. If there are no categories on your site yet, then it will fit the one created by default. Therefore, before filling your site with content, I recommend sitting down and thoroughly thinking through the structure of the project, its headings, then creating them and placing information in them.

A shortcut is an identifier by which you can access all entries in a category via a URL. For example, if the category label is html, then all its entries can be viewed at: domain.com/html.
A category can also be nested. Let me give you an example. Let's say you have a general html topic, but this is a global topic that concerns markup language as a whole. In it you can create subcategories. For example: html tags – html history – layout and html, etc. Then they will need to specify html as the parent category.
It is not necessary to fill out the description; anyway, it will most likely not be displayed by default; to do this, you will have to slightly change the template code.
Tags are created in the same way, but there is one difference. Tags are an optional attribute of posts - they can be used or not.
Okay, let's take a closer look at how to add an entry. This is the page that awaits you when you click on adding a new entry:

In principle, the interface is as beginner-friendly as possible. WordPress offers us 2 modes in which you can write text. The first is visual. I recommend using it for beginners, those who do not know the basics of html. Another advantage of this mode is that you can almost immediately see how everything will look in the end.
The “Text” mode is worth choosing if you are already a little familiar with html tags. Personally, I like this mode better, because you can freely use any tags in it, WordPress will not overwrite them. Of course, in this mode you cannot see in real time what the text looks like, but you can do this using the “Preview” button.
Actually, the WordPress editor is very simple and convenient. Here you can manage the visibility of a post, schedule its publication, manage its status, set categories and tags. By the way, you can easily create new categories on the same page.
Many widgets are simply not displayed on the screen because they are less important. You can enable them using the “Screen Settings” button, which is located at the very top. This is where we will finish with the notes; we have more or less covered this point.
Media files
Here you can add a new file or view those that have already been downloaded in the library, as well as change their parameters. To do this, click on the desired file.

For pictures, as you can see, you can set an alternative test, description, title and signature. Of all this, only the signature will be directly displayed on the web page if you write it down. Files can be easily deleted.
Media files include images, audio recordings and videos. These are the files you can upload to WordPress. Usually I don’t go to this item at all, but add all the necessary media files directly when writing a post using the “Add media file” button.
Pages
There is nothing interesting here, you just can see a list of all pages and add a new one. It is added in the same way as an entry. The page is different in that it usually displays static information that is not directly related to the topic of the site.
The page can be, for example, a site map, author biography, contact information, feedback page, rules, terms of cooperation, etc.
Comments

Actually, on this page you can see all the comments on your site, edit, reject them, mark them as spam, etc. The commenting settings themselves are configured elsewhere.
Depending on your settings, you will still have to moderate comments when you receive them. I'll tell you honestly that if you leave everything as it is, you will receive a lot of spam. How to get rid of it is another matter; any anti-spam plugin will help you here.
For example, you can set it up so that only the first comment from a user requires approval. Then all his further comments will not need to be approved. Or you can set it to require admin approval for all comments.
In this case, you will have to deal with the issue of moderation much more often. If you have a large website, you can even hire a person who will be responsible for this matter.
Appearance

This paragraph contains a lot of subparagraphs. For example, you can manage WordPress themes. At this point they can be installed and switched.
The “Customize” item, in turn, has a lot of simple settings for the appearance of the site. For example, here you can set a title and description, an icon, a general background color or image, a logo, add a menu, and change widgets.
Again, these opportunities may not exist. It depends on the template itself and on its developer - whether he included the appropriate customization options in the theme or not. There’s not much to explain here; it’s best to learn by directly practicing operating the engine. It is best to do this on a local server.
The Widgets, Menu, Header, Background items contain almost the same functionality as the “Customize” page, but allow you to deal with one component on a separate page.
I would especially like to note the “Editor” item. It allows you to change the code of the php files of the active theme, as well as the style file, directly from the admin panel. I don’t recommend beginners to go here, but if you understand php, html and css, then this will be a convenient opportunity for you to quickly fix or add something, because you don’t need to connect via ftp or go to the hosting to change files.
Plugins
WordPress is a great engine, but it wouldn't be half as good if it weren't for the plugins that make it look like a piece of cake. So, you can install, activate and deactivate plugins on this page.

It also has its own editor, which allows you to edit the plugin code. But this is also for advanced users who are fluent in PHP.
Users

Another feature of WordPress is to easily add new users, as well as delete them and change their rights. To add a new user, you need to fill out the following form:

For example, you want to hire someone to work on a website. For example, he will write new entries. It would be convenient if he did not do this in Word, but immediately wrote it in the engine editor, so that you, as an administrator, would not have to publish these entries yourself.
Accordingly, you must also select the capabilities of the new user. For example, if you specify “Author,” the user will be able to add and edit his own entries, but his rights are limited to this; he cannot touch other people’s entries. This is exactly the ideal role for a hired copywriter.
Tools

Here I already have a little more points, since earlier I apparently installed a couple of plugins that added new tools. In general, the default tools here are import and export of your posts, categories, tags and comments and an xml file.
This is a fairly convenient option; it allows you to very quickly export data and then upload it, for example, to a local server. There you can change them and download them back. True, to import you will need to install the official plugin from the developers.
You can familiarize yourself with the remaining tools by clicking on the “All tools” link.
Settings
Finally we come to the last point of the admin panel. It could take a very long time to describe it, but I will try to talk only about the most basic and necessary settings.

Actually, there may be much more items here; they will appear after installing new plugins. As you can see, I already have the corresponding items for 2 new plugins.
In general settings, in principle, there is nothing to explain. Here you can set the time zone, date format, name and description of the site, and language. In general, everything is very basic and basic.
Writing. There are no particularly important settings here. You can set up publishing via e-mail, I personally have not done this. You can insert a list of ping services into the very last field. Many people say that this way you can speed up the indexing of a new page. I don’t know how relevant this is for RuNet, you can find a list of sites and paste them here.
Reading. And here we have very important settings.

In particular, you must choose what will be displayed on the main page, how many posts will be displayed on 1 page of the blog, as well as in the RSS feed. It is not recommended to display more than 30-40 entries on a page, as then it will be too heavy.
If you have set up broadcasting of publications via RSS, then I recommend that you display only the announcement of the post in them, and not the full text, so that thieves cannot steal your texts through the feed.
Finally, there is a checkbox that allows you to disable site indexing. But WordPress itself does not guarantee its operation. If you have already decided to close the site completely from indexing, then in addition to this checkbox you will need to take other measures.
Discussion. It is also very important to set up a discussion on your site. There are a lot of settings here, so we won’t go into detail; you can figure them out yourself. The main choice you have to make is to allow people, after one approved comment, to write others without the need for approval, or to manually approve absolutely every comment except your own? Here you must decide for yourself what to do.
Media files. Here you can set default sizes for thumbnails, as well as specify maximum sizes for medium and large images.
Permanent links. Here you must choose how exactly the URLs will be generated. I strongly recommend that you use the option – Post Title. Or customize your own based on the prompts. For example, so that the category label is also shown in the URL.
That’s all, we’ve looked at the standard WordPress settings, there’s absolutely nothing complicated about them. The last button that is in the panel is the menu collapse button. You can click and see how the appearance changes. Personally, I prefer the expanded menu.
Well, we’ve looked at all the features of the WordPress admin area; the rest will be added depending on what templates and plugins you install. With this, I say goodbye to you and wish to continue studying WordPress, because there is nothing complicated in this engine. We have many premium lessons and 2 good courses on wordpress, you just need to start your training and you will quickly grow from a beginner to a professional.
Did you know that 40% of users leave websites with poor design? Why lose profit? Choose and install one of them right now 44 thousand premium website templates. The ideal choice for your business!
The best HTML admin panels - a collection of the best design solutions for the admin panel for various web projects.
When creating a website, it is always better for developers to use non-standard solutions. The admin panel is one of the main working tools for both the average user and the administrator. Using the admin panel, users can configure settings, view statistics, and much more. To make this process even more enjoyable for your audience, you can use HTML admin panels. These are ready-made sets of templates and page layouts with all the necessary elements, which can be further customized at your discretion. By choosing and customizing one of these panels, you will greatly simplify your work and be able to gain additional sympathy from users. All panels have a convenient and beautiful interface that will appeal to even the most demanding users.
HTML admin panel is a very necessary solution for all web developers and site administrators. Especially for you, we have prepared the TOP 10 best admin panels so that you can choose the best HTML admin panel template for yourself. If you don't find what you need in our list, we recommend checking out the other 300+ HTML Admin Website Templates on Themeforest.
The best HTML admin panels for the site
Limitless – Responsive Admin Panel Template
Limitless is a modern, powerful and flexible tool that is suitable for any type of web application. It has a stunning design and a clean and clear layout. Built on Bootstrap and LESS. Five layouts, 1000+ HTML pages with comments, 1000+ components, 100 plugins and extensions are available.
The set works with the LESS preprocessor and includes 100+ LESS files with comments. Each of these files corresponds to a specific component, layout, page, plugin or extension. This way you can easily find the line of code you need and change it accordingly. The kit includes regular and minified LESS-based CSS files.
There are two types of vertical navigation, as well as multi-level horizontal navigation with stateful support. Mega menus and headers of panels and pages support advanced customization options.
Along with the template comes a “Starter Kit” - a set of blank pages to simplify the developer’s work.
Angulr – a set of cool admin panels for web applications

Cool admin panel template for Angulr web applications built on Bootstrap and AngularJS. The kit includes several ready-made UI solutions for various applications: Angular JS, Html/jQuery, Music SPA, Google Material Design and App Landing Page. Specifically, Music SPA has a single page application, an audio player, a video player, and multiple layouts.
CSS files are written in LESS. There are a large number of jQuery plugins included, many of which work without creating a directive. Lazy loading function available. Dependency management using Bower is supported.
You can customize any parameters, including color, and save custom settings. The template can be easily translated into Russian and any other language.
Clean UI – premium HTML admin panel template for Bootstrap 4

Clean UI template is designed by professionals for professionals. Comes with nine layout options and six color schemes. Each template has hundreds of useful components, elements, plugins and pages available for any type of interface. Additionally, there are several ready-made pages for the admin panel, profile, messages, mail, calendar and gallery. There are also designed pages for customization and even . There are also login, registration and lock screen pages with high-quality design. Among the components, it is worth highlighting forms, tables and graphs.
By purchasing the Clean UI template, you will receive a whole set of 1600+ premium Icomoon icons, as well as a Clean HTML Player for playing media files.
The template works without bugs and glitches with any devices: both stationary and mobile. Powered by the SASS preprocessor and contains 50+ SASS files with comments. In addition to the HTML version, the AngularJS version is also supported.
Electric – powerful Angular JS+HTML5 admin panel template

The Electric template has an attractive layout that allows you to fully manage one or more projects.
The multi-tasking framework supports four admin panel styles, 60 pre-built pages (including an admin profile page), more than 20 widgets, and a full-fledged system for managing author profiles and emails. There are two menu (header) options: light and dark.
There are dozens of buttons available in different styles plus 100+ hover effects. 10+ chart styles, two styles each for notifications, galleries and portfolios, and three styles for the services page. The kit also includes a table with prices and a Google map. Four page numbering options.
Various Live Stats Updates will allow customers to track information about their overall account balance, new orders, sales, views, as well as social indicators and other statistics. Live chat supported.
Fuse – HTML admin panel template in material design style
In addition to the three admin panel options and 18 ready-made designs for various pages available in the Fuse template, it also has a number of built-in applications. Among them are calendar, Ecommerce, mail, chat, file manager, Gantt chart, Scrumboard, Todo, Contacts and Notes.
When working with Fuse, you can choose from six available page layouts with different navigation options. Out-of-the-box page layouts include authentication, payment, profile, search, scheduling, and error pages. To create pages even faster, you can use the 15 available content organization layouts.
Using the theme generator, you can create your own Angular Material template with a unique design. You can also easily customize the colors of any element from the Angular Material library. The template meets all Google Material Design requirements.
Flatkit – a user interface design kit for applications

The Flatkit set of UI layouts is specially created for designing the admin panel (and not only) when developing applications. It is built on Bootstrap 4, the most popular HTML, CSS and JS framework. It also supports AngularJS and all its features, including lazy loading. You can also work with Grunt, which allows you to minify CSS and JS files, compile and save you time, allowing you to focus on writing code. The Bower tool will allow you to manage frameworks, libraries and utilities.
By using elements from this kit when developing your application, you will improve the user experience of your application. You can customize the colors of any elements as you wish. Four color themes are supported: light, gray, dark, black. There are six pre-built layouts. HTML version with Ajax is supported.
The template is responsive and works with all modern browsers, including Edge, Chrome, Opera, Safari and Firefox.
Ubold is a responsive skin kit for web applications.

Ubold is a full-featured premium HTML admin panel template powered by the Bootstrap 3.3.7 framework. Uses all modern web design technologies: HTML5, CSS3 and jQuery.
The kit includes four admin panel options. Also available are 500+ ready-made handcrafted components: widgets, graphs, task lists, inboxes, buttons, tabs, notifications, carousel, videos, forms, tables, maps and chat. There is a library of 110+ chart options. As many as 3000+ beautiful icons are available for a unique design. The template comes with several built-in apps, including a calendar and contacts. There are also several ready-made pages: a landing page, a page for login, registration and password recovery, an error page and a page with prices. In addition, the kit includes Email templates. There are also several separate ready-made pages for CRM and ecommerce.
The code is written very clearly so that a web developer can easily turn this theme into a powerful web application.
Material – admin panel template in material design style

The Material template will allow you to create an admin panel for an HTML website. The template design is inspired by Material Design from Google. It runs on the Bootstrap and Angular JS frameworks. This is a 2-in-1 template, and in addition to the template for the admin panel, it also comes with a ready-made landing page template. There are several ready-made design color schemes.
The template supports modern technologies and programming languages: Sass CSS and jQuery. High-quality template code is ensured thanks to the Angular style guide. Supports work with Gulp and the Twitter Bower package manager. All ready-made layouts are designed very high quality and have a responsive design. Thanks to this, it will be easy for your users to work with the admin panel both from a PC and laptop, as well as from a tablet and smartphone.
Adminto – responsive admin panel template

Adminto is a simple HTML admin panel template with a clean user interface, customizable components and three different color schemes. Setting it up is not difficult, and the code is written very well and simply, so any developer can understand it.
A large number of ready-made custom widgets and UI components are available: buttons, cards, sliders, notifications, forms, tables, and so on. The kit also includes seven libraries with 75+ different diagrams. Several sets of unique icons (more than 1700). In addition to the components, there are also more than 55 ready-made pages, including for login, registration, email confirmation, project and task management, pricing and errors. You can also add maps, projects and a gallery. Additionally there are Email templates.
The Adminto template is powered by the Bootstrap 3.3.7 framework and has a fully responsive design.
StartUI is a ready-made, fully functional HTML admin panel that runs on Twitter Bootstrap 4, jQuery and CSS (Less). It comes with a large number of components for creating an admin panel, including for a content management system (CMS) and a customer relationship management system (CRM), a control panel in an online store, and so on. There are ready-made pages for emails and user profile.
The template supports a unique tabbed navigation that allows you to switch between other navigation options. When designing the tables, great attention was paid to the smallest details. Thanks to the clear LESS code, you, as a developer, can easily customize your admin panel according to your individual preferences and requirements.
StartUI is a full-fledged modular HTML template in the style of an admin panel, with which you can create a powerful admin panel for any purpose.
That's all the HTML admin panels that we wanted to present to you in this review. We are confident that among them you will find a decent solution for your project. We remind you that on Themeforest you can find more than 300+ different templates for the admin panel. Choose only premium templates and you are guaranteed to achieve success in your business. Good luck!
Alexander is the founder of the “Web Laboratory of Success” website project, created to support beginning and continuing Internet entrepreneurs. He is a convinced workaholic with professional experience in managing the editorial office of an online magazine, creating and managing his own online store. Main occupation: promoting businesses (including online stores) through Facebook and Google Adwords. Main hobby: monetizing websites through affiliate marketing tools and Google Adsense. Personal confirmed records: 3 million blog visitors per month.
Nest- free, plug-in control panel for the site. The site can be anything, but initially the panel is designed for one-page business card sites (landing page).
The panel is easy to connect and runs on PHP and JavaScript. Does not require a database. All you need to do is upload your project to the Nest folder and embed the script into your website. Next you need to put everything on the PHP server. Open the panel, the panel accesses your favorite elements on the page by id, class, tag.
Nest does not rewrite the page, it saves the data in json format and when the page is loaded, it mounts it in the right place in the DOM tree. This is done to minimize integration complexity and errors. id should be written with a hash #id, class with a dot.
The process of connecting the Nest panel to the page template
- Download Nest.
- Drop index and project files into the Nest root directory. Near admin.html.
- Connect (system/js/nest.js) script to all pages that you want to monitor.
- Upload everything to a PHP server (WAMP, XAMPP, OpenServer).
- Start the server and open admin.html in the URL.
- Enter the password, default is “0”. You can change the password in "system/info.txt".
Ideal conditions for using Nest Admin
You have an order to create a simple but beautiful landing page, and so that the user can update it himself.The budget for the order is small, and therefore, writing an admin panel, even a simple one from scratch, does not involve a lot of money and deadlines.
The best option is to use a CMS, such as WordPress, but there is one problem: there is a lot of unnecessary stuff in the CMS, in the context of this task. Poking around in CMS templates to tailor them to a creative, specific design will take longer than making the template yourself.
In such cases, a panel like Nest will help. You make the template as you please, connect the script to the pages that will be controlled and to the blocks that will be controlled by Nest. Set semantic and logically understandable ids, such as header, content, footer, logo. It is by them that Nest will navigate.

Notification panels- an extremely effective means of stimulating the user to move to the required page. In addition, they serve to display important information, as they always attract the user's attention. Some panels contain forms for data entry and can be used, for example, to organize a subscription to mailing lists.
In online stores, notification panels are actively used to notify visitors about promotions and discounts and, thus, are a powerful mechanism for increasing sales.
In this review, I will talk only about some of the most functional and attractive, in my opinion, plugins for creating such panels on the pages of a website or blog on the platform. Each of them has its own advantages, many functions and the ability to adapt the appearance to the style and design of your website. I have no doubt that thanks to this review you will be able to choose the plugin that best suits your requirements.
Custom Notifications
A high-quality premium plugin that has all the necessary functions inherent in a plugin of this level.The notification bar can contain simple text, email entry form or on the website, social networks and countdown timer.
And all this is enclosed in adaptive containers and will be displayed correctly on any screen. In addition, the settings panel allows you to control the position on the page and the color scheme with almost no restrictions.
Cost: $29

BugMeBar WordPress plugin
A simple but eye-catching panel with very beautiful and eye-catching color effects. It can be placed anywhere on the page, and in addition, it can set cookies and not be displayed on a subsequent visit to the page if the user suddenly does not want to see it anymore.Other features worth noting:
- Specifying the pages on which the panel will be displayed and on which it will not.
- Setting the validity period of cookies.
- Full control over the appearance, including choosing color, transparency, etc.
- The ability to shift fixed headers while maintaining the integrity of the layout.
- Ability to enable or disable transitivity and animation

Hello Bar
One of the most popular notification bars for Wordpress. And besides, free, although in terms of functionality it is in no way inferior to its premium counterparts.To use Hello bar, just go to the plugin and enter the URL of your blog. Next, you will be taken to the settings panel, where you can configure the location and appearance of notifications. Moreover, the settings panel has a preview function, so you can quickly give your notifications the desired look.
After completing the settings, you will receive a code fragment that you need to paste directly into the site page. If you do not feel qualified enough for this operation, you can install one that will do this routine work for you.

DW Promobar
A fairly simple plugin containing only the essentials. The notification bar can display simple text, a button, a link, or a countdown timer. It looks attractive and gives you full control over all customization options.
Foobar – WordPress Notification Bars
This review wouldn't be complete if I didn't mention Foobar. This is one of the most widely used premium plugins in this class. It contains over 30 customization options and, unlike many others, allows you to customize the notification bar separately for each page.Cost: $9

WordPress Notification Bar
Free plugin, easy to use and activate. The panel content can be plain text, or it can also contain a button associated with a specific action. Thanks to the wide range of color settings, you can perfectly adapt the panel to the design of your website.
Royal Footer Bar
Royal Footer Bar is a plugin of the highest class, truly “royal”. It looks very professional and has a wide variety of options.The information panel can contain plain text, a form for subscribing to mailing lists, and various links, including to accounts on social networks. In the settings panel, you can not only set the necessary settings, but also get complete statistics about activity.
The highlight of this plugin is that the developers called it an A/B/C test - you can set several settings and, after evaluating them in your working environment, choose the one that best suits the concept of the site.
Cost: $39

Notification Bar
A very simple plugin that displays notification panel either at the top or bottom of the page. Includes 5 color options for text message orHello, dear readers. Today, the topic of our conversation will be the WordPress admin panel. It is also a site control panel. How to enter it and protect yourself from outside penetration.
There is nothing complicated about this, however, not everyone pays due attention to detail. As a result, these people put effort into creating a site, nurture it, and when the long-awaited profit begins to loom on the horizon, the portal leaves the hands of the owner. It's unpleasant, isn't it? So what are we going to talk about today?
How to log into the site control panel
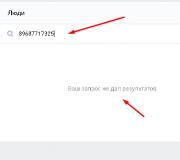
How to log into a WordPress site? Enter your site's address in the omnibox (the search bar at the top of your browser) and then " /wp-admin" or " /wp-login.php- whichever you like best.
A window like this will appear. Enter your username and password here.

Your login and password will be sent by email after registering the WordPress engine (). If you install the program like me, through hosting Timeweb , then in addition to the letter, after registration the following information appears in the main window. Save this information until you change your password.
If you have lost your login and cannot log into the admin area or the login does not work (white screen), then Timeweb technical support will help you find out this information. Don't hesitate to contact us.

That's it, you are now logged into the site as an administrator. You can do whatever you want. Conquer!

The first thing you need to do is to protect the admin panel from hacking, but you must agree. Those red notification icons are so annoying, let's get rid of them first.
Click on the Updates section and then Update Now.

Not long ago I decided to use a demo site on free hosting to create screenshots for my articles. I couldn't update for three weeks. Most likely the hosting did not support the new version. Now the “torment” took only a couple of minutes.

A little about the panel itself
I don’t know about you, but since we’ve entered the control panel, the first thing we want to do is poke around in different sections. What's there?
The “Console” button takes us to the main menu, thanks to which you can easily and quickly manage the site.
“All posts” is a section for adding and editing new publications.
“Media files” - allows you to create your own galleries with pictures and videos. This is necessary to make the site work faster, but you can learn about such nuances from my future publications, subscribe to the newsletter or look for information about this on the Internet.
“Pages” allows you to work with the main page, sections, headings, categories or forum.
“Comments” allows you to quickly receive a notification that a user has left an opinion about your publication.
“Appearance” allows you to work with the template design.
“Plugins” are tools invented by other developers that make working with WordPress more functional, simple and professional ().
In the Users section, you can add editors, authors, subscribers, and administrators. We'll talk about their functionality later.
“Tools” make it possible to work with publications on the Web.
Well, with “Settings” I think everything is clear.

I marked the logo with the number “2”, which helps to navigate to the site and see it through the eyes of the visitor. The number “1” will tell you how to log into the site’s admin panel again.
This is what your portal currently looks like:

How to protect yourself from hacking
Whether you are going to make websites for yourself or want to, the most important thing is to ensure their reliability.
There are many articles on the Internet on the topic of how to get into the WordPress admin area. Recently, one customer, for whom I made a website at the beginning of my activity, called with a complaint that I deliberately broke his website so that he would order a new one from me. In fact, his portal was simply taken away, but what can you prove here and is it worth... reputation is more expensive, I had to make a new one. I was never able to restore the old one. Set passwords wisely and warn clients that although this does not happen often, their site may be damaged. Help them figure out their passwords.

What passwords won't work?
- Any password that contains the word is not suitable ().
Use a random set of at least twenty characters. Be sure to switch the keyboard from small to capital letters, and do not neglect numbers.
- Don't store important passwords in a simple Word document.
Viruses on your computer or experienced programmers can access them remotely.
There are many programs that select the most popular passwords, then various combinations and find a way to log in.
- Do not create many profiles for administrators, as this increases the chances of the site admin being hacked.
How to come up with a password so strong that it will be impossible to hack it
Unfortunately, even hitting your head on the keyboard will not give a good result.
It is better to use a specially trained program that stores passwords and blocks access to them even for viruses. For example, KeyPass Password . It's free and really powerful.
Download and install on your computer. Let's open it.

We accept the conditions.

You won’t be able to download the program in Russian right away; we need to install the language additionally. Click View – Change Language.

We need more languages!

Now you will be redirected to the official website, from which you can download Russian. Download both, it won't hurt.
Open “My Computer” and look for “Program Files”, and then the KeePass Password Safe 2 folder. Usually, the path looks like this - C:\Program Files\KeePass Password Safe 2. I have two drives, so the picture is a little different.
Open the archived, newly downloaded new language and drag it into this folder.

Now open the program, select Russian.

We point it to Russian and agree. Yes!

Now everything has become much clearer. The program guarantees users that the files with passwords that you will store on your computer cannot be hacked. You can store all sorts of complex ciphers from electronic payment systems, websites and more.
Create a separate file, as shown in the picture, or a folder if you are going to store several passwords.

For greater security, create a new key file so that only you can use the program.

Hold down the left mouse button and move across the picture on the left. Click OK.

Now enter your 30 character master password. It should include large and small letters, as well as numbers. Use a sentence and write it down on a piece of paper so you don’t forget.

You can give the database a new name and write comments.

Select the section you need. For example, the Internet, if you come up with a password for the site.

Create a new key as shown in the picture.

By clicking on the ellipsis, you will see the basis of the password that the program came up with for you. You can add to it. The main thing is to repeat it in the column below...

That's it, a new password has been created. By left-clicking on this form you will see all the password information.

Now you need to enter it into the WordPress admin area. Go to “Users”, find “Your profile”, scroll down the form and enter the passwords you just created in the KeePass program.

All these measures are necessary. Not a single minute of your time should be wasted.
On this I think we can finish today’s article. Good luck to everyone and don't forget to subscribe!