Building a computer from scratch. Self-assembly of a system unit in pictures or how to assemble a computer at home
3DNews has a large and diverse audience. The resource is visited by both seasoned enthusiasts who have assembled more than one PC, and readers who are just beginning to delve into all the intricacies of computer technology. The test laboratory elegantly overclocks them to serious frequencies, studying the durability of drives, in modern games and purchasing unusual hardware abroad, but at the same time does not forget about inexperienced users. This is how the “” section appeared, which offers various configurations of system units. After reading the comments and personal communication with the readers of the site, it became clear to me that it was time to tell in detail and show newcomers how to assemble the components proposed in the article into a single whole. This is exactly what this material is dedicated to.
⇡ Selection and compatibility of components
Sometimes deciding on the set of components that will make up your PC is more difficult than assembling the system unit yourself at home. You can find a huge number of processors, motherboards and video cards on sale. You can argue for a long time about which brand is preferable, as well as debate about whose graphics are faster, the main thing is that when the final configuration is selected, all the hardware is fully compatible with each other. By the way, these are the systems I propose in “”. If you follow this rule, assembling a system unit is not much different from playing with a construction set in which all the parts fit together. The dimensions of components, parameters of mounting holes and connectors - all elements of a computer are strictly regulated, and therefore, for example, it cannot be that DDR3 RAM suddenly works on a motherboard with DIMM slots intended for installing exclusively DDR4 modules. You simply won't be able to install them into the appropriate slots.
For the full functioning of the system unit, you must purchase the following devices: motherboard, central processor, cooler, RAM, hard drive or solid-state drive, video card (if the CPU or motherboard does not have a built-in graphics core), power supply and case. Additional components include an optical drive, as well as various discrete devices: network and sound cards, additional cooling.

The motherboard is the basis of any computer. It depends on it which processors will be used, how many RAM modules, video cards and drives can be installed. The dimensions of the motherboard also play an important role when choosing a case. At the moment, among motherboards, the most popular form factor solutions are E-ATX (305 × 330 mm), ATX (305 × 244, 305 × 225 or 305 × 199 mm), mATX (244 × 244, 244 × 225 or 191 × 188 mm) and mini-ITX (170 × 170 mm), although there are much more standard sizes of such devices. The form factor is always indicated in the technical specifications of the cases.
The “housing” itself for components is also divided into types depending on size and shape. As a rule, the larger the computer case, the more efficient hardware we can install in it, while ensuring high-quality cooling of all system components. The dependence, however, is nonlinear - practice shows that it is quite possible to assemble a powerful gaming PC in compact cases with a volume of 7-10 liters. You just have to first select all the components more carefully.
Among PC cases, the most popular are four types of models: Midi-Tower (examples - and ), Full Tower (), Mini-Tower () and Slim Desktop (). Naturally, the more compact the device, the fewer seats it has for installing discrete video cards, drives and case fans. For example, the 10-liter Node 202 can only accommodate 2.5-inch hard drives and SSDs. A conscientious manufacturer indicates all these features in the technical characteristics of the device.
When choosing components, pay attention to other limitations that any computer case has:
- maximum height of the processor cooler;
- maximum video card length;
- maximum length of the power supply.
Before purchasing equipment, be sure to make sure that all devices are compatible with each other, do not conflict, and fit exactly in the computer case. The simplest logical chain that will not allow you to purchase components that do not match each other is as follows:
- We decide on the model of the central processor.
- Select a motherboard with a suitable CPU socket.
- We study the list of compatible motherboard equipment on the official website and select a set of RAM.
- We select drives that are compatible with the motherboard.
- We select a video card, power supply, processor cooling and a case that will accommodate all the components.
Again, the given sequence is by no means an axiom. Since assembling a PC is always a creative process, the sequence of choosing hardware may change. For example, you liked a certain case and want to build your dream system only in it. Or you already have some components on hand and need to buy the rest.

If the system unit will use a maintenance-free water cooling system for the processor or video card, then you will additionally need to find out the sizes of the supported radiators, as well as the locations in which they can be installed. Obviously, the mounting locations for the SVO coincide with the mounting locations for the fans. Single-section radiators are usually installed on the rear wall, two-section and three-section - on the top and/or front.

To write this material, based on the above sequence of component selection, I used the following set of devices:
- CPU AMD Ryzen 7 1700, socket AM4, 3.0 (3.7) GHz;
- MSI X370 GAMING PRO CARBON motherboard, socket AM4, X370 chipset;
- RAM Kingston HyperX Fury (HX426C16FR2K4/32), 4 × 8 GB, DDR4-2666;
- solid state drive;
- video card;
- Cooler Master MasterWatt power supply, 500 W;
- Cooler Master MasterBox 5 MSI Edition case;
- CPU cooling Cooler Master MasterLiquid 120.
As you can see, when preparing this material, the most common form factors are used - ATX for the motherboard and Midi-Tower for the case. Similar options are offered in the “Computer of the Month” - because this standard size is the most universal and is the most popular. True, I can’t say that the assembly process in Mini-Tower and Slim Desktop cases is fundamentally different. It’s just that the requirements for selecting hardware that is compatible with each other are noticeably higher.
Additionally, I would like to note that when selecting devices, all modern trends were taken into account. The main drive is the Kingston HyperX Predator model with a PCI Express interface. And the choice in favor of the Cooler Master MasterBox 5 MSI Edition was made due to the possibility of installing a power supply at the bottom of the chassis, as well as the presence of a mount for drives on the barrier wall. Plus, maintenance-free liquid cooling systems are very popular. Cooler Master MasterLiquid 120 is a bright representative of single-section “water coolers”, which are ready to work right out of the box. The remaining components are selected in such a way that the end result is a productive system unit for work and entertainment. The optical drive was not used. In my opinion, in 2017 there is no need for it, and the Cooler Master MasterBox 5 MSI Edition (as well as many other new cases of a similar format) does not have seats for installing devices in 5.25-inch bays.

To assemble the system unit, you will definitely need two Phillips screwdrivers with different slot diameters, nylon ties and wire cutters. Perhaps pliers will come in handy - in cheap cases, the threads are cut by eye, as well as double-sided adhesive tape, degreasing liquid and cotton swabs. In order to avoid scratching the case and damaging the motherboard, I place all components on a rubber mat. An antistatic bracelet or gloves will also be useful for beginners, but, to be honest, more to give confidence in their own abilities. Since assembling a PC also includes connecting small connectors to the motherboard, you definitely can’t do without good lighting or a flashlight on hand.
⇡ Step No. 1. Installing the processor and RAM
The motherboard user manual always contains a description of the installation of all main components and connectors. Beginners, keep this book with you. The sequence of steps for assembling the system unit may vary depending on the type of components. For example, sometimes it is better to install a processor cooler right away, and sometimes it is better to install it second to last or last. Even before fixing the motherboard in the case, you should install the central processor and RAM in the appropriate slots.

You are probably aware that the design of AMD and Intel processors is noticeably different from each other. Thus, on AMD chips, protruding contacts, called “legs” by the hardware, are located directly on the PCB substrate. But Intel chips do not have such elements - for these CPUs, the contacts are placed directly in the motherboard socket.
AMD chips are installed very simply: lift the lever, place the processor on a plastic substrate, lower the lever.

As for Intel solutions for LGA115X platforms, a similar technique is used here: together with the lever, we raise the clamping frame, install the processor, lower the lever and the clamping frame.

In the case of Intel LGA2011 and LGA2011-v3 platforms, to raise the clamping frame, you will need to release two levers from the locking slots.
|
|
|


Please note that all central processors and motherboards are equipped with pointers and so-called foolproof protection. In principle, you will not be able to install the chip into the socket in any other way, so NEVER use force when assembling the computer. All elements in the system unit are equipped with protection against incorrect connection. Apart from the CPU, you won't be able to connect power supply cables, case connectors, fans, discrete devices, drives, or RAM in any other way. More precisely, you can, but this will require maximum effort. I think it’s not worth talking about the consequences of incorrect installation of PC components.

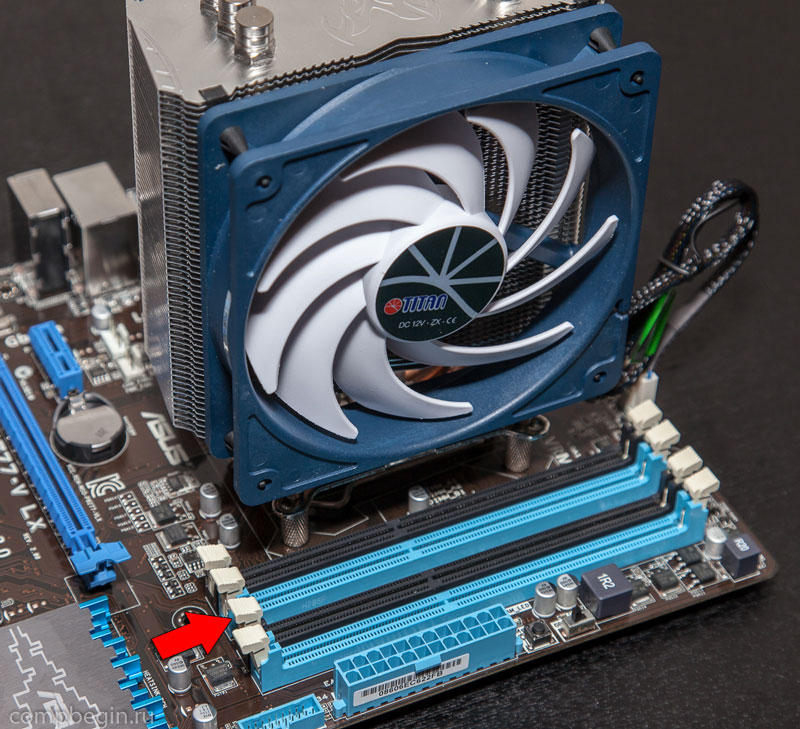
After the central processor, I install RAM in the DIMM slots, usually located on the right side of the central processor. MSI X370 GAMING PRO CARBON supports DDR4 RAM; there are four ports on the printed circuit board. Some motherboards may have only two of them (most often these are either the cheapest devices, or mini-ITX form factor solutions, or), in models for the LGA2011 and LGA2011-v3 platforms there are eight. Typically, all DIMM slots are marked on the PCB.
Most modern AMD and Intel processors have dual-channel RAM controllers. That's why motherboards use either two or four DIMM slots. Therefore, it is considered optimal to install either two or four RAM modules. In the first case, RAM is installed through one connector. Some motherboards have special indicators. For example, in the MSI X370 GAMING PRO CARBON, modules are installed in the DIMMA2 and DIMMB2 slots - in this case, the RAM will operate in dual-channel mode. In other motherboards there are inscriptions like , - in such cases, to ensure dual-channel mode, the modules must be installed in the DDR4_A1/DDR4_B1, DIMM_A1/DIMM_B1 and DDR4_1/DDR4_2 slots, respectively.

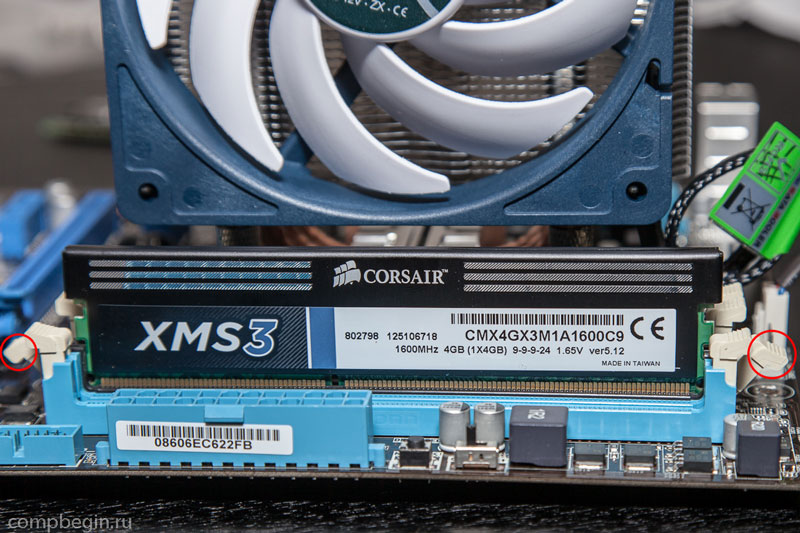
"Fool proof" for RAM
I have already said that it will not be possible to insert RAM incorrectly, since the design of the DIMM connectors uses a jumper. It is also used to prevent the user from “squeezing” modules of a different standard into a motherboard that supports DDR4.
RAM cards are secured using latches located at the edges of the DIMM slots. Some motherboards only have these latches on one side of the connectors. This is done so that the user can easily change RAM modules without, for example, removing the video card.

After installing the CPU and RAM, you can immediately install a CPU cooler, but only if the design uses a small heatsink. The use of an oversized cooling system will complicate the installation of the motherboard, as well as the subsequent connection of wires. The photo above shows examples of installing boxed coolers—the so-called coolers that are sold together with processors. Coolers for the AMD AM3+ and FM2+ platforms are mounted using plastic “ears” - a special metal bracket with eyes clings to them. Box cooling for Ryzen chips is installed differently; here you will have to work with a screwdriver: first remove the plastic mount, and then screw the radiator to the backplate. The cooler for Intel processors is attached using plastic clips: install the heatsink on the CPU and press the latch until you hear a characteristic click. In general, in the case of installing box cooling systems, even beginners should not have any problems.
Thermal paste is already applied to the base of some coolers - its use significantly increases the efficiency of heat removal from the CPU. In any case, thermal paste is always included with the processor cooler. For example, Cooler Master MasterLiquid 120 came with a small tube, which should nevertheless be enough for 3-4 uses. Please be sure to remove the protective film before installing the cooling system, if any, on the base of the device. The process of applying thermal paste is described in point number five.
But the installation of other coolers is done individually, since each manufacturer uses a mounting kit of its own design. Therefore, immediately remove the instructions from the CO packaging. Most devices are equipped with universal mounting mechanisms that fit both AMD and Intel processors. True, the mating part of the mount, which must be pre-fixed on the board, is different for different platforms. The list of supported equipment, as well as cooler dimensions, are always indicated in the technical specifications. And yet there are quite a few models on sale that are compatible with only one specific platform.

Once again: if the device is large or, as in my case, a maintenance-free liquid cooling system is used, then at the first stage it is enough to attach the back plate and frames to the board, which will hold the cooler’s radiator. We will install the radiator itself next to last, after all the cables are connected to the motherboard. Yes, in cases of the Cooler Master MasterBox 5 MSI Edition level, the barrier wall has a window for access to the cooler's backplate, but it is not always convenient to use.

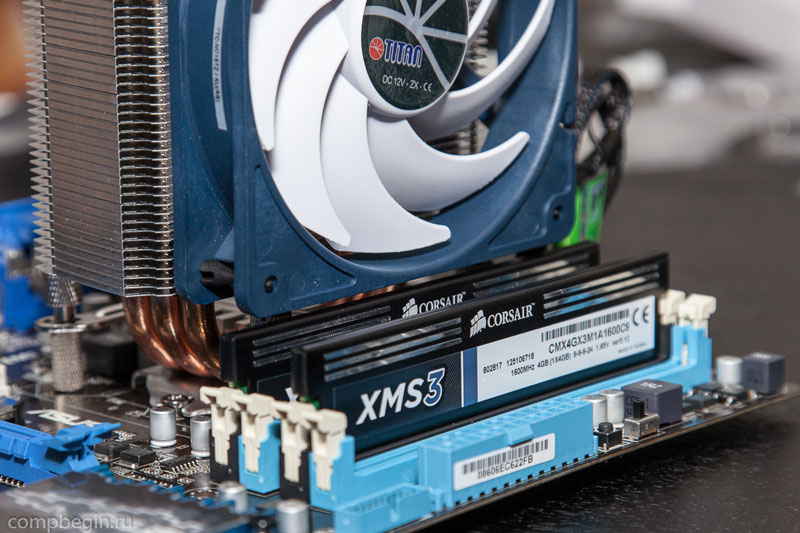
If we talk about air processor coolers, tower type coolers are considered the most popular. Depending on the platform used and the specific model, the CO radiator can be installed in two positions. In the first case, the cooler fan will blow air through the rear wall of the case, in the second case, through the top. The correct installation option is determined by the shape of the housing used. So, in the case of models in Full-, Midi- and Mini-Tower formats, it is better to use the first option. It is important that the used CO does not overlap the expansion slots, and also does not rest against the cooling elements of the motherboard power subsystem. For example, the MSI X370 GAMING PRO CARBON does not conflict with even the largest tower coolers. A wide processor cooler can also prevent the installation of RAM modules with high cooling radiators. Therefore, it is better to use compact RAM kits, such as Kingston HyperX Fury for example, or make 100% sure that CPU cooling and memory will not conflict with each other.
Our assembly uses a maintenance-free liquid cooling system Cooler Master MasterLiquid 120, so its installation will be done penultimately (step No. 5).

The cooler and case fans are connected to the motherboard using 3- and 4-pin connectors. The MSI X370 GAMING PRO CARBON has six such elements soldered at once, which is very convenient. The number of such ports is not regulated in any way, but at least two connectors must be present on the board: for connecting the CPU cooler fan and for the system (case) impeller. All connectors are marked accordingly: CPU_FAN, SYS_FAN (or CHA_FAN). Sometimes the 4-pin connector intended for the processor cooler is highlighted in a different color (usually white). You can also find the PUMP_FAN connector in mid- and high-price boards. It is designed to connect the rotor of a water cooling pump, but at the same time it is suitable for any other fans. It’s just that a greater current is transmitted through this port.
The three-pin connector does not allow you to adjust the speed of the fan connected to it. But the 4-pin port has such an opportunity, and modern motherboards are able to regulate the rotation speed of the “turntables” both with pulse-width modulation (fans with four contacts) and without it (fans with three contacts).
If there is a shortage of connectors for connecting case fans, all kinds of adapters will help. This can be a regular splitter that allows you to connect several impellers to one 3- or 4-pin port at once. Or a cable connected to a MOLEX or SATA connector. There are also devices such as, although their popularity has never been high. However, they are initially equipped with simple (most often three-position) controllers that control the fan speed by lowering the voltage from 12 to 7 or 5 V.
In the case of our PC, there is no need for additional adapters and splitters, since only two CBO fans and one case impeller need to be connected to the motherboard.
⇡ Step No. 2. Installing the motherboard and connecting case connectors
Now that the CPU and RAM are connected to the motherboard, it's time to start working on the case.

For a long time now, in tower cases the power supply has been installed primarily at the bottom. This was done both for aesthetic reasons (it’s more convenient and easier to lay wires) and for the sake of increasing the cooling efficiency, primarily of the PSU itself. However, there are case models on sale with other options for installing the power supply.

Mounting spaces for installing a power supply, 2.5- and 3.5-inch drives
The design of the Cooler Master MasterBox 5 MSI Edition includes a small basket with a slide that can accommodate two 3.5-inch hard drives. More compact 2.5-inch drives are mounted on a barrier wall.

Installing the motherboard begins with fixing the I/O panel plug in a specially designated rectangular hole. You won't have any difficulties. The plug is always included with the motherboard.

Mounting accessories are always supplied with the housing. Along with the Cooler Master MasterBox 5 MSI Edition, I found three types of screws, as well as plastic clips for installing additional fans. Other cases may have more mounting options. On some models, the stand screws required to install the motherboard are already screwed into the corresponding threaded holes on the barrier wall. In the case of Cooler Master MasterBox 5 MSI Edition, you will have to do this procedure yourself.

So, the case supports the installation of motherboards of mini-ITX, mATX, ATX and even E-ATX form factors. There are symbols on the wall (a similar note is used in many models). Since the assembly uses an ATX form factor board, you need to screw all eight stand-off screws into the threaded holes marked with the letter “A”. However, not all motherboards belonging to this standard size meet the length and width parameters of 305 × 244 mm. For example, the MSI X370 GAMING PRO CARBON is narrower by 19 mm, so it cannot be mounted in the case on the right edge. Consequently, when connecting wires from the power supply or installing memory modules in DIMM slots, the textolite will bend. Install these elements more carefully in such cases.

After the motherboard is secured, I personally immediately connect the controls and connectors on the front panel of the case. The front wall of the Cooler Master MasterBox 5 MSI Edition has two USB 3.0 A-type ports, two 3.5 mm mini-jacks for headphones and a microphone, as well as system power and forced reboot keys. Difficulties can arise only when connecting controls - this is a bundle of wires with connectors Power LED- and Power LED+ (transmit information to the computer status indicator), Power SW (responsible for the operation of the power key), HDD LED- and HDD LED+ (transmits information to the drive activity indicator ), as well as Reset SW (responsible for the operation of the forced reboot button). Some elements may not be on the “face” of the case, since not all devices are equipped, for example, with a Reset key or LED indicators. However, in all cases these connectors are connected in a specific sequence, as shown in the table below. It’s just that motherboard manufacturers use their own designations for essentially the same pad: JFP1 in MSI motherboards; PANEL in ASUS; PANEL1 in ASRock and F_PANEL in GIGABYTE.
| Power LED+ | Power LED- | Power SW | Power SW |
| HDD LED+ | HDD LED- | Reset SW | Reset SW |
In addition, among the internal connectors on the motherboard there may be contact pads for connecting USB 3.1 and USB 2.0 ports, RGB strips, a TPM module, FP audio and a speaker.
Update 03/20/2013
Probably every computer enthusiast has long had thoughts of assembling a “system unit” with his own hands.
Installing the OS and other application software has long been completed.
But assembling a completely ready-to-use computer from components is not as easy as it seems at first glance.
This article will be a detailed instruction manual for assembling a computer, or rather a system unit, from separately selected components.
How to select components for a system unit, read in our articles:
- .
- .
- ?
- .
- .
- .
The article describes the assembly of a budget system unit.
It is clear that with the release of new components, this system is no longer relevant.
But we are not describing a specific kit for a gaming/media computer, but the principle, method and sequence of assembling the system unit. Which is not very different from other systems.
Let's start in order:
1. So we take out the case.
We selected and purchased the building Cooler Master Elite 332
.
The case is made of fairly thick metal and has convenient clamps for screwless installation of equipment.
The case is equipped with a high-quality power supply with a power of 460W or 500W (optional, selected using ), which is capable of providing an average gaming system and has all the necessary (for us) connectors.

Also included in the package are all the necessary mounting screws, motherboard holders, and even a ferrite ring, which is used to eliminate electrostatic interference from consumers connected to the front panel.

2. Then we take the motherboard.
Article
The choice fell on ASUS P8P67 LE
is an excellent motherboard with the new P67 chipset and CrossFireX support.
The delivery set includes 1 ATA cable, 2 SATA 3Gb/s cables and 1 SATA 6 Gb/s cable (!).
it differs in appearance from ordinary sata cables

We prepare the motherboard for installing the processor. Open the latch and remove the protective insert of the mat socket. boards, shipping film from the chipset heatsink and a sticker from the PCI connectors


3. The next component will be our processor.
Article
Was chosen and purchased Intel Core i3-2120
– a dual-core processor made using a 32-nm process technology, with a clock frequency of 3.3 GHz for each core, and with support for HT technology (Intel® Hyper-Threading).

Thanks to which each processor core is capable of conducting calculations in two threads.
This results in 2 cores/4 threads. Windows 7 sees this processor as quad-core.

The BOX package includes the processor itself and the cooler, with applied thermal paste

We take out the processor and simply put it in the motherboard socket. We control the coincidence of all “keys” and pointers.

In principle, you won’t be able to put the processor in any other way (they won’t give you the keys), but it’s better to check it again.
Then we close the frame and fix the latch - the processor is installed.

4. Next, take the cooler (radiator + fan) and install it in the holes of the motherboard.
At the same time, we check that all four cooler latches are closed (turned all the way in the direction opposite to the drawn arrow).

One by one, carefully, crosswise, press the latches onto the motherboard until they are completely secured. Mat. It is better to pick up the board and, pressing it, hold it from the back side.

Then be sure to check that all the latches are fully latched. If not, then gently squeeze.

Now connect the fan to the connector cpu_fan motherboard.

5. Take RAM modules.
Article
We have chosen budget levels DDR3
frequency 1333 Mhz 2 x 2Gb
, but a well-known company G.SKILL
.
The strips are taken from the same batch for correct operation in dual-channel mode.
It was possible to focus on a KIT set, but our budget was too limited.
We decided to stop at these.

We equipped the next two systems with a DDR3 4096Mb CORSAIR (CMZ4GX3M1A1600C9) Vengeance KIT kit with a frequency of 1600 Mhz

According to the motherboard specification, for the memory to work in Duall Chanell, the sticks must be installed in the first (DIMM_A1) and third (DIMM_B1) slots (channel A and B).

Open the latches of the memory slots and install the memory according to the key (jumper) on the memory bar and slot. The memory is installed by pressing evenly on both edges until the latches are completely seated and closed. Considering that everything is new, the latches may be difficult to move, then you need a little help closing the latches.

As a result, we have this look

6. Install the back plate included in the mat kit. boards into the computer case

Now we take the motherboard and “try it on” in the case to find out which holes we need to screw the board holders into. Having decided, we screw it in.


Before fixing the motherboard, we lay under it (so as not to interfere) the audio cable coming from the front panel and connect it to the connector front panel audio connector (AAFP)
.
Different boards have different locations for the front panel audio connector. For more details, see the manual for the motherboard kit or download the manual from the office. manufacturer's website fees.

Then we insert the mat into the back bar. board and fix it with screws to the holders

Be sure to pay attention to screws with the correct threads


Then we connect all the controls and indications of the front panel of the case in series (observe strict polarity, white wires are “minus”, colored wires are “plus”).
In the installation instructions mat. The board has a detailed description and illustration of how to connect USB ports and front panel controls, right down to the full pinout. On boards from different manufacturers, the front panel is connected differently. For more details, see the manual for the motherboard kit or download the manual from the office. manufacturer's website fees.

Speaker POST – signal

Power and Reset buttons

HDD indicator (red LED) and power indicator


Again, due to a very limited budget, I had to buy a cheaper CoolerMaster fan (but it’s not advisable to completely abandon it).
We equipped all subsequent systems with a better and more productive model CoolerMaster SickleFlow 120mm 2000 RPM Blue LED

We remove the front panel; in this case it is held on by simple latches; in other cases it may be secured with screws.

We install an additional fan, and strictly for blowing (with the fan housing inside the computer case)

And connect to the connector cha_fan2 on the motherboard

While the front panel is removed, we are preparing a place to install our DVD drive


Close the front panel.
We lay the wires coming from the front panel and secure them with vinyl clamps

8. The next step is to install the HDD into the computer case.
Article and/or.
Due to a limited budget, we chose a manufactured hard drive W.D. volume of 500Gb with 16 Mb cache and interface SATA3 6Gb\s .

We equipped subsequent systems with a fast, single-pancake, quiet hard drive Seagate Barracuda 7200.14 1TB 7200rpm 64MB ST1000DM003
with 64 Mb buffer (cache).

Our motherboard just has 2 SATA3 connectors, which are marked in white and labeled as SATA 6G

We insert the hard drive into the case so that it is blown by the front fan on both sides, and secure it with mounting latches.
In other cases, fixation is carried out using screws.
The first thing you need to understand is why you need such a system. This affects not only the cost of assembly, but also the nature of the choice of components. The most ordinary computer that performs standard tasks can be assembled from entry-level elements. There is even an opportunity to play low-cost games. If you are an avid gamer or are demanding on graphics, then this choice is indispensable. You need a so-called gaming computer. You will need more RAM (from 16 GB), a processor with at least 4 cores, one or two discrete video cards, and, of course, a powerful power supply that will handle it all. The price of this pleasure can exceed 100 thousand rubles. Is it worth pursuing? Everyone decides for themselves. But it is more advisable to opt for a mid-level car.
What do you need to assemble a computer?
CPU
The “heart” of a computer is considered to be the CPU, on whose power a lot depends - whether the external video card will show its full potential, whether it will be possible to open several resource-intensive applications at once, whether it will be comfortable to watch videos in UltraHD format. Intel processors (i5 or i7) are suitable for these purposes. The clock speed starts at 3 GHz. It should not be surprising that over 10 years this parameter has increased insignificantly. Engineers achieved a reduction in the technological process, which made it possible to increase the number of transistors on a chip, reducing power consumption.
It is better to pay attention immediately to the seventh generation of Intel processors, since the built-in graphics card allows you to play video content in the H.265 format, which is gaining popularity. The latest generation codec not only supports high frame rates, but also 10-bit color. A dual-core processor with four Pentium threads, the cost of which is minimal, can currently decode such material. Therefore, such a CPU is suitable for assembling a non-gaming system. For games in FullHd format, you need to take a closer look at the i5 line, for 4K games - at the i7 series.
A landmark event in 2017 was the release of competitive models from AMD. The Ryzen 7 1800X can perform on par with the Intel i7-7700k. The most powerful platform for the average user will be based on one of these “stones”. But you cannot build the cheapest computer on AMD Ryzen, since these processors do not have a built-in video core.

CPU cooling system
When the “stone” operates, heat is generated that must be removed. Therefore, a fan is required. Central processors are supplied with a cooler (BOX version) and without (OEM). If you are a connoisseur of silence in the room, then it is better to choose the second option. Typically, third-party coolers have lower noise levels. For example, in the model from Arctic Cooling - Alpine 11 PRO - this figure reaches 14 dB, which is 9 dB lower than that of “box” fans. Despite this, it is capable of cooling processors up to 95 Watts. But it will not work if you are going to increase the CPU clock speed specified in the specification. For a gaming system, you need to choose a cooling system with copper heat pipes. Copper base improves heat dissipation performance. For example, the TITAN Hati TTC-NC15TZ/KU cooler is designed for a maximum processor heat dissipation of 160 Watts.


Today, most cooling systems are made with speed control depending on the CPU temperature. When the system is not loaded, less energy is required. Therefore, the fan should rotate more slowly (from 500 rpm) and create less noise. This modification has a 4-pin power connector, without control - a 3-pin connector.
The cooler has different mounts for AMD and Intel platforms. The most common sockets are LGA 2011 and 1151, and boards with AM4 have begun to be released for AMD Ryzen processors. Compatibility is very important, check it in the instructions or on the manufacturer’s website.
Motherboard
The foundation on which the entire system rests is called the computer motherboard. Models differ in the socket where the central processor is installed. This has been said before. In turn, they are divided according to the type of chipset, which is the connecting link between the components. For example, Intel has Z270 or X99, AMD has X370 or 970.
The form factor also matters (ATX, mATX or mini-ITX). It depends on the type of case in which all the elements of the computer are located. You can get an inexpensive machine based on mATX. This motherboard has shortened dimensions while maintaining all the necessary functions. The gaming modification does not involve savings; the ATX type is suitable for it. For enthusiasts who need maximum performance and detailed rendering in games, manufacturers have added SLI and CrossFire functions (combining the power of several video adapters). Modern technologies allow you to install up to four video cards with one graphics processor. If the model name contains the word “Gaming”, rest assured that it is supported here. A nice addition could be the presence of backlighting.
The backplane contains two or four RAM slots. For the future, it is better to purchase with four, so that later you can increase the total memory capacity. It is more profitable to choose a platform that supports DDR4 memory, the price of which is the same as DDR3. Check compatibility on the manufacturer's website.
If video is built into the central processor, you need to pay attention to which outputs are used to communicate with the monitor. HDMI and DVI interfaces are common.
There are also USB ports on the rear panel. At the moment, their fastest type is USB 3.1, including the input for various gadgets - Type-C.

All modern motherboards have PCI-E 3.0 x16 slots.
An audio controller will be important for music lovers or movie lovers with high-quality sound. We choose the most effective - SupremeFX S1220 or Realtek ALC1150/1220. Digital audio has better performance than analogue. Therefore, manufacturers began to include an optical S/PDIF connector. An audio device with an HDMI input can be connected through the corresponding output of the video card.
The power supply to the motherboard and processor must be 24+8 pin.

RAM
Previously, its volume was measured in megabytes. Now even 4 GB is not enough. Memory sticks are located in slots on the motherboard. Some applications and, especially, games require large resources. The minimum required volume can be considered 8 GB. For gamers, 16 GB is already required.
RAM performance increases if it operates in 2-channel or 4-channel modes. Therefore, we choose two sticks with a capacity of 4 or 8 GB, depending on the needs.
The bandwidth of DDR4 is higher than that of DDR3. At the same time, energy consumption is less. If the first operates in the voltage range of 1.2 - 1.35 V, then the second - at 1.5 V.
Memory frequency is critical if the video adapter is integrated into the processor. Otherwise, strips with a frequency from 2133 to 2666 MHz and a voltage of 1.2 V are suitable. Increasing the frequency will require increasing the supply voltage to 1.35 V, which will lead to greater energy consumption.
The ideal option is to purchase two sticks of 8 GB RAM with a frequency of 2666 MHz.

Video card
The graphics card is an important element for transmitting video information from the computer to the display. It comes in two types - built-in and external. The first does not require additional power and is not intended for gaming. The most advanced video core in Intel processors is HD Graphics 630, which is capable of decoding high-bitrate video in H.265 format. If you are happy with this, then you can save a lot on assembly without resorting to an external adapter. Otherwise, you can’t do without it.
It all comes down to price and performance. The market offers many options for discrete video cards. Their power has grown so much that not one of them can do without fans, the number of which reaches three. Another important parameter appears - noise level.
Two manufacturers are fighting for the buyer in this segment - NVidia, which is more productive and cooler, and AMD, which balances price and quality.

For the average user, for whom the maximum requirement is the availability of online games, a model from NVidia’s junior line – GTX 1050TI – is suitable. It is equipped with a sufficient amount of video memory of 4 GB, a recommended power supply of only 300 Watts, and supports high resolution 7680 x 4320.
Fans of high-end games need a more powerful video adapter. They have the following models to choose from: GeForce GTX 1060, GTX 1070, GTX 1080, GTX 1080TI and GTX Titan X. The latter has 12 GB of the fastest GDDR5X memory, but requires 250 Watts of power. GeForce GTX 1080 with 8 GB of video memory and 180 Watt consumption is the best option for gaming in 4K resolution with the highest detail. If you are comfortable playing with medium settings, then we choose the GTX 1070 based on the price/performance ratio.
To improve energy efficiency, some cooling systems can stop fans from spinning when idle to reduce noise. The use of two or more coolers increases the reliability of the video system as a whole in the event of failure of one of them.
Storage media
Any computer cannot do without hard drives on which personal data will be stored or the operating system will be installed. For faster loading and operation of Windows, you will need an SSD drive of at least 120 GB. It consumes less power than a mechanical drive, is silent and takes up less space in the case. But it is not without its shortcomings. The main ones are time between failures and a higher price. Therefore, if you record a large amount of information, it is cheaper to buy an internal or external hard drive with a size of 4 TB or more.


power unit
When all components of the PC platform have been selected, we will begin to search for the most important element on which the stability of the system depends. The power supply is involved in energy distribution and voltage stabilization.
If you have an office version of the computer (for example, without an external video card), then 400 watts of power will be enough. The average video adapter will require a 500-watt power supply. To power the GTX Titan X or several devices in SLI/CrossFire mode, you need a unit of 750 watts or more.
There are two main indicators - efficiency and PFC. Power supplies with an efficiency of more than 80% (80 Plus standard) are considered more efficient. The efficiency determines how much useful energy is transferred to the PC components. The larger it is, the less the power unit heats up. It is recommended to use a PSU with active power factor correction (APFC), as it further smoothes the voltage supplied to it. But it has a significant drawback - this type of device does not require the use of uninterruptible power supplies (UPS).
More details about selecting a power supply are written in the article Selecting a power supply for a computer.

Frame
All elements of the future system are placed in a metal box. The thicker the sheet, the more reliable it is. By size they are divided into ATX, mATX and mini-ITX. The choice is yours. Small enclosures have limited volume for good ventilation, but take up less space. The ATX size allows you to install a long video card.
A case with a transparent lid, where you can see the LED lighting inside, will look impressive. Expensive models are equipped with an additional cooling system. This is important for a gaming PC that experiences intense heat.
It is better to choose a lower location for the power supply, as it takes in cold air from under the bottom.

Peripherals
But the choice is not over yet. Without input keys it is impossible to use a computer. The mouse and keyboard are wired (USB and PS/2) and battery-powered. The second option is more practical, but the communication signal sometimes disappears. It's cheaper to buy a set at once. For a gaming PC, a mouse with multimedia buttons or a gamepad is suitable.
If there is a need to record information on optical media, then we purchase any DVD-RW drive.
Finding a monitor is a separate issue. We only note that you need to select LED displays, without flickering and with the ability to reduce blue radiation. It is recommended to check viewing comfort in the store, since TN+film, IPS and VA matrices differ in contrast and color rendition. Otherwise, the only difference is in resolution and diagonal.
How to assemble a computer yourself from components
PC components purchased. You can proceed directly to assembly.
We take the motherboard out of the box and place it on cardboard or foam rubber. We find a socket on the board for installing the CPU. We take the processor and carefully insert it there without any additional effort.

Thermal paste is included with the CPU cooler. Apply a thin layer of it to the surface of the “stone”. After reading the instructions, install the propeller on the base of the board. We check the tightness of the bases to each other. Connect the cooler power wires to the “CPU_Fan” connector. We find a similar connector for connecting a case fan.


We place the power supply in the case, which is secured with screws.

In the front part of the case, we attach the existing hard drives, SSD drives and floppy drives to a metal rack.

Before installing the motherboard, we screw special legs into the holes of the case to prevent short circuits.

Included with the backplane is a rear strip for connectors of external parts of the PC: monitor, sound speakers, USB devices.

Carefully place the board on the legs and fasten it with screws.


Remove the plug on the back of the case and insert a discrete video card into the PCI Express x16 slot.


Now is the time to connect all installed elements with cables.
We connect the plugs on the front panel of the case - indicators of hard drive operation and power availability, buttons for rebooting and shutting down the PC, as well as for USB ports. The connectors are usually located in one place under the PCI slots and are labeled.


We connect hard drives and drives to the system board with SATA cables.

Now is the time to start connecting components to the power supply. First, we insert a 24-pin (or 20+4 pin) cable, which is responsible for supplying power to the motherboard, then an 8-pin cable that powers the CPU.


Let's supply power to the recording and storage devices.


An external video accelerator usually requires additional power. We find this wire from the power supply (6 and 8-pin) and insert it into the connector on the device.
The computer assembly from scratch is completed. Close the housing with a lid. We connect the monitor with a wire for transmitting video data, plug the network cable into the power supply, and the mouse and keyboard into the corresponding USB or PS/2 ports. Turn on the computer.
Important steps in assembling a PC are determining the functions it will perform and calculating the power of the power supply. This will help save a lot of money. Next, we find out whether an external video card is needed. It's not cheap either. SSD drives are a necessary element for maximum system performance. Effective cooling in the case will require an additional turntable. If the motherboard and graphics card have LED backlighting, then it is advisable to choose a frame with a window on the side wall. The main advantage of assembling it yourself is the ability to replace components at any time.
More and more people are wondering every day, how to assemble a computer yourself from components from scratch. Assembling a computer yourself and with your own hands is a rather exciting and educational process. Self-assembly and configuration of a computer costs on average 30% less than purchasing a machine that is already assembled and ready to use.
Some people by computer mean a system unit, but I hasten to remind you that a system unit without a monitor, keyboard and mouse is useless. Only with these peripheral devices does it become a fully functioning personal computer.
What do you need to assemble a computer?
To begin assembly, you need to select a new set of parts. It is not advisable to buy used parts, since in the absence of experience in setting up a PC, difficulties may arise.
So, what do you need to build a computer? Point by point:
- computer case,
- power unit,
- motherboard,
- CPU,
- RAM,
- video card,
- sound card,
- DVD drive,
- hard drive,
- monitor,
- keyboard,
- computer mouse.
Which computer case to choose?
Choose a good quality computer case. It is necessary to pay attention to the fact that in stores there are cases made in China, which are made of very thin sheet metal and are easily deformed under mechanical loads.
The computer case includes a power supply and a network cable. Sometimes the case and power supply are sold separately.
How to choose a motherboard?
Motherboards come with integrated cards for processing video and audio. These motherboards are easier to assemble and have average technical parameters.
If you need to equip your computer with more powerful means of reproducing sound and video information, then you need to use a motherboard that is equipped with slots for a video card and a sound card.
When choosing a motherboard, you need to determine the area of primary use of the computer.
How to choose a video card?
There is no point in using an expensive video card to view news and video information on the Internet. But if you are a fan of computer games with cool video effects or plan to work in powerful video editing programs, then you cannot do without a good video card.
When choosing, always consider the purpose for which you are purchasing a video card. The power and price of the video card will depend on this.
Tell the store salesperson what you need the video card for. He will be able to help you choose the right model.
How to choose a sound card?
The question of how to choose the right sound card is quite extensive, so I will limit myself to the basics.
Sound cards integrated into the motherboard generally have two channels. If you plan to listen to music through an amplifier or receiver, then buy a multi-channel sound card. There are those that support 5.1 and 7.1 sound systems, when the system has several speakers and a subwoofer.
There are internal sound cards, which are inserted into a connector on the motherboard, and external, which can be connected to the computer via a USB or Firewire connector. Although the latter are more professional level sound cards, which are used by sound engineers, DJs and electronic musicians.
First of all, to answer the question of how to choose a sound card, ask yourself why you need a sound card in principle, and then look for a model that meets your criteria.
How to choose RAM?
To buy suitable RAM, you must first decide on its volume. For an ordinary modern computer, 4 GB is enough. A gaming computer requires at least 8 GB.
It is also important to know the type of RAM connectors on your motherboard. Lately you can mostly find only DDR3, but in general you can find the following types of connectors:
The type of RAM connector is usually indicated in the description of the motherboard. In any case, check with the store to see if they can exchange the memory you are buying for another type of memory of the same capacity if you make a mistake in choosing the type of memory.
RAM boards are sensitive to static charges, so it is not recommended to unpack them and keep them open until installation. Before installation, it is recommended to touch the metal case to remove any accumulated static charge on you.
Hard drive
Information that is located on a hard drive also requires a certain amount of space. Depending on your purposes, you may need additional memory.
For work, a 500 GB hard drive is the best option. If you are going to play games or download movies in Blu-ray format to your hard drive, and there will be a lot of them, then you can safely buy a hard drive of 1 terabyte. I prefer Seagate Barracuda hard drives.
DVD drives
DVD drives differ by manufacturer and price, otherwise they are standard. They are mainly needed to install programs and drivers for hardware at the initial stage of setting up a computer. Further, if you connect to high-speed Internet, most likely you will rarely use the DVD drive.
How to choose a processor?
Processor power used to depend only on the clock speed. The higher the frequency, the more powerful the processor. But now such a factor as the number of processor cores has been added. The more powerful the processor, the higher the speed of the computer. The motherboard must support the platform or socket of the processor you choose. Therefore, it is better to choose them together and in advance.
The answer to the question of how to choose a processor depends, again, on what you are going to use the computer for.
Monitor, keyboard, mouse
I have been using a Phillips widescreen monitor, a Logitech MX Performance Mouse wireless mouse, and a very ordinary USB keyboard for quite some time now and successfully.
But I leave the choice of these peripheral devices to your personal taste. The number of opinions and options here is huge. I recommend taking simple but reliable ones.
Assembling a computer with your own hands: How to assemble a computer yourself?
Important tip:
While assembling a computer yourself, it is not recommended to wear synthetic clothing, which condenses electrostatic charge. Electrostatic voltage is detrimental to microcircuits. Therefore, you should use clothes made of cotton fabric.
So, how to build a computer yourself? Assembling a PC begins with installing the processor and radiator with fan on the motherboard. The processor is installed in the socket and secured with a lever. Thermal paste is evenly applied to the surface of the processor and the heatsink is secured, as shown in the figure in the instructions. The cable connector from the fan must be connected to the power socket, which is located next to the processor panel.
You can immediately install a RAM card on the motherboard. You must be extremely careful and not make large mechanical efforts so as not to damage adjacent board elements. I already wrote a detailed one with pictures. Detailed instructions for installing the processor are included with the motherboard.
The next stage of assembly is installing a hard drive and a DVD drive into the PC case. Then the motherboard is installed and secured. The wires with connectors that come from the power supply must be connected to the corresponding sockets of the motherboard, DVD drive and hard drive. Then connect all the wires that go from the front panel of the computer case to the corresponding connectors on the motherboard, following the connection instructions.
Now you can proceed to installing the operating system. After completely setting up the computer software, you can close the case cover.
In general, assembling a computer with your own hands takes place in exactly this order. The nuances of how to assemble a computer yourself are not described intentionally, since they are different in each specific case. Leave questions about assembling a computer in the comments.
In the first part of a detailed manual on assembling a computer with your own hands, we will talk about installing a processor on the motherboard, installing its cooling system and installing RAM.
Introduction
In recent years, the computer industry has experienced a real boom in demand in the mobile PC segment. Smartphones, laptops, ultrabooks, all-in-one computers and, of course, tablets that have flooded the market are increasingly displacing classic desktop computers from our lives. This trend is evidenced by various reports from various analytical agencies.
But ten years ago everything was completely different. Sales of system units and components for them were the main source of income for many computer companies, and low-power and expensive laptops were practically not regarded by users as an alternative to a stationary home PC.
It was this time that can be called the heyday of “self-assembly,” when the vast majority of system units sold were assembled not at company-owned plants or factories, but in small pavilions of computer markets, by the hands of self-taught sellers. The users themselves did not lag behind them. The most creative and experienced of them preferred to independently assemble the future PC itself at home. And we must admit that this approach had many advantages. Individual components tended to cost less than the complete computer. Moreover, you could choose a suitable hardware manufacturer, eliminating the possibility of low-quality equipment appearing on your desktop, made by nameless handicraft Chinese companies (it was called “noname”).
Today, self-assembly of a system unit is becoming less and less common among users. And this is not surprising. As we have already noted, on the one hand, the desktop PC market is now experiencing a decline due to the rapidly increasing popularity of mobile computers. On the other hand, huge competition and the development of IT technologies have made it possible to saturate the market with inexpensive computer devices, making “self-assembly” impractical for the sake of saving money.
And yet there are still many enthusiasts who prefer not only to independently create the configuration and select components for their future electronic machine, but also to assemble it all with their own hands. This is especially true for mid- and top-end high-performance computers. After all, it is this approach that allows you to choose the right balance between the installed devices and their cost, without worrying that, for example, in addition to a powerful processor, you will be installed with a weak video card with a large amount of video memory, which simply will not be used. Also in this case, there are always ample opportunities for subsequent modernization of the system unit, modding and prompt minor repairs.
Thus, despite the fact that assembling a PC with your own hands is gradually fading into the background, this issue still remains relevant. Therefore, we decided to prepare material, or rather even a manual, for novice users, which will tell you in detail how to assemble a system unit yourself at home.
Before assembly
Before starting assembly, let's get acquainted with the components that will make up our future computer. Here it is worth mentioning right away that we in no way encourage you to assemble a PC of the same configuration and from the same parts that will be involved in this material. All the equipment used to demonstrate the assembly is a purely personal preference of one person and has nothing to do with advertising of certain brands and manufacturers.
So, in our case, solutions from Intel were chosen as the main platform for the future computer, which included a motherboard based on the Z77 chipset with an LGA 1155 socket and a quad-core Core i5 processor. To cool the processor, a low-noise tower fan was selected.

The rest of our assembly included: a pair of 4 GB DDR3 RAM modules, a GeForce GTX 580 video card, a 1 TB hard drive and an additional internal fan for airflow, a DVD-RW optical drive, a medium-sized ATX case and a power supply with power 700 W.
In order to assemble all this into a single whole, we need only one tool - a medium-sized Phillips screwdriver, preferably with a magnetic tip. And of course a pair of straight hands.
Everything is ready to begin assembly and now it’s time to remember one important detail - static electricity, which in some situations tends to accumulate on our body. All computer components, with the exception of the power supply, are low-voltage equipment and can easily burn out even from the shortest high-voltage discharge. But banal combing of hair or rubbing against woolen items can lead to the accumulation of a static charge of several thousand volts. So imagine what could happen if you cut it on some computer part?
To avoid unfortunate consequences, be sure to touch any metal object, such as a heating pipe or refrigerator, before handling components. If your body was electrified, then in this case, the accumulated charge will instantly discharge. Also, during assembly, it is better not to wear things that can contribute to the accumulation of static electricity.
It is advisable to carry out the assembly itself on a surface that does not conduct electricity (wood, plastic). If the work table is covered with a cloth tablecloth, then it is better to remove it for a while, since many fabrics tend to accumulate static electricity.
Processor Installation
At the first stage of assembly, we will install the processor and RAM into the motherboard, and also mount the CPU cooling system. Of course, you can first screw the motherboard into the case, and only then do the above steps. But here it is important to know that some processor fans have mounts, some of which are located on the back side of the motherboard, which may make it impossible to install it when the board is already inserted into the case.
Finding the processor socket on the motherboard is very easy. It has a rectangular shape with sides measuring more than 4 cm, so it is quite difficult not to notice it.

One of the main design differences between Intel and AMD processors is the fact that the former uses contact pads to connect to the connector on the motherboard, while the latter uses contact pins.
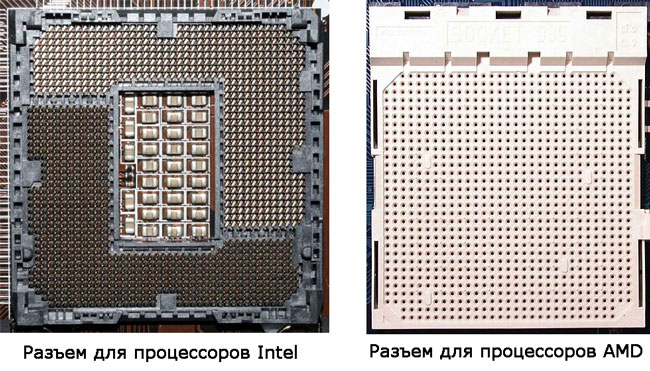
Accordingly, motherboards also have different sockets, which for Intel microprocessors are equipped with soft spring-loaded legs, and for AMD, with many tiny holes. Let us remember that in our case we are dealing with an Intel processor and an LGA socket.
Before installing the processor, you must open the connector by pressing the metal lever and pulling it to the side.

Once released from the mount, move the elevator lever up, after which the clamping frame will open.

To prevent incorrect installation of the processor in the socket, manufacturers make auxiliary docking cutouts in the design of their cases. Intel has semicircular recesses on the case, while AMD has beveled corners.

After opening the socket, we take the processor and install it into the socket without any effort or pressing, so that the mating cutouts align.

Now we close the clamping frame by inserting the protrusion located on it with a recess under the limiter, and return the metal elevator lever to its original place, thereby pressing the processor to the contacts located in the connector.

At this point, the black protective cap on the pressure frame should fly off, after which it can be thrown away. At this point, the installation of the processor can be considered complete, so let’s move on to installing the cooling system.
Installing a CPU Cooling System
Today there are a large number of different cooling systems on the market, which use different methods of attachment to the motherboard. Of course, it is difficult to talk about all the nuances within the framework of one material, but this is not necessary, because, as a rule, many coolers with unusual mounting systems are supplied with detailed instructions for their installation.
We will look at the two most common methods of installing fans, which are used with certain nuances in the vast majority of cooling systems.
To install the cooler in the motherboard next to the processor socket, there are four holes.

In most cases, the cooler mount for modern Intel processors contains four legs, which are inserted into these very holes and secured there by pressing on them from above. To avoid distortions, it is better to fasten them crosswise.

Standard fan for processorsIntel
To dismantle fans with this type of fastening, you need to turn the head of the leg counterclockwise 90 degrees, and then pull it up. After removal, rotate all legs to their original position.
Motherboards with sockets for AMD processors are equipped with a special frame for installing the cooling device, to which the standard cooler is attached with two screws. So everything is simple here.

Let's move on to our case. We did not use the original Intel fan, replacing it with a more advanced tower cooler with low noise levels. Its installation on the motherboard is somewhat different from the standard procedures described above. Here, to increase the stability of the cooler, a special frame is used to mount it, located under the processor socket, to which it is subsequently screwed. It is with its placement that we will begin.
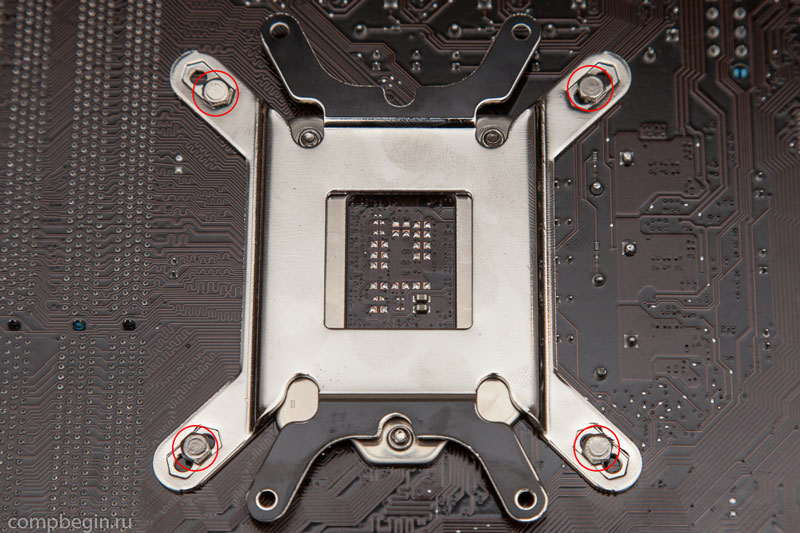
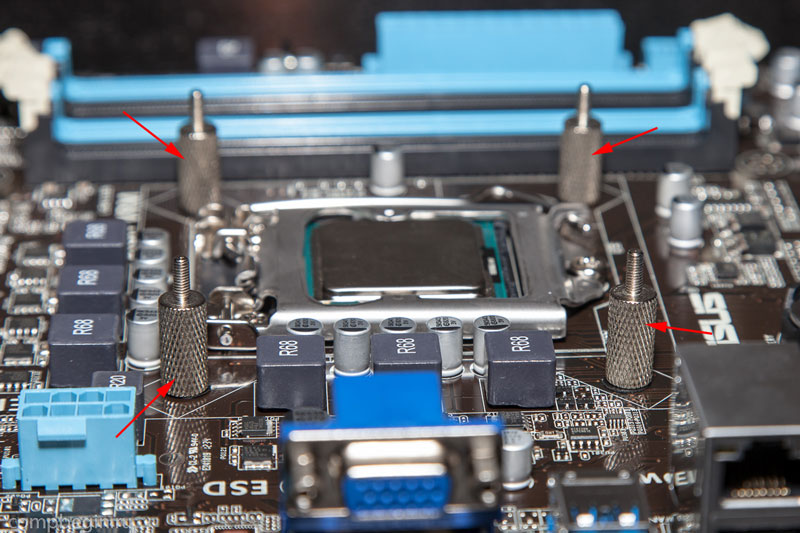
We attach the frame to the back of the motherboard in such a way that all four holes on both parts are aligned. Then we insert the screws included in the kit and fasten onto them on the other side of the board the nuts to which the frame will be attached, pressing the base of the radiator into the processor cover.
Cooling of the processor occurs due to the heat exchange process between its cover and the base of the cooler. Ideally, the lid and base should be completely adjacent to each other, which would ensure maximum heat dissipation efficiency. But in practice this is very difficult to achieve, since their surfaces have roughness. Therefore, in order to increase the contact area, liquid thermal paste is used to fill microvoids, thereby improving heat transfer between the surfaces of devices.
As a rule, in many solutions, including inexpensive and standard coolers, thermal paste is applied to the radiator of the cooling system at the factory. So all you have to do is properly secure the fan to the motherboard. But in our case, you will have to apply the thermal paste yourself, since the tube with it is included separately.
You should know that thermal paste should be applied in a very thin layer. The principle, the more the better, does not apply here, as this will only harm normal heat transfer. For application, you can use any available means, as long as your imagination is enough. We used a regular cotton swab, first moistening its ends a little so that the cotton would not peel off.
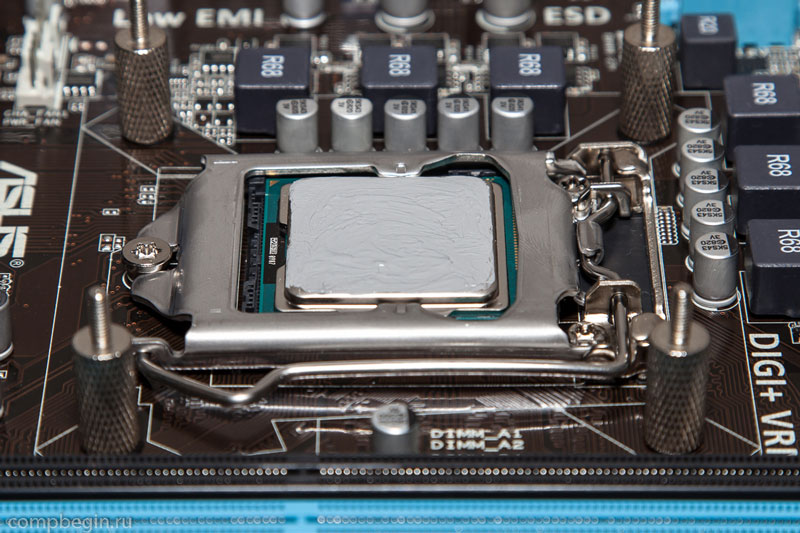
Squeeze a small amount of thermal paste from the tube onto the processor cover.

Then spread it evenly over the entire area.
Now, everything is ready to install the cooling system. We take the radiator and remove the protective film from its base.

We install the radiator on the processor and secure it using a special clamping frame and nuts that are screwed onto the screws we prepared earlier. To avoid distortions of the radiator, tighten the nuts crosswise.

Now all that remains is to connect the fan to the control connector on the motherboard, and then put it on the radiator, after which the installation of the cooling system can be considered complete.
The connector on the motherboard for the processor cooler is always located next to the processor socket, has four contacts and the name CPU_FAN.

It should be taken into account that the cooler itself may often have a three-pin connector, which in any case will be compatible with the one located on the motherboard. The presence of the fourth pin is not mandatory, since it is responsible for an additional function that makes it possible to use various automatic fan speed control modes, depending on the processor temperature, using the motherboard BIOS.
Regardless of which connector you have on the cooler, to avoid incorrect connections, auxiliary notches are always placed on it, so it is almost impossible to make a mistake when connecting the fan to the motherboard.
Our first stage of assembly is completed by installing RAM. This is a very simple procedure, as you will soon see for yourself. Slots for installing memory are not at all difficult to find, since they have an elongated shape, are always located next to the processor socket and are painted in pairs in different colors. By the way, they have appeared more than once in many previous photographs.
In our case, we have four connectors in black and blue colors, which makes it possible, if desired, to install four memory sticks respectively. In general, different motherboard models may contain 2 (low-cost models), 4 (standard) or 6 (legacy models) RAM slots. As you can see, in any case their number is even. The fact is that it is customary to install memory modules in pairs to enable dual-channel mode, which doubles the speed of data exchange between the RAM and the central processor. That is, if you want to have 8 GB of RAM, then you should buy two 4 GB sticks. Of course, you can install a single 8 GB memory chip instead, but in this case the computer's performance will be reduced.
It’s not for nothing that the manufacturer paints the RAM slots in pairs in different colors. These are the so-called “banks”, each of which has its own color. To use the dual-channel mode, you need to install a couple of memory chips in one bank, and not at random. For example, in our situation, we fill either both black slots or blue ones.
Before installing the modules, move the white locking levers located on the sides of the selected connectors to the sides. Next, using light pressure, carefully insert the memory stick into the slot.
In this case, it is necessary to align the notch on the memory module with the jumper in the connector on the motherboard.

After making sure that the bar is inserted into the slot, fix it by pressing from above on the corners of the memory until a characteristic click is heard. The side clamps should return to their original position.

We do the same with all the other planks.
At this point, the first and most important stage of assembly can be considered complete.
Don’t be surprised, but after installing all the components described above, you can start the system for the first time and check its functionality. After all, most modern processors have a built-in graphics core, and motherboards have integrated connectors for connecting a monitor. Having temporarily connected the power supply to the processor and motherboard, it is not difficult to turn on the assembled system by closing the corresponding contacts on the “motherboard” with any metal object, for example, a screwdriver. Only experienced users should perform this trick. Well, if this is your first assembly, then go straight to the second stage.


