Create a pptp connection windows 7. PPTP connection – what is it and is it safe to use? PPTP: general principles of connection and operation
Many users have probably heard of the term “PPTP connection”. Some people don't even remotely imagine what it is. However, if we describe in simple language the principles of establishing a connection based on this protocol, then it is not at all difficult to understand them.
What is a PPTP connection?
This type of connection is based on a protocol of the same name, the name of which comes from the English point-to-pointtunnelingprotocol. This can be literally translated as “point-to-point tunnel protocol.” In other words, this is a connection between two subscribers through the transmission of encrypted data packets over unsecured networks based on TCP/IP. The PPTP connection type makes it possible to convert so-called PPP frames into standard IP packets that are transmitted over the same Internet. It is believed that the PPTP protocol itself is inferior in security level to other options such as IPSec. However, despite this, it is quite widespread. Essentially, the user is dealing with one of the types of VPN connections (wireless connection).
Why use a PPTP connection?
The scope of use of the PPTP protocol is quite extensive. First of all, it is worth noting that this type of connection between two users allows you to protect information, as well as significantly save on long-distance calls. The PPTP protocol is quite often indispensable when providing communication between two local networks via Internet transmission over a tunnel or secure line without using a direct connection between them. This means that the two local networks do not have direct contact and they use the tunnel as an intermediary. On the other hand, tunneling based on the PPTP protocol can be used to create a client-server connection. With this connection, the user terminal connects to the server via a secure channel.
Implementation of PPTP in various operating systems
Let's digress a little and look at the PPTP connection from the other side. Few people understood what it was since the development of this protocol by Microsoft Corporation. In its full version, this protocol was first implemented by Cisco, but Microsoft specialists did not lag behind. Starting with the version of the Windows 95 OSR2 operating system, the ability to create a connection based on the PPTP protocol appeared in later software products, and they even had tools for setting up a PPTP server. As an example, the PPTP connection in the Windows 7 operating system will be considered below. It is worth noting that that today this operating system is considered the most popular. Until recently, Linux systems did not provide full support for the PPTP protocol. It appeared only in modification 2.6.13. Official support for this protocol was announced in kernel version 2.6.14. MacOSX and Free BSD operating systems come with built-in PPTP clients. Palm PDAs that support Wi-Fi wireless connections are equipped with a special Mergic client.
Conditions for a correct connection
The process of using tunneling is quite specific. Configuring a PPTP connection requires the use of TCP port 1723, as well as the mandatory IPGRE protocol with number 47. Therefore, the configuration of the firewall, if any, and the built-in firewall of the Windows operating system must be such that IP packets can pass freely without restrictions. This applies not only to user machines, but also to local networks. Such free transfer of tunneled data must equally be ensured at the provider level. When using NAT, VPN processing must be configured accordingly in the intermediate stage of data transfer.
PPTP: general principles of connection and operation
We've covered the PPTP connection quite briefly. Many people probably already understand at least a little what it is. To clarify this issue, let us consider the basic principles of the functioning of the protocol and communication based on it. We will also take a closer look at the process of establishing a PPTPGRE connection. The connection between two points is established based on a regular PPP session based on the GRE protocol (encapsulation). The second connection is made directly on the TCP port, which is responsible for initiating and managing GRE. The transmitted IPX packet itself consists directly of data, sometimes called the payload, and additional control information. What happens at the other end of the line when a packet is received? The corresponding PPTP connection program extracts the information contained in the IPX packet and sends it for processing using means that comply with the system's own protocol. In addition, one of the important components of the tunnel transmission and reception of basic information is the mandatory condition for using access using the login-password combination. While it is still possible to hack passwords and logins at the receiving stage, it is impossible to do this while transmitting information through a secure corridor or tunnel.
Connection Security
As mentioned earlier, PPTP tunneling is not secure in all aspects. If we take into account that data encryption uses tools such as MSCHAP-v2, EAP-TLS or even MPEE, then we can talk about a fairly high degree of protection. In some cases, to increase the level of security, callbacks can be used, in which the receiving or transmitting party connects and transmits information programmatically.
How to configure PPTP using your own Windows 7 operating system: network adapter settings
On any Windows operating system, setting up a PPTP connection is quite simple. As mentioned earlier, we will look at Windows 7 as an example. First of all, you need to go to the “Network and Sharing Center”. This can be done using the “Control Panel”, or using the menu called up by right-clicking on the network or Internet connection icon. On the left side of the menu there is a line for changing the network adapter settings. You need to enable it, and then right-click on the local network connection to call up the context menu and select the properties line. In the window that opens, you must use the properties of the TCP/IPv4 protocol. In the settings window, you must specify the parameters that were provided by the provider when connecting. As a rule, automatic acquisition of addresses for DNS and IP servers is set. It is necessary to save the changes made and return to the local network connection, where you need to check whether it is active at the given time. To do this, use the right mouse click. If the top line says “Disconnect”, then the connection is active. Otherwise you need to enable it.
Creating and setting up a VPN
The next step is to create a VPN connection. To do this, you need to use the line to create a new connection in the “Control Center” section on the right side of the window. After this, you need to select a connection to your workplace, and after that, use an existing Internet connection. Then you need to postpone setting up the Internet connection. In the next window, you must specify the Internet address of the VPN operator and specify a custom name. At the bottom, be sure to check the box next to the line “Do not connect now.” In this field, you must again enter your login and password, if they are provided for in the service agreement, and then click on the “Create” button. After this, you need to select the one you just created from the list of available connections and click on the properties button in the new window. Next you need to act extremely carefully. It is mandatory to set the following parameters on the security tab:
— VPN type – automatic;
— data encryption is optional;
— protocol resolution: CHAP and CHAP version 2.
Now you need to confirm the changes made and go to the connection setup window, where you need to click on the connect button. If the settings are completed properly, you will be connected to the Internet. Is it worth using third-party utilities for this purpose? Users react differently to the issue of installing additional PPTP servers or clients. However, most of them agree that setting up and using the built-in Windows module is much preferable in terms of simplicity. Of course, you could install something like the pfSense package, which is a firewall router. However, its native Multilink PPP Daemon client has many of the problems associated with using PPTP-based Windows servers in terms of distributing the use of the authentication protocol between the server and client in enterprise systems. It is worth noting that no such problems were noted in home user terminals. This utility is much more difficult to configure; without the use of special knowledge, it is impossible to specify the correct parameters or correct the regular “gap” of the user’s IP. You can try some other server or client utilities that are designed to establish a PPTP connection. But does it make sense to load the system with unnecessary programs, since any operating system of the Windows family has its own tools for this purpose? In addition, some software products in this regard are so difficult to configure that they can cause conflicts at the physical and software levels, so it would be better to limit yourself to what you have.
Conclusion
This is actually all that concerns the PPTP protocol, creating, configuring and using a tunnel connection based on it. The use of this protocol is not justified for the average user. There are legitimate doubts that some users may require a secure communication channel. If you need to protect your IP address, it is better to use anonymous proxy servers on the Internet or anonymizers for this purpose. To ensure interaction between local networks of commercial enterprises and other structures, then installing a PPTP connection can be a simple solution. Such a connection, of course, will not ensure 100% security, but there is some common sense in its use.
One of the frequently asked questions by our users is how to add a different IP address to their server. You can assign your private IP address to your droplet by creating a VPN tunnel. There are several options for building your own virtual private network (VPN) or assigning an SSL certificate to this IP address. Of all the possible options, the best choice is between PPTP and OpenVPN. Point-To-Point Tunneling Protocol (PPTP) allows you to get your VPN up and running very quickly and is compatible with most mobile devices. And although PPTP is less secure than OpenVPN, it is faster and uses less CPU resources.
Step 1 - Install PPTP
You need to select one server that will be responsible for distributing IP addresses to other servers and authorizing all your servers in your VPN. It will become your PPTP server.
On CentOS 6 x64:
Rpm -i http://poptop.sourceforge.net/yum/stable/rhel6/pptp-release-current.noarch.rpm yum -y install pptpd
On Ubuntu 12.10 x64:
Apt-get install pptpd
Now you need to edit the /etc/pptpd.conf file, adding the following lines to it:
Localip 10.0.0.1 remoteip 10.0.0.100-200
In this case, localip is the IP address of your server, and remoteip is the IP addresses that will be assigned to clients that connect to it.
Here client is the user name (login), server is the type of service (in our example - pptpd), secret is the password, and IP addresses indicates which IP addresses can log in (with the given login and password). By setting an asterisk * in the IP address field, you indicate that this login/password pair should be accepted from any IP.
Step 2 - Adding DNS Servers to /etc/ppp/pptpd-options
ms-dns 8.8.8.8 ms-dns 8.8.4.4Now you can start the PPTP daemon:
Service pptpd restart
Check that it is running and accepting connections:
Step 3 - Setting up Forwarding
It is very important to enable IP forwarding on your PPTP server. This will allow you to forward packets between the public IP and private IPs that you have configured using PPTP. Just edit /etc/sysctl.conf to add the following line if it wasn't already there:
Net.ipv4.ip_forward = 1
To apply the changes, run the command sysctl -p
Step 4 - Creating NAT Rules for iptables
iptables -t nat -A POSTROUTING -o eth0 -j MASQUERADE && iptables-saveIf you also want your PPTP clients to be able to communicate with each other, add the following rules for iptables:
Iptables --table nat --append POSTROUTING --out-interface ppp0 -j MASQUERADE iptables -I INPUT -s 10.0.0.0/8 -i ppp0 -j ACCEPT iptables --append FORWARD --in-interface eth0 -j ACCEPT
Now your PPTP server also works as a router.
If you want to set a limit on which servers can connect to your droplets, you can set an IP table rule that restricts TCP connections to port 1723.
Step 5 - Setting Up Clients
Install the PPTP client on your client servers:
Yum -y install pptp
Step 6 - Adding the Required Kernel Module
modprobe ppp_mppeCreate a new file /etc/ppp/peers/pptpserver and add the following lines there, replacing the name and password with your values:
Pty "pptp 198.211.104.17 --nolaunchpppd" name box1 password 24oiunOi24 remotename PPTP require-mppe-128
Here 198.211.104.17 is the public IP address of our PPTP server, box1 and 24oiunOi24 are the login/password pair that we set in the /etc/ppp/chap-secrets file on our PPTP server.
Now we can "call" this PPTP server. The next command must use the name you gave to the peer file in the /etc/ppp/peers/ directory. Since we named this file pptpserver in our example, our command looks like this:
Pppd call pptpserver
You should see a successful connection in the PPTP server logs:
On your PPTP client, configure routing to your private network via the ppp0 interface:
IP route add 10.0.0.0/8 dev ppp0
Your ppp0 interface should be configured, which can be verified by running ifconfig
Now you can ping your PPTP server and any other clients connected to this network:
We can add a second PPTP client to this network:
Yum -y install pptp modprobe ppp_mppe
Add the necessary lines to the /etc/ppp/peers/pptpserver file (replacing logins and passwords with your own):
Pty "pptp 198.211.104.17 --nolaunchpppd" name box2 password 239Aok24ma remotename PPTP require-mppe-128
Now on the second client run the following commands:
Pppd call pptpserver ip route add 10.0.0.0/8 dev ppp0
You can ping the first client, and the packets will go through the PPTP server and be redirected according to the rules of the IP tables that we set earlier:
This setup will allow you to create your own virtual private network:
If you want all your devices to communicate securely on the same network, this is the fastest way to do it.
You can use this approach with Nginx, Squid, MySQL and any other applications.
Because traffic within the network is encrypted with 128-bit encryption, PPTP is less CPU intensive than OpenVPN, but still provides an additional layer of security for your traffic.
In this article we will look at how you can organize your own VPN server on Windows 7 without using third-party software
Let me remind you that VPN (Virtual Private Network) is a technology used to access secure networks over the public Internet. VPN allows you to protect information and data transmitted over a public network by encrypting it. Thus, an attacker will not be able to gain access to data transmitted within the VPN session, even if he gains access to packets transmitted over the network. To decrypt traffic, he needs to have a special key, or try to decrypt the session using brute force. In addition, this is a cheap solution for building an enterprise network over WAN channels, without the need to rent a dedicated expensive communication channel.
Why might you need to organize a VPN server on Windows 7? The most common option is the need to organize remote access to a computer with Windows 7 at home or in a small office (SOHO) when you are, for example, on a business trip, visiting, or generally not at your workplace.
It is worth noting that the VPN server on Windows 7 has a number of features and limitations:
- You must clearly understand and accept all potential risks associated with a VPN connection
- Only one user connection is possible at a time, and it is not legally possible to organize simultaneous VPN access to a computer with Win 7 for several users at once.
- VPN access can only be granted to local user accounts and Active Directory integration is not possible
- To set up a VPN server on a machine with Win 7, you must have administrator rights
- If you connect to the Internet through a router, you need to have access to it, and you need to be able to configure port forward rules to allow incoming VPN connections (the actual setup procedure may vary significantly depending on the router model)
This step-by-step instructions will help you organize your own VPN server on Windows 7, without using third-party products and expensive corporate solutions.
Open the panel NetworkConnections(Network connections) by typing “network connection” in the search bar of the start menu and selecting “View network connections”.

Then hold down the button Alt, click on menu File and select the item New Incoming Connection (New incoming connection), which will launch the Create Computer Connection Wizard.

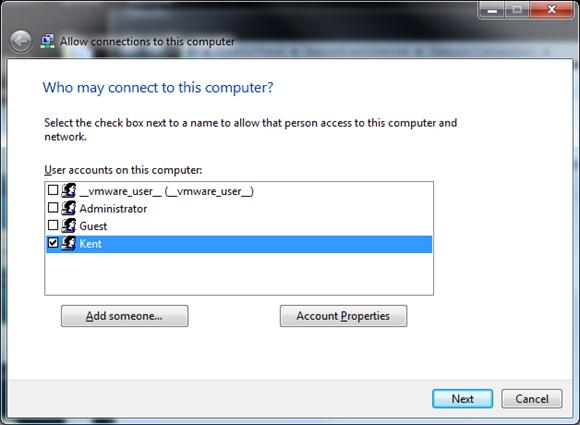
In the wizard window that appears, specify the user who will be allowed to connect to this Windows 7 computer via VPN.
Then specify the user’s connection type (via the Internet or via a modem), in this case select “Thought the Internet”.

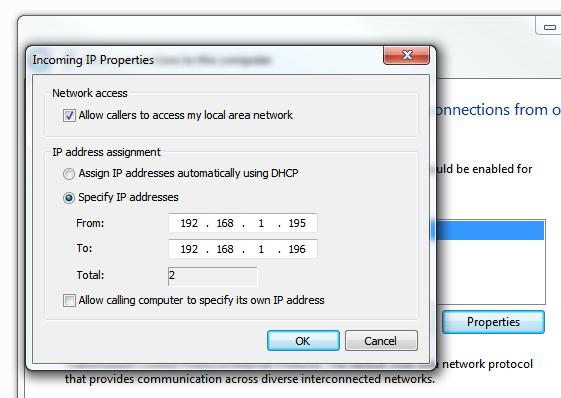
Next, specify the types of network protocols that will be used to service the incoming VPN connection. At least TCP/IPv4 must be selected.

Click the Properties button and specify the IP address that will be assigned to the connecting computer (the available range can be set manually, or you can specify that the IP address will be issued by the DHCP server).
After you press the button Allowaccess, Windows 7 will automatically configure the VPN server and a window will appear with the name of the computer that will need to be used to connect.

That's it, the VPN server is configured, and a new connection named Incoming connections will appear in the network connections window.

There are a few more nuances when organizing a home VPN server on Windows 7.
Setting up firewalls
There may be firewalls between your Windows 7 computer and the Internet, and in order for them to pass the incoming VPN connection, you will have to configure them. Setting up various devices is very specific and cannot be described in one article, but the main thing to understand is that you need to open the PPTP VPN port number 1723 and configure forward (forwarding) connections to a machine with Windows 7 on which the VPN server is installed.
Don't forget to check your built-in Windows firewall settings. Open the Advanced Settings control panel in Windows Firewall, go to the Inbound Rules section and check that the “Routing and Remote Access (PPTP-In)” rule is enabled. This rule allows accepting incoming connections on port 1723

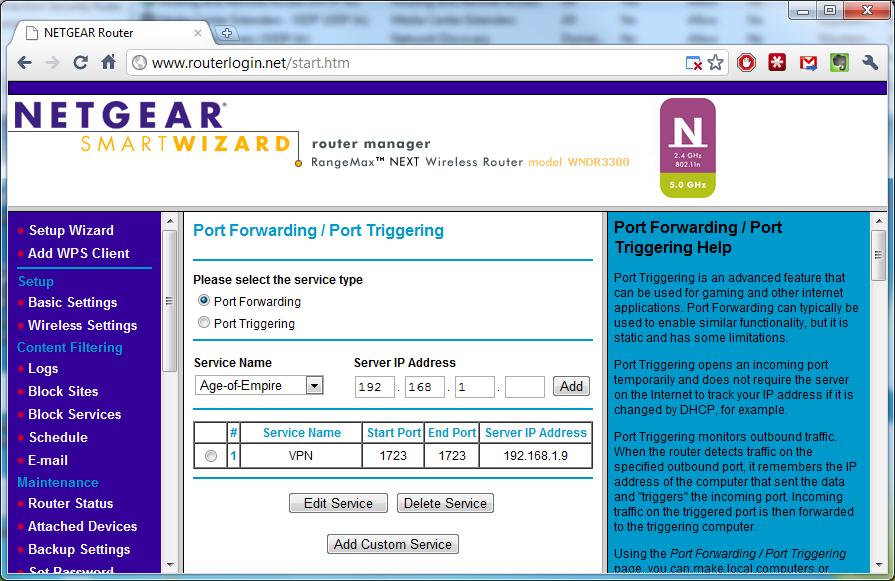
Port forwarding
Below I have posted a screenshot showing the organization of port forwarding on my NetGear router. The figure shows that all external connections on port 1723 are redirected to the Windows 7 machine (whose address is static).
Setting up a VPN connection
To connect to a VPN server with Windows 7, you need to configure a VPN connection on the connecting client machine
To do this, set the following parameters for the new VPN connection:
- Right-click on the VPN connection and select Properties .
- On the tab Security in the field TypeofVPN(VPN type) select option Point to Point Tunneling Protocol (PPTP) and in the section Data encryption select Maximum strength encryption (disconnect if server declines) .
- Click OK to save the settings

Welcome to our website! In this manual, you will learn how to set up a VPN connection using the PPTP protocol for the Windows 7 operating system.
As a reminder, VPN (Virtual Private Network) is a technology that is used to access a secure network(s) over the public Internet. Using a VPN channel, you can protect your information by encrypting it and transmitting it within the VPN session. In addition, VPN is a cheap alternative to an expensive dedicated communication channel.
To set up a VPN using the PPTP protocol for Windows 7, you will need:
- OS Windows 7;
- address of the VPN server to which the connection will be made via the PPTP protocol;
- login and password.
This concludes the theoretical part, let's move on to practice.
1. Open the "Start" menu and go to the "Control Panel" of your computer
2. Then select the “Network and Internet” section

3. In the window that opens, select “Network and Sharing Center”

4. At the next stage, select “Set up a new connection or network”

5. In the newly opened window, select “Connect to a workstation”

6. In the new window, select "Use my Internet connection (VPN)"


8. In the window that opens, in the “Internet address” field, enter the address of your VPN server; in the “Destination name” field, enter the name of the connection, which you can select arbitrarily

9. In the next window, enter the username and password that are registered on the VPN server. In the “Remember this password” field, put a “tick” so that you do not have to enter it every time you connect

10. After the above steps, the connection is ready for use, click the “close” button

11. After this, go back to the Start menu, then to Control Panel, Network and Internet, Network and Sharing Management, where we select “Change adapter settings”

12. Find our VPN connection in this window, right-click on it and go to its properties


14. In the same window, only on the “Network” tab, uncheck the boxes next to the items: “Client for Microsoft networks” and “File and printer access service for Microsoft networks”


This completes the VPN setup using the PPTP protocol for the Windows 7 operating system and the VPN connection is ready for use.
Having examined in detail in the previous article how to raise the server part of a VPN connection on the Windows platform, we move on to setting up a PPTP client connection. To begin with, I would like to remember, just in case, that the PPTP protocol uses two network sessions: a PPP session is established using the GRE protocol for data transfer, and a connection is established on TCP port 1723 to initialize and manage the connection.
Accordingly, do not forget to create a rule for GRE. You can read how to create such rules in a standard firewall if you are directly connected to the Internet. If you are behind a router, you can read here.
But we’ve already read all this, we know. Therefore, let’s get down to setting up a client VPN connection for PPTP.
First you need to go to Control Panel, in Win7 all you have to do is click Start. and go to Control Panel. Next, depending on the display settings, we either click Network and Internet-> -> . Or we go straight to Network and Sharing Center -> Setting up a new connection or network.
A wizard will appear Installation and connections and networks. Choose Connection to the workplace
Next, enter the Internet address (server address) and the name of the connection to be created, best of all Allow other users to use this connection. Also, just in case, I advise you to check the Don’t connect now box. Because we will configure the VPN settings manually.
Our connection has been successfully created. Now you need to configure it. Go to the section Changing adapter settings from the window Network and Sharing Center.
There we look for our VPN connection and use RMB to go to the menu item Properties. On the tab Safety We select PPTP as VPN type. In fact, that’s all. There is nothing more to configure on the client side using the PPTP protocol.


