Various headers and footers. Creating Headers and Footers
You can change the layout of your document using the top and footers and inserting page breaks. Headers and footers usually contain additional information such as page number, date, document name, and footnotes. Page breaks and horizontal lines break up text and improve readability.
In this tutorial, you'll learn how to insert and edit headers and footers, and how to insert page breaks and horizontal lines.
Headers and footers
A header is a section that appears in the top margin of a document, while a footer is a section that appears in the bottom margin of a document. The text entered in the header and footer will appear on every page of the document.
To insert a header or footer:

After closing the footer, it will still be visible, but will be blocked. To edit it again, simply click anywhere on the header or footer and it will unlock.
Formatting text in the header or footer
To format text in the header and footer, you can use many of the same formatting options that are available for formatting text in the body of the document. You can align the text, change the font style and size, and add bold, italic, and underline styles.

To add page numbers in the header or footer:
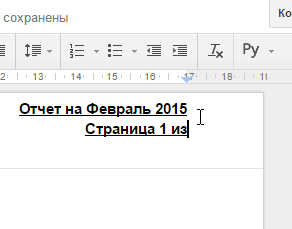
Google Docs automatically numbers each page and places it in the header or footer. If you want to display the word Page within the page number, you will need to enter the word "Page" in in the right place in the footer.

To display the number of pages:
Google Docs can also automatically display the Page Count in the header or footer - how many pages there are in the document. If you want to add the number of pages next to the page number, you will need to enter the word "From" after the page number.
Working with footnotes
The footnote provides additional background information about the text. It may include information on how to learn more about the topic or may include citations (links to published works for citations) used in the text. Footnotes are often used in scientific reports and academic writing.

To add footnotes:

Page breaks
Page breaks allow you to have more control over the layout of your document. You can use a page break if you are writing a document that has front page or bibliography to ensure that typing begins on a new page.
To insert a page break:
- Place the insertion point where you want the page break to appear.
- Click Insert a, then select Page break from the drop-down menu.
- A page break appears in the document.
To remove a page break, place the cursor below the page break and press the Backspace key on your keyboard. You may need to press the key several times to remove the gap.
Horizontal lines
Horizontal lines divide text into sections. Adding a few thoughtfully placed horizontal lines can make your document more visually appealing and easier to read.

To add a horizontal line:
- Place the insertion point where you want to place horizontal line.
- Click Insert, from the drop-down menu select Horizontal line.
- A horizontal line will appear in the document.
To delete a horizontal line, double-click the line to select it and then press the Backspace or Delete key on your keyboard.
A hat is not a headdress at all. More precisely, not only the headdress. A header, or header, is the text that repeats at the top of each page of a document. For example, some books have a chapter or section title at the top of each page. This is the header, or header. A footer is a footer because it is located at the bottom of the page. An example of a footer would be the old-fashioned phrase “Please turn the page,” although there are more meaningful footers that include page numbers, the title of a chapter or document, and anything else useful. In this book, the title of the part and chapter is indicated at the bottom of the page. The footer is created according to the same principle as the header.
- The header can contain your name, document title, date, page number, title, phone number, advertising slogan - at your discretion.
- The footer can contain all the same things.
- A footer and a footnote are two different things. After reading Chapter 22, you will learn the difference between the two.
How to create a footer
Only headers and footers can give a document real chic. It is not necessary to use the top and bottom at the same time - one is enough. In any case, the same command is used to create them.
A footer is text that repeats at the top or bottom of each printed page. graphic image. Headers and footers may include, for example, a heading, a date, a page number, or a picture. Headers and footers appear on printed documents and are also visible on the screen in viewing modes Preview(Print Preview) or Page Layout.
The headers and footers on the first page of a section may be blank or different from the rest of the document. In addition, you can install different headers and footers for even and odd pages.
Word divides the document into sections. A section is a group of pages that has a specific design, including margins, headers and footers, and page numbering. The input cursor can be located anywhere in a section while creating a header and footer for it.
The section is created by selecting a command Break in the Insert menu (Insert, Break)(Fig. 53).
Rice. 53. Creating a partition
By default, all pages of a document form one section. When choosing a team Headers and footers in the menu View, Header and Footer Word switches to Page Layout view and places the input cursor in the header and footer field.
Header and footer design
- Select a team Headers and footers in the View menu (View, Header and Footer).
- Select a team Page Options in the File menu (File, Page Setup).
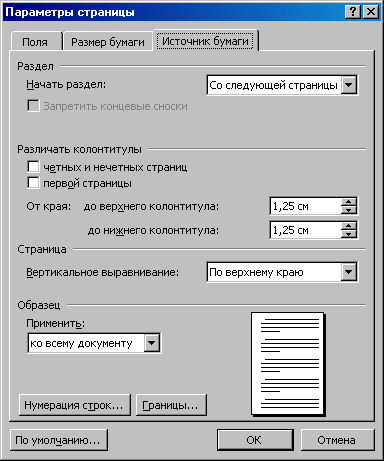
- A dialog box appears Page Setup which contains the Layout tab (Fig. 54).
- Select the option Differentiate first page headers and footers.
- Select the option Distinguish between even and odd page headers and footers.
- Click OK to return to the footer area and enter the desired values.
In the dialog box Page Options the sheet's appearance is displayed in the Sample field.
Rice. 54. Header and footer options
Bookmark Page Setup Dialog Box Layout also contains fields for defining the beginning of sections and vertical alignment text on the page. Field Vertical alignment contains options:
By default, the top of the first paragraph is aligned to the top of the margin.
When choosing a team Headers and footers in the View menu (View, Header and Footer) the field reserved for the header and footer appears Headers and footers(Fig. 55), where:
Transition from header to the bottom and back;
Go to previous footer;
- move to the next footer;
To create a new footer similar to the previous one;
Inserting page numbers;
Insert number of pages;
Page number format;
Insert the current date;
Insert current time;
Opening the Page Setup dialog box;
Show/hide the text of the main document;
Return to document editing;
Insert an AutoText element.
Rice. 55. Header and Footer panel
Current date and time are entered into the header and footer text in the form of fields. A field is a reserved space in a document. Field Date and time Word updates automatically when a document is open and when you print the document.
- Place the input cursor where you want to enter the date or time.
- Click the button Date or Time button on the Header and Footer toolbar. Using the Buttons Date or Time (Date, Time) in the Header and Footer panel
does not provide the ability to change the date format. If you need to change the default time or date format, enter the date by selecting Date and time from the Format menu (Insert, Date and Time) and setting required format.
You can insert a page number field into the footer to indicate the page number current page. If desired, the page number field can be combined with text. For example, the word "Page" may precede the page number field.
Exercise
Creating headers and footers and pagination
- Select a team Headers and Footers in the View menu.
- Click the button Header/Footer in the Header/Footer toolbar to go to the desired footer.
- Type any text, such as the name of the organization.
- Apply the desired text formatting.
- Place the input cursor where the page number will be located.
- Select a button Page number in the Header and Footer panel to enter the Page field.
- Select a button Close in the Header and Footer panel after finishing.
Word allows you to quickly format page numbering. In this case, you can set the page numbers at the top or bottom of the page and align the numbers (left, right, center).
Team Insert menu page numbers (Insert; Page Numbers) sets the automatic numbering of document pages (Fig. 56). Word adds the page number as a separate object in a specific location in the footer.
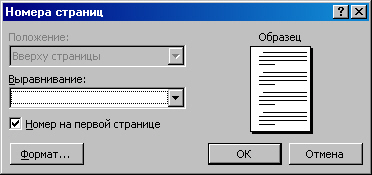
Rice. 56. Page numbers
- Select the menu command Insert (Insert, Page Numbers).
- Set options Position and Alignment(Position and Alignment).
- Click the button Format Select the page number format from the dialog box that opens (Fig. 57), including the Continue or Start with options. 4. Then click OK.
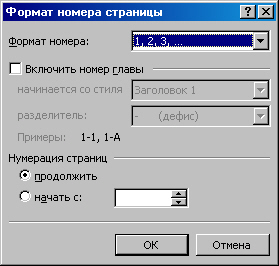
Rice. 57. Page number format
Using the Page Numbers command from the Insert, Page Numbers menu to automatic numbering pages in the header and footer field when numbering already exists will result in the page number being reprinted.


