How to remove a blank page from Word. How to delete a page in Word? Forced page break is set
Full description parameters, as well as instructions for setting up the built-in sound Realtek cards. Setting up playback, recording, 3D sound. Windows Vista/7/8
2012-02-17T18:19
2012-02-17T18:19
Audiophile's Software
Copyright 2017, Taras Kovrijenko
Full or partial copying of the text is allowed only with the written permission of the author.
Prologue
This time I will touch on a topic that is relevant, so to speak, for beginner enthusiasts - that is, for those who have not yet acquired a discrete sound card and want to get the most out of an integrated one.
1. Educational program
To begin with - brief educational program. Who doesn’t know or doesn’t fully understand what it is hardware audio codec, carefully read the relevant Wikipedia pages:
Have you read it? Great! And now it would be very nice if you read my two articles:
Well, now we can start.
2. What we have
So, I have at my disposal Windows 7 SP1 Ultimate x64 (the setup described in the article is suitable for all operating systems starting with Vista), built into motherboard(ASUS P7H55-V) ALC887 codec (datasheet available), external amplifier and microphone connected to the rear connectors (green and pink sockets, respectively). Please note that we will configure the card for withdrawal stereo sound by analog interface.
3. Software installation
First of all, you need to install the drivers. Of course, most likely Windows OS itself has already found and installed drivers for sound device, however, to gain access to all functionality, as well as for peace of mind, we will install the driver package directly from Realtek, latest version which you can download on the corresponding page of my website. By the way, the settings specified here were tested on driver version R2.67.
Download the drivers and perform a simple installation procedure (by running HD_Audio/Setup.exe), reboot the computer.
After loading the OS, a brown speaker icon should appear in the system tray:
4. Driver setup
First of all, let's go to Windows Control Panel->Hardware and Sound->Sound and, making sure that our headphones or speakers are connected to the green socket sound card, turn off everything unnecessary devices, and make our connected device the default device:

At the same time, let's do the same with recording devices:

Now double-click on the tray icon. If there is no icon, look for it in hidden icons, if not there, go to Control Panel->Hardware and Sound->. One way or another, the dispatcher window should open:

Here we immediately set the speaker configuration (stereo), set our analog device device by default (after which the corresponding button will go out), turn off if, God forbid, surround sound is turned on.

By button in the form yellow folder You can configure to disable detection of front panel connectors:

Also note that the connected connectors are displayed bright color- in our case, speakers are connected to the green output, and a microphone is connected to the pink input. There is one very important detail here: by double-clicking on the connector icon, you will see a window with a choice of the type of connected device. This is important because if you choose "headphones", then the codec will use a special additional amplifier (otherwise the sound in the headphones will be too quiet), for the connected active speakers or external amplifiers should be selected "Front Speaker Output". Here you can enable the automatic pop-up of this window when you connect a device to any of the card connectors:

Using the “i” button, you can open a window with information about the driver version, DirectX, audio controller and codec version, and you can also turn on/off the display of the icon in the system tray:

Now let's turn off the effects:

The “Room Correction” settings for the stereo configuration are not available, which is strange - in the same console from THX (which is included, for example, in the Creative X-Fi driver package) you can adjust the distance and angle of direction of the speakers relative to your location, which It can be very useful when you are not sitting directly in front of the speakers, or they are located asymmetrically relative to you. Well, okay, let it be on the conscience of the developers.
The last tab duplicates the control panel settings (however, most of the settings from the Manager are also in the control panel):

Here you can set the parameters of the system mixer - with what sampling frequency and depth Windows bit will mix all played sounds. Let's set it to 24 bit, 96 kHz. I’ll tell you why later.
Since I am constantly bombarded with questions about how to set up a microphone (which, in my opinion, should cause a minimum of confusion), I will still focus on setting up recording devices. Their settings, by the way, like those of playback devices, are located on separate tabs at the top of the window. Let's start with the stereo mixer:

Everything here is elementary. This device records everything you hear through the speakers, i.e., the finished audio stream that Windows transmits to the sound card. It is reduced to the specified form (since the mixer operates with a sampling frequency of 96 kHz, then we will set the same here).
But our main recording device is, of course, the microphone:

So, set the recording volume to maximum and turn off the microphone gain (then, if necessary, you can turn it on). Also, very often people complain that they reproduce the sound picked up by the microphone; to prevent this from happening, we turn off the playback. To your taste - noise filtering, echo suppression. On the tab , again, the recording format is set:

Considering the characteristics of the sound recording path, the standard 16 bit/44.1 kHz will suffice here.
5. Setting up foobar2000
In principle, the work done is enough to ensure the highest (for this card) sound quality in any player. But for the truly paranoid, I will provide foobar2000 settings. We will need, in fact, the player itself and several plugins for it - WASAPI output support And SoX Resampler. Well, or you can download my assembly, which already has everything.
So, in the player output settings (File->Preferences->Playback->Output) select WASAPI:<наше устройство>
, set the bit depth 24 bit:

When outputting via WASAPI Exclusive, all sound card effects (if enabled) are bypassed, as well as Windows mixer(for which we specified the sampling frequency).
Now let's move on to the DSP settings:
 Here we add the resampler SOund eXchange and Advanced Limiter to the chain. In the resampler settings, set the frequency to 96 kHz.
 Now why 96 kHz? I conducted a series of experiments and this is what I found out. In front output mode, if the volume control is set to more than 90%, when playing a test tone udial(sampling frequency - 44.1 kHz) strong distortion is heard. The distortion disappears if you either lower the volume, switch to headphone mode, or resample the audio to 96 kHz.
It is difficult to judge the reasons for this phenomenon based on the available data, but you can draw conclusions and play it safe twice: output all audio at a sampling rate of 96 kHz, and do not increase the volume to more than 90%.
And a few words about the need to configure foobar2000. In principle, it is possible to output audio to the device "DS: Primary sound driver" In this case, resampling will be performed using Windows(the resampler there is not the worst), besides, all other sounds will not be turned off (as when playing through WASAPI Exclusive). Additionally, by selecting this device, Windows will output sound to the device that is set by default in the Control Panel, which can be convenient (for example, when you turn off one of the devices, the sound automatically switches to another). So the choice is yours - convenience, or confidence in quality.
6. Resurrecting 3D Audio and Hardware Mixing
And of course I haven’t forgotten about gamers. Since in Windows, starting with Vista, there is no access to hardware mixing of streams (all operations are performed by Windows, and then one single stream is output to the sound card), the developers came up with special program, analogous to Creative ALchemy, but for Realtek - 3D SoundBack. It connects to hardware resources via the OpenAL interface, emulating for specified programs Windows emulates a DirectSound device (as in Windows XP), and then simply converts DirectSound (or DirectSound 3D) commands to OpenAL commands, resulting in true EAX 2.0 in games, as well as the ability to convert multi-channel audio in stereo with ambient effects.
To launch the program, open the folder .../Program Files/Realtek/3D Sound Back Beta0.1, in file properties 3DSoundBack.exe on the tab "Compatibility" install Windows Vista SP2 compatibility mode:

Now run this file. To add an application - click Add Game, enter the name and address of the folder that contains executable file programs. For example:

After adding, do not forget to highlight the added application and click the button Enable.
Now specified application will default to using the DirectSound emulated device and gain access to the sound card's hardware resources:

Epilogue
Well, another grandiose article is completed. By the way, I was thinking: in a good way, this article should have been written one of the first... However, at that time I still would not have had enough knowledge to describe everything in such detail, so it may be to to the best.
If something is not clear, or you have any questions, please ask or comment. I wish you good luck!
Information from the sponsor
EuroTekhnika: chain of stores household appliances. On the website http://euro-technika.com.ua/ you can familiarize yourself with the range of modern 8-core smartphones (using convenient catalog) and place an order here (with delivery or pickup).
If your computer runs on Windows XP, Vista or 7, and is also equipped with an audio chip from Realtek, then for sound to work you need to have special driver. To activate it, type “Realtek” in the Start search. When you find in the results Realtek Manager HD - launch it. If this program is not in the search, then this driver is missing on the computer or is installed too old version. This article will tell you how to install and configure the Realtek driver.
Installing the Realtek driver
Follow this step by step instructions, if the computer does not have a driver or it is outdated.
- Download current version required driver from the Realtek website or from our website using the following link: .
- Start the installation by running the downloaded file in “.exe” format.
- To continue the installation, click “Next”.
Attention: if during installation there is a warning that Windows does not know about the driver publisher, then simply click on “Install” to continue the installer.
- After installing the driver, restart your computer for all changes to take effect.
Signal about correct installation software there will be a Realtek HD Audio Manager sign on the taskbar. To go to the Realtek manager, simply double-click on the sign.
Realtek High Definition Audio Features and Settings
The Realtek audio codec supports 8-channel audio, Jack-Sensing, and many other features. In addition, it works successfully with Universal Audio Jack, making it easy to troubleshoot cable connection errors.
Realtek Audio Manager supports motherboards, which work with the audio processor from Realtek.
Note: All menus are listed below for reference and their names may differ greatly from what will be on your computer. In the environment indicated above Windows versions, Realtek HD Manager will automatically find devices connected to the ports. And depending on them, tabs with settings will already be shown. Also, the program interface may differ depending on the driver version or the model of the sound card installed on your computer.
For example:


Speakers Menu
First, a slider will open in front of you to adjust the volume of all devices. The panel on the right will contain parameters related to the operation of audio output devices.

Digital output
To configure the input digital audio do the following:
- In the " Additional settings Devices”, you can configure the input jack separation parameters.
- After that, four more submenus will become available to you.
To set up speaker systems:
1.
Select the "Speakers" menu.
2.
To set the analog output port as the default device, click on “Set Default Device”.
3.
Select the "Speaker Configuration" menu located under "Speakers". The configuration options will be there. You can also configure there surround sound and specify the speaker configuration.

4. In the menu " Sound effect“You can set up karaoke, select the environment around you, and also choose one of several modes for the equalizer.

5.
To adjust the speakers, you need to go to the “Room correction” menu. There you can adjust the distance and angles based on your location. This is very useful feature useful when you are not directly in front of the speakers, but stand in an asymmetrical position from them. But its operation is possible only in modes 5.1 and 7.1.
6.
Menu " Standard format» is responsible for the mixer parameters. More specifically, for the sampling frequency and bit depth with which the OS will process outgoing sounds.

Microphone settings
You can configure your microphone in the last menu, which is called “Microphone”. At the top there will be sliders for adjusting the microphone volume and balance. Adjust them until you reach the desired volume.

This section is divided into two tabs: Microphone Effect and Standard Format.
In the “Microphone Effect” tab, you can change the conference mode parameters, as well as enable echo and noise suppression mode.
Information menu
By clicking on the information icon, which looks like the letter “i,” you can find out the program version, audio controller, DirectX, codec and select the program language.

Thank you for your attention! Write your clarifications on the settings Realtek High Definition Audio. 🙂
Hello friends! How to remove unnecessary page in Word - this is the topic of my today's “Crib”. For those who have not encountered similar problem, this question may seem ridiculous. However, such a need may arise in the following cases:
- needs to be removed front page(I wanted to take a different template or abandon the title altogether);
- it was necessary to remove any chapter (one or more sheets) from the document;
- Blank pages appeared in the document out of nowhere, and we also don’t need them for 100 years.
The first two problems are solved so simply that I, friends, even doubted whether it was worth talking about in this article at all. But then I decided that since all the previous “Cribs” each considered its own question meticulously and thoroughly, then let this one be the most complete guide regarding the problem of how to remove an unnecessary page in Word. So, let's remove the title page.
How to Remove a Cover Sheet in Word 2016
If you do not want to remove the title completely, but only replace it with one of the templates offered by Word, then you just need to click on the selected option. The old title page will be immediately replaced with the new one. In case of complete refusal of the title page, you should click on the line “ remove cover page" All these operations are performed in the “ Insert", section " Pages" When you press the button " Title page
"In the drop-down window, you can select either a suitable template or delete the title altogether (Fig. 1). 
How to remove the second page in Word (or any few)
The second, third, any other, or several pages at once can be easily and simply removed by clearing them of text. To do this, select top line on the page to be deleted, then when pressed Shift key- bottom. All text on the extra page is selected, after which we remove it using the key Delete. This operation can be performed on all pages to be rejected at once. Simultaneously with the disappearance of the text, graphic elements or formatting marks and the page disappears.
Please note, friends, if the pages were numbered, then there will be no breaks in it. The numbering will automatically be restored in order.
How to remove an extra blank page in Word
Blank pages... This flaw is usually detected when the document is printed. If it was numbered, then such “dummies” violate the logical order of numbers. And we don’t need any extra paper consumption. Isn't it?
But why do they appear in Word documents? extra pages? Where do they come from? Is this an error in the program or perhaps the printer? No, friends. Neither the WORD text editor, nor, especially, the printer has anything to do with it. All such “jambs” are only our merit.
The fact is that such pages only seem empty. In fact, they always have some hidden characters formatting. We don’t see them, but the program takes them into account as full-fledged and necessary. To prevent such incidents from happening, my advice to you: when typing text and formatting it, always turn on the “ Show formatting marks" After activating it, you will see marks of paragraphs, spaces, headers or footers or breaks on the supposedly “blank” page.
Now, I think it’s clear that to delete a “blank” page you just need to display formatting marks on it and remove them using the key Backspace. Just? Without a doubt! But there is another - more complex case. Let's consider it.
How to remove the last blank page in Word after a table
If the last page of a document, chapter, or section ends with a table, then it is more difficult to get rid of the blank page at the end. The point is that removing the last paragraph mark in a text Word editor it is forbidden. And it will automatically be transferred after the table to new leaf. What to do in this case?
Of course, there is a way out. Yes, the program will not allow us to remove the paragraph mark. So let's make it invisible not only to us, but also to the Word itself. To do this, select our ill-fated icon and on the “ Home"go to the section " Font" Click on the arrow in the lower right corner to open the font adjustment window and put a checkmark in the line “ hidden" Click " OK" - the task is completed. We got rid of the last blank page after the table (Fig. 2). 
If you need to add articles on the topic of MS Word to the site, so be it. The other day I optimized TTN printable forms for Excel and Word. Since in Excel the TTN has many columns, for one-time filling I recommend using printed form in Word. The file consists of two filled pages, the third sheet is empty, so delete it standard methods it didn't work out. After reading the Internet, I collected all the ways to remove the last sheet in text document. So, how to delete a blank sheet in Word?
Conscious addition blank sheet It’s easy to do - add a page break - press the combination Ctrl keys+Enter. Often a blank sheet is added by pressing the Enter key many times, i.e. adding paragraphs to the page.
We will discuss how to remove a blank sheet below:
First, let's figure out how the empty sheet was added. Add a display of invisible characters to your worksheet. Go to the Home tab - Paragraph section - Show all characters button:
When calling the function, even non-printable characters will be displayed. If a blank sheet is added with paragraph marks, it will look like this:

Delete unnecessary characters and the sheet will also be deleted.

Clean it up.
But the empty sheet is often not cleared simple removal? The problem occurs if there is a blank sheet left at the end.
How to remove last page in Word?
When the Delete and Backspace buttons are cleared last sheet don't work, you have to use tricks.
The easiest way to remove the last sheet in Word is to go to the last paragraph and make the font as small as 5.

Second way- play with the fields of the document, if in in this case reduce the top or bottom margin (to 0.5), then the TTN table will fit on two pages. This can be done through Preview— Page Settings window.

Third way— when printing, indicate that you only need to print 2 sheets.
Other ways to remove the last sheet in Word
Apparently an example is small mistake developers and standard function There is no way to delete the last sheet. But I recommend several additional ways. Methods do not always help.
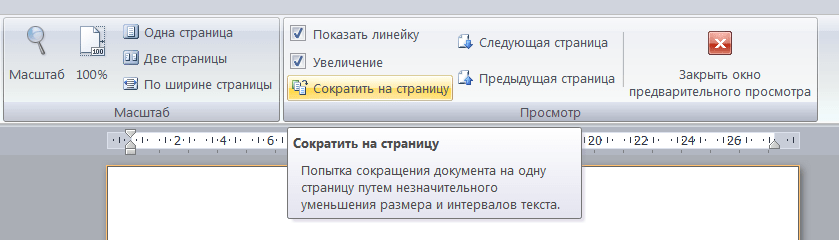
- Try the Page Fitting function, in versions higher than 2010 - Shrink per page. It is located: Preview - Shrink to page.
- In versions of the editor from 2007, go to the Insert menu - Pages - Blank page, click on the button and another one appears blank page. Delete the page that appears with Backspace, click delete again and our problem page should disappear too.
- Select the last paragraph and right click mouse, go to the menu to open the Font dialog box. Check Hidden to hide the paragraph.
Removing a blank sheet when printing in Excel
If, when printing tables in Excel, you end up with a blank page after a filled sheet, then you need to correctly configure the print area. Read how to do this in our.
Share our article on your social networks:


