How to change the visual editor of posts in WordPress? TinyMCE Advanced is an advanced WordPress editor.
Hello everyone!
Today I will tell you about the Ultimate tinyMCE plugin, which allows you to significantly expand the functions of the standard visual editor wordpress.
With the Ultimate tinyMCE plugin, you can choose a suitable text font, specify its sizes, and process images and videos more functionally.
When writing an article, put down various emoticons and much more in the right places. And even if you are not a supporter of unnecessary plugins, then in this case the article will be useful for you, because in it, I'll show you how to implement some of the functions using regular code.
So, let's begin! Everyone who works with the wordpress engine knows perfectly well what the working panel of a standard visual editor looks like:

It includes a minimal set of features that allows webmasters to write and publish useful material on their blog. Personally, I am quite satisfied with the standard set of functions of the WordPress editor, but not everyone is happy with it and prefer to use other editors or programs.
Ultimate TinyMCE plugin. Improving the visual wordpress editor
You can download the Ultimate TinyMCE plugin. Next, install it on your blog and activate it. Who doesn't know how plugins are installed,. After installing and activating the plugin, an additional Ultimate TinyMCE tab will appear in the administrative panel of your resource:

Going to the tab, you will see an impressive list of different buttons, each of which is endowed with a specific function. Now you can refine your visual editor with any of the missing features that are present in the plugin.
I will not describe each button, because most of them have been translated into Russian and each of you will be able to deal with them on your own. The only thing worth mentioning is their implementation on the blog.
In order for this or that button to appear in the working panel of the visual editor, it is enough to set a check mark in the “Enable” column opposite the required button. In addition, the plugin offers to independently choose the location of the buttons, which can be done in the column "Row Selection":

As you probably noticed, all the buttons in the editor panel are arranged in two lines, but thanks to Ultimate tinyMCE you can increase the number of lines to four, but not more. This is facilitated by the value "ROW", which means "String" in translation.
By default, each item is set to "ROW 1". If you leave everything unchanged, the function in the form of a button will continue the first line of the visual editor panel and will be displayed at the very end, after all the standard functions.
If you select, for example, the value "ROW 3" from the list, the function button will move to the third line. I think this is understandable! After activating all the additional functions (I counted 53) and scattering them along the lines, I got the following picture:

Impressive, isn't it? And I forgot to mention that when adding or removing any function, do not forget to click the "Update Buttons Options" button at the very bottom of the plugin to save the settings.
How to extend the functionality of the visual editor wordpress using code
So what features can you add with code, and how do you do it?
1. You can add a "Font Family", ie. you can choose the font you need from the list and write them a whole post or a small excerpt. To implement this function, open the functions.php file for editing (path to the file: / wp-content / themes / theme (template) name /functions.php).
Warning: before editing the functions.php file, be sure to do it in order to avoid incorrect actions!
After opening the file, find the tag at the very end: ?>
and just before it paste this code:
| add_filter ("mce_buttons_2", "add_fontselect_row_2"); function add_fontselect_row_2 ($ mce_buttons) ($ pastetext = array_search ("pastetext", $ mce_buttons); $ pasteword = array_search ("pasteword", $ mce_buttons); $ removeformat = array_search ("removeformat", $ mce_buttons); unset ($ [$ pastetext]); unset ($ mce_buttons [$ pasteword]); unset ($ mce_buttons [$ removeformat]); array_splice ($ mce_buttons, $ pastetext, 0, "fontselect"); return $ mce_buttons;) add_filter ("tiny_mce_before_ "," restrict_font_choices "); function restrict_font_choices ($ initArray) ($ initArray ["theme_advanced_fonts"] = "Andale Mono = andale mono, times;". "Arial = arial, helvetica, sans-serif;". "Arial Black = arial black, avant garde;". "Book Antiqua = book antiqua, palatino;". "Comic Sans MS = comic sans ms, sans-serif;". "Courier New = courier new, courier;"... "Georgia = georgia, palatino;" ... "Helvetica = helvetica;" ... "Impact = impact, chicago;" ... "Symbol = symbol;" ... "Tahoma = tahoma, arial, helvetica, sans-serif;"... "Terminal = terminal, monaco;" ... "Times New Roman = times new roman, times;". "Trebuchet MS = trebuchet ms, geneva;"... "Verdana = verdana, geneva;" ... "Webdings = webdings;" ... "Wingdings = wingdings, zapf dingbats"... ""; return $ initArray; ) |
Save the file and move it back to your blog theme folder, replacing the old one.
2. Add buttons for horizontal separator, superscript and subscript, font size, change styles and background color. To do this, add the following piece of code to the same functions.php file, before the same tag?>:
| function add_more_buttons ($ buttons) ($ buttons = "hr"; $ buttons = "del"; $ buttons = "sub"; $ buttons = "sup"; $ buttons = "fontselect"; $ buttons = "fontsizeselect"; $ buttons = "cleanup"; $ buttons = "styleselect"; $ buttons = "backcolor"; return $ buttons;) add_filter ("mce_buttons_3", "add_more_buttons"); |
After that, save the file again and move it back to the server, replacing the old one. Refreshing the page with the visual editor and see what we got:

That's all for me and now you also know how to add functional buttons to the wordpress editor, thereby expanding its standard capabilities! Good luck to everyone! Bye and see you soon!
How do you like the article? Perhaps you know of other ways to improve the standard features of the visual editor for WordPress? Share them with blog readers in the form of comments on this post.
(Last update: 20.01.2019)
Good day! Starting this week, I'm going to focus on theme as much as possible - the most useful and needed plugins for WordPress. Mandatory that must be installed immediately after creating a site / blog, you can read about some of them in this blog. Today I will focus your attention on the WordPress plugin. TinyMCE Advanced... This module belongs to the category - installation as possible, that is, at your request or otherwise recommended. Although it can be attributed to - must be installed for good article design. Something like that.
Classic WordPress editor
First, ladies and gentlemen, before we get down to the main topic of the article - installing and configuring the TinyMCE Advanced editor for wordpress, you need to perform an additional step. What for? In WordPress 5, instead of the classic editor, the new Gutenberg block editor has been introduced. The new Gutenberg editor is cool, of course, but it takes time to master and get used to. Therefore, we must first of all return the classic editor, that is, the old WordPress editor to which we are all so accustomed. Although this is not necessary.
If you want to continue using the previous (classic) editor in WordPress 5.0 and newer, TinyMCE Advanced has the option to replace the new editor with the previous one. If you prefer to have access to both editors side-by-side, or allow users to switch editors, it would be better to install the Classic Editor plugin. TinyMCE Advanced is fully compatible with Classic Editor.
Please note that the TinyMCE Advanced plugin works with both classic and new Gutenberg blocks.
Prefer to stay with the good old classic editor? No problem! Not surprisingly, more than 1 million users have already installed the old editor. Support for the Classic Editor plugin will remain in WordPress until 2021 inclusive.
Classic Editor Plugin
 Classic Editor Plugin
 Classic Editor is an official plugin from the WordPress development team that restores the old classic editor and post edit screen. To install it, go to Plugins - Add New - Enter the name of the plugin. On the modules page, click on the "Install" button next to the Classic Editor.
 Installing the classic editor
 After installation, click "Activate". After that, go to Settings - item Writing. Here, set the default Editor to Classic editor, and in Allow users to switch editors to Yes (you can switch to the block editor and vice versa):
 Setting up WordPress publishing
 Everything! Now, in order to add new features for editors, we need the following plagin.
TinyMCE Advanced plugin
 TinyMCE Advanced introduces Classic Paragraph and Hybrid Mode block for the new block editor (Gutenberg)
 TinyMCE advanced - editor for WordPress. Version 5.0 is a major update to TinyMCE Advanced. It provides additional buttons and settings for the Rich Text toolbars in the Block Editor. Like the toolbars in the Classic Editor, most buttons can be added, removed, or rearranged.
Plugin description
Plugin introduces Classic Paragraph block and Hybrid mode for the new Gutenberg block editor. If you are not quite ready to switch to the Block Editor, it is better to use the Classic Paragraph and Hybrid mode block. It allows you to continue using the familiar TinyMCE editor for most tasks and at the same time gives you full access to all the blocks and new features in the block editor.
The plugin will allow you to add, remove and place buttons that appear on the visual editor toolbar in classic paragraph and classic blocks in the new block editor, as well as in the classic editor (if enabled by the plugin). There, you can customize up to four rows of buttons, including Font Size, Font Family, Text and Background Colors, Tables, and many more.
Some functions
- Hybrid mode that allows you to use the best of both editors.
- Includes a Classic Paragraph box that can be used in place of or in conjunction with the default paragraph box.
- Supports converting most default boxes to "classic" paragraphs and from classic paragraphs back to default boxes.
- Support for creating and editing tables in Classic Blocks and Classic Editor.
- Additional options when inserting lists into Classic Blocks and Classic Editor.
- Search and replace in classic blocks and classic editor.
- Ability to set font family and font sizes in classic blocks and in classic editor.
- And many others.
And so, we add the functionality of the WordPress editor.
Installing and configuring the TinyMCE Advanced plugin
The plugin installation is standard through the WordPress admin panel. Plugins - Add a new one and enter the name TinyMCE Advanced in the search field:
 Installing and activating the plugin
 After successful installation and activation of advanced TinyMCE, in the "Settings" section you will see a subsection with the same name of the module - TinyMCE Advanced, click. And we get to the settings page to add buttons to the editor panel and various functions to your classic editor and block editor (Gutenberg). TinyMCE Classic Editor Tab:
 WordPress editor settings
 The process of customizing the visual classic editor is not at all complicated. Everything is completely in Russian. As you can see, you have four fields and Unused buttons. With a simple mouse click, place / drag buttons on the panel or drag them to change the order of their arrangement.
Just below on the page, configure Options, Advanced Options, and Management.
 Setting up the new Gutenberg editor
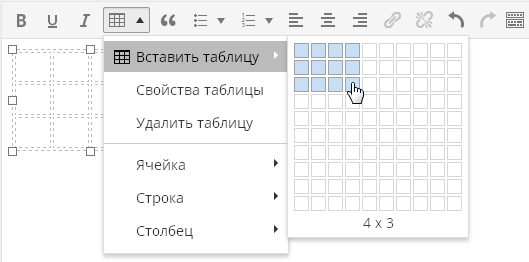
 Of course, I will not show how to work with buttons, but you yourself know better than me. I will only note that now you can easily insert a table into the article. Configure it and set the desired parameters:

And the Anchor button (navigation in the article) comes in handy - many bloggers use it to the fullest. The article button is also a useful thing. That's probably all for today. Working with the new and old editor will now be great. You will have beautifully designed articles with new features.
And I say goodbye to you. Until next time. Good luck to everyone.
* You can connect the visual editor in the "Plugins" section of the console.
Plugin TinyMCE Advanced adds additional buttons to the standard editor for formatting text. Here is some of them:
- Font size
- Font type
- Background color
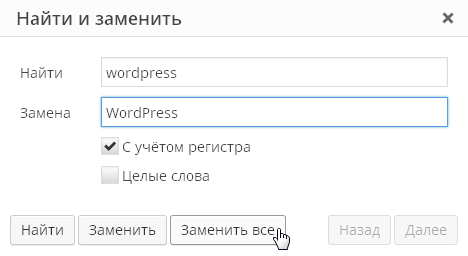
- Find and replace text on a page
You can also turn off the automatic deletion of blank lines.
You can add or remove preference buttons from the toolbar, and arrange them in the order that suits you.
The editor settings are located in the "Settings" - "TinyMCE Advanced" section of the console.
Plugin settings

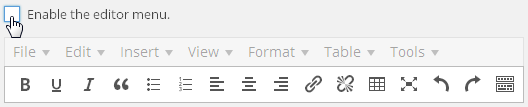
Plugin settings are located in "Settings - TinyMCE Advanced". Do not be afraid that the plugin is not translated into Russian - the buttons themselves in the TinyMCE visual editor are almost all translated into Russian, so you don't need to know English. And the cat cried about the settings here - in fact, you just need to drag the necessary buttons to the toolbar of the visual editor with the mouse. And this is not necessary - almost everything is duplicated in the editor menu:
The menu, by the way, can be disabled by the first plugin setting:
The buttons themselves are in English, but it's easy to understand what they mean:
As you can see, everything is in English in the plugin settings, but when editing a record, all English inscriptions are automatically translated into Russian. Even if something is not clear to you - they dropped the button on the panel, saved the settings, switched to editing the record and looked at what this or that button means.
You shouldn't add every possible button to the toolbar, as you will never need many buttons. Moreover, it is better to remove some of the buttons that are already there. The simpler the editor, the more convenient and effective it is to use it.
The Find and Replace button calls the following dialog:
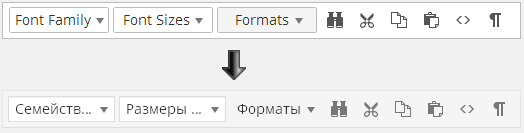
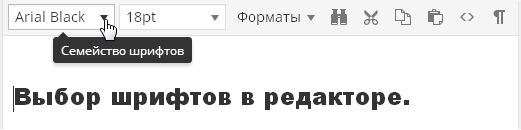
Ability to choose a font and its size:
It is also a very useful function that allows you to design the text of your article the way you like without editing the template styles.
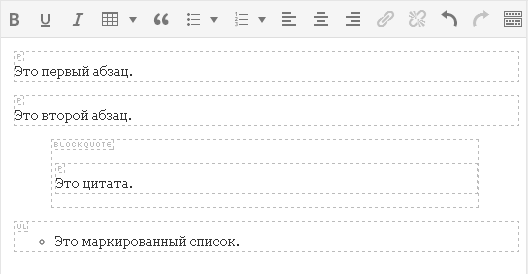
There is also a "block view" function:
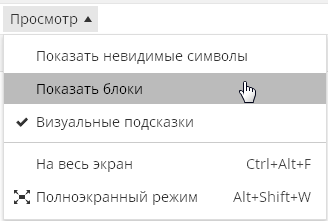
It allows you to visually evaluate how your text is styled. This is important because it is often very difficult in a visual editor to understand how a particular piece of text is designed. Or where do the extra indents come from in some piece of text:
In the WordPress editor, paragraph and line break tags are automatically placed and you don't see them at all. Any text after which you pressed "Enter" is taken into paragraph tags, which you will not be able to see, even by switching to the "Text" tab of the visual editor.
Sometimes this behavior of the editor causes a complete stupor. For example, in this screenshot you can see that the text taken in the tags
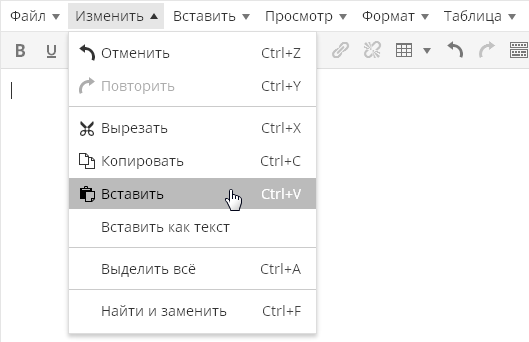
automatically ended up still wrapped in paragraph tagsBy the way, the TinyMCE Advanced plugin makes it possible to see the real source code of your text, without the stripped tags. To do this, in the "Tools" menu, select the "Source Code" menu item:
This feature will allow you to see the real source code for your article, not the one you see when you switch to the Text tab. For example, on the "Text" tab, the code might look like this:
And when you use the "Source Code" function, you will see:
That is, you will see your text with paragraph tags already arranged. And this will be exactly the code that will be displayed in your published post on the site.
The plugin also extends the ability to insert standard lists. There is only one kind of lists in the default editor:
The plugin makes it possible to insert lists of various types:
Insert emoji button:
A funny button that allows you to evaluate how the emoticon will look in the published post, since in the visual editor, emoticons will still be displayed in text form. Do not forget to just go to "Settings \ Writing" and check the box "Convert emoticons like 🙂 and 😛 to pictures."
Now it's worth mentioning the settings below the unused buttons selection bar:
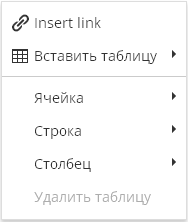
By default, only the option “ List Style Options", Which includes the advanced options for inserting lists, which are described above. Option " Context Menu"Includes the plugin context menu, called when you right-click in the editor:
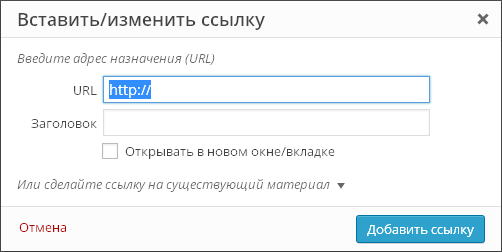
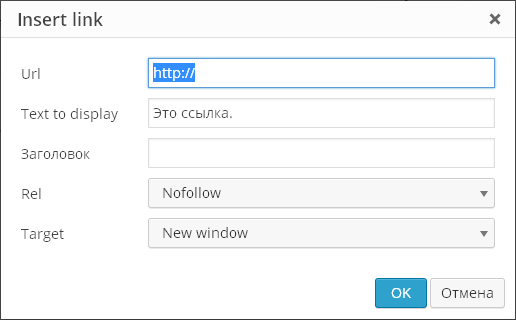
Option " Link (replaces the Insert / Edit Link dialog)»Concerns the link insertion dialog. By default, this dialog looks like this:
The plugin can replace it with this:
That is, in fact, the plugin dialog only allows you to prescribe rel = "nofollow" for links, and everything else is in the standard dialog for adding links. Whether you need this plugin feature or not, you can decide for yourself.
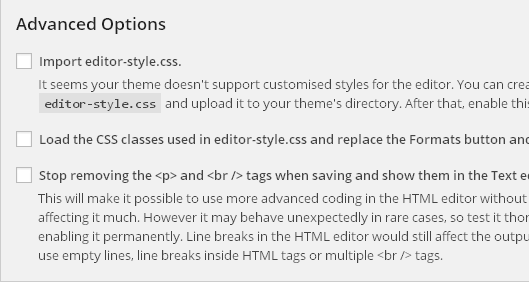
The last part of the plugin settings is the "advanced" settings:
Load the CSS classes used in editor-style.css and replace the Formats button and sub-menu- this function is not supported on Prihod.ru.
Stop removing the
And
tags when saving and show them in the Text editor - The most recent plugin setting forces the editor to show paragraph and line break tags in the Text tab. That is, when editing a post, everything will be the same, but on the "Text" tab you will see the full html markup. However, the editor will still freak out with its auto-formatting. For example, here's the code:
After switching to "Visual" and back to "Text" it will turn into:
That is, the editor removed one line break by taking the remaining two line breaks in the paragraph tags. But after saving the page, everything
disappear.But when you enable this setting, WordPress stops "eating" empty lines that you put with the Enter button in visual editing mode. The editor inserts the code in place of the empty line
and does not delete it on save, even if there are many such lines on the page.The article is taken from here and a little supplemented 🙂
Viewed (4251) times
Having dealt with the main functionality of the admin panel in WordPress. The greatest amount of time, after the formation of the basis of our site, we will devote to articles, their writing and optimization. For typing and formatting posts in WordPress, an editor is implemented, but it is very inferior to plugins specialized for these needs. After installing and configuring the Tinymce Advanced visual and html editor plugin, editing your posts will be much easier.
There are many text editor plugins, one of which is a functional plugin that a huge number of people have chosen for themselves - TinyMCE Advanced.
Navigation through the article:
In order to start using and testing this TinyMCE Advanced plugin, you need to download and install it, how to do this is presented in the video tutorial below.
TinyMCE Advanced plugin description
The add-on plugin for the TinyMCE Advanced editor has been around for a very long time and probably 90% of users of the WordPress platform have it installed and used daily.
The TinyMCE Advanced plugin is very simple, but at the same time it provides all the necessary functionality when working with pages and posts.
Thanks to TinyMCE Advanced, we can add to our standard editor, available after, a large number of new buttons that will definitely come in handy for you.
It is almost impossible to overestimate this plugin, it is used hourly, every minimal and fine tuning will become simple and accessible with the help of TinyMCE Advanced.
Video review of TinyMCE Advanced, its installation and configuration
In this video, you will see the benefits available when installing and working with TinyMCE Advanced.
Why TinyMCE Advanced is better than standard
For those who do not yet know the purpose of plugins, we have a special one, while the rest can plunge into the article with their heads.
TinyMCE Advanced exists to create your publications in a convenient visual and code format, to change and create a style of writing unique texts. The editor offered in the basic WordPress package is poor to say the least and has only basic tools.
As you can see, in confirmation of the above, you cannot overclock far with the standard editor, for this reason TinyMCE Advanced comes to our aid with its advanced functionality.
At first glance, it is clear that our capabilities will grow significantly with such functionality of the TinyMCE Advanced capabilities. Anyone who has worked with text editors at least once will be able to easily understand the icons and capabilities of the plugin. For those who do not want to search for the necessary elements by typing, we will analyze the main features and settings of TinyMCE Advanced.
What TinyMCE Advanced will give us
So, using the advanced editor TinyMCE Advanced will allow us to add and use the following features:
- Easy and convenient creation of tables directly when writing an article. Editing and filling which will not cause you any inconvenience.
- Advanced and convenient formatting of the page structure. The ability to create and adjust the placement of layers (
blocks).- You will also be able to put superscripts and subscripts.
- Changing the background color of text with TinyMCE Advanced is very easy without using CSS.
- Embedding video files will become much more convenient with the TinyMCE Advanced editor.
- Change the font size.
- Wide variety of font families.
- A set of hot keys will add speed to your writing and formatting of your texts.
- It will become available to clear all formatting with one key.
These features and more will come in handy in shaping your WordPress creations.
The plugin is constantly updated, which cannot but please us, because this is the main sign that the developers think about your comfort.
Using TinyMCE Advanced, you will write your posts confident in your capabilities, we wish you inspiration and unique texts, we will meet in the next
Possible problems with TinyMCE Advanced and how to solve them
The TinyMCE Advanced plugin is written in PHP, just like any program, it may not work for one reason or another. The following are the most common problems that users encounter. What is the problem with the editor for WordPress.
WordPress visual editor TinyMCE Advanced not working
If, when connecting a plug-in, you cannot edit it, use icons, add or change settings, try the following operation:
- Check the performance of other plugins that you control from the admin panel, if their settings buttons work, then go to the next item. In case of problems with other add-ons, you need to look for the reasons for the internal settings, and not in the plugin itself.
- Update WordPress to the latest version.
- Remove the plugin completely and download TinyMCE Advanced from the official website.
- After installation, activate it and check if it works.
If this does not help you, perhaps the problems are related to other plugins, sometimes they can conflict, try disabling all plugins and check if the situation has changed. If TinyMCE Advanced does not work and you need to look for deeper problems with a "clean" engine, you should contact a programmer.
On the admin page: TinyMCE buttons are not sorted, they do not move, the toolbar is empty, other errors on the page
This is usually caused by another plugin that adds incompatible JavaScript libraries to all pages, not just where needed. You can work around this by trying to find out which plugins do this, temporarily disable the rest of the plugins until all the TinyMCE buttons appear, and enable them one by one by checking the changes in the settings.
If that doesn't work, try some common Javascript troubleshooting: clear cache, try a different browser, try a different computer if possible, uninstall and re-download all plugin files, and finally install Firefox with Firebug or Opera, note the first JS causing errors (important) and post it below or search the web to see what is causing it.
Organized the buttons and saved them, but nothing changes in the visual editor on the posts page
Click on the "Delete" button (next to the Save button) and then on "Continue". Then turn off and activate the plugin again. This will reset all settings that are stored in the database.
Some buttons are missing from the TinyMCE menu, or some tools do not appear at all, or TinyMCE behaves strangely after installing the plugin
Almost all of these problems are caused by the browser cache, or network cache. Clear your browser cache, close your browser, then launch it and try again. If the problem persists, try reloading the page while holding Ctrl (in IE) or Shift (in Firefox) to tell the browser to reload the page from the server. It can also be caused by a network cache somewhere between you and your web host. Just wait a few hours for the problem to go away.
I do not see any styles imported to "style" in the dropdown menu
These styles (classes only) are imported from the editor into the style.css file of your current theme. However, some themes do not include this file. In this case, follow the instructions on the TinyMCE Avdanced settings page to add your own style.css editor file to your theme. When defining styles, keep in mind that TinyMCE will only import class names:
My_class ()
My_other_class ()
I just installed the TinyMCE Avdanced plugin but nothing happened
Quit WordPress, clear your browser cache, restart your browser and try again. If that doesn't work, there might be a proxy caching or network cache somewhere between you and your host. You may need to wait a few hours for this cache to expire.
When I add emoticons, they don't show in the editor
The Smiley button in TinyMCE adds emoji codes. The actual images are added by WordPress when viewing a post / page. Make sure the "Convert emoticons like :-) and :-P to pictures" checkbox in the "Settings" / "Writing" menu is checked.
Plugin does not add any buttons, "Visual" and "HTML text" tabs are missing
Make sure the "Disable visual editor" checkbox under "Users" / "Your Profile" is unchecked.
The visual editor has been updated TinyMCE to the latest version. However, even the updated editor has only basic functions that any more or less advanced blogger clearly lacks. Plugin TinyMCE Advanced expands the capabilities of the standard editor, adding about 15 different plugins to it - from choosing fonts to inserting tables. There are many similar plugins, but TinyMCE Advanced the most popular of them, so I advise you to pay attention to it.
1 Unpack the archive.
2 Copy the folder tinymce-advanced v / wp-content / plugins /.
3 We go to the blog admin panel on the " Plugins"and activate the plugin.
Plugin settings are in " Settings \ TinyMCE Advanced". Do not be afraid that the plugin is not translated into Russian - the plugins themselves are TinyMCE almost all are translated into Russian, so you don't need to know English. And the cat cried about the settings here - in fact, you just need to drag the necessary buttons to the toolbar of the visual editor with the mouse. And this is not necessary - almost everything is duplicated in the editor menu:
The menu, by the way, can be disabled by the first plugin setting:
The buttons themselves are in English, but it's easy to understand what they mean:
As you can see, everything is in English in the plugin settings, but when editing a record, all English inscriptions are automatically translated into Russian. Even if something is not clear to you - they dropped the button on the panel, saved the settings, switched to editing the record and looked at what this or that button means.
You shouldn't add every possible button to the toolbar, as you will never need many buttons. Moreover, it is better to remove some of the buttons that are already there. The simpler the editor, the more convenient and effective it is to use it.
Of the new features of the editor, I would like to note the insertion of tables:
A couple of clicks and the table is ready. A very primitive table, but for most bloggers this will be enough.
The "Find and Replace" button calls the following dialog:
Honestly, I don't understand why there is no such functionality in the editor by default. This is a general trend of various editors, even in the default there is no search and replace option. Although personally I very often use this function in various text editors.
Ability to choose a font and its size:
It is also a very useful function that allows you to design the text of your article the way you like without editing the template styles.
For me personally, the "block view" function seems to be very useful:
It allows you to visually evaluate how your text is styled. This is important because it is often very difficult in a visual editor to understand how a particular piece of text is designed. Or where do the extra indents come from in some piece of text:
In the editor WordPress tags of paragraphs and line breaks are placed automatically and you do not see them at all. Any text after which you clicked on "Enter" is taken into paragraph tags, which you will not be able to see, even by switching to the "Text" tab of the visual editor.
Sometimes this behavior of the editor causes a complete stupor. For example, in this screenshot you can see that the text taken in the tags
automatically ended up still wrapped in paragraph tags... This is very important when creating a new template or editing the styles of an existing template.
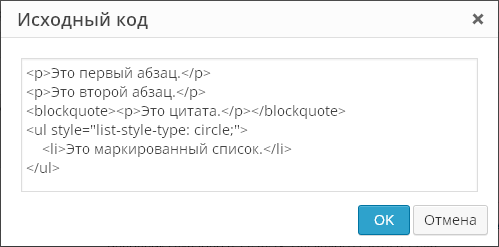
By the way, the plugin TinyMCE Advanced makes it possible to see the real source code of your text, without the stripped tags. To do this, in the "Tools" menu, select the "Source Code" menu item:
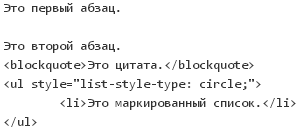
This feature will allow you to see the actual source code of your article, not the one you see when you switch to the "Text" tab. For example, on the "Text" tab, the code can be like this:
And when you use the "Source Code" function, you will see:
That is, you will see your text with paragraph tags already arranged. And this will be exactly the code that will be displayed in your published post on the site. When I first started working with WordPress, this behavior of the editor pissed me off. But most of the users are satisfied with this - after all, you do not have to think about the design of the text, the editor does everything himself.
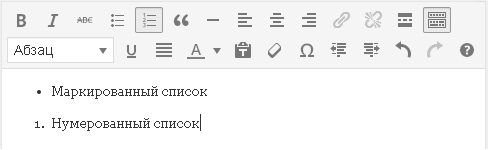
The plugin also extends the ability to insert standard lists. There is only one kind of lists in the default editor:
The plugin makes it possible to insert lists of various types:
A funny button that allows you to evaluate how the emoticon will look in the published post, since in the visual editor, emoticons will still be displayed in text form. Do not forget to just go to " Settings \ Writing"and check the options" Convert emoticons like :-) and :-P to pictures".
Actually, this is where I will end my review of the new features of the visual editor. Try the remaining buttons and functions yourself.
Now it's worth mentioning the settings below the unused buttons selection bar:
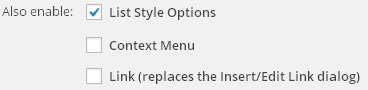
By default, only the " List Style Options", which includes the advanced options for inserting lists, which I wrote about above. Option" Context Menu"includes the plugin context menu, called when you right-click in the editor:
This is a completely useless menu, which consists almost entirely of the insert table menu. Why I need it, I still do not understand - the browser's native context menu is just an order of magnitude more useful. The next option concerns the insert links dialog. By default, this dialog looks like this:
The plugin can replace it with this:
That is, in fact, the plugin dialog only allows you to register for links, and everything else is in the standard dialog for adding links. Whether you need this plugin feature or not, you can decide for yourself.
The last part of the plugin settings is the "advanced" settings:
What editor-styles.css and why is it needed? This file stores template styles that should be applied in the visual editor. Let me explain with an example, let's say that there is an entry in the editor with a quote:
When published, this post in the blog template will look like this:
Let's create a file editor-styles.css in the template folder with this code:
add_editor_style ("editor-style.css");
We update the post edit page and see:
Thus, in the visual editor, you can get the same view of the post as in the published form. Plugin option to import file editor-styles.css serves to load the contents of this file, if the template in functions.php there is no direct call to this file. But, if you have already created this file, then write one line in functions.php it will not be difficult for you.
All the latest default templates in WordPress contain style support for the visual editor. As well as some premium templates. But in the vast majority of cases, no files editor-styles.css not in templates, this fashionable and convenient feature is still not popular with template developers, but in vain.
The most recent plugin setting forces the editor to show paragraph and line break tags in the "Text" tab. That is, when editing a record, everything will be the same, but on the "Text" tab you will see the full html-markup and you will no longer have to use the "Source Code" function for this. However, the editor will still freak out with its auto-formatting. For example, here's the code:
After switching to "Visual" and back to "Text" it will turn into:
That is, the editor removed one line break by taking the remaining two line breaks in the paragraph tags. Basically, the result is the same - 3 lines of indentation. But it's still unpleasant - I don't like it when the program considers itself smarter than the user. Indeed, in my template, I can have indents for paragraph tags both at the top and at the bottom, and as a result, visually there will be not 3 lines of indentation, but all 4. But oh well, I'm already finding fault.
Anyway, using the plugin TinyMCE Advanced creating and editing blog posts is much more convenient. So pay attention to it if you are still using the editor built into the engine.
Categories