How to make microsd a local disk. How to make an external USB HDD (hard disk) bootable using standard Windows tools? From an ISO image
Introduction.
Most laptop owners sooner or later face the problem of lack of space on. As a rule, laptops up to and including 15 inches do not have a free second slot for a 2.5 inch device. Therefore, owners are forced to think about either replacing the laptop itself, or replacing its hard drive. After replacing the hard drive, there is always an old drive that can be easily turned into an external USB drive for data transfer.
Naturally, you can purchase a mobile 2.5-inch hard drive and turn it into an external drive. Fortunately, the cost of external drives allows this. For example, at the time of writing, a 250 GB mobile hard drive costs $40, while a 500 GB device from WD costs only $45.
Decide on the type of hard drive.
In fairness, it should be noted that an ordinary desktop 3.5-inch hard drive can also be turned into an external drive - you just can’t call it mobile anymore. If you have an unused 2.5 or 3.5 inch hard drive, then first of all you need to determine the type of its interface.
To date, the following interface types exist on the market: IDE (ATA) and various SATA options. As a rule, all SATA interfaces are backward compatible with each other, and we will not dwell on their variations. The situation is completely different between IDE and SATA interfaces, which are absolutely incompatible with each other and have different connectors.
Image is clickable --
The figure shows two hard drives with different interfaces. Winchesters have a mobile format of 2.5 inches. On the left is a hard drive with a SATA interface, on the right is a hard drive with an IDE interface.

Image is clickable --
In our hands was a 250 GB hard drive from Western Digital of the Scorpio Blue series with a SATA interface. This drive was used in an Acer laptop for a long time, but its capacity was not enough, and it was replaced with a more capacious 500 GB solution.

Image is clickable --
Despite long-term use, the hard drive did not cause any complaints, so it was decided to use it as an external mobile drive. To do this, it was necessary to find an external case for him, which we did. External case AGESTAR for 2.5 inch mobile hard drive.
Computer hardware stores offer a wide variety of external cases for 2.5 inch hard drives. Their key difference is this:
- body material,
- type of external port (interface),
- cost.
As a rule, various cases with USB 2.0 interface are presented in stores, cases with eSATA interface are presented in a much smaller number, and even fewer cases with their combination of USB 2.0 & eSATA. Several cases with a modern USB 3.0 interface were found on sale, but their cost exceeded the cost of the hard drive itself, so we did not consider them.
The key difference between USB 2.0 and eSATA is the transfer speed. Using the USB 2.0 interface allows for maximum compatibility, as these ports are available on all computers. A significant disadvantage of the USB 2.0 interface is the low data transfer rate, which will not allow you to unlock the full speed potential of your hard drive.
The eSATA port is more promising, but it is not common and is found only in expensive versions of motherboards, cases and laptops. The eSATA interface allows you to fully unlock the potential of SATA devices.
The material of manufacture can also be very different. Simply put, it's plastic. In more expensive variations, an aluminum case with a leather case is included.
The cost of external cases also varies. The cheapest option will cost the user 3 dollars, expensive versions will cost more than 100 dollars.
Purchasing a $100 case for a hard drive that costs less than $40 when new and is half the price once it's in use is wasteful to say the least. Therefore, for testing, we were given a case worth a symbolic 3 dollars - AgeStar SUB2P1. Completion and external inspection AgeStar SUB2P1.

Image is clickable --
From a device worth three dollars, we did not expect any miracles, both in terms of equipment and in terms of performance. The device comes modestly packaged in a package. The front wall of the device is covered by a cardboard box listing the key characteristics of the device. This is support for 2.5 inch mobile hard drives or solid state drives with a SATA interface, the availability of a USB 2.0 data transfer interface and various color options.
In fairness, it should be noted that our suppliers have confirmed that they have not seen any other than the black color of this case.

Image is clickable --
After opening the package, we were pleasantly surprised by the fact that the set includes an instruction manual completely in Russian.

Image is clickable --
The case is completely made of plastic. There are paper stickers on the front wall indicating the model, which will be erased in any case, so we recommend that you immediately remove them from the surface of the device.

Image is clickable --
The material of the case is soft black plastic, which does not smell anything, is uniform throughout its structure.

Image is clickable --
The covers of the device come off in two different directions, which makes it easy to remove and install the hard drive in an external case.

Image is clickable --
The two sides of the outer case are fixed with a plastic latch made from the material of the case. Thanks to the recesses on the walls, the lids are securely fixed and spilling a glass of liquid, or leaving the device in the rain, is unlikely to lead to any problems.

Image is clickable --
The device is designed for SATA hard drives, which we have repeatedly emphasized. Inside soldered controllers with SATA ports for power and data transfer.

Image is clickable --
On the side wall there is a mini USB port for data transfer and hard drive power supply. There is no additional port to provide power to the drive, which may cause some problems for users. With a weak power supply that lowers the voltage along the 5 volt line, you often have to deal with problems starting the hard drive. As a rule, connecting the drive directly to the port on the motherboard, and not on the case of the system unit, using a high-quality USB cable allows you to forget about this problem.

Image is clickable --
Sellers of computer components often talk about the presence of a USB data cable in the kit as an advantage of one or another external case or offer to purchase it separately if it is not. We advise our users not to pay attention to this, as a mini-USB-to-USB cable is usually found in almost every family and is often supplied with mobile phones. In our case, we successfully used a stale data cable from a Nokia mobile phone.

Image is clickable --
The next step is to install the hard drive in the case. This is done quite simply - by light pressing. Most importantly, first rotate the hard drive correctly according to the SATA power and data ports located in the case.

Image is clickable --
The absence of any protruding elements on the hard drive controller circuit allows you not to worry about its rear surface when transporting and using the device.

Image is clickable --
Some users may argue that the plastic case does not provide adequate heat dissipation from the hard drive. Naturally, external cases made of aluminum cope with this task much more effectively. At the same time, we should not forget that mobile hard drives do not have such a high power consumption to suffer from overheating, and in laptops, as a rule, they are not cooled by anything else.

Image is clickable --
After the assembly of the device is completed, the stage of its testing and use begins. The power supply to the device is accompanied by the glow of the blue LED, which also symbolizes the user about the data transfer process. It should be noted that not everyone will have a smooth start with the created external drive. If the hard drive has already been used, it has been formatted and partitions have been created on it, you will not have problems getting started. It will be defined as a regular USB flash drive using the Plug & Play method. But for those users who have purchased a new hard drive without formatting and with no partitions, there will be a problem that will be associated with the absence of a drive letter in the "My Computer" tab.
To do this, you need to create partitions on the hard drive and format it. This can be done through various boot disks, but it's better not to bother and do it in the Windows operating system itself.

Image is clickable --
To do this, you need to go to the "Control Panel" through the "Start" section, then visit the "Administrative Tools" section. In this section, select "Computer Management", where in the "Disk Management" tab you can partition and format the newly connected external drive. After creating partitions, formatting them, you will have access to them through the "My Computer" tab and you will be able to exchange with the drive, as with a regular hard drive. Test configuration.
The assembled external drive was tested both on a desktop computer based on a modern Core i7 processor and no less modern motherboard, and on an Acer Aspire 7730 laptop based on a Core 2 Duo processor. It should be noted that the level of performance on two different systems turned out to be comparable equal.
1. Data reading speed was tested in HD Tach 3.0.4.0

Image is clickable --
It's nice to note that the external drive we assembled shows a much higher level of performance than the WD My Passport Essential external hard drive we tested earlier. The maximum data transfer rate was 34.3 Mb / s, and the average delay was about 17.9 ms.
2. Data reading speed in HD Tune 4.5.

Image is clickable --
In the second synthetic test, we got similar data to the previous ones, which also turned out to be slightly better than that of the official WD My Passport Essential external hard drive.
3. The speed of writing files of 64 MB in HD Tune 4.5.

Image is clickable --
Somewhat more valuable is testing close to practice, by writing 64 MB files. In this test, we got quite expected results, which were also limited only by the capabilities of the USB 2.0 interface.
Separately, I would like to note that during the entire testing, the temperature of the hard drive did not exceed 35 degrees Celsius, while a similar hard drive installed in a laptop had a temperature of about 43 degrees. Therefore, users will not need to worry about the working conditions of the hard drive in this case.
4. The speed of loading the Windows 7 operating system.

In the course of practical testing on the boot speed of the Windows 7 operating system image, we received results similar to other external drives with a USB 2.0 interface.
5. Drive performance evaluation in Windows 7 environment.

We tested the performance of the external drive we assembled using the Windows 7 operating system. To do this, you need to call the command on the command line: "winsat disk -drive g -ran -write -count 10", where "g" is the letter of the drive under test in the system.
From the test results, it can be seen that the drive we assembled received a much higher rating than the factory WD My Passport Essential solution.  Conclusion.
According to the materials of this article, it is clear that any mobile hard drive can be turned into a good external drive without any hassle. Especially for testing, we asked to provide us with the cheapest external case, worth $ 3. Three dollars allows you to get an excellent external drive from a mobile hard drive, at least for data storage. Not to mention the fact that the same external case facilitates the recovery of data from the hard drive of "dead" laptops.
Despite the fact that AgeStar products are criticized by many for their low quality, after many years of using it, I have only a positive impression of it. First of all, it is for a democratic cost. Marriage occurs in all manufacturers, even if AgeStar has a slightly higher figure than Thermaltake. But the latter has no analogue to the presented external case for three dollars and with a guarantee of 6 months. We award AgeStar products with a gold medal for the best performance/price ratio.
When there is not enough free space on the hard drive, and it is impossible to free it, you have to consider various options to increase the space for storing new files and data. One of the easiest and most affordable ways is to use a flash drive as a hard drive. Many medium-sized flash drives are available, so they can be freely used as an additional drive connected to a computer or laptop via USB.
A regular flash drive is perceived by the system as an external portable device. But it can be easily turned into a drive so that Windows will see another hard drive connected.
In the future, you can install an operating system on it (optionally Windows, you can choose among the “lighter” options, for example, based on Linux) and perform all the same actions that you do with a regular disk.
So, let's move on to the process of turning USB Flash into an external HDD.
In some cases, after performing all the steps listed below (for both bit depths of Windows), you may need to reconnect the flash drive. First, safely remove the USB drive, and then reconnect it so that the OS recognizes it as an HDD.
For Windows x64 (64-bit)
- Download and unzip the archive.
- Plug in flash drive and run "Device Manager". To do this, simply start typing the name of the utility in "Start".

Or right click on "Start" select "Device Manager".

- In branch "Disk Devices" select the connected flash drive, double-click on it with the left mouse button - they will start "Properties".

- Switch to tab "Intelligence" and copy the property value "Hardware ID". You do not need to copy everything, but up to the line USBSTOR\GenDisk. You can select lines by holding Ctrl on the keyboard and clicking the left mouse button on the desired lines.
An example is in the screenshot below.

- File F2Dx1.inf from the downloaded archive you need to open with Notepad. To do this, right-click on it and select "To open with…".

Select Notepad.

- Go to section:
You need to remove the first 4 lines from it (that is, the lines before %attach_drv% = f2d_install,USBSTOR\GenDisk).

- Paste the value that was copied from "Device Manager", instead of the deleted text.
- Before each inserted line, add:
%attach_drv% = f2d_install,
It should look like the screenshot.

- Save the modified text document.
- Switch to "Device Manager", right-click on the flash drive and select "Update Drivers...".

- Use the method "Search for drivers on this computer".

- Press "Overview" and specify the location of the edited file F2Dx1.inf.

- Confirm your intentions by clicking on the button "Continue installation".
- When the installation is complete, open Explorer, where the flash will be displayed as "Local Disk (X:)" (instead of X there will be a letter assigned by the system).
For Windows x86 (32-bit)

After that, you can partition the flash into partitions, install an operating system on it and boot from it, as well as do other actions, as with a regular hard drive.
Please note that this will only work on the system where you have completed all of the above steps. This is due to the fact that the driver responsible for recognizing the connected drive has been replaced.
If you want to run the flash drive as an HDD on other PCs, then you need to have an edited driver file with you, and then install it through the "Device Manager" in the same way as indicated in the article.
I have long wanted to write this article, I think it will be very interesting to you. I received such a question from a friend, how to make a hard drive out of a flash drive. So, we will analyze two options: changing the flash drive to 64-bit Windows and to 86-bit.
If you decide to use programs such as or others to view the flash drive, then you will not see it there, because there is a so-called descriptor Removable Media Bit (RMB), which is in any flash drive and causes Windows to detect such drives as removable, and not as a local drive. To fix this, we just need to delete this descriptor.
Why did I say there will be two options? Because on systems of different bit depths, this operation will be carried out in different ways. This will be easy enough to do, so let's get started.
How to make a flash drive a hard drive on Windows x86?
To do this work, we need to download a special driver Hitachi Microdrive. You can download from here.
Now let's find out the device instance code. In this case, we need to go to the device manager, there go to the tab disk devices. Look for your flash drive and right-click on it. In the window that opens, go to the tab "Intelligence", and choose from the drop-down list "Path to Device Instance". In field "Meaning" select the entire line and copy.
Let's move on to the driver. Unpack it to start anywhere, and then, using any notepad, open the . Find an item there. and in the very last line, starting with the word USBSTOR we replace everything with what we copied in the device manager. Here's how it'll turn out:

At the end of the line, after REV_XXX, you need to remove a small tail:

Once done, save the file.
Now once again we go to the device manager and open the properties of our flash drive again. Let's go to the tab "Driver" and then click the button "Update".

On Windows 7
Here we need to choose "Search for drivers on this computer" and select just the cfadisk.inf file that we changed with you.
In Windows XP
In this OS, we choose "Install from a specified location", Then "Do not search" And "Install from disk". Again, select the cfadisk.inf file as the driver.
After that, your flash drive should be recognized by the system as a hard drive.
| INTERESTING: |
How to make a flash drive a hard drive on Windows x64?
So, in this case, we download this archive.
Now go to the Device Manager, open the properties of our flash drive and go to the tab "Intelligence". There, from the drop-down list you need to select "Hardware ID". In the "Value" field, you will need to copy all the lines except USBSTOR\GenDisk And GenDisk.

The F2Dx1.inf file that we downloaded can be opened with a regular notepad. In general, it is advisable to use Notepad++. Opening the file, find the item in which we delete the first 5 lines, and then simply replace them with what we copied. The main thing is that each line begins with the phrase: %attach_drv% = f2d_install.

In addition, I want to say that the flash drive will be determined by the hard drive only on the system in which you performed this operation, since we just changed the driver in the Windows environment. If you insert a USB flash drive into another computer, then it will be defined there as a USB flash drive. That's all.
Have you purchased a new, fast solid state drive (SSD) and your old one is lying around? Give it a new task and use it as an external storage device. To do this, you only need a case with a SATA controller; it is available for both 2.5" and 3.5" models. For the latter, a power supply is required, while compact drives have enough power supply through the USB port.
Labor intensity: average, costs: 600 rubles.
Mini NAS on router
 Need to access the same data across your entire home network? You don't need expensive and bulky network attached storage (NAS) for this - a USB drive can do this task if it is connected to your router. Newer devices are equipped with the corresponding port.
First you need to format the USB drive from under Windows OS in the NTFS file system and then just connect it to the router. In this case, the latter must have a USB port and must support the appropriate functionality. Now, typing 192.168.1.1 (or similar) in the browser's address bar will take you to the router's user interface.
Click the USB Settings | Sharing a storage device” (for TP-Link routers, for other devices, the name of the menu items may differ) and make sure that the disk starts up.
To access data on your home network, it will be enough in Windows Explorer to type an address like "\\192.168.1.1\Volume1". A permanent connection is achieved by right-clicking on the folder you plan to allow access to and selecting Map Network Drive.
Labor intensity: low, costs: no
Flash drive instead of a password
 There is also a practical use for a small USB flash drive. For example, when you sign in to Windows, you can unlock your computer without entering a password. To do this, you need the Rohos Logon Key tool (1450 rubles), Predator (650 rubles) or free USBLogon (http://www.rohos.ru/products/rohos-logon-free/).
 After installation, you need to select the connected USB drive and configure the security settings. After entering the Windows password, the flash drive is ready for use. Unfortunately, working with USBLogon is complicated by the German-language interface, but even without knowledge of German, it is easy to figure it out.
Labor intensity: average, costs: no
flash drive for emergencies
 If the computer no longer works as it should, a bootable USB flash drive comes to the rescue. The Sardu tool (http://www.sarducd.it/) installs up to 20 different antivirus programs on the drive, and also provides various versions of Linux and other first aid software.
> Training: in the left sidebar, the selected software is listed by category. Check the required programs. We recommend choosing multiple antiviruses and a Linux version (e.g. Ubuntu).
> Flash drive creation: on the right sidebar, click on the symbol with the USB drive. You can start creating a bootable flash drive.
> Use in an emergency: to use a bootable flash drive in case of an "accident", you need to change the boot sequence from the drives in BIOS Setup.
 In this case, you should set the boot priority from USB to HDD. Then select the desired program from the list. Don't forget to revert your BIOS changes after "repairing" your computer.
A photo: manufacturing companies, racum/Flickr.com
No matter how difficult the installation of the OS is, and my opinion is that it is enough to be friends with the computer and have two more hands besides the head - one right and the other left. To install an OS on a computer, you need or.
But what if there is neither one nor the other, the optical drive does not work, or you have a netbook? After a little thought, I remembered that I have an external usb-pocket for the HDD and a free old HDD 2.5ʺ is also there. In general, if there is a pocket hard drive, it can be made bootable accordingly.
For this purpose, there are utilities with which you can do this, but I decided to use the standard Windows tools.
There are a lot of descriptions and videos on the network, but, unfortunately, there is one problematic point that the authors for some reason omit. Well, okay, I'll start in order.
Preparing an external HDD
Before working with a disc, be sure to transfer and save the necessary information from this disc to another medium.
All settings will be carried out using standard Windows 8.1 tools. There may be some differences from previous releases of Windows, but if there are, they are not significant.
First of all, I want to note that making an external HDD bootable is much more convenient. I divided the disk into two partitions, one contains the Windows distribution, the other partition is for my needs.
1. Connect usb-pocket and go to Disk Management.
Attention! All data on the disk will be destroyed!
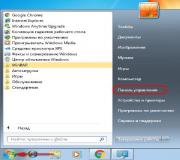
If you have Windows 8.1 installed on your PC, right-click: Start / Disk Management;
If Windows is older, open the Computer Management console: Start / Control Panel / Administrative Tools / Computer Management / expand Storage Devices / left click Disk Management.
2. Choose an external HDD. Be extremely careful, if you choose another disk by mistake, all information will be destroyed.
In my case, this is Disk 1. As you can see in the screenshot, the disk is divided into two volumes (partitions):
3. Delete disk partitions:
4. Create new disk partitions. One for the distribution, the second will remain for your needs:
Right-click on the free space of the disk, select the command in the context menu Create a simple volume:
5. In the New Simple Volume Wizard window that appears, click the button Further:
Specify the volume size of 4404 megabytes and click Next. Please note that the size is indicated in megabytes. And since 1 gigabyte is equal to 1024 megabytes, then 1024 × 4.3 = 4403.2 megabytes is obtained under the distribution section (the weight of mine is 4.18 GB for example);
In this dialog, you need to format the new partition (FAT 32), press Further then Ready:
6. After that, you need to make the created partition active. (don't forget, because the computer will boot from this partition), for this:
Right mouse click, select the command in the context menu Make section active.
To the request for confirmation, we answer YES.
7. In the same order, we format the second partition on the disk, preferably in NTFS, but do not make it active.
Copying Windows to the active partition of an external HDD
Copying a Windows distribution to a bootable external HDD is quite simple and easy.
From bootable DVD:
Open the installation DVD in Explorer, select all folders and files, and copy to the active partition of the external HDD;
From the ISO image:
By and large, an ISO image is a kind of archive. So you can open it with any archiver. You can also open the ISO image through Total Commander or Daemon Tools. Well, if you have Windows 8 or 8.1 installed on your PC, then open it with Explorer. Select all folders and files, and copy to the active partition of the external HDD;
That's it, your external HDD can act as bootable media. Just reboot and set USB HDD as boot priority in BIOS (depending on BIOS type).
- When you turn on your laptop, press F2, to ;
- Go to tab Boot;
- IN Boot priority order install USB HDD;
- Click F10, and then OK.
If not, then check out the article.
Save your changes and get started.
As you can see from the text, preparing an external HDD for installing Windows is quite simple. And my description will not be complete if I do not talk about one problem, which for some reason is rarely written about on the net.
Making a hard disk partition active
When I divided the hard drive into two volumes, for some unknown reason, none of the disk partitions could be made active. This function was not available in the context menu.
The partition from which the computer boots is called active.
There are two ways to make a partition active:
- Using the Computer Management console. We have already considered this method, but, unfortunately, for a number of reasons, the Make Partition Active command is not available. The solution to this problem is also not difficult. Remember how to prepare a bootable flash drive from the Command Prompt.
- Using the Command line, through the utility diskpart. The second way is a little more complicated, but more effective. You just need to do all the operations carefully and slowly.
Setting the active partition using the command line
1. Connect an external USB HDD;
2. Click Start/All Programs/Accessories/ Command Prompt. Press the right mouse button and select Run as administrator.
 3.
In the window that opens, write the command diskpart and press the button Enter. A prompt for working with the utility will appear - DISKPART>;
3.
In the window that opens, write the command diskpart and press the button Enter. A prompt for working with the utility will appear - DISKPART>;
 4.
Enter command list disk and press the button Enter. You will see all disks installed on your computer;
4.
Enter command list disk and press the button Enter. You will see all disks installed on your computer;
 5.
Select the disk with which we will work. To do this, enter the command select disk 0, where "0" is the disk number in the list, i.e. for my external drive there will be a command select disk 1. Click the button Enter, the message Disk 1 selected;
5.
Select the disk with which we will work. To do this, enter the command select disk 0, where "0" is the disk number in the list, i.e. for my external drive there will be a command select disk 1. Click the button Enter, the message Disk 1 selected;
 7.
Select the section with which we will work. We enter the command select partition 1, where 1 is the section number in the list, i.e. for the section that we make active. Click Enter, a message will appear Section 1 selected.
7.
Select the section with which we will work. We enter the command select partition 1, where 1 is the section number in the list, i.e. for the section that we make active. Click Enter, a message will appear Section 1 selected. 8.
We mark the selected partition as active, to do this, enter the command active. Click the button Enter, a message will appear DiskPart: partition marked as active.
8.
We mark the selected partition as active, to do this, enter the command active. Click the button Enter, a message will appear DiskPart: partition marked as active.
 That's all. Good luck.