Local network on the router. Local Wi-Fi network
In this article we will set up a local network between two or more computers with Windows 7 (Windows 8) installed, which are connected via Wi-Fi router. In fact, setting up a local network in Windows 7, Windows 8, and Windows 10 is practically no different. Windows XP does have its own nuances; there are always some problems when setting up a network between Windows 7 and XP. But, more on this in a separate article, and it’s time to switch from Windows XP, it’s outdated.
It is clear that in order to set up a local network and share files, computers need to be somehow connected to each other. This can be done using a network cable; I will introduce a direct connection between two computers. But it is much more interesting to connect all computers through a router, which is now installed in almost every home and office. When connecting via a router, you can already set up a local network not only between two computers. You can connect all computers, and even mobile devices that are connected to one router, into a local network
For example, desktop computers can be connected to the router via network cable, and laptops - by Wi-Fi networks. It’s up to you what’s more convenient for you, and how it works out for you. It doesn’t matter whether the computer is connected to the router via Wi-Fi or cable, the local network will work. And it doesn’t matter what operating system you have installed, but I will show you on Windows example 7.
And I will configure and display the network through a router to which my laptop is connected via Wi-Fi, and desktop computer. Both run on Windows 7. Now we will set up a local network between these two computers. And also, we will open general access to folders and files. What is a local network between computers for? Mainly for file sharing. If you often need to transfer some files from one computer to another, then instead of running around with a flash drive, you can do this over the network. Well, you can play games online.
If your network also has a TV with a Smart TV, then you can configure access to movies on your computer from the TV. More details in the article.
Instructions for setting up a local network in Windows 7
Let me remind you that the computers that you want to connect to the network must be connected to the same router, or connected directly with a cable. Also, all the actions that I will show in this section must be performed on both computers.
Important point! If you want to set up a network through a Wi-Fi router to which some third-party devices are connected (for example, your neighbor), then after setup, he will be able to access those folders on your computer that you set up shared access to. Install a good one to protect your network. If you still need to connect to your router third party devices, but you want to set up a home network, you can create " guest network", as we did on the Zyxel router in .
One more thing. If you are setting up a network by connecting computers directly, without a router, then you will also need to set static IP addresses in the local network connection properties. If you are connected through a router, then you do not need to do anything additional, continue to follow the instructions.
1 First of all, we need to check that all computers are working in the same workgroup. This needs to be checked on all computers that will be connected to the local network.
We do this: press the key combination Win+R, and in the window that appears, specify the command sysdm.cpl. Click Ok.
Against Working group, most likely it will be written WORKGROUP. You can leave it. The main thing is that on other computers the workgroup should also be WORKGROUP.

If you want to change it, for example to MSHOME, then click the button Change, and indicate new group. Save the changes and restart your computer.
2 The second step is to change the sharing settings. We also perform these settings on all computers on the network. Now I'll show you what needs to be included.
Click right click mouse on the Internet connection icon in the notification bar, and open Network and Sharing Center. In the new window select Change advanced sharing options.

There will be two profiles. Home or Work, and General. Let's change the one that says current profile. You can make these settings for both profiles.
First of all, put the switch near Enable network discovery. Also, we turn on File and Printer Sharing, and turn on folder sharing. See screenshot below.

Scroll through the settings page, find and open the tab All networks, or General, and definitely disable Sharing with password protection .

After these steps, it is advisable to restart the computer. These are all the settings, the local network should already be working. To check, you need to go to Explorer (My Computer) on one of the computers and open the tab on the left Net. All computers on the network will be displayed there. In the screenshot, you can see my computer, and another one from the network.

We can already log into the computer in our home network, there will be access to shared folders.

If you do not have computers on the network, or do not have access to a computer, then see the solutions at the end of this article.
Setting up file and folder sharing
As I wrote above, access to shared folders is already available. But, we may need to share access to some other folder, which is located, for example, on local drive D. This can be done without any problems. After we open shared access to the folder, all computers on the local network will be able to view the files in it, change them, and add new files to this folder (though this depends on what permissions we enable).
For example, I want to share the "Pictures" folder. To do this, right-click on it and select Properties. Go to the tab Access, and press the button Advanced setup. Place a tick next to the item Share this folder, and press the button Permissions.

In the window that opens after clicking the button Permissions, we need to set access rights to this folder. To ensure that network users can only view files, leave the checkbox next to Reading only. Well, for full access to a folder with the ability to change files, check all three boxes.

Click Apply And Ok. In the window Advanced sharing setup, also press the buttons Apply And Ok.
In folder properties, go to the tab Safety, and click on the button Change. Another window will open in which we click on the button Add. We write in the field "All" and press Ok.

Selecting a group All, and below we tick off the access points we need for this folder.

That’s it, after these steps, this folder will be shared with all computers on the network. It starts working without rebooting, I checked. Open this folder from another computer:

It's all confusing, until you figure it out... It was possible to somehow make these settings easier and more understandable. But everything works. It turns out that I have access to a folder that is located on another computer. And this is all over the air, since both computers are connected to the router via Wi-Fi.
By the way, this folder will also be accessible from smartphones and tablets that are connected to this Wi-Fi router. To view network folders on Android, I advise you to install ES Explorer, or use standard conductor. Everything works:

Now we will also look at possible problems and errors that can very often be encountered during the setup process.
Possible problems and errors when setting up a home local network
If any errors or problems appear during the setup process, then first of all disable your antivirus, and other programs that may block the connection. If the problem is in the antivirus, then you will need to add your connection to the exceptions.
- Computers from the local network do not appear on the Network tab. In this case, we check the workgroup and sharing settings on all computers. Open a tab in Explorer Net, right-click on an empty area, and select Update. Another important point, very often antiviruses and firewalls block access to the local network. Try disabling your antivirus for a while. You also need to make sure that there is a connection to the router.
- No access to the shared folder. Another problem is when we seem to have everything set up, shared access has been opened, but when we try to open a folder on a computer on the network, a message appears that we do not have access, we do not have rights to access this folder, it was not possible to open network folder etc. Or, a username and password prompt appears.
Be sure to check the sharing settings in the properties of this folder. There are a lot of settings, everything is confusing, maybe something was missed. Well, again, disable the antivirus, it may block. - A computer connected via Wi-Fi cannot be seen by other computers on the local network. Or vice versa. If your network is built from computers and laptops that are connected via wireless network, and via cable, then problems may arise with a certain connection. For example, laptops connected via Wi-Fi may not appear on the local network.
In this case, pay attention to which profile you enabled network discovery for (settings at the beginning of the article). It is also advisable to assign home network status to connect to your Wi-Fi network. Well, be sure to try disabling your antivirus.
I think you succeeded. If you couldn’t configure something, then ask in the comments. Also, don’t forget to share your tips on this topic.
Hi all! Today we will look in detail at how to set up a local network via a wifi router. By starting to write this article, I mean that you have already configured your router and connected a couple of computers or laptops to it. If not, then be sure to read or, otherwise you will not understand anything.
Actually, under the concept “ local network» it is understood that all computers, laptops, smartphones, tablets, TV set-top boxes and other devices that are connected to one wifi router, will see each other and you can exchange data between them. This is what the technologies for creating an FTP server are based on, DLNA media server, access to shared printer, to the video surveillance system and so on.
Now our task is to understand exactly how public access to these network resources opens after you have connected your computer to the router - via wifi or cable, it doesn’t matter.
How to share folders on a Windows local network?
In order to open shared access to a folder on the computer for the local network, right-click on it and go to “Properties > Access > Advanced settings”. Check the box “Share this folder” and save the setting with the “Apply” button.
We do the same with all folders that need to be shared on all computers. After that, by going to the “Network” section, you will see the names of these PCs, and by going inside them you will see the shared common Windows folders.

If you can’t connect to them, try rebooting and connecting again, or disabling firewalls - built into Windows or from third-party antiviruses- they can block your attempts to connect.
Homegroup on Windows 7
After creating a local network through a router, you can also configure the so-called home group is a system in which shared folders, printers and other devices connected to different computers and laptops will be visible and open for work only on those devices that are included in this group, and not for all workstations on the network.

To create this restriction, the home group is usually password protected.
Go to “Start - Control Panel - Network and Sharing Center”.
I’ll say right away, create a home group on the cheapest Windows version 7 — Home Basic, it won't work. It will only be possible to connect to an existing one. Therefore, this can only be done on the version starting with the “Home Extended”.
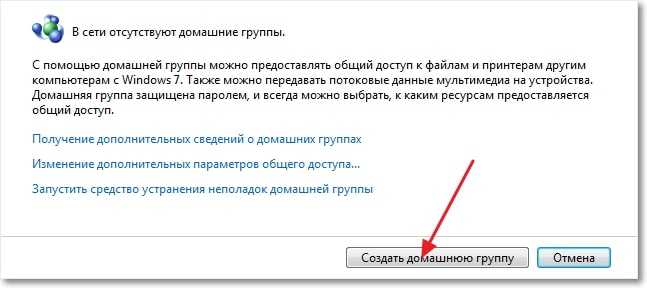
So, we connect to the router, find the subheading “Home Group” and click on the “Ready to Create” link, and then on the “Create Home Group” button.

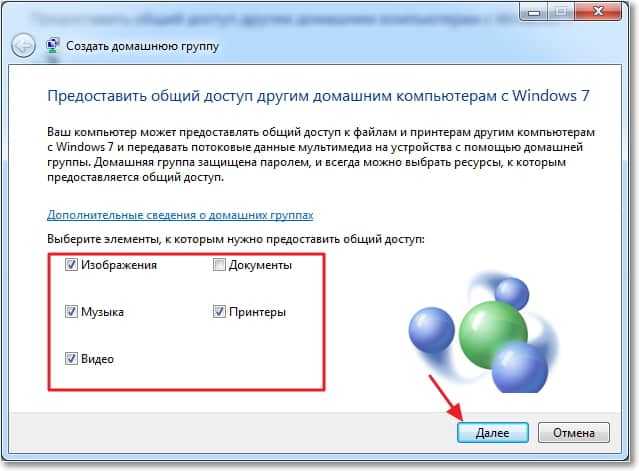
After this, we select those folders and devices that are connected to the computer and to which we want to allow access from the network.

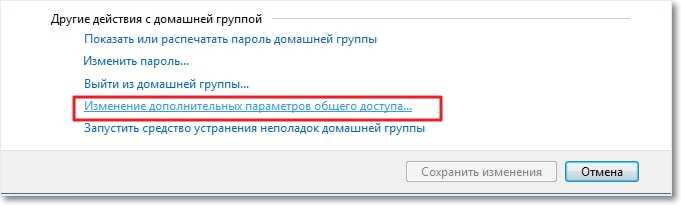
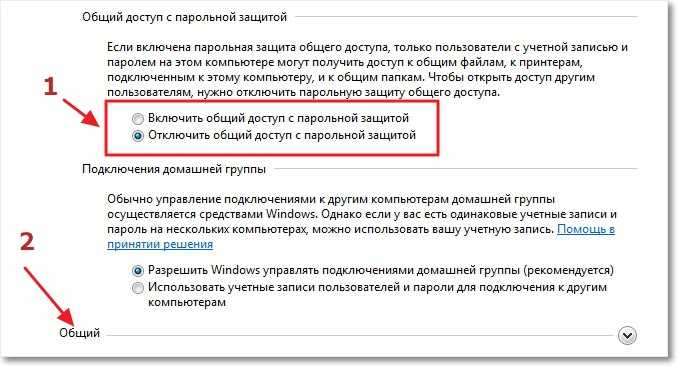
Then in the next window that opens we will find the link “Change additional parameters public access." Click on it and look for all the items where it says that you need to “Enable shared access with password protection.” It must be disabled, otherwise you will not be able to create a local wifi network. Then save the settings.

That's it on the first computer - the homegroup has been created. Just in case, you can restart your computer so that everything is saved and all settings are applied.
Now you need to connect another computer or laptop to this group. We connect to our wireless network and go through the chain “Start - Control Panel - Network and Sharing Center - Home Group”. And click the “Join” button.

If you can't connect, disconnect third party firewall(firewall) that you have installed. It may also be built into some antivirus.
That's it. Now, when you log into the network, you will see all devices connected via wifi to the local network. By clicking on the icon of any computer, you will see all shared folders and devices, such as a printer.
How to set up a homegroup on Windows 10?
The algorithm for creating and connecting to a homegroup on Windows 10 is similar to 7, but there is a difference in navigation and how to get into its device. To do this, right-click on the “Start” icon and select “ Network connections»


- Create a group or connect to an existing one
- Choosing which resources to share
- If necessary, enter a password to connect
But you can also open access to other folders, not just those that we specified when creating home group.
To do this:
- Right-click on the folder, select “Properties”, “Access” tab.
- Next is the “Advanced setup” button
- and check the “Share this folder” checkbox.
- After that, click “apply”
Now this folder has appeared among the shared ones and is visible to all members of the local wifi networks.
Local network and Android
But that's not all. You can create a local network not only between computers and laptops, but also include a tablet or smartphone based on Android into it, after which we can access files on the phone from the laptop and vice versa - from Android we can access Windows folders located on the computer .
For mobile platform There is such a cool program as ES Explorer. It can be downloaded via Google app Play. We install it and connect from Android to wifi.
After that, go to the “Menu” and open the “Network” subsection

Open the “LAN” section - Explorer will detect all computers on the local network. Those of them that you can go into and view files from them are highlighted in dark color.

If this PC is part of a password-protected homegroup, it will open additional window authorization

After which we will see all open shared folders of the system

But that’s not all - now you can also directly print documents from this gadget through a printer connected to one of the computers to which shared access is configured.
I hope that after reading this article you have realized all the advantages of setting up a local network via a router and can now exchange documents between computers via wifi. If you have questions, ask in the comments!
If the article helped, then in gratitude I ask you to do 3 simple things:
- Subscribe to our YouTube channel
- Send a link to the publication to your wall in social network click on the button above
VKontakte Facebook Odnoklassniki
Gone are the days when the only one home computer was the pride of the owner and the center of leisure for the whole family
The pace of development of electronics leads to the fact that soon there will not be a single household item that does not have a processor installed, albeit small. And even now in every home there are five or two devices capable of storing, processing and transmitting information. And sooner or later there comes a time when we, tired of running with a flash drive from one device to another, begin to think that it would be nice to connect them with each other.
Of course, ideally it would be to think through the composition of the equipment in advance so that incompatibility problems and unnecessary expenses do not arise. But in practice, it often happens that a host of different devices are already present in your home and you need to somehow connect them together, minimizing effort and costs as much as possible.
Photo from the site hardnsoft.ru
The optimal cost/effectiveness ratio is a wired Ethernet network. Of course, it requires drilling into walls to lay the cable, but it works very reliably and is unrivaled in terms of connection speed, especially if you use ports with a speed of 1 Gb/s. And if all future nodes (that’s what network nodes are called) are equipped with an RJ-45 port and rarely move around the apartment beyond the designated areas, then this will be the best solution. All that is required to create a network is a few tens of meters of cable " twisted pair"and a simple router or switch.
But we will consider a more complex case, when some devices are constantly moving (netbooks, laptops or tablets - who has what), others do not have an Ethernet port, but are equipped Wi-Fi module(PDAs or communicators), and still others have neither one nor the other (HD media player or external storage). You can be sure that building a network in any case is not something outstanding and is quite within the capabilities of everyone.
Photo from the site hardnsoft.ru
Types of Wi-Fi networks
Obviously, at home the only possible universal solution There will be a Wi-Fi based wireless network. First you need to decide on the basis of which of the Wi-Fi standards should be designed future network. At the moment, there are four varieties of them: 802.11a, 802.11b, 802.11g and 802.11n, colloquially called a, b, g, n - after the last letter.
The most common is b, which is also the slowest: the transmission channel speed does not exceed 11 Mb/s (compare with 100 or 1000 Mb/s for Ethernet). Moreover, if Ethernet real speed data transfer approaches the channel speed, then for a wireless network it is usually about two times lower (see the article “In the city “n” in this issue).
A and g have higher speeds - up to 54 Mb/s, but a operates at a different frequency - 5 GHz, which is not certified in Russia, unlike b and g, which operate at 2.4 GHz. This speed is sufficient for browsing the Internet and most other applications, so we will choose 802.11g as the basis for our network. As a rule, every device based on the g standard also supports b, which will ensure compatibility with less advanced devices such as PDAs.
If the speed of 20-30 Mb/s (i.e. only about 3 Mb/s) seems insufficient (for example, you plan to transfer over the network large files, such as high-definition films, etc.), you will have to fork out for n - the most modern and expensive standard, allowing you to achieve speeds of as much as 300 Mb/s. There are two versions of it - at 5 and 2.4 GHz, the first of which is also not certified, but is more effective, since it uses the currently almost unused frequency range.
Therefore, the most demanding users can be advised to purchase dual-band devices at their own risk (taking into account the very limited range of the transmitter - about several tens of meters, you can see that the risk is small). But here a compatibility problem may arise, because not all 802.11n devices operate at 5 GHz (this means high-speed mode n, since they still support modes b and g).
Sharing resources
One of the main advantages of the network is the ability sharing to information (for example, films, music or documents). A similar problem can be solved in several ways. One of them is to share folders on one of the computers using standard means operating system(for security, you can limit yourself to the “Read Only” mode). This method is quite simple, but requires permanent job computer with shared data. Similarly, you can make a locally connected printer or MFP publicly available.
Looking ahead, let's say that routers with built-in USB ports provide more convenience. They allow you to connect an external hard drive or a printer, making them available to each of the network nodes, and even organizing a torrent “rocking room”. It will be able to work completely autonomously and around the clock (it is not customary to turn off the router, and its power consumption is quite insignificant), download files not only from distributions, but also from most popular file hosting services (the latter usually requires installing modified firmware, but this is beyond the scope of this article ).
Wireless routers equipped with USB ports can also provide network access to external drives in the form of an FTP server. This method is a little more complicated in settings (they are performed through the router’s web interface), but more universal, does not depend on the computer, however, it forces you to convert the file system of the external hard drive, for example, to EXT.
Photo from the site hardnsoft.ru
Selection of equipment
Now let's talk about what equipment we need. To organize a Wi-Fi network, you need a so-called access point: it is responsible for sending data packets from one device to another. But it is only suitable for connecting several devices over the air, so we will use a Wi-Fi router that has such a point inside as the “heart” of our wireless network, as well as a built-in switch for wired devices. It is he who can provide not only the connection of “wired” devices (storage systems or desktop computer) along with wireless, but also connecting this entire economy to the Internet. Without a switch, we would have to keep one of the computers constantly on.
Photo from the site hardnsoft.ru
So, conduct an audit of your computer equipment and choose a router that is suitable for the price with necessary set ports and wireless standard. For example it could be budget option with four hundred megabytes Ethernet ports and an 802.11b/g access point or a sophisticated one - with eight Gigabit Ethernet ports, a dual-band 802.11n access point and three USB ports 2.0, - covering almost any requests.
Particular consideration should be given to cases where the connection to the Internet is made not through a local Ethernet network, but via ADSL (an example is the well-known “Stream”), or more in an exotic way(WiMAX, GPRS or some other way). Then this should be taken into account when choosing a router. Stream will require a special router with a built-in ADSL modem, or, if you couldn’t find one or want to save a little money, you can use your existing ADSL modem, connecting the Internet through it, and all other nodes through an additional inexpensive router connected to the modem .
Photo from the site hardnsoft.ru
To work in WiMAX networks (Yota, Comstar and the like) there are special devices, including a WiMAX modem and a point Wi-Fi access. In this case, a router is either not needed at all, or can only be used to connect wired devices; you just need to pay attention to the fact that it can connect to the WAN via Wi-Fi (usually this is not possible using standard firmware). The same applies to a GPRS/EDGE connection (or a more modern version, the so-called 3G) - the easiest way is to purchase a communicator that can share an Internet access channel using the built-in Wi-Fi module.
It is still better to connect all devices with Ethernet ports with wires: files will be transferred more reliably and faster. The rest will use built-in Wi-Fi adapters or must be retrofitted with such adapters. For most laptops, it is easy to purchase and install a built-in PCI Mini card / PCIe Mini or use an external USB adapter, which is also suitable for some media players and NAS.
For network storage torrent downloaders are suitable external USB drive or a flash drive (64 GB models are already quite affordable) connected to the router (it must have a USB port). A flash drive has the advantage that it does not require additional food, unlike the vast majority of USB hard drives (the built-in USB port in the router is very limited in terms of power provided), but it works slower. However, for most applications its speed is sufficient. You can organize a “rocking chair” in a media player or NAS, many of which support download mode, but this is less convenient, as it requires always on two devices instead of one.
Manual setting
For manual settings network in each of the devices connected to it, you need to set three parameters - the IP addresses of the device and gateway, and the subnet mask. Everyone probably knows that an IP address is unique number, with which you can transfer data to any of the network nodes.
There are two versions of the address - v.4 and v.6, consisting of 4 and 6 bytes, respectively. The 6-byte version is not supported by all devices, but it will be the dominant one in the future. For now, the usual 4-byte one will suffice for us.
Photo from the site hardnsoft.ru
Since the IP address is unique, it must not be the same between devices on the same network. This is an immutable rule, violation of which is fraught with either a complete failure of the network or permanent problems. Therefore, you will have to use your imagination and come up with four numbers from 0 to 255 for each of the devices. To make this difficult task even easier, there are certain rules.
Data in computer networks are transmitted using so-called packets or sets of bytes equipped with a header indicating the IP address or addresses of the destination nodes. Obviously, transmitting packets to all billions of computers on the Internet at once would make the work impossible, so the networks are divided into subnets smaller size, and IP packets for local computers must not leave the subnet. To simplify the transmission of packets, all nodes on the same network are assigned similar IP addresses: 1, 2 or 3 bytes are the same, the rest are different. The subnet mask will help determine the number of matching bytes. Units are written in the place of matching bits, and zeros are written in place of different bits.
Thus, the class C network mask 255.255.255.0 means that only 1 byte, the last one, can change, that is, there cannot be more than 256 nodes in this network (in fact, only 255, since the address x.x.x.255 is reserved for broadcast packets, delivered immediately to all network nodes). It is unlikely that you will have more devices, so it is advisable not to fantasize and use this particular format. Addresses from 192.168.0.0 to 192.168.255.255 are reserved for addressing nodes in a type C network. Considering that they can also be used in the local network of your Internet provider, and also taking into account the restrictions on the use of broadcast packets, it is reasonable to choose addresses from 192.168.0.0 to 192.168.0.254 or from 192.168.N.0 to 192.168 for home network nodes .N.254, where N is any number from 1 to 254 (but must be the same for all network addresses!), if the first specified range coincides with the provider’s network range. Let's leave the subnet mask as standard: 255.255.255.0.
And the last thing is the gateway address. A gateway is a network node through which all other nodes connect to the Internet. So for us this will be the address of the router (usually 192.168.0.1) or the always-on computer that we decided to use as it. When setting up the router itself as a gateway, we specify it (if it is connected directly to the provider’s network) or the address of the ADSL modem (if it is connected via a modem).
Photo from the site hardnsoft.ru
The story about IP addressing will be incomplete if we do not mention one more, “special” address - 127.0.0.1. It is used to indicate the so-called localhost, that is, the same computer from which the packet is sent. If you want to access files on the hard drive of the same computer you are currently working on through a browser, use the address 127.0.0.1, or localhost.
Photo from the site hardnsoft.ru
Automatic setup
Although manually setting up IP addresses is easy, there are ways to automate this process. The main one is the DHCP server. As a rule, it is already built into most routers. It is enough to activate this option in the settings, and all network nodes that support the DHCP client function will be able to obtain an IP address themselves: you just need to tell them “Obtain an IP address automatically.”
Photo from the site hardnsoft.ru
This can be convenient in some cases: for example, when friends often come to you with their laptops and you don’t want to go into their settings every time. In addition, some devices, such as smartphones and media players, do not allow you to configure the IP address manually and only accept the automatic option.
Although manually entering addresses also has its advantages - the network configuration becomes more predictable, and some programs strive to remember the IP address internally network resource, therefore, after changing it (which can happen at any time in auto mode), they happily report that “the resource is unavailable.”
Photo from the site hardnsoft.ru
Safety
Is it necessary? Many users do not pay due attention to security, which is partly facilitated by the policy of equipment manufacturers: in order to make the initial configuration of devices as easy as possible, all security systems are disabled by default. IN wired networks this is acceptable, since to achieve absolute security it is enough to disconnect your home network from the Internet, and then a possible attacker will have the only way penetrate your network - get inside the apartment and connect to your router.
Even when connected to the Internet, your internal resources are not visible from the outside: to ensure their visibility, you need to configure the function Port forwarding in the router (as they say, “forward ports”). Then, when accessing a local resource from an external network, the router will redirect the packet to the local network node where the the right resource(each type of resource has its own port number). Initially, Port forwarding is not configured at all, which allows you to be calm until you decide to become interested in this issue and configure the function yourself.
The situation is completely different with a wireless network. Since radio radiation spreads well even through walls, connecting to it is possible at some distance from your apartment. That is, an attacker living in a neighboring apartment or simply walking into the entrance (and sometimes sitting on a bench near the house) can easily connect to an unprotected (“open”) network. With the use of directional antennas this is possible even at a distance of several kilometers!
And don't say that you have nothing to hide. In the best case, attackers can simply steal your traffic (even if you have unlimited traffic, the speed will still drop), and in the worst case, they can commit some illegal action (say, steal passwords from a bank) by accessing the Internet through your network. And then the security service, having discovered the hack, will track the hacker's IP address, which will lead to - where do you think? - straight to you! And explaining that you have nothing to do with it will be quite problematic.
Therefore, using an open wireless network is not acceptable. There are three ways to protect data: authorization, encryption and packet filtering. Authorization is used to allow access to network resources only to those nodes that know the secret key. Encryption prevents possible interception of transmitted data by an attacker. Finally, packet filtering blocks network access to all but pre-defined users. You might think that authorization and filtering are similar; in fact, this is not so - node packets that have not passed filtering do not even reach the authorization stage.
But encryption and authorization are similar in that they are usually controlled by the same security standard. Modern routers and access points support following standards: WEP (aka Shared Key), WPA-Personal (sometimes referred to as WPA-PSK), WPA-Enterprise, WPA2-Personal and WPA2-Enterprise. It is better not to use everything except the last two due to insufficient security, and WEP encryption(sometimes controlled by separate settings) also leads to a noticeable drop in transmission speed.
However, the 802.11b network does not provide other options; the few WPA implementations from different manufacturers, as a rule, are incompatible with each other. And if there are such devices in your network, the entire network will operate in mode b, with all the ensuing consequences, including snail’s speed.
So it is extremely advisable to get rid of outdated devices that do not support 802.11g. In laptops this is usually possible by replacing the built-in Wi-Fi cards or application external USB adapter, and in PDAs... Old PDAs will have to be replaced entirely or not used at all on the network.
Now let's talk about the difference between Personal and Enterprise encryption options. The first of them uses the generation of access keys based on a password, which, of course, should be chosen as long as possible, using letters of different case, numbers and special characters. If you fail to connect one or more devices, you should try entering the key in hexadecimal form, which is provided in almost all devices.
Of the two key encryption options - TKIP and AES - it is recommended to choose the second, more secure one. The combination TKIP+AES option that is sometimes encountered seems redundant and can lead to problems. Enterprise encryption is more secure, but requires a special RADIUS server. Therefore, if you do not have the time and/or desire to set up such a server, it is advisable to limit yourself to the “personal” option, especially since WPA2-Personal provides a quite sufficient level of security - in conversations about hacking wireless networks, WEP or, less often, WPA is usually mentioned and almost never WPA2. The decrease in network performance when using WPA2 encryption is almost invisible.
For those who want to take their security level to the paranoid level, we can recommend enabling filtering by MAC addresses. MAC address is unique identifier devices, different for each wireless adapter, laptop or PDA. By adding the MAC addresses of your devices to the list, you can be sure that only they will be able to access the network, and activation hidden mode network (turning off Broadcast SSID) will not give an attacker even a reason to become interested in it. Additionally, you can activate the firewall (aka firewall) built into the router, leaving only the necessary ports open. In addition to protecting against port scanning, this is good against DoS (denial of service) attacks. You can also enable MAC filtering in the firewall, which will protect against unauthorized access through the wired network segment. Of course, this still won’t protect you from the attention of the mafia or intelligence services, but it will be several orders of magnitude more reliable than the lock on your front door.
Photo from the site hardnsoft.ru
The delights of high speeds
Appetite, as they say, comes with eating. It’s the same in building a network: having assembled and tested “at least some kind of network,” you immediately want “the same one, but faster.” Wide distribution of high-quality films of 30-40 GB each and other entertainment content requires impressive resources not only for storing it, but also for transmission. Therefore, if finances and availability allow available equipment, it makes sense to build a network immediately with a reserve for the future, that is, based on 802.11n.
True, expecting from this standard a threefold increase in speed compared to Fast Ethernet would, perhaps, be overly optimistic. As tests show (see the article “In the city of “n” in this issue of the magazine), the maximum that can be expected is to get very close to 100 Mb/s. Well, a fourfold increase in speed (compared to g) is also not bad. This will allow, for example, to transfer a gigabyte file in a couple of minutes or directly watch a Full HD movie from a network drive.
However, if you are just going to open the movie file with a player program, smooth browsing will only be possible if its size does not exceed one DVD disc. Due to possible dips in speed, which is almost inevitable with radio communications, on files larger size“plugs” may occur. If you want to watch movies this way, you will have to install a video streaming server, but this is a topic for a separate article.
To achieve even such relatively modest results in speed, you need to spend some time. First - on the selection of equipment. Since we nevertheless chose a router as the main element of the network (we will immediately discard the budget option - using a computer with a Wi-Fi card instead, since we decided to go for a walk), a lot depends on it.
The best choice would be to use a dual-band (2.4/5 GHz) device, since the 5-GHz band, due to its unoccupied nature, provides noticeably better connection stability (even if the average speed does not differ much from 2.4 GHz). This will allow applications critical to the quality of communication (such as video players) to be placed on the 5 GHz channel, and 2.4 GHz to be used to work with devices that are incompatible with the higher frequency channel.
If there are no strict requirements for connection stability, you can limit yourself to a single-band 2.4 GHz device (you shouldn’t buy a single-band 5 GHz router - it’s incompatible with most client adapters. However, I have never seen any). But you should pay attention to the company and model, otherwise there is a risk of disappointment. If you have a fast Internet channel connected via VPN or PPPoE, do not choose a model with weak processor, since it may not keep up with the speed of the channel.
For laptops, it is preferable to use the built-in card. Of course, a USB adapter is convenient and versatile, but due to its limited size, most dongles have an ineffective antenna, which has a detrimental effect on the quality of communication. The antenna built into the lid of the laptop is unrivaled here. Unfortunately, due to problems with certification in Russia, it can be difficult to purchase a built-in card, but this can be done without any problems abroad - through online stores. A wide variety of such cards allows you to choose an option suitable for price and characteristics for almost any laptop, and sometimes even with free shipping.
As for 802.11g devices, they, of course, will work on the n network in compatibility mode, but if this is not necessary, it is better to disable this mode. Now we’ll tell you in more detail how to configure 802.11n for maximum performance.
802.11n - squeeze out the last one
How to ensure stable work networks at high speed? To better understand all the intricacies of the settings, we’ll tell you a little about what reserves were used to increase the speed in 802.11n.
First, the modulation type was changed from direct sequence spread spectrum (DSSS) to orthogonal frequency division multiplexing (OFDM), increasing the speed from 54 to 65 Mbps. The “green field” mode made it possible to reduce the size of the introductory packet and thereby reduce the overhead costs of service information. And finally, combining packages (Frame Bursting) made it possible to reduce the required amount. Thus, the speed has increased slightly to 72.2 Mb/s. “Where is the promised 300 Mb/s?” - you ask, and I will answer that the laws of physics are unshakable, and 72 Mb / s is all that can be obtained in one standard channel communications.
A further increase in speed was achieved only by “brute force” - the number possible channels increased to four (the so-called MIMO, or multi-beam transceiver mode), and the frequency band in each channel was doubled. All this added up to a maximum speed of almost 600 Mb/s. However, there are no devices on the market with such bandwidth yet, since the number of channels in real devices limited to two. But this leaves the possibility special problems releasing them in the near future.
Now let's talk about how to use this magnificence. Often there are very few settings in the driver - only the channel number and frequency band. And it is precisely the second parameter that is not configured by default in the best possible way: set to 20 MHz instead of 40, which gives only half the speed! Of course, this needs to be fixed. It is advisable to choose the channel number experimentally - for the best quality of communication and the absence of interference with other devices. You can use “Auto” - the router will try to select the least loaded channel, and all adapters will adapt to it.
All other options listed previously must be enabled, otherwise speed will drop. Unfortunately, the use of “green field” and Frame Bursting leads to packet collisions when there are devices on the network that do not support them (and these are all 802.11g devices). It is also advisable to activate the WMM (Wi-Fi multimedia) mode - this will ensure more stable operation of streaming applications, such as VoIP, through the use of the QoS (Quality of Service) service. Enabling WMM mode in a router may be required for the operation of some adapters, which otherwise will refuse to work at high speed. The WMM No-Acknowledgement checkbox in the settings can add a little more speed, but cause an increase in the number of errors in conditions of strong interference.
In order for all the features of the 802.11n network to function, clients exchange information with each other about what exactly each of them can do. The 802.11d protocol is responsible for this. In his absence maximum speed will not be achieved, so it must be enabled. But it’s better not to use non-standard “improvers” like Afterburner: not only will they work only on those devices that are supported (and there are very few of them), but they will also only work in 802.11g mode, plus they impose a lot of other restrictions.
And finally - about the physical configuration of the network. “What could be the configuration? - you say. - Arranged the pieces of iron - and forward! But just this moment can significantly affect the quality of radio reception, and therefore the speed and stability of the channel. If, in the case of a single antenna, radio waves propagate from it uniformly in different sides, then in the case of two antennas (namely, two channels are used in modern n-standard routers), due to interference, the signal level can vary greatly. Try tilting or rotating one of them and see the results.
Setting the transmitter power to maximum (where it is possible to regulate it) is not the best best solution. Of course more powerful signal is guaranteed to “reach” to the farthest corners of your apartment, but it can drown out the response of the receiving device, and as a result, communication will be ineffective (the so-called near-field effect).
Attention should also be paid to the location of the devices. It is advisable to install the router higher, if possible at an equal distance from all reception points. This is especially critical in houses with reinforced concrete walls, since the internal reinforcement of such walls noticeably weakens the radio signal. In general, experiment and your efforts will be rewarded. At the planning stage, try to borrow equipment from friends for a while to figure out what and how. It is possible that you will need to inspect other devices in your apartment: for example, wireless mouse, operating at a frequency of 47 MHz, has a noticeably less impact on the operation of the Wi-Fi network than its sister based on Bluetooth technology.
Photo from the site hardnsoft.ru
Finally, we would like to thank the readers for the patience they needed to read the article to the end. As is easy to see, it contains the bare minimum of recommendations, and specific examples we tried to avoid. This was done deliberately, since specific implementations of certain parameters may differ from one manufacturer to another, but once you get the gist, it will not be difficult for you to determine which flag is responsible for required parameter. The most important idea that I would like to convey to the reader is that there is nothing complicated in creating wireless networks. Just do it and you will succeed!
500 - Internal Server Error
Hello. Recently responding to a comment on a blog, I promised to write an article about that how to set up a local network via a Wi-Fi router. And since I have TP-Link TL-WR841N installed, I will write instructions using this router as an example. Although in setting up a local network between computers, the router will practically not be configured, so even if you have a different Wi-Fi router, this article will be useful to you.
Local network, a useful thing. You can exchange files, you can play games, especially since setting up a network through a router is not very difficult. If you have two or more computers If they access the Internet through one router, then there is already a network between them. And it doesn’t matter how they connect, both via a network cable, Wi-Fi, or one via cable and the other via a wireless network. Let's get started with the setup process. I will write in order what we have and what needs to be configured. Let's go.
Setting up a local network via a Wi-Fi router
What we have:
- Wi-Fi router is connected to the Internet. Distributes IP and DNS automatically.
- Computer No. 1. operating room Windows system 7. Connected to the router via a network cable, the Internet is working.
- Computer No. 2. Operating system Windows 7. Connects to the router via wireless wifi networks, the Internet works.
Target:
Set up a local network between two (you may have more) computers. Share access to a specific folder or local drive. Get the ability to share files.
We work:
Before starting to set up the network on the computers, I decided to ping from one computer to another to see if there was a connection between them. Read more about ping. If you want to do this too, then you need to go to the router settings from one computer and see what IP address the router assigned to another computer on the network. I recently wrote an article about that, you can read it.
Well, I’ll quickly write how to do it. We type 192.168.1.1 (192.168.0.1) in the browser and go to the router settings. Go to the “DHCP” and “DHCP Clients List” tab, we see there the devices that are connected to the router. We look at the IP address that is assigned to the second computer with which we want to set up a local network.
Now we ping to it. Click “Start” and write in the search bar cmd, in the search results, run the utility “ cmd.exe“.

A window will appear in which we write the command ping “IP address of another computer” and press “Enter”. Let's look at the result, if you see that packets are being exchanged, then everything is fine, there is a network between the computers.

I think I’ll do another ping from a laptop that is connected via Wi-Fi, and I see that packets are not being transferred. And if the ping does not pass, then the network will not work. And then it started, for a long time I changed different settings until it dawned on me that I had installed ESET Smart Security , yeah! He completely checks the network.
If during setup or operation problems arise with network connection, then the first thing you need to do is check and disable antiviruses and firewalls. I also advise you to disable Windows Firewall.
I open the antivirus, go to the “Settings” tab, “Network”, select “Change mode network security computer" and celebrate “Allow sharing”. Click “Ok”, repeat the ping, everything works. Half the job is done, let's continue.
Setting up a local network
Now you need to check on each computer which workgroup they are connected to and give them a name. If the name has already been set, then it is better to change it by writing the word in English letters.
Right click on “My computer” and select “Properties”. Further “Additional settings” and go to the tab “Computer name”. Click the “Edit” button. Enter a new name and, if necessary, a group.
You need all the computers you want to connect to the network to work in the same group.
I had a registered group “WORKGROUP”, and I left it.
After making the settings, click “Ok” and restart the computer.

Let me remind you that we perform all actions on both computers.
We continue the setup, go to “Start”, "Control Panel", “Network and Sharing Center”.
Let's look at what network your network belongs to, what you need is “Home network”, if you have for example “Community Network” , then click on it and select “Home network”.
Now click on the right “Ready to Create”.

Click.
Select the items you want to share and click “Next”.
A window with a password will appear, just click “Finish”. In the window that appears, click .
We also need to disable the password request when accessing a computer on our local network. Scroll the page and find the item “Sharing with password protection”, select “Disable password protected sharing”. Then open the “General” tab, look for the same item, and disable the protection. Don't forget to press the button “Save changes”.
That's it, the network settings are complete. Restart both computers, or however many you have. For some reason, it then seemed to me that the Home Group could not have been set up, everything would have worked just like that, but oh well.
Let's see if our computers can see each other. Let's go to “My computer” and on the left click “Network”. Everything works for me, both my computer and laptop that are connected to the router via Wi-Fi are displayed. The network works the same way on a laptop.

If we go to a computer on the network, we will only get access to Shared folder. In order to open general access to, for example, the entire “D” drive, you need to make some more settings.
If you have different operating systems on your computer, say Windows XP and Windows 7, and you have problems setting up the network, then read the article.
Opening shared access to folders on the local network
Go to the folder, or to local disk, which you want to share and click the button at the top “Sharing”, “Advanced sharing settings...”.
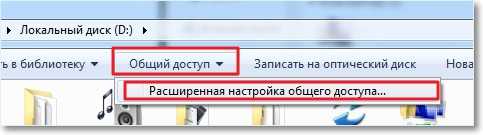 A window will open in which click “Advanced setup”. Check the box next to “Share this folder” and click “OK”. If you want, you can also specify the name of the share.

Now all devices connected to the network will be able to share access to this folder.
What we got. We have set up local network via Wi-Fi TP-Link router TL-WR841N. One computer is connected to the network via a network cable, the second via Wi-Fi. Basically, you can have more computers, and they can be connected in different ways.
How to connect an Android smartphone (tablet) to a local Wi-Fi network?
I was already thinking about finishing this article, but I decided to try connecting my HTC One V to the newly created network. To do this, I advise you to install the “ES Explorer” program. Really cool program. Launch it and go to the tab “Local network” (phone number must be ), click the “Search” button.
My smartphone found two of my computers on the local network, you can connect to them and go to the folders to which open access. I even started the movie on my phone from my computer, wow technology :).

Now that’s all for sure, well, it took a while to write this article :), I hope it’s useful to you. For some reason, I’m sure that many questions will arise about that article, ask, we’ll try to figure it out. Good luck friends!
Also on the site:
How to set up a local network via a Wi-Fi router? Detailed instructions at example TP-Link TL-WR841N updated: February 7, 2018 by: admin
The main purpose of the router is to create an access point to Internet resources. Router-router, performs the function connecting element to create a home local network, an on-router provides the ability to connect peripheral devices located at home or office to the Internet provider channel. A home network via a wifi router is very convenient, modern and practical!
Let's look in detail at how to create a home network via a wifi router, and also consider the advantages of working with a home local network.
Benefits of creating a local network
A local network is usually understood as a group of devices connected to each other using two types of networks:
- Wired type;
- Wireless type.
Classic type - connection via cable elements. Today, this approach can easily be supplanted by the router and wireless LAN.
Such a group of devices connected via LAN has advantages:
- Possibility of direct transmission of information arrays– data and files between separate devices groups. At the same time, there is no need to use physical storage media;
- Uninterrupted and permanent access to Internet resources;
- Creating a local network will also allow you to have access to all resources of any of the devices in the group. For example, it will be possible to easily carry out via a PC document printing located on a mobile gadget;
- A local network via a wifi router allows you to organize single playing space, which will be useful for fans of online games.
What you need to organize a local group
The task at hand - creating a network through the use of a router - will require certain equipment:
- Directly the router;
- A personal computer, which will serve as the center of all subsequent manipulations;
- Laptop or netbook;
- Tablet computer or smartphone;
- Printer
- Other devices that support data transfer via Wi-Fi
DHCP
Before you do and implement your plan, it is important to make sure that the server is available and active DHCP: the protocol will allow you to automatically set network parameters for all devices in the group. In the tab DHCP there is a subsection "DHCP Clients List" in it you will see all the devices connected to the router. Of course, you can do without deploying DHCP, but in the absence of automatic distribution of addresses, to connect to the router, you will have to set network parameters manually on each device.
Switch

Appearance of the D-Link switch
The router has ports on the side or back for connecting your devices. One of the ports is highlighted in color (usually yellow) and is intended for connecting an Internet provider cable; it is called the WAN port. LAN ports are intended for connecting devices. If there are not enough sockets to connect all your gadgets, you can purchase a special eight port switch. Then you connect the switch to the router, and then connect all your devices to the switch. Switches can be:
- Megabit;
- Gigabit (if you need more than high speed communication with disk).
Learn more about creating and configuring a local network
So, how is a home network created through a router? Let's present all the required actions in the form of a list:
Before carrying out all the necessary manipulations:

To set up your home network correctly, as well as for its proper functioning, you need to provide shared access to certain folders or disks - the network through the router must be open for access by one technical means to each other and vice versa. To do this, in the properties of an object - file, folder or disk - set general access and select the ability to write and read.
What's next: connection
Once the HomeGroup is ready, installed, and organized, it is recommended that you restart the central PC.
Now you can check whether everything was done properly. To do this, it is recommended that from another device of the created group, for example, a laptop connected to wi-fi, go to the “network management” menu and in the “home group” option connect to it.
Then, after entering security password and carrying out the manipulations described in the previous paragraph - opening access to disks and files, folders - rebooting the laptop. Communication between internal networks separate equipment should become available. In this case, the required “bridge” between the computer and the laptop is built correctly.
What you need to connect your tablet or smartphone to your HomeGroup
To connect to your home local group With tablet computer or smartphone (which should preferably be able to install applications and run on an operating system) Android systems), you will need to perform a number of actions:
Install the “ES Explorer” application on the device from which you plan to connect;
After installing the program, you need to connect to a wireless Wi-Fi network;
“ES Explorer” has an option (tab) LAN – access to your home local network. By accessing this tab, we initiate the search procedure;
The search result will display a list of computers available for connection;
By selecting any of the homegroups, you can safely access it and exchange data packets between your tablet or smartphone and your computer.
Checking connection and operation
To make sure the newly created home network is working, you can use two ways:
Refer to " network environment" If all of the devices required for connection are found in the list that opens, then everything is in order;
Use command line and the command “ping + device address”. We build a chain of checks according to this command. If satisfactory results are obtained and responses are received from each of the devices in the home or working group(depending on the previously specified settings) the process can be considered completed normally.
Summing up
A competently and correctly built local group and, subsequently, connection, has a number of advantages compared to cable analogues from the past: it is not only of high quality new level data transmission, but also convenience and practicality of use.
We figured out how to set up a local network, how to organize communication between all the equipment located in the group we created on central computer. The main nuances and subtleties of organizing this method of communication between home computers, regardless of their functionality, are also considered: both static all-in-one PCs and laptops, netbooks, smartphones and tablets can be connected. Access to shared data is open to any of the devices.
You, dear user, just have to carry out all the considered operations yourself and enjoy the technology and all the benefits of your new local group connected wirelessly.


