Not included in the tp link router. How to find out the IP address of a router using the command line
LDS.ua Network User's Guide
Setting up TP-link - Option 2
1. Preliminary data.
Before directly connecting and setting up the router, you must go to your Personal Account and write down your current "MAC address".
Please note that the MAC address can only contain the numbers 0, 1, 2, 3, 4, 5, 6, 7, 8, 9 and the letters of the Latin alphabet a, b, c, d, e, f
2. Correct connection.
There are five connectors on the back of the router. Four of them are signed LAN, one is WAN (Internet). For proper operation of the device, you need to connect an Internet cable to the WAN port, and with another wire connect one of the LAN ports to the connector of the network card of your computer, from which subsequent configuration will be carried out.

3. Enter the router settings.
We launch any browser, where we enter http://192.168.1.1 in the address bar (the option http://192.168.0.1 is possible) and press the key "Enter". In the window that appears, in the fields "User Name" And "Password" enter admin and press the key "OK"

4. Connection setup.
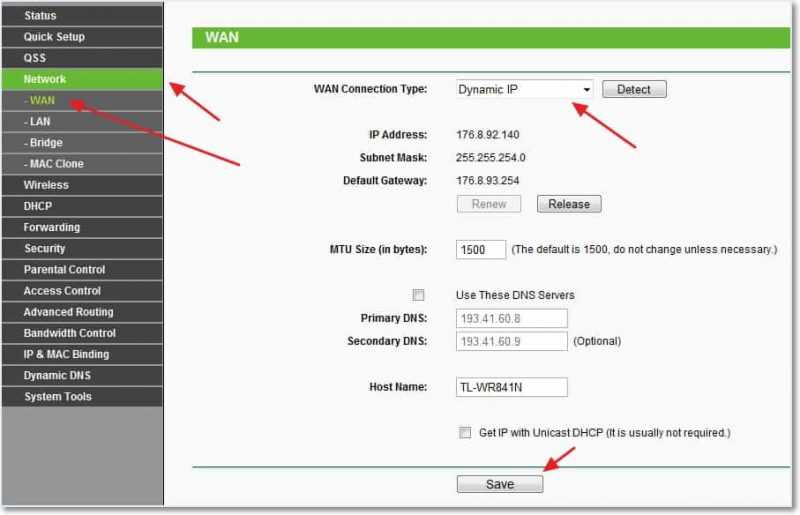
You must select a section "Network", further "WAN".
In the window that opens, fill in the fields:
WAN Connection Type: PPPoE/Russia PPPoE;
Username: Your LDS user login;
Password: Your password;
WAN Connection mode: Check the Connect Automatically checkbox.

And finally, save the settings "Save".
After that we go to "MAS Clone" and press the button "Clone MAC Address".
If an address appears in the MAC Address field that does not match what you wrote down from your statistics, correct it manually.
We complete the setup with the button "Save".

5. Configuring Wi-Fi connection parameters.
Now let's set up a WiFi connection. Select the “Wireless” item, and then click the “Wireless Settings” button.

Fill in the fields:
Wireless Network Name: Let's come up with a name for the WiFi network;
Region: Ukraine;
Channel: Auto;
And press the button "Save". Then we move on to "Wireless Security"

Fill in the fields:
Checkbox WPA/WPA2 - Personal
Version: Automatic
Encryption: AES
PSK Password: Wi-Fi network password
And to complete the settings, press the button "Save".
6.Software download.
Updating the router software is not a mandatory procedure for setting it up, but it is advisable to perform this procedure, because otherwise, correct operation is not guaranteed. A software update can solve problems with previous software versions and improve the current operation of the device.
Before you start updating, you need to determine the hardware version (revision) of the router and download the software from the manufacturer’s website. To do this, look at the bottom of the router case, where we look for the line H/W Ver.:

Go to https://www.tp-link.com/ru/download-center.html. and select the model of your router. In the page that opens, select the hardware version of the router (Ver.) in accordance with the revision of your router.
If there is a current software version for this model, the option will appear "Firmware", in the section of which you can download the archive we are interested in.

In this example, the software file will be archived (zip). After extracting from the archive, we get a file with the extension bin.
7.Software update.
We log in to manage the router, in the window that opens, go to the section "System Tools", then click "Firmware Upgrade". In a new window using a copy "review" we find the file with the software that was previously downloaded, and then click "Upgrade". After updating the software, the router will automatically reboot.
Do not unplug the power cord during the update.

Hello dear friends. Nowadays, unlimited Internet will not surprise anyone, as well as its high speed. People are massively buying tablets, laptops and smartphones that have a built-in Wi-Fi module that allows them to use wireless Internet throughout the home. And some people just want to get rid of wires throughout the apartment. In both cases, Wi-Fi routers came to the rescue, making it easy to distribute the Internet throughout the house. We'll talk about this further.
Of course, I decided a little late to get a Wi-Fi router. So again, an article from my own experience. I will write about that today how to connect and configure Wi-Fi router TP-Link TL-WR841N (this is the router I bought for myself). Also set a password for the Wi-Fi network so that the neighbors don’t steal the Internet :).
Before I move on to writing the instructions, I’ll draw your attention to a question that probably worries a lot of people who have thought about installing a Wi-Fi router. This is about the harmfulness of Wi-Fi, I wrote an article about it, you can read it. And one more thing, you ask (what is there to ask, if you are reading this article, you have probably already bought a router) why did I choose the TP-Link TL-WR841N router? According to my observations, this is the best option for this price; I paid 300 UAH for it. (1200 rubles). This is not an expensive router that can provide a full-fledged Wi-Fi network for the home.
I’ve already written a lot of unnecessary text, but I only promised instructions with pictures :)
1. You brought the router home or to the office, it doesn’t matter, we open the box and find a lot of pieces of paper there, a disk with instructions and a wizard for setting up the router. Also included, of course, is the router itself, if not, then you were deceived :), a network cable for connecting it to the computer and a power supply, that’s all.
 2.
We connect the router to the computer. Everything is very simple here. We place the router not far from the computer, it’s just that the cable included in the kit is not very long, if necessary, you can crimp more cables (you can even do this yourself, in more detail). This can be done in almost any computer store.
2.
We connect the router to the computer. Everything is very simple here. We place the router not far from the computer, it’s just that the cable included in the kit is not very long, if necessary, you can crimp more cables (you can even do this yourself, in more detail). This can be done in almost any computer store.
We connect power to the router and plug it into an outlet. Then we connect the WAN Internet cable to the blue socket. The TP-Link TL-WR841N router has 4 LAN ports, which means you can connect 4 computers via a network cable. We connect the computer to the router using the cable that comes with the kit. Here are the pictures:
 Let's quickly go through the buttons and connectors:
- On/off button.
- Power cable.
- WAN connector for connecting to the Internet.
- LAN connector for connecting the router to a computer via a network cable.
- Enabling the feature.
- Button to reset the router settings.

That's all, our router is connected. Let's now move on to the setup.
Setting up the TP-Link TL-WR841N router
Before you start setting up, I recommend doing .
To configure the router, open any browser and write 192.168.0.1 in the address bar, usually 192.168.1.1 goes through, but I was able to access the settings only through 192.168.0.1. Only after configuring the firmware update do I get access to the settings via 192.168.1.1.
A window will appear in which you need to enter your login and password to access the router settings. By default, the login is admin and the password is admin.
If the router does not accept the password and login by default, then see the article for possible solutions to this problem.

We get to the settings page.
Let's first update the firmware on our TP-Link TL-WR841N. To do this, you first need to download it from the website tp-linkru.com. We find it for our model and download the latest version. Unzip the firmware file to your computer and return to configuration.
Go to the “System Tools” menu and select “Firmware Upgrade”. Then click “Browse”, select the file we downloaded and click “Upgrade”. We are waiting for the router to update the firmware and reboot.
More detailed instructions for updating the firmware on the router -

Let's continue with the setup. Let's change the login and password to enter the router settings. Go to the “System Tools” tab, and then “Password”. fill in all fields and click “Save”.
Go to “Network” and “WAN”. Here you need to select the network type. If you don’t know what to install, call and ask your provider. You can also look at a detailed article on setting up a router to work with your provider -

Setting up a Wi-Fi network on TP-Link TL-WR841N
Go to the “Wireless” tab and configure the following parameters. In the “Wireless Network Name” field, enter the name of your Wi-Fi network. Below you can select the region where you live.
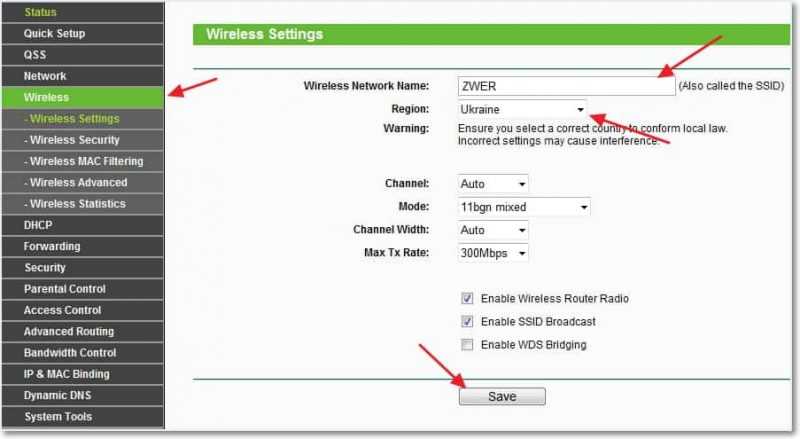
Don’t forget to click “Save” and go to the “Wireless Security” tab. This is the most important page, where we will configure the security settings of our Wi-Fi network.
For more information about setting a password for a wireless network, see

We set everything up as I have in the screenshot above. In the PSK Password field, create and enter a password that will be used to connect to your Wi-Fi network.
We save our settings with the “Save” button. The setup is complete, let's now reboot our router. To do this, go to the “System Tools” tab, and then “Reboot”. Click on the “Reboot” button and confirm the reboot.

That's all, we have just installed and configured a Wi-Fi router. As you can see, there is nothing complicated here and you can do without calling a specialist. If you have any questions, ask them in the comments. Good luck friends!
Also on the site:
How to connect and configure the TP-Link TL-WR841N Wi-Fi router? Instructions with pictures. updated: February 7, 2018 by: admin
In fact, going into the settings of a TP-Link router is quite simple, since a good interface creates convenience for the average user who has never dealt with such things. And the login and configuration algorithm is very similar to other routers.
A large number of people prefer this brand. It’s clear why, because, firstly, almost all the company’s models have the same type of settings. Secondly, as already mentioned, a simple interface, which makes setting it up yourself easy, and after reading the article - in general there will be no questions left.
How to enter the manufacturer's TP-Link router settings
- Connect the power adapter to a socket with a voltage of 220 V. We insert the other end of the wire into the appropriate power connector (usually it is located next to the power button). Turn on the router.
- Connect the device to the computer (the network cable included in the package will help with this). If you previously used a modem, you first need to disconnect the cable from the computer, insert it into the blue WAN connector and turn it on again. Then connect the cable (patch cord) included to the computer, and the other end to any yellow LAN connector. If, when connecting a PC to the network, you are asked for an SSID and password, you can look at it on the sticker at the bottom of the router.
- Next we enter the network and sharing control center. In the sidebar on the left (left menu) go to the item “Change adapter settings”. Next, right-click on our connection and select properties. Go to the item “Internet Protocol...”. In the window that opens, change the initial values to “Obtain I.P. address automatically” and “Obtain automatically”. After this, with the help of DHCP, the router will distribute IP addresses. Next you need to go to “Protocol Properties”. If any DNS servers are written there, then write them down on a piece of paper so as not to lose them.
- We go to the browser (Google Chrome, Opera, Yandex Browser or Safari is recommended. Internet Explorer does not always support the TP-LINK settings page) to the device’s website at the address indicated on the bottom of the device itself. For TP-Link, these are IP addresses 192.168.0.1 and 192.168.1.1, or the tplinkwifi host address. net, which is universal for any models of this manufacturer. You must enter one of the proposed options in the address bar. By the way, it is most convenient to do this from a computer or laptop. Also, you cannot log in from two gadgets at the same time.
- Log in. Next, you need to log in to the site. The default username and password are admin admin. If this combination does not work, then, as in the case of the IP address, you need to look at the bottom of the device. It is recommended to change your password later to avoid trouble.
Great, you're in in the router settings panel TP-LINK and ended up in your personal account. The interface looks like a black and green page with a side bar on the left, which contains everything you need to configure. In order to launch the quick setup, you need to click on the second menu item from the top and fill in the required fields.
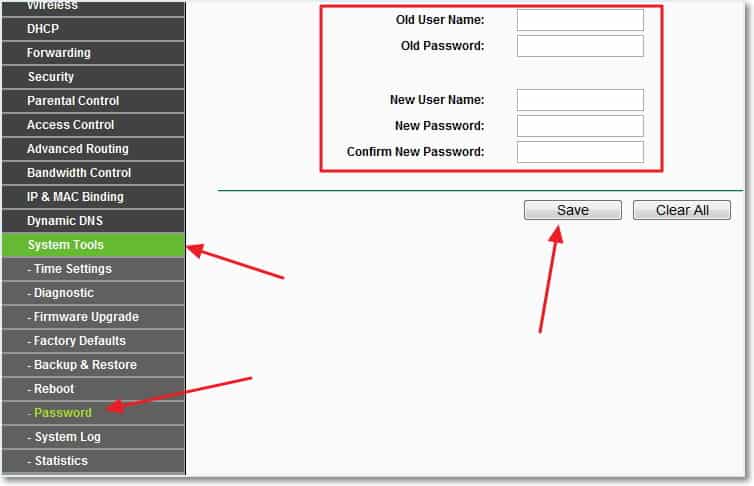
By the way, about changing the password
 This is a rather important procedure, because anyone who connects to the network can enter the router setup menu. So if your network is not password protected, then your neighbor can change all factory settings and put your username/password. In this case, only a reset will help. Therefore, to prevent this from happening, you should change the standard password immediately. It's easy to do:
Go to the tab System Tools, further in Password.
Old User Name- in this field we write admin or previous login.
Old Password- enter admin or previous password.
New User Name- We come up with any desired login.
New Password- write any desired password, we recommend a reliable one that is difficult to guess.
Confirm New Password- type the same as in the previous field, thereby confirming the password and your desire to change it.
A little more about the menu
 This article discusses the menu using the TL-WR841N model as an example, but in general the TP-LINK router interface is the same for all models.
Status - shows the current state of the network as a whole. Quick Setup - launch quick setup. Network - network. Wireless - wireless network. Forwarding - redirection. Security - security. Parental Control - parental control. Access Control - access control. Static Routing - advanced routing settings. Bandwidth Control - bandwidth control. IP & MAC Binding - binding of I.P. and MAC addresses. Dynamic DNS - DNS is dynamic. System Tools - as you might guess, tools.
If the settings according to the instructions do not help, and the router still does not want to work, then you can reset the settings to factory settings and try again from the very beginning. If it is suddenly really needed, then we perform the following algorithm:
- On the back, next to the WAN and LAN ports, there is a Reset button. You need to hold it for half a minute. After this, the basic settings will be set.
- When you log into the router’s website, we launch the quick setup and do everything again according to the instructions indicated above.
A standard question that novice users ask is how to go into the settings of the TP-Link router, which they are trying to connect and configure themselves. Their main mistake is that they consider the router to be a peripheral device of the computer and it should be displayed in the device manager. This is an incorrect judgment.
The fact is that a modern WiFi router is a separate network device that has its own processor, memory and operating system. Accordingly, it will not be possible to access the settings of the TP-Link router through the Windows Device Manager. In fact, everything here is quite simple. Simply follow the steps below.
How to find out the IP address of a router
The first step you need to start with is to find out what IP address your TP-Link router has. To do this, it is usually enough to simply turn it upside down and see what is written on the sticker:
As you can see in the example above, the IP address of the router on the local network is 192.168.1.1 . Sometimes, some models of TP-Link routers use IP.
Recently, on modern models of TP-Link routers, instead of an IP address, the domain name of the device on the network is indicated.

Usually this tplinkwifi.net, tplinklogin.net or tplinkmodem.net. This is very confusing for beginners, as they believe that this is the address of the manufacturer’s official website. But in fact, this is the domain name of the TP-Link Wi-Fi router, which was made specifically to make life easier for the user due to the fact that even the same model of modem or router, but with different firmware, may have different IP addresses.
Note: Pay attention to the contents of the fields Username And Password. This data will also be useful if you need to go into the settings of your TP-Link router. After setup, it is advisable to change the password to a more complex one for security purposes.
Access to TP-Link router settings
We have found out the address of the device on the local network. We also know the login and password to access the web configurator. Now, to go into the settings of your TP-Link router, you must first connect it with a cable to your computer or laptop. You can, of course, connect via WiFi, but to do this you need to know the Wi-Fi password.
Then launch the Internet Explorer, Microsoft Edge or Google Chrome web browser and in the address bar enter the IP address of the TP-Link router, which is indicated on the sticker:

Accordingly, if the domain name is indicated on the sticker tplinkwifi.net or tplinklogin.net- you can write exactly this in the address bar:

If there are no problems with accessing the settings of the TP-Link router, then the next step will be an authorization window where you need to enter your username and password to enter the web interface.
If you are setting up a TP-Link router for the first time after purchase or after resetting it with the reset button, then enter the password from the sticker (usually admin).
On the most modern models, an automatic request will then appear to change the factory password “admin” to another, more complex one:

In the future, be sure to take into account the fact that the factory password has been changed and using it you will not be able to enter the router configuration interface.
Setting up a TP-Link router via phone
If necessary, you can go into the settings of the TP-Link router from a mobile phone or tablet connected to it via WiFi. Everything is done exactly the same as on a regular PC: launch a web browser and enter the router address. The same web interface will open, but in a mobile format, oriented towards a small screen.
Another very convenient tool for setting up a TP-Link router via phone and tablet is this application TP-Link Tether. It is available in the Android and Apple iOS app stores.

The application for Wi-Fi routers TP-Link Tether provides a simple and intuitive user interface designed for a miniature mobile device. Despite this, it provides the same router configuration options as a full-fledged web interface. Moreover, due to the built-in support for DLNA technology, the application allows you to watch videos on your smartphone and listen to music from a flash drive or portable drive connected to the router.

Among the interesting features of the Tether program is an interactive map of clients, where you can find out who is connected to the router and from what devices.
If you have several TP-Link modems or routers on your network, then you can create a separate profile for each of them. Moreover, almost all modern models are supported.
Wireless networks – the ability to conveniently connect to the Internet without additional cable installation. A router (or router) is a compact substation, the main task of which is to transmit the signal received from the network to connected devices.
Unfortunately, even modern technologies fail. But even when your device is working properly, you may need to, for example, change the password or wireless network name. In all of the above cases, you will need to go into the router settings and perform certain actions. The TP link router control panel is located at 192.168.1.1 or 192.168.0.1.
TP link settings: using a personal computer
- Using a network cable, establish a connection to the computer router. To do this, connect one end of the cord to a personal device, and the other to the router. To connect to the router, use any of the LAN connectors (yellow outputs).
- Specify the address specifically for your router. To do this, turn the device over and on the back left side find the IP line and look at the next combination of numbers. In some device models, instead of the usual numbers, the domain address tplinklogin.net or tplinkwifi.net is written. Then remember this address.
- Open any browser on your PC and enter the IP address (or domain) data in the search bar.
- Press Enter.
- A window will appear in which you must enter your username and password. Again, look at this information on your router. It is listed below the IP address (or domain). Standard data “admin” and “admin”. If you have previously changed the login information for the router settings, then enter the already changed information.
- Press Enter (or “Login”) again.
- The required settings will appear in front of you.
TP link settings: use wireless Wi-Fi network
This method will help if you need to get into the control panel of the router, but there is neither a power cord nor a computer. Important note: When working with device settings via Wi-Fi, do not update the software, otherwise you risk breaking the device. The router firmware is carried out only using a cable connection.
- On the back of the router you will find the connection information IP address, login and password.
- Next, launch the browser on any gadget (phone, tablet, laptop) connected to the router via a Wi-Fi connection.
- Enter IP addresses (or domain address) into the search bar.
- You are making the transition.
- In the window that appears, fill in the “Login” and “Password” fields. To do this, enter the appropriate data for your router (standard “admin” and “admin”).
- Click “Login”.
- If everything was done correctly, a page of the required settings will open in front of you.

TP link settings: possible problems
In some cases, performing the steps listed above does not bring the desired result. What are the possible causes of failures?
It is not possible to open the page
After specifying the IP address and attempting to navigate, a message appears on the screen that the browser cannot display the page. In this case it is necessary:
- Check the Internet connection. The status bar on your computer (or mobile device) should show an Internet connection icon.
- Check the network settings on the PC or other gadget with which you are trying to access the router settings.
- When establishing a wired connection, check the integrity of the cable. If possible, try connecting via Wi-Fi.
- If both Wi-Fi and a network cable connection are active on your computer, disable one of the communication methods.
- You shouldn’t rule out a possible breakdown of the router itself.
- If the above steps do not give the desired result, try resetting the router to factory settings (press and hold the Reset button on the back of the router for about 10 seconds).

Incorrect login and password
An error may also occur at the stage of entering your login and password (or entering this information does not lead to any further events). In this case:
- Try different login options. If you changed the data, enter the new information, not the standard data. Leave both fields blank and try to login. Leave the “Password” line blank or try entering the combination 1234 in it.
- Change your browser.
- If the steps are unsuccessful, you will most likely have to perform a factory reset (as described above).


