Why can't I connect my laptop to wifi? What to do if your laptop does not connect to the Wi-Fi network
Have you ever seen a situation where your laptop does not connect to the Wi-Fi network? Then you've come across to the right address. The purpose of the article is to understand the most common connection errors, identify the malfunction and correctly reconfigure the equipment.
Most often, the problem is encountered by users who have reinstalled the system, updated drivers and software, or installed third party applications like a firewall, antivirus and something like “Anti-malware” (a utility for cleaning your PC from spy files). Yes, there are other situations, but first things first.
We want to analyze the following situations:
- no connection (red cross on icon wireless network);
- the laptop does not see a specific network;
- the network is visible, but connection is limited or impossible;
- The connection is successful, but the sites do not load.
Turn on the Wi-Fi module
If you think that the wireless network is turned on by default, then you are mistaken. Some manufacturers, in order to reduce power consumption, programmatically turn off the function. Let's say right away that further actions will only be successful on a “clean” system that was originally installed by the manufacturer. Those. all drivers, programs and utilities work in normal mode and have not been changed to similar products with the same functionality.
Let's start with the basics - hardware switch(which is now only found on older models) and keyboard shortcuts.
In the first case, we look for a special lever on the ends of the case or side walls, next to which there is a “Wi-Fi” icon (antenna with schematic waves). Switch to the active position and the problem is solved.
On modern models available separate button on the keyboard (usually additional), or activation occurs with a keyboard shortcut Fn And F1-F12(look for the one with an antenna or an airplane on it). Press both and watch what is happening in the lower right corner of the monitor. 
WITH function keys It's not that simple. On the system in mandatory All programs and components from the manufacturer must be installed, otherwise the button simply will not work. Driver packs, unofficial builds like Zver and Ovgorsky won't help.
You can try the following. Go to the official website of the laptop manufacturer and download necessary components with the following name:
- Lenovo – Energy Management;
- ASUS – ATKACPI driver and hotkey-related utilities;
- HP - HP UEFI Support Environment, HP Software Framework.
There are also special forums where you can clarify the necessary software.
Launching a wireless network on different versions of Windows
If the laptop does not connect to Wi-Fi, then the module may be disabled by software. For Windows 7,8 and 10, the inclusion algorithm is different, so we will consider all options.
Windows 7
In this OS you need to go to the “Network Control Center...”. Click right click mouse over the network icon and select desired item menu. 
The second way is to press the combination Win+R on the keyboard and enter the command " ncpa.cpl" This method is even simpler. 
Here we need the wireless network icon. He must be gray(inactive). Right-click on it and select the “Enable” command. 
By the way, the icon may not appear. In this case, you need to reinstall the driver, but more on that below.
Windows 8
“Eight”, although not a bad OS, has its own shortcomings. It's difficult to adapt after Win7. For Wi-Fi activation you need to go into the settings and make sure that the network is really turned on. 
Windows 10
In the latest OS from Microsoft problems should not arise. To begin, click on the network connection icon (as in Win7) in the lower right corner of the monitor. Then make sure that “Wi-Fi” is activated, but “Airplane” mode is not. 
The second option is through the parameters, which is more typical for Win8. Go to “Settings”, then “Network and Internet”, and then “Wi-Fi”. 
Additionally, if standard options don't help, read official instructions on the Microsoft website.
For all versions
The options described above are not a panacea. Additionally, try running proprietary utilities from laptop manufacturers, which should be included in the kit. In the vast majority of cases, you can find “Wi-Fi” or “Wireless” in the name. The interface will allow you to quickly switch the adapter to the active position. The program is located in the "Start - All Programs" path.
And a little more about drivers. If Windows has just been installed, and all drivers were installed in automatic mode or a “driver pack” from a disk/flash drive, then additionally take a look at the official website of the laptop and download the necessary components. In 90% of cases this will solve the problem.
Wi-Fi is on, but I can't see the network
The first problem was dealt with, but it turned into another: you cannot connect to home network- she is not visible. The lion's share of such cases is not necessary drivers. The system is new, the viruses worked, the children played pranks and accidentally deleted it - it doesn’t matter. The problem needs to be solved. There are 4 approximate scenarios:
- after installing the system, everything “tightened up” automatically;
- you install individual components who did not immediately decide;
- use of driver packs;
- something was undecided, and you did not attach importance to it.
In all Wi-Fi cases may not work, although the manager says “the device is working normally.” In the latter, the system may not even know about the device, although it physically exists and works correctly. In all cases, only the official website of the manufacturer can save you. Look for your laptop model and download for the desired OS.
To find out current version“firewood”, press the Win+R combination and enter the command “ devmgmt.msc» 
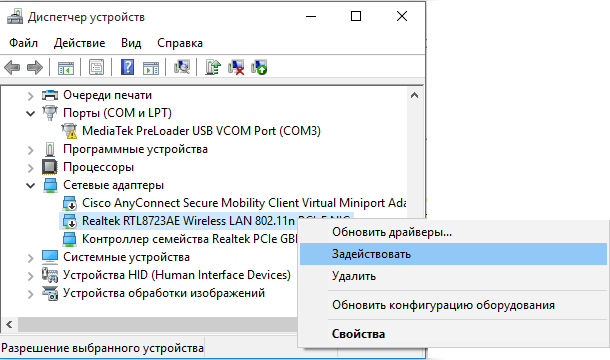
You will be taken to Device Manager. Here we are looking for a subgroup " network adapters", open it and look for devices that have “Wi-Fi” or “Wireless” in their names. Right-click on the item and open Properties. 
In this section we look for the “Driver” tab. We pay special attention to the highlighted lines in the screenshot. 
If the supplier is Microsoft (and not Intel, as in in this case) and the update date is very different from the current one - go to the official website for new ones.
It’s funny, but in Windows 10 the situation may be the opposite: fresh “firewood” is deliberately replaced by the system with obviously more outdated ones. In this case, it is worth “rolling back” the version to the previous one, and then prohibiting all updates.

Finally, you may have to re-enable the wireless module.
Additional reasons and their solutions
The situation can be resolved in more unconventional ways. The most common case is a change in network settings, or the inability to select a specific standard and Wi-Fi channel. Try this:
- change the channel on the router, selecting a specific one, not “auto”;
- adjust the frequency and network type according to the router specifications;
- make sure that the password does not contain Cyrillic;
- try changing the region to USA.
The laptop is connected, but the sites still do not open
If you have connected everything that is required, checked the connection, but the pages do not load, then there is a problem with the router settings. To get started, you should do the following:
- see if the Internet works on the PC (if available);
- connect your smartphone/tablet/console/TV and other devices with wireless access.
Below is a more detailed picture. It is quite possible that the router settings have been reset to factory settings, so you will have to manually (if there is no disk with the provider settings) return the required configuration. I would like to say right away that you should look for information exclusively from the provider, who will describe the procedure in detail and step by step, based on your specific model router.
But if only Internet pages do not open, but Skype and some other programs work properly, then we dig deeper:
- look at the register;
- getting rid of viruses;
- we clean the static routes of the router;
- check the “Hosts” file.
Registry
Press the familiar Win+R combination and enter the command “ regedit" And then we follow this section.
We are looking for a file called " AppInit_DLLs" Its value must be zero (empty column). If there is any value, right-click and reset it to zero. Next, go to the root directory and do the same steps along the path below.
Reboot and see the result.
Viruses
Everything is simple here. Install a good antivirus and additionally “trailer” Dr.Web CureIt latest version. We check and try to find something. Doesn't work? Then try Anti-Malware from Malwarebytes. It has a slightly different algorithm for searching for modified files and false routing paths, but the effect is there, and quite noticeable.
Cleaning routes
To update static routes Router should call the command “ CMD"via Win+R. Will open command line. Here you should write the value “ route -f"(the space before "-f" is required). Press Enter and reboot the router. 
If you previously prescribed something manually, you will have to repeat the operation again.
Hosts
Another “root of evil” in the system, which is poorly monitored by users, installing various software, not paying attention to additional checkboxes and ticks. It can be treated simply. We follow the following path on our laptop.
Open the document " hosts"(using notepad) and scroll down the document. It should end with lines like this. 
We don’t need everything that is written below, unless you first manually entered the addresses of gateways and servers for specific tasks, or did not install “broken” software (which is very bad). Clear, save and reboot.
Results
Yes, there are many more ways to revive Wi-Fi and make it work, but we have looked at those that a beginner who has not previously encountered reverse side operation of your system. Why call a specialist if you can do everything yourself in a few clicks. Be careful.
Almost every day visitors to our service center ask a question: Why does a laptop or PC see a Wi-Fi network in the list of available ones, but does not connect to the router (access point). Today we will tell you why this can happen and how to solve this problem. After all, a laptop without the Internet is a useless thing. What to do with it then? It's not like playing chess. So, let's go.
Why can't my computer connect to the Wi-Fi network? After all, he sees her!
Reason #0 - the user enters the wrong security key (i.e. Wi-Fi password). Therefore, first, make sure that you are entering a valid password. It is best to set a key of 10 digits and you will definitely not confuse the language layout.
1. Weak Wi-Fi signal
Most often the problem is that at Wi-Fi transmitter your laptop doesn't have enough power in order for the signal to reach the router antenna. But at the same time, the wireless receiver catches the router’s network because The router often has a more powerful radio transmitter.
In other words, we can say this: the client device “sees” the router’s signal, but the router no longer “sees” weak signal client. Therefore, at first glance, we get an absurd situation when a laptop sees the network, but does not connect to it.
Solution: This is not a malfunction. The solution is to reduce the distance between the client and the router. In large houses, it is recommended to place routers and access points in the middle of the territory or use them to connect to the Internet.
If you are sure that this is not your case, read on.
2. The MAC address filter is enabled in the router settings
If this Wi-Fi the network belongs to you, or an access point, and add the MAC address of the device (which finds the Wi-Fi network, but does not connect) to the allowed list:

If the network and router are not yours, ask your administrator to set up Wi-Fi and Internet access for your computer or laptop, if possible.
3. The router is set to 802.11 mode, which the client device does not support
If in the settings Wi-Fi networks router you have set the standard 802.11n only, then only those laptops that support the N standard will be able to connect to the wireless network. Most often, these are new smartphones, laptops and tablets. In order for older devices to also be able to connect to the router and access the Internet, set the mode in the settings 11bgn mixed(mixed):

4. Wi-Fi adapter driver does not work correctly
This case is not very common, but still occurs. Last time I came across something similar on Asus laptop your friend. It was like this: the laptop officially supported only Windows 8.1, but the store sold it to the person and installed it licensed Windows 10. When the manager went to the manufacturer’s official website and realized that there were no drivers for the “top ten”, he manually installed it on the laptop WiFi driver from Windows 8. This is where the problem we are talking about today appeared - the laptop detects all the Wi-Fi networks around, but connects every once in a while and the connection constantly drops. Internet access. If you have any questions, ask them in the comments.
Today we will look at:
Very often we encounter such a problem as lack of access to Wi-Fi. This problem mainly occurs in the operating room. Windows system. What is the reason, and what will be the solution to the problem? This is what we will now try to find out.
So, there are several reasons why a laptop cannot connect to Wi-Fi. Problems with the settings of the laptop itself, outdated drivers. Let's take a closer look at these reasons and find ways to fix the problem.
No wireless adapter connected
The problem is the lack of a connected wireless adapter on the laptop itself. In each laptop model, manufacturers install an on or off button on the F keys Wi-Fi adapter. Look at your keyboard and look for the Wi-Fi symbol, usually located at F5, F10 or F12.
Next, we find the Fn function button and simultaneously press Fn and F12 several times (You press the key where wifi icon), let's see what's happening, whether there are any changes. Sometimes it happens that Fn is not active because there is no installed drivers, if the laptop does not react at all when you press F12 and Fn, then check the Fn key by increasing or decreasing the volume.
In addition to the adapter, you need to check in the network connection settings whether the network card is connected.


Didn't help? So, we do the following:

Drivers not installed
This problem mainly occurs when Windows is suspended on a laptop.
If a non-professional installed the system, he might not have installed it, which led to Wi-Fi being turned off.
To check this, you need to do a few simple manipulations:
Using Win+R, go to the “Run” window, give the command devmgmt.msc, and select the name of your router from the list. If there are no drivers, then instead of the router name the standard “Ethernet controller” will be indicated.

So, in the list, instead of the name of the router, we found “Ethernet controller”. There are two ways to solve the problem:


True, for this you also need to download the driver from the official website, but you do not need to install it. In Device Manager, right-click on the name of the adapter and then select the “Update drivers” command. Then restart the laptop and check if Wi-Fi is connected.
Troubleshoot connection problems

Click on “Properties”, a list appears in the newly opened window, in which we find the item: IP version 4 (TCP/IPv4) double-click on it with LMB, the window with DNS settings and IP address parameters.

Here, be sure to check the box next to “Use the following IP address.” We specify the parameters exactly as in the example, click OK, and check.
Disabled WLAN services
If all of the above methods do not help, the last thing you can do is check the WLAN auto-configuration service. Of course, shutdowns happen extremely rarely, but everything happens at some point, and checking it won’t hurt. So, press the combination Win+R that is already familiar to us, enter the command services.msc and click OK.
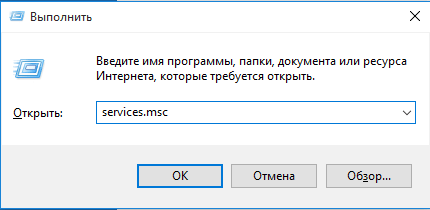
In the window that appears, we find: “WLAN AutoConfig Services”, right-click on it, and in the drop-down window, execute the “Run” command.
In this article we will look at a situation that many users face. You click on the wireless networks icon in the lower right corner of the desktop, select the desired network from the list, click Connect, but instead of accessing the Internet, an error appears: “Windows could not connect to...”.
There may be several reasons why this window may appear. We will look at some of them in this article, and we will figure out why Wi-Fi may not connect to a laptop.
Network diagnostics
Let's start with the settings in operating system.
We will perform network diagnostics. Click on the wireless network icon in the tray, select the one you need and click “Connect”. Enter the password if it is protected.

When an error window appears, click on the button in it "Troubleshooting". Windows will search for problems and offer solutions. Just follow the recommendations. In some cases, this helps, and the laptop successfully connects to Wi-Fi.

New network connection
If the laptop still does not connect to Wi-Fi, then we will delete the network we want to connect to and connect again. This may help if you or someone else has recently changed their network password. The laptop has other settings saved that do not match the current ones, which is why it does not connect to Wi-Fi.
Right-click on the network icon and select "Network Control Center and shared access» .


In the list, select the network to which the laptop cannot connect, right-click on it and select “Delete network”.

After this, click on the network icon in the tray again and connect to the desired network Wi-Fi. You may need to find out and enter Current Password from her. After this, Internet access should appear.

Changing router settings
Let's move on to the router settings. They could have gone astray for some reason, or someone replaced them. Since you do not have access to the network on your laptop, open your favorite browser on a computer that is connected to the same router using a cable and enter address bar IP address: 192.168.1.1 or 192.168.0.1.
Data cleaning
route -f
ipconfig /flushdns
netsh int ip reset
netsh int ipv4 reset
netsh int tcp reset
netsh winsock reset
After each, press "Enter". This will help clear data in DNS and Winsock, reset routes and network adapter parameters.
That's all. I hope at least one of the described methods helped you. And now you will know what to do if the laptop sees the Wi-Fi network, but cannot connect to it, as a result of which an error window appears.
Rate this article: (2
ratings, average: 5,00
out of 5)
Webmaster. Higher education with a degree in Information Security. Author of most articles and computer literacy lessons
Before you start figuring out why Wi-Fi or the Internet does not work, you should know (especially for those who have just purchased Wi-Fi router), that it’s not enough just to connect the provider’s cable to the router; it also needs to be configured (set up the Internet and Wi-Fi network). All of the methods described below are valid if Wi-Fi and the Internet were working for you before, and then suddenly stopped or you cannot connect a new device to Wi-Fi. For convenience, I divided the article into two parts, the first is devoted to the inability to connect to a wireless network, the second part will answer your questions if you are connected to a Wi-Fi network, but there is no Internet.
Cannot connect to Wi-Fi network.
Reboot the router.
The first thing you need to do if you have problems connecting to a Wi-Fi network is to restart the router. To do this, simply disconnect the power supply from the router and connect it again after a few seconds. After 1-2 minutes. The device will boot, then try connecting to the wireless network again. To avoid such situations in the future, I recommend updating the router firmware (perhaps the manufacturer knows about the problem and fixed it in the new firmware).
Enabling the Wi-Fi module on the laptop.
Check if Wi-Fi is turned on on the laptop, I won’t turn around, all the ways turn on Wi-Fi I described in the article How to turn on Wi-Fi on a laptop .
Change the wireless network mode.
If you are trying to connect a device (laptop, smartphone) that is more than 5-7 years old, please note that it may not support modern regime Wi-Fi work -n. Therefore, you need to switch the router to an operating mode that is supported by the device or enable mixed mode b/g/n. More details about Wi-Fi operating modes are described. In order to switch the wireless network mode, you need to go to the router’s web interface, go to the Wi-Fi settings and select the appropriate mode.
Removing a duplicate network SSID.
One of possible problems Inability to connect to Wi-Fi is a duplication of the Wi-Fi network (SSID). Suppose you come to your friends, their Wi-Fi network is called “Home”, you successfully connected to it. Time passed and you came across the same network name with other friends or at home. The laptop (this also applies to tablets and smartphones) tries to connect to the network using the previously saved password, but it fails because this name is used New Password. To solve this problem, you need to remove the matching network from the list of saved Wi-Fi networks.
To do this, right-click on network icon in the lower right corner of the screen and select "Network and Sharing Center."

After this, you will see a list of saved wireless networks. If you see that the network you are trying to connect to is in this list, you need to remove it from this list. Select the network and click the "Delete" button. After this, you will need to enter a password to connect to the wireless network.

No Internet via Wi-Fi.
Internet payment check.
The simplest thing that can happen when the Internet is not working is that it’s time to pay for it or the provider is working on it. To clarify the situation, call your provider and find out if you have a debt for the Internet and whether work is being done on the line.
Static IP address.
One of the problems of the Internet not working may be the prescribed static address not with the network settings that are required. In this case I recommend using automatic receipt network settings. To do this, you need to go to the Network and Sharing Center. One way to do this is to right-click on network icon in the lower right corner of the screen and select "Network and Sharing Center".

Another way is to use hotkeys

It doesn’t matter which method you used, the result will be the same - a window will appear on the monitor Network connections. Next you need to wireless connection press with two mouse clicks, In the status window that opens, select "Properties" in the properties window "Internet Protocol version 4 (TCP/IPv4)"


Problem with the router.
The Internet may not work due to a router failure; the simplest thing you can do is reboot it. There are situations when the router resets the Internet settings, in this case you need to connect to it via the web interface and re-enter the Internet settings, in order to experience fewer problems with the router in the future, I recommend updating its firmware.
Conclusion
In this article, I described all the ways I know to solve problems with Wi-Fi and the Internet. If these methods do not help you, you can describe the problem in detail in the comments and I, together with the readers of this site, will try to help you.


