Step-by-step instructions: how to create an email address for free. Creating email on your computer
Step-by-step instructions - how to create an email
E-mail has become an integral means of business and personal communication. Young people can no longer imagine how to live without her. And all the memories of the older generation about how they had to go to a meeting point to communicate with family and friends seem like an anachronism today.
Let's not lag behind the times and just as quickly as we once mastered the cell phone, let's conquer the wisdom of the Internet in the same way. And we will start with e-mail, which will allow us to be more mobile in communicating with friends and family, and will also introduce you to many concepts on this still mysterious Internet.
E-mail is especially relevant for our country, where the quality of regular postal services is depressingly low, and rates for international telephone calls are too high. Email is incomparably more reliable, cheaper and faster than regular mail. A paper letter across the CIS can travel for months, and from America it can take six months. In addition, there is never any certainty that the letter will not get lost in the long chain of transportation and flight of correspondence.
By email, a letter reaches anywhere in the world in a few seconds. If it happens that you make a mistake with the address, you will be instantly informed why the letter did not reach the addressee. The cost of sending is negligible and is the price of the minutes you spend on the Internet. The cost does not depend on the distance at which your recipient is located.
1.Create your email address
The most popular search engines in the vastness of Russia, or, as is commonly called, Runet, are Yandex, Mail and Rambler. You can set up a mailbox in any of them, and they will all work great.
Mailboxes can be paid or free. We will install a free email service using Yandex as an example.
Before you go to the post office and register your email address, let’s check again.
Electronic mail (English e-mail) is written in the form xxxxxxxxx (dog)xxxxxxx.xx
xxxxxxxx - your login (pseudonym) e.g., sidorov
dog - @
xxxxxxx.xxx - search engine, yandex.ru
Examples of email addresses in different search engines: [email protected], [email protected], [email protected]
The @ sign, commonly known as “dog” in our pronunciation, is the separator between the login and the search service. There are several versions of why it was called that, but none gives a clear interpretation. Let's accept the one that recognizes that the given symbol (@) looks like a curled up dog. In other countries, this icon is called differently, apparently depending on the associations.
I think you now have an idea of what your email address and the addresses of your friends with whom you will communicate will look like.
The lesson was written at the request of the magazine "60 years is not age"
Each email account has a whole bunch of different settings. You can change almost everything in it - information about yourself, password, email design and much more. To do this, you first need to go to your email account, and then open the part that is responsible for changing the parameters.
Yandex.Mail
In the upper right corner, next to the name of the email box, there is a gear icon.
After clicking on it, a small window opens, at the top of which the most popular settings are collected. You can select one of them or click on the All Settings link at the top.

A page will open where you can change the necessary parameters. On the left side there will be a menu for moving to other settings.

To return to regular mail(s), click on “Letters” in the top left.
Mail.ru

A page opens with a list of what can be changed in the mail.
On the left there will be a list for quickly moving to other parameters. You can also return to your emails through it by clicking on the “Go to Inbox” link at the top.

Gmail.com (mail from Google)
To change Google mail settings, you need to click on the picture with the image of a gear in the upper right corner of your mailbox.

A small list will appear. Click on “Settings”.

A new page will open. On a gray background there will be a bunch of parameters that can be changed.
But that's not all! At the top there are bookmarks for editing other settings.

The most important settings
Of all this heap of settings, I have identified only three that really should be changed - the sender's name, photo and signature.
The sender's name is what will be written in the "From" part. As a rule, this is the data that the recipient sees when a new letter arrives.
A photograph is a small image that will be used to decorate each of your messages. It can be either a personal photograph or just a picture. It's not necessary to add it, but many people like it :)
Signature is text that is automatically added to each letter. Convenient to use for business correspondence so you don’t have to retype contact information each time.

Where to change
Yandex.Mail: → Personal data, signature, portrait.
Mail.ru: Settings → Sender's name and signature. To add/edit a photo, click on “Personal information” in the menu on the left.
Gmail.com. To change the sender's name:
To add a signature to letters:
Adding/changing a photo: click on the upper right circle with the image of a man or an already added photo and select “change photo”.

How to check
Let's say in my email settings I specified a name, added a photo and a signature. The easiest way to check the result is to send a letter to yourself, to your own address.
This is the letter I received in my case:
This means that this name and picture will now be added to all the letters that I send. And if you open the letter, there will be a signature under its text. In my case this is a contact block.

If suddenly the result does not live up to expectations, it can always be corrected in the same way (see Where to change).
Today we will look at how to create email on the Internet and configure the user’s computer to collect letters from the mailbox.
E-mail is a very popular service in the modern computer world. Many people use mailboxes every day to exchange messages. Of course, this is not the only use of e-mail, because in the computer era it can be used to carry out mass mailing of various types of digital information, including advertising materials. In this regard, full-fledged mailing services have emerged, which greatly simplify the delivery of the necessary data to a huge number of subscribers. Creating mail “on a computer” means setting up the mailbox in such a way that letters are collected without visiting the mail site on the Internet.
So let's take a look:
I. How to create a mailbox
You can register a mailbox for free on many online resources. The most popular email services are listed in the article "". For example, consider creating an email on a website mail.yandex.ru .

Go to this page and click the big button “ Create an email». At the first step of registration Enter your first name, last name and desired (unique) login in the appropriate fields.

On the second step you need to come up with a strong password, confirm it and write the answer to the security question. After entering the characters from the picture, click the " Register».

Congratulations, Now you have your own email.

To start working with it, click on your login in the upper right part of the page and select “ Mail».

If you don't want to visit the site mail.yandex.ru every time you view your mail, then you can configure the collection of letters from the newly created mailbox to your computer’s hard drive through a special email client. Let's consider this procedure using the example of the popular TheBat client.
II. How to set up collection of letters on your computer through an email client
Download the latest version of this program from the Internet (for example, here http://allbat.info/release/). Run the downloaded installation file and follow the prompts of the installation wizard. Confirm the license agreement, select the installation mode " Full" and click the " Install" Wait until the files are copied and launch TheBat email client.
It will begin initial setup applications. The first window will ask you to install data protection, which will allow you to store all email information in encrypted form (if only you use the computer, you can skip this step).


On the next page, select " Create a new mailbox" and click the " Next».

Enter any mailbox name, not necessarily what was written on mail.yandex.ru, and leave the Home directory as " Default».


In the next window, to access the server, select POP3 protocol, in the server field for receiving mail, enter pop.yandex.ru, and in the SMTP server field enter smtp.yandex.ru. Check the box " My SMTP server requires authentication" and click the " Next».

Enter your login (without prefix yandex.ru) and the password that was used when creating mail on the resource mail.yandex.ru .

If you do not want to delete letters from the main server on mail.yandex.ru, then check the appropriate box. Specify your method of connecting to the Internet (usually via a local network) and in the last client settings window, click the “ Ready».
The main window of TheBat program will open. To receive mail from your mailbox, you must use the corresponding button on the panel or press the key on the keyboard F2. To send a letter, select the menu " Letter» — « Create» or press the keyboard shortcut Ctrl+N.

Now you know how to create an email and configure your computer to collect letters from this mailbox. In the TheBat client you can add several mailboxes, which you will register on various Internet resources. All mail will be displayed separately for each account, and quick access to any email account will save your time.
We answer all questions in the comments.
If you decide to get yourself a mailbox, but have no idea how to do it, then this article is for you. This is a step-by-step instruction on how to get yourself a mailbox.
Step 1 - Select a service:
Now there are a huge number of services where you can create a mailbox. The first thing you need to do is choose a service where you will create your mailbox. The most popular services in Russia are:
In principle, there is no particular difference where to create a mailbox, because All these services work on a similar principle and have similar functions.
The following will depend on which service you choose to create mail:
1) Where you will check your mail. That is, if you registered your mail on Mail.ru, then you will check your mailbox through the Mail.ru website.
2) What comes after the "@" sign in your mailing address. Your future email address will consist of two parts - your login and the address of the site where you registered your mailbox. That is, if you registered your mail on Mail.ru, then your mailing address will look like " [email protected]
", where login is your login.
Step 2 - Start Registration:
And so, you have chosen the service. In this article I will look at registering a mailbox on Mail.ru. Links to instructions for other services are at the bottom of the article.
First of all, you need to go to the Mail.ru website, to do this, enter “Mail.ru” (without quotes) in the address bar of your browser or simply click on the following link ->. When you go to the Mail.ru website, click on “Registration with mail” as shown in the picture below:
After this, the mailbox registration page will open directly in front of you, where you need to enter all the necessary data.
Step 3 - Mail Registration:
Now you need to fill in the required fields: 
I marked each of the fields with numbers, let's look at what needs to be entered in each of them:
1
Your name. You can enter in both Russian and English letters.
2
Your last name. You can enter in both Russian and English letters.
3
Your birthday date. Click on the word day/month/year and a drop-down list will open from where you can select the desired date.
4
Your city. Click on the empty field with the left mouse button and a list will open in front of you where you can select your city. This field is optional, you can leave it blank if you wish.
5
Your gender Just click on the circle next to the desired floor.
6
The address of your future mailbox. This field can only be filled in English letters. This address will be used by you to log into your mail, so be sure to remember or write it down,
7
The password that will be required to log into your mailbox. Come up with a strong password (do not use birthdays and the like as a password, because such passwords are very easy to hack) and remember, or better yet, write it down.
8
Enter the password again for accuracy.
9
Your cell phone number. It is not necessary to enter. If you don't have a phone, you can click on the words "I don't have a mobile phone" just below this field.
10
Register - Click this button to create a mailbox.
Here is an example of correctly filled in mailbox registration fields: 
As you can see, there is a green checkmark next to each field, this means that the field is filled out correctly. I also selected the “I don’t have a mobile phone” option so as not to enter my number (because I was too lazy to look for a phone number). If you enter your phone number, then after registering your mailbox you will receive an SMS with a verification code on your phone. This code will need to be entered on the site.
That's it. After you fill out all the fields correctly. Click "Register" and your mailbox will be created.
Your email address will consist of what you entered in the “Mailbox” field and the prefix “@mail.ru”. If we take the example from the picture above, my mailbox address turned out to be " [email protected] ".
Step 4 - Login to mail:
After registration, you will be automatically redirected to your mailbox, from where you can immediately send email messages to anyone you want. But how can you access your mailbox later? Very simple!
To get to your mailbox, you first need to go to the Mail.ru website, to do this, enter “Mail.ru” (without quotes) in the address bar of your browser or simply click on the following link ->
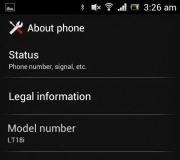
Creating and setting up email is a very trivial task and should not cause any difficulties, but users nevertheless continue to ask questions. Many of them have only recently acquired gadgets and are experiencing difficulties even in such seemingly basic tasks. Email on a mobile phone has become an integral part of the life of a modern business person. The purpose of this material is to explain to newcomers to the Internet how to create an email on their phone and use it in the future.
Postal services
First, you need to decide which of the hundreds you want to register with. Among the popular ones are Gmail, Yandex iCloud.com. All of the above have the same operating principle, without any special features.
The first thing you need to do is register your own mailbox. To do this, you need to visit the official website of one of the mail services (it can be Google or Yandex, at your discretion) and go through a simple registration procedure.
In most cases, you will be required to provide the following information:
- First and last name.
- Login (name of your mailbox).
- Password.
- Mobile phone number.
This is a basic set, it is possible that you will be asked to enter a spare box or information about your website, you may have to enter a special code to confirm that you are a person.
Once you fill out all the specified forms, you can breathe out - the box is ready.

How to create an email on an iOS phone?
The next step in setting up your mail is connecting it to your phone. If you own an iOS-based smartphone (gadgets from Apple), then you probably registered already the moment you turned it on for the first time. If so, then you already have your iCloud mailbox set up and ready to go. You can easily receive a letter from your phone. If this does not happen or you want to connect a different address, you will have to do it manually. To do this:
- Go to “Settings > Mail, contacts, calendar > Add account.”
- We look for the provider you need in the list, for example Google.
- We enter the registration data and wait for the mailbox to connect.
If the list of providers does not contain what you need:
- Scroll down and select “Other > Add Mailbox.”
- Enter your registration details (your name, email address and password).
- On the next screen, enter your IMAP information. Let's look at the example of Yandex:
- In the subcategory “Incoming mail server” enter imap.yandex.ru;
- In the subcategory “Outgoing mail server” enter smtp.yandex.ru
These details may vary depending on where the box was registered. In most cases, it will be enough to replace yandex with the name of your email service.

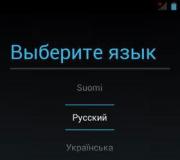
How to create an email on an Android mobile phone
In the case of Android, the principle is the same. By purchasing a new device and registering, you will receive a Google account, and with it a Gmail inbox. Therefore, those who have completed this procedure may no longer think about how to create an email on their phone. If you prefer manual setup or want to connect a mailbox other than Gmail, then first:
- Find the Mail app on your device.
- Click “Add a new account” (if you are offered IMAP and POP3, feel free to select IMAP).
- On the next page, enter your registration information:
- your mailbox address;
- password;
- IMAP and SMTP server data;
- port, information about which can be found on the official website of the mail provider in the “Help” section (for Yandex this is 993 for IMAP and 465 for SMTP).

Using third party email clients
The simplest and fastest method for setting up mail is to download a special one that will help you both create an email on your phone for free and use it to the fullest.
To find one, just visit one of the application stores, in the case of iOS it’s AppStore, in the case of Android it’s Google Play. In both of them you can find ones created for specific providers.
In most cases, these programs are designed as simply as possible and are ready to work from the moment they are launched. In addition, this option is perfect for those who do not yet have their own mailbox and are just about to start one.