Windows xp network settings. Setting up a local network on a computer with Windows XP
Creating a local network at home is not a whim, but a necessity if you use two or more computers. The main task of such a network is to connect PCs and create the opportunity for the user to conveniently use the resources of each of them, rather than switch between computers. In this article we will look at how to set up a local network connection between computers.
For example, two devices will be used: a desktop computer based on Windows 7 and a laptop based on Windows 10. The list of instructions that will be in the article can also be used on other Windows operating systems (8, 8.1).
Methods for connecting computers over a local network
Today, you can connect via a local network through a router or directly. The first method is gaining popularity, and the second is already a relic of the past, although the time period has not passed that long. Let's look schematically at how the connection occurs.
First, let's look at the first scheme “directly”. It only works when the computers are connected to each other. Data transfer occurs only in one direction, i.e. either from the first PC to the second, or vice versa. At the same time, if one computer is connected to the Internet, then the second one can be configured to provide it, but this is already inconvenient, because routers appeared.
Desktop computers connect to the router, and mobile devices can receive data from the router or transmit it to it using a wireless network. Thus, you can, using a router (usually they come with a Wi-Fi access point), connect all the devices in the house into one network and use the Internet from one access point, without interfering with each other at all.
We will now configure the local network according to the “via router” principle, because it is more convenient, practical and modern, and also not very difficult even for a novice user. How to configure your router? Use the instructions from the manufacturer’s website; now they are written very clearly and accessible. Once you have configured the router, proceed to setting up the local network.
Please note that if you have been using the Internet via a modem for a long time, your desktop computer is connected to it, and the router is connected to the modem, you do not need to make any additional settings. It is only important that a laptop or other PC is connected to the router using a wireless Wi-Fi network. Let's start setting up the network.
Setting up a local network on a desktop computer (No. 1)
To start using the local network, you must follow the following instructions:
- Let's go “Start” - Control Panel - Network and Sharing Center;
- Next, on the left side of the screen select “Change advanced settings...”;

- In this window you need to check the boxes next to the following:
"Enable network discovery"
"Enable file and printer sharing"
"Enable sharing so network users can..."
"Use 128-bit encryption..."
"Enable password protected sharing"
"Allow Windows to manage homegroup connections"

- Click "Save changes"(it is important that you are logged in with “Administrator” rights);
- At this step you need to join a home group, but we will create it on a laptop, so scroll through the article to the point, and then return here;
- When the password is received, you need to enter it in the required window. To do this, go to "Conductor" and then "Home Group";
- Click "Join", check the boxes next to all components for which shared access is provided and enter the password that was generated earlier (you should have written it down on a piece of paper);

- The password will be checked and the connection will begin. Here you need to wait until everything is configured as needed;

- When the joining is completed, you will receive a message as in the window below, and also, if you repeat step 6, you will see the message “This computer has joined a homegroup.”


Setting up a local network on a laptop (No. 2)
First of all, you need to do the same steps as on computer No. 1, namely steps 1-4. Since we have Windows 10, in order to enter the “Control Panel”, you need to enter “Search” and enter this request. After this, everything is done in the same way as with the first PC.
Now let’s move on to creating a “Home Group” and further setting up the network:
Now, to make sure that everything works as it should, we need to check the functionality of the local network we created, which we will now do in the next part of the article.
Network health check
The main task of a local network, as we have already said, is the sharing of resources. Most often, such resources are faxes, scanners, printers, etc., as well as the files themselves on different PCs. We will not check the operation of the printer from different PCs, but this function should definitely become available after the above conditions are met.
Let's check the health of the network using file transfer. To do this, let's create a shared folder on the laptop. Let's go to "Conductor", and then in "Net":
The computer named “Jenya” is our laptop, and the second computer “Evgeniy1” is a desktop computer. This verified that the computers are indeed on the same network. Now go to Local Drive D and select a folder for sharing, let it be, for example, “Notes”. Select it, press RMB, and then "Properties":
Therefore, you need to click "Access", and then "Sharing". In the list of users, select the one who logs in to the system on computer No. 1 using such and such a login. After this, you will receive a message that the folder is open for public access: 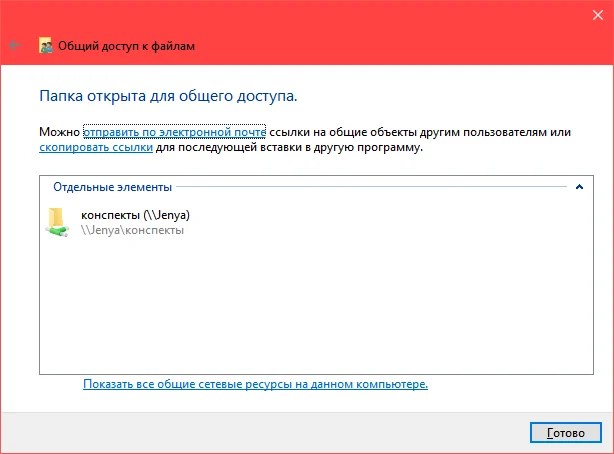
Now press again "Ready". On computer No. 1 we enter “My Computer” - “Network”, and then select our computer “Jenya”. Now our “Notes” folder has become available in the list of folders. It is important not to immediately go into this folder and check if everything has been transferred - you need to wait about a minute after you close the Properties window for the changes to take effect.
Windows 10 users sometimes experience error 651 and similar errors when connecting. These are called "Internet connection errors". This occurs due to a software or hardware network failure...
After concluding an agreement with an Internet provider and installing cables, we often have to figure out on our own how to connect to the network from Windows. To an inexperienced user this seems somewhat complicated. In fact, no special knowledge is required. Below we will talk in detail about how to connect a computer running Windows XP to the Internet.
If you find yourself in the situation described above, then most likely the connection parameters are not configured in the operating system. Many providers provide their own DNS servers, IP addresses and VPN tunnels, the details of which (address, username and password) must be specified in the settings. In addition, connections are not always created automatically; sometimes they have to be created manually.
Step 1: New Connection Wizard
- Opening "Control Panel" and switch the view to classic.

- Next we go to the section "Network Connections".

- Click on the menu item "File" and choose "New connection".

- In the New Connection Wizard start window, click "Next".

- Here we leave the item selected "Connect to the Internet".

- Then select manual connection. It is this method that allows you to enter data provided by the provider, such as username and password.

- Next, we again make a choice in favor of the connection that requests security data.

- Enter the name of the provider. You can write whatever you want here, there will be no mistakes. If you have several connections, then it is better to enter something meaningful.

- Next, we enter the data provided by the service provider.

- Create a shortcut for connecting on the desktop for ease of use and click "Ready".

Step 2: DNS Setup
By default, the OS is configured to automatically obtain IP and DNS addresses. If your Internet provider provides access to the World Wide Web through its servers, then you need to register their data in the network settings. This information (addresses) can be found in the contract or found out by calling the support service.

Create a VPN tunnel
VPN is a virtual private network that operates on the network-on-network principle. Data in a VPN is transmitted over an encrypted tunnel. As mentioned above, some providers provide Internet access through their VPN servers. Creating such a connection is a little different from the usual one.
- In the Wizard, instead of connecting to the Internet, select a network connection on the desktop.

- Next, switch to the parameter "Connect to a virtual private network".

- Then enter the name of the new connection.

- Since we connect directly to the provider's server, there is no need to dial the number. Select the option shown in the figure.

- In the next window, enter the data received from the provider. This can be either an IP address or a site name like “site.com”.

- As in the case of connecting to the Internet, check the box to create a shortcut and click "Ready".

- We enter the username and password, which will also be provided by the provider. You can configure the saving of data and disable its request.

- The final setting is to disable mandatory encryption. Let's go to properties.

- On the tab "Safety" uncheck the corresponding box.

Most often, you don’t need to configure anything else, but sometimes you still need to register the DNS server address for a given connection. We have already discussed how to do this earlier.
Conclusion
As you can see, there is nothing supernatural about setting up an Internet connection on Windows XP. The main thing here is to follow the instructions exactly and not make mistakes when entering data received from the provider. Of course, you first need to figure out how the connection occurs. If this is direct access, then you need IP and DNS addresses, and if it is a virtual private network, then the host address (VPN server) and, of course, in both cases, a username and password.
Microsoft Corporation, starting with Windows Vista, has greatly changed the security policy of its systems regarding the local network. The operating system seemed new, somehow too complicated, and therefore many could not figure out how to open access to files on the computer. Today we will look at how this is done using Windows 8.1 as an example, but Vista and 7 have a similar system, and the difference is not fundamental. The local network can also be used to later create , which will unite all multimedia devices of a house or apartment, or to share files with your phone or tablet.
In my opinion, this is very convenient when, without additional movements, you can play a movie from a computer, laptop or even phone on a large TV screen, or listen to your favorite music from your phone on a speaker system without connecting additional wires, although this is already necessary . But let's move on to setting up the local network.
Video instructions are available at link.
Step by step instructions
- For the normal functioning of a local network, all computers on this network must be in the same workgroup; for a home network, let’s take MSHOME. To install it, we need to follow the following path: open “Control Panel” - “System and Security” - “System” (you can also right-click on the “Computer” shortcut on the desktop and select “Properties” or the key combination “ “ ). In the window that opens, select “Advanced system settings” in the left column.

- In the window that opens, go to the “Computer name” tab and click the “Change” button. A dialog box opens in which we need to record a new workgroup. Enter MSHOME (all in capitals) and click OK. We also close the system parameters by pressing the OK button and restart the computer.

- Next, it is advisable to configure a permanent IP for both computers. To do this, go to “Control Panel” - “Network and Internet” - “Network and Sharing Center” - on the left side of the “Change adapter settings” window - select the network card, right-click and click “Properties”.

- Before completing this step, read the notes under the screenshot. Select “Internet Protocol Version 4” and click “Properties”, fill in as shown in the picture.

P.S. If your local network is organized through a router with a DHCP server enabled, the IP address, Default Gateway and DNS Server can be left in automatic mode. This action must be done if you have two computers connected directly or if DHCP is disabled on the router.
P.P.S. The IP address value must be different on computers within the same local network. That is, for this computer we indicate IP 192.168.0.7, and for the next one it is already 192.168.0.8.
- At this point, we begin to work with folders that we will share on the network. I will tell you using the example of one folder, but you can open access to the entire local drive using a similar scenario.
First, we need to share the folder. It should be taken into account that if the network is not limited to two computers (for example, some providers (Beeline) provide Internet to apartments based on one large local network), it makes sense not to give the right to change the contents of the folder; If you are confident in the computers on the local network, feel free to give “Full access”. So, open the properties of the folder we need, to do this, right-click on the folder and select “Properties”, open the “Access” tab and click the “Advanced settings...” button.
- In the window that opens, check the “Share this folder” checkbox, click the “Permissions” button and give the necessary rights to the folder; Since this is an example, I'm giving full access to the folder, but you can use it at your discretion. Here's what I got:

- Click OK to accept the changes, also click OK in the “Advanced sharing settings” window, then in the folder properties go to the “Security” section and click the “Change” button.

Next, we need to configure the visibility of the computer within the local network. To do this, go to “Control Panel” - “Network and Internet” - “Network and Sharing Center” - on the left side of the window, select “Change additional sharing settings” and profiles of sharing settings will open in front of us. Here your task is that in all profiles you must enable “network discovery”, and “file and printer sharing”, and “sharing so that network users can read and write files in shared folders”, as well as “Disable password protected sharing.” Click save changes.


Instructions
Call the context menu of the desktop item “My Computer” by right-clicking and select “Properties”. Use the “Computer Name” tab in the dialog box that opens and click the “Identification” button to launch the wizard utility.
Skip the first wizard window by clicking the "Next" button and apply the checkbox in the line "The computer is intended for home use" in the next one. Click the "Next" button and complete the first connection step by clicking the "Finish" button in the new dialog box.
Reboot the system and bring up the main menu by clicking the "Start" button. Go to “My Computer” and expand the “Network Neighborhood” link. Expand the Network Tasks node and select the Set up home network command.
Skip the first Network Setup Wizard dialog by clicking Next and confirm the installation of the required hardware by clicking the same button again in the next window. Check the “This computer is connected to the Internet through...” checkbox in the new dialog box and click the “Next” button.
Type a description and computer name in the appropriate fields of the next dialog box and use the “Next” button to move to the next window. Type the name of the workgroup in the field of the same name in the next window. Please note that this name must be the same on all computers on the local network. Click the "Next" button and complete the network configuration procedure by clicking the "Finish" button in the last window of the wizard.
If you need to change settings, use the Network Neighborhood folder. Expand the “Show network connections” link and expand the node of the desired connection by double-clicking. Change the required settings manually or use the “Fix” button to switch to automatic mode.
Sources:
- Setting up a local network in Windows XP
- how to connect to the internet with xp
The workgroup is created automatically by the Windows operating system during the network setup process, allowing the user to connect to an existing workgroup. group online or create a new one. This operation does not require specialized computer knowledge and is carried out using standard OS tools.
You will need
- - Windows Vista;
- - Windows 7.
Instructions
Click the "Start" button to open the main menu of the system and go to the "Control Panel" item to initiate the process of joining the work group.
Select the item “System and its maintenance” and expand the SYSTEM link.
Click on the “Change settings” field in the “Computer name, domain name and workgroup settings” section and enter the computer administrator password in the corresponding field of the confirmation window.
Select the "Computer Name" tab in the dialog box that opens and click the "Change" button.
Specify the Workgroup option in the Members of Groups section and enter the name of the selected workgroup to connect to an existing workgroup group or enter the desired new group name to create a new workgroup.
Click OK to apply the selected changes.
Select the "Network and Internet" item in the "Control Panel" tool to use an alternative method of connecting to your desktop group in the Windows operating system.
Click the "Change Settings" button in the "Workgroup" section and go to the "Computer Name" tab in the "System Properties" dialog box that opens.
Click the "Change" button and enter the desired name in the "Computer Name" field in the next dialog box.
Specify the name of the selected workgroup to connect to an existing one group or enter the desired name in the Workgroup field to create a new workgroup.
Click OK to confirm the command and restart your computer to apply the selected changes.
Useful advice
Remember that when you connect to a workgroup, the existing computer account in the domain is deleted.
Sources:
- Setting up a workgroup in Windows Vista
Tip 3: How to connect to a desktop on a local network
The task of connecting a local computer to a remote desktop is standard for the Microsoft Windows operating system and is solved using the system itself. No additional software required.

Instructions
Open the main menu of the Microsoft Windows operating system by clicking the “Start” button and call the context menu of the “Computer” element by right-clicking on the remote computer.
Select "Properties" and select the "Remote Use" tab in the dialog box that opens.
Check the “Allow remote access to this computer” checkbox and click “Yes” in the prompt window that opens to confirm that the selected changes will be applied.
Use the “Select deleted users” button to view the list and specify the required users by clicking the “Add” button.
Click OK to confirm your selection, click OK again to execute the command, and click the same button again to confirm your changes are applied.
Insert the Windows installation disc into your local computer's drive and select the "Perform other tasks" command when the welcome message appears.
Use the “Install Remote Desktop Control” item (if necessary) or click the “Start” button and go to \Programs\Accessories\Communications\Remote Desktop Connection (if the service is already installed) to start the service.
Log in to your local computer and make sure that your computer is connected to your local network or the Internet.
Return to the main Start menu and go to All Programs.
Go to the "Remote Desktop Connection" node and select the "Options" command.
Select the computer to be connected from the list and enter the user name, password and domain name (if necessary) in the appropriate fields of the application window.
Click the “Connect” button to confirm the execution of the command and specify the password of the account selected for connection in the “Login to Windows” window that opens.
Sources:
- Using Remote Desktop Connection in Windows XP
Counter-Strike is the world's most popular online shooter.
Most people who have never played Counter-Strike on the Internet are wondering: how to play their favorite shooter online?
The principle of creating a local network in any version of Windows (XP, 7, 8, 10) is practically nothing no different. Exceptions are complex multi-level corporate networks, where several subnets, proxy servers and VPNs are used.
But in this article we will look at how to create home network without resorting to purchasing expensive equipment, but using a regular switch or router with Wi-Fi support.
What is needed to create a network
First of all, to create a local network from a certain number of computers, we need equipment:
Please note: if a direct connection is used (i.e. we insert a twisted pair into both devices without using a router), then you will need not a standard cable, but cross— over, except when modern network cards with MDI-X support are installed. In this case, you can use the standard crimping method.
How to create a local network
Now let's proceed directly to creation. First we need to prepare:
- Install all equipment in its place - computers, routers, etc.
- We crimp cable, if necessary.
- Let's do wiring, i.e. we extend the twisted pair to the equipment.
- Connecting twisted pair equipment.
Costs pay attention, that when the connection is made and all devices are started, the connection connectors on the computers should shine. The same applies to routers with routers, only they have light bulbs located on front panel. If any light is off, it means the connection has been made. wrong.
When the connection is made, you need to configure the network in the operating system.
To begin with checking working group, for which we go to properties " My computer" You don’t have to open the properties, but use the combination Win+
R and enter in the window sysdm.
cpl.
On all devices working group should be is the same, otherwise the computers will not see each other.
To change the group, just click on the button change and enter the group name. Name must be entered Latin alphabet, and match on all devices. 
Then we look for network icon in the notification area and with its help we get to Network and Sharing Center.
Here we are interested in the link change additional parameters, it's third from the left and will allow you to edit sharing settings. In each profile we select: Enable network discovery, auto-tuning And general access to files and printers. 
Scrolling page and below turn off shared access with password protection. All other settings can be left. Click Save changes and exit.
This completes the setup. The network should work, but only if your router distributes dynamic addresses.
If you used a router, or the devices were connected directly with a cable, then you need to make a few more settings.
Network settings
In case direct connection or using a router, we need change IP addresses of computers. For this necessary:

We will not describe what each setting is responsible for, because... This is quite a large topic. It is enough to enter the addresses described above on all computers.
After making all the settings described above, the network should work. However, do not forget that a firewall or antivirus software can completely block the network. Therefore, if nothing works, check their settings or temporarily disable them altogether.
Local network via WiFi router
Setting up a network through a router is absolutely nothing no different from what we described above.
If the device is configured to distribute dynamic addresses, then there is no need to change the addresses. Well, what if IP users static, then you will have to use the previous section.
Also, there will be no difference between whether the device is connected by cable or via Wi-Fi; in most routers, the settings for distributing addresses are configured simultaneously and wireless and on wired connection.
How to make shared folders
After everything is configured, you need to create shared folders for information exchange.


