Win 10 disable defender. Making changes to the registry
Programs, the so-called spyver.
Spyware- English spy - spy + second part software - software.
It is impossible and not necessary to download windows defender, because it is included in the set of standard operating system services.
Enable the service
The service is enabled using the Windows Action Center. To do this, you need to open the "Control Panel" using the "Start".
The list will contain the line "Support Center", and you need to select it.

In the support center there should be a "Security" block. When Defender is turned off, it will have a "Protection from spyware and unwanted programs" tile.
The service will be enabled by clicking the "Start Now" button.

After initializing the start of the service, the defender window will appear and it will work.

Note! windows 8 defender also starts from action center. To do this, you need to enter "Help Center" in the search bar on the start screen. All subsequent steps are the same.
Setting up Windows Defender
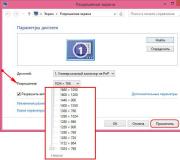
To start setting up the program, you will need to select the “Programs” section in the top line, and in it the “Parameters” block.

This will open the program settings window.
The first item in the list on the left - "Automatic check" allows you to set the frequency and type of automatic system check for unwanted programs and configure the conditions for its implementation.

The Default Actions tab is responsible for the actions that the program will apply to detected threats.
In normal mode, each threat will be accompanied by a corresponding dialog box with the option to select an action.

In "Real-time Protection" settings of the protective screen are configured, which constantly monitors the status of key files and directories.
Here you can turn it on and off, as well as activate the check of downloaded files and incoming mail.

"Excluded files and folders" together with "Excluded file types" allow you to set the program files, directories and file types that will not be scanned.


The Details tab allows you to assign additional actions, such as checking archived files, enabling heuristic analysis, or setting a mandatory scan of removable media.

"Administrator" allows you to disable the service, as well as assign the use of the program to all users of the computer.

Advantages and disadvantages of the service
To correctly assess the positive and negative sides of Windows Defender, you need to remember that this is not a full-fledged antivirus.
Important! The program was originally developed as a means of protection exclusively against spyware. It is the ignorance of this circumstance that leads to low scores in independent tests of anti-virus software. Malicious software that affects the functioning of the system should be blocked by antiviruses.
Positive aspects of the Defender
The defender does an excellent job with his functions. Blocking spyware is effective.
If you configure the program to automatically scan and delete infected files, the user will not even notice how his system is being protected.
![]()
The advantage of the Defender is that it is already built into the system. You do not need to download it, install or pay a subscription.
It is enough to start the service once, and the system will be protected from attempts to steal personal information.
A wide range of automatic functions (updating, scanning and removing threats) allows the user to not even notice the application is running.
Negative qualities of service
The conditional negativity of the Defender lies in the limitation of its functionality. In fact, this is a stripped-down version of Microsoft Security Essentials.
In addition, when used in pair with some full-fledged anti-virus programs, conflicts may arise when threats are detected.
![]()
Despite the fact that the defender copes well with the threats of his profile directly in the system, malicious links in the browser are his weak side.
To recognize them, the Internet Explorer algorithm is used, which is not very reliable.
The built-in utility - Windows Defender protects the PC from viruses and malware that can be "picked up" on the Internet when downloading files or connecting other users' flash cards to the device. If you are completely satisfied with the performance of your antivirus program, then you need to know how to disable Windows Defender 10 permanently. This is written in this article.
Disabling and enabling
Using the Settings app
Good to know! The built-in protection will be disabled for a while (approximately 15 minutes). After that, the system will automatically launch Windows Defender.
In the Local Group Policy Editor

After that, any attempt to launch the built-in defender will result in an error.
Good to know! If you set the parameter to the "Not configured" position, it will start functioning in the normal mode.
In the Registry Editor

Important! If you don't find this setting in the registry branch, create it yourself: RMB on the “Windows Defender” folder → create → DWORD value (32 bits) → enter the name “DisableAntiSpyware” → set its value to “1”.
If you decide to run defender again, set the value to "0" in the Registry Editor.
Video
The video shows in detail how to completely disable Windows Defender using the Group Policy Registry and the Registry Editor.
Third Party Programs
In addition to standard tools, you can disable the built-in defender with special free programs.
The program was originally developed to disable the updates that are performed automatically. But she "can" much more: enables and disables the OS defender, and has a Russified interface. 
The utility disables surveillance in the OS. But when using the advanced configuration mode, the option to disable Windows Defender is available in it. 
Activation
To activate the defender in Windows 10, you do not need to perform any actions - click on the message that is located in the notification center and the system will do everything automatically.
If Windows Defender was deactivated through the Registry Editor or the Local Group Policy Editor, then repeat the same steps as when disabling, only start the internal defender.
Making exceptions
Conclusion
Windows Defender protects your computer from viruses and malware. If necessary, it can be disabled or enabled, as well as configured by adding the necessary files, folders and programs to the list of exceptions.
The question of how to remove Windows 10 defender is asked by many users. This is due to the fact that Microsoft's built-in protection often does not allow you to install various games and applications on your computer.
In addition to unauthorized intervention in the list of programs allowed to be installed and launched, the built-in protection of Windows has other disadvantages. It is not fast enough to recognize malicious viruses and attacks on the contents of the computer. It also does not have the full arsenal of means of struggle that independent solutions from antivirus software developers can offer. A reasonable decision is the desire to disable the built-in functionality in order to avoid conflict situations and waste of system resources.
Ways to disable protection
In order to disable Windows Defender 10 permanently, there are the following options:
- Using the Registry Editor. Enter "gpedit.msc" into the command line, then in the menu that appears, select "Windows Components" - "Endpoint protection". This service must be disabled in the context menu. The next time you turn on the device, the defender will be turned off, but will continue to send notifications about the need to turn it on.
- Using the Updates Disabler utility. The program uses a clear interface and supports the Russian language. The functionality of the application allows you to disable both system updates and individual services. In the "Disable" tab, select "Windows Defender" and click the confirmation button.
- Using Destroy Win 10 Spy. The application is designed to disable OS surveillance, but also supports the protection blocking functionality. To disable Win Defender, select the appropriate item in the "Settings" section.
It is possible to temporarily disable the protection functionality, which is used for a one-time installation of an application of interest. To do this, in the "Update and Security" section, find the "Windows Defender" element and disable the "Real-time protection" attribute for it. This action will disable the restrictions for a while, after which the system will automatically start them again.
More Windows Defender Actions
After disabling, it may be necessary to perform the following actions:
- Turn off notifications. To turn off the annoying reminder of a disabled process, you need to go to the "Security and Maintenance Center". There, find the "Security" section and click on the button to turn off the corresponding notifications.
- Restoration of the work of the defender. During the notification that an application is down, you can double-click to bring up a notification window containing the Spyware Protection and Malware Protection processes. Both processes must be activated by clicking the "Enable Now" button.
Periodically, a situation arises when the user did not manually disable Windows Defender, but it stopped functioning on its own.
This is due to the launch of another antivirus program, which blocked the basic functionality.
If you remove this program from your computer, Windows Defender will automatically continue its work.
Microsoft's attempts to provide all the needs of users with built-in tools often fail. The native protection system of the Windows operating system did not hold its ground either. The most popular and famous Windows Defender - how to disable it? Consider detailed step-by-step instructions for disabling the antivirus.
Today, the problem of many users is that starting with Windows 10, the antivirus program is not so simple. If you turn it off in the usual way, then after 15 minutes, Windows Defender will automatically turn on. Of course, this situation is annoying. In order to deactivate Windows Defender, there are 4 reliable ways. Let's consider them in order.
First way
How to get rid of Windows Defender by changing the registry entry.
This method is suitable for advanced users, so if you are not sure that you know what you are doing, it is better to skip this step. Changes in the system registry have serious consequences for the normal functioning of the entire system as a whole: it is a database that stores information about the computer's configuration. This information is used by the system all the time. The registry looks like a tree structure, which consists of sections and subsections.
If you are a confident user, then on the desktop we are looking for the Start button - select the "Run" item. In the window, enter the regedit command.
We follow this route:
Chapter HKEY_LOCAL_MACHINE, then section SOFTWARE, then subsection Policies-Microsoft- and finally, Windows Defender.
Now we are looking for the parameter in the registry DisableAntiSpyware. The value must be set to one. If it is not found by you in the registry key, then you need to create it. In the tray, find the defender icon. Right-click on an empty field - then select Create - DWORD Value (32 bit). Then give it a name - DisableAntiSpyware, and again set the value to one.
If you suddenly need to restore the antivirus on your computer, then the changed values \u200b\u200bmust be returned to zero.
Second way
Stop Windows Defender using a tool like Task Scheduler.
Select on the desktop Start - Run(key combination Win+R with English. layout). In the field, enter the command - taskschd.msc. We follow the path in a new window: Section Microsoft, it has a subsection Windows. Looking for an item Windows Defender. We are looking for an inscription here Windows Defender Scheduled Scan. Select the task execution condition: the option to run the task when the computer is idle. Make its value as large as possible - to prevent the antivirus from starting.

Third way
Disabling Defender using the Group Policy Editor.
Select the English layout, press the combination on the keyboard at the same time Win+R. In the window that opens, enter the gpedit.msc command. Now we follow in order: in the section Computer Configurations find Administrative Templates. Choose Windows Components. Looking for an item endpoint protection. Now you need to enable this component. Then change the "Not Set" value to the "Enabled" menu item.
Fourth way
If the above methods could not help you, then try the automatic program. A program from a third-party developer called NoDefender. It is able to disable Windows Defender. For security reasons, it is still advisable to use the above methods, since it is not clear what processes this program runs in the background.
We hope that you were able to successfully follow our instructions to disable Windows Defender and are satisfied with the result.