Create a CD partition on a USB flash drive. Bootable flash drive for blondes
A CD-ROM on a USB stick is a very handy thing. It is 100% compatible with ISO images and guaranteed to work from the computer BIOS. That will allow you to boot from a USB flash drive as from a regular CD-ROM. That is, the computer will never know that it is being “cheated”.
The era of optical drives is leaving. In modern computers, a CD-ROM drive (DVD, DVD-ROM, DVD-RW, CD-RW) is becoming a rarity. Therefore, users have to "get out" in every possible way when it is necessary to install an operating system. In order not to look for an external USB optical drive, it has long been possible to boot from a USB flash drive. And all modern computers have this support in the BIOS. But no, no, yes, a situation arises as in Viktor Tsoi's song "everything is in place, but something is wrong." Many times I came across a situation where the computer was booted from only one flash drive out of five. And the only way out of this situation is to create (emulate) a CD-ROM on a USB stick. That is, when the computer sees the USB flash drive as a real optical drive.
There are many solutions on this matter on the net. They all represent some kind of puzzle. In which you first need to find out the type of controller on the flash drive, the organization and model (brand) of memory. Then, for this hardware, you need to find a special program for reprogramming the controller and uploading an ISO image. At the same time, not all controllers used in flash drives have the ability to emulate CD-ROMs. That is, it is not a fact that your flash drive can do this at all. And the saddest thing is that even following exactly all the instructions, there is a great chance to ditch the USB flash drive.
The ideal option in such a situation is to buy a USB flash drive for which the manufacturer himself has provided the possibility of creating a CD-ROM. Once I came across a Transcend JetFlash 620 8Gb flash drive
A distinctive feature of which is the presence of a built-in virtual CD-ROM. This means that the controller supports CD-ROM creation and we are halfway to success.
How to create a CD-ROM on a Transcend JetFlash 620 8Gb flash drive
To create a CD-ROM on a Transcend JetFlash 620 8Gb flash drive, you need to download the diagnostic and recovery utility for this model of JetFlash Online Recovery USB drive from the official website. At the time of this writing, for the Transcend JetFlash 620 8Gb flash drive, the current version of the program for Windows is v9.0.0.8 (JetFlash 620). The size of the program is 5.7 MB.
After downloading the archive, you will need to unpack the EXE file in it. I have this OnLineRecovery_JF620_v9.0.0.8.exe. This is a self-extracting archive containing the OnLineRecovery_620.exe utility and the security_f.iso CD-ROM image file.
So, the most important secret of this article. In order to create a virtual CD-ROM on a Transcend JetFlash 620 flash drive, you need to rename the ISO image file you need, for example, the installation distribution of the operating system, to security_f.iso and put it next to the OnLineRecovery_620.exe recovery utility. After that, run the utility and it will create two partitions on the flash drive, into one of which it will write your ISO image, which will be detected by computers as a USB-CD-ROM, and the remaining space will be a regular flash drive. It's that simple.
I hope you don't need to warn that as a result of the JetFlash Online Recovery utility, all data from the flash drive will disappear.
The procedure for creating a CD-ROM on a USB flash drive
- Download the recovery utility from the official site. We unpack it.
- Rename the required image to security_f.iso and put it next to the utility.
- We launch the recovery utility and enjoy the result.
It took me to put the system on an old computer.
There was no CD-ROM in the computer, and it was not interesting to install my own, and for a long time I was interested in how to divide my 8 Gb flash drive into several partitions. It was not possible to do this by ordinary means, since after creating partitions, Windows refused to see the second partition. I found a description about various methods for installing additional drivers for the second section, but this did not suit me. this must be installed on every PC you connect to for the first time.
Therefore, I decided to devote Saturday to an interesting case of studying how flash drives work.
I learned a lot about what chipsets are, what to do with the flash drive if it is not detected by the system, where to look for utilities for program recovery, and how to put the flash drive into test mode by closing the legs on the chip. But we will not delve into everything.
1) You need to find out the manufacturer of the chipset and the values VID and PID.
This can be done by downloading and running the ChipGenius v3.0 utility
(be sure to write down or save the data that it will show, because in case of bad firmware, this will help you find the program you need)
2) Then go to the iFlash database page and enter VID or PID to the search bar.
We find which programs are designed to work with your flash drive. (my flash drive was with an SK6211 chip, and the SK6211_20090227_BA program came up to it)
3) If you have a different chip, not from Skymedi, then you do not need to read further.
So:
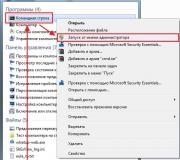
a)... We connect the USB flash drive to the USB connector of the PC.
b)... Launch SK6211_20090227_BA.exe
v)... In the utility, click -> Advanced-> in the window Password enter numbers 123456
and click on the Check button.
The windows will become active.
G)... On the menu Code Bank ver... select the latest database. For some, the flash drive was identified in the program (lit green, Ready) only after that.
e)... Dapee - press Multi-Partition.
In this window: Top left corner - check the box Enable CD-ROM, if you need to split the rest of the CD-ROM, and split a part into 2 more partitions (i.e. make a CD + flash + Flash), then move the engine - set the size of the partitions.
Top right corner - check the box Enable CD-Rom Booting(make the CD-ROM bootable) and write the path to the ISO image. The size of the CD part is set automatically depending on the size of the image. I tried a 2.5 GB image, everything is fine.
e)... Be sure to write the parameter autorun counter- it is responsible for all glitches associated with the disappearance of a flash CD after several downloads:
turns out autorun counter this is the number of times the Flash CD will appear on the system.
If we write 10 (as stated in the instructions), then the flash CD will appear and work exactly 10 USB flash drive connections.
In order for the image to work indefinitely, 255 (== unlimited) must be entered in this field.
source: http://www.mydigit.net/read.php?tid=58732&uid=35139
g)... Lun0 and Lun1 are partitions that will actually be seen as a flash drive. If the engine (see above) was not touched, there will be CD + 1 flash section, otherwise - CD and 2 flash drives (the volume of each depends on the position of the engine in the upper left corner).
Here we install:
format - ( Fat or Fat32)
section name - ( Format Labe l).
The first Flash partition can be done - ( Fixed) (i.e. it will be detected not as a flash, but as an HDD),
as well as block the partition from being overwritten - ( write protect), immediately writing the necessary files to it, registering the path to the folder with them (but I did not do this, because protection against overwriting was not included in my needs).
Click OK and agree to the changes.
h)... Further (in the previous window that appears after this, you can set VID and PID(if you want to change the name of the controller manufacturer and its type displayed in CHIP GENIUS - to determine the flash drive by the flashing utility in case of subsequent flashing it will not affect), Serial no. flash drives (you can use any) and LED parameters ( LED) - blinking frequency and light intensity, parameter Curr leave equal 100 mA(it is better not to set more, as far as is known, this is the maximum current current consumed by the USB flash drive).
It is better not to change all other parameters - I do not know what they are responsible for.
and)... Write down your profile name and click " Save"(save the profile), agree to the changes and close this window.
To)... The firmware is possible only if the flash drive is in the database (see above).
In this case, it will turn green and it will be written " READY".
Select the profile we saved and click AUTO-LLF(AUTO-LowLevel Format).
The flash drive lights up yellow " BUSY"- the rewriting process is in progress.
Its successful completion is indicated by green color and " PASS". Congratulations!
Important Tips !!!
- If the color before the start of the firmware (after selecting the last base of supported flash drives) is blue (NO Match), then you are out of luck (the flash drive is not in the database), wait for the firmware update or search for yourself, I found the right one from the third time.
- If you need to overwrite a new image, be sure to first use the Recovery Disk utility (or the main utility to rewrite the controller firmware without creating a CD partition - remove the Enable CD-ROM and Enable CD-Rom Booting checkboxes, leave only the LUN0 partition (removeble), and only then change it again as you need it, otherwise an error may occur when flashing)
Thanks for all the instructions and tips:
Domrachev.Ivan,
AVP-720,
website flashboot.ru,
Chinese programmers who wrote programs for flashing.
Important Note: all materials are presented for informational purposes and for the education of blondes.
Sidebar. Live CD(also LiveCD and CD Live Distro - English live CD, pronounced "liv si-di") - an operating system that boots from removable media (CD, DVD, USB drive, etc.), does not require the functioning of the installation on the hard disk. The same concept also denotes media with such OS (sometimes they distinguish LiveCD, LiveDVD and LiveUSB, depending on the media).
Petersburg ordeals, or why USB-CDROM
As I expected, the option of stupidly throwing the operating system installation files onto the card did not work. A more subtle approach is needed here. In the course of the research, significant differences (and part-time difficulties) of writing a bootable USB flash drive, as compared to CD, were found out. Here they are:
1) The need to spend a little more time in the BIOS
Many people are generally scared by the cyanotic color of this program and a lot of English words, and in our case we have to navigate through it. Moreover, USB turned out to be so "inferior" that its support is often disabled by default, and in especially outdated versions it is absent altogether (it can be treated by updating the BIOS). The BIOS itself can be very different from each other, in each of them you will have to navigate anew.
2) Simulated boot from a USB drive
Even if we were lucky enough to contemplate the ability to boot using usb in BIOS, there will be several options for such a download at once (although not always). Moreover, each of them is an imitation of downloading from other devices (for example, USB-FDD and USB-ZIP- imitation of booting from a floppy disk, USB-HDD- from a hard drive, USB-CDROM- from an optical CD). This introduces a certain amount of confusion in the solution of the problem.
3) Correct formatting of the flash drive and binding to the manufacturer
Before writing information to a flash card, you should format it. And this is done in a special way in order to correspond to one of the selected download options, marked with the paragraph above. The piquancy is added by the fact that for each flash drive there is a specific set of utilities from the manufacturer, with the help of which formatting and direct recording of boot data is carried out.
Running a little ahead
I started my acquaintance with the software for creating a bootable USB drive with FlashBoot - excellent multifunctional software. The problem was that it supported the progressive USB-HDD format, which was not present in my BIOS. I do not give links, since this does not affect the subject of the article.
The second massive attempt involved a powerful contraption WinSetupFromUSB. Differs in support of floppy disk imitation (USB-FDD and USB-ZIP). After stubborn battles with minimal knowledge and mastering the program, I still managed to stir up a USB flash drive for loading using the USB-ZIP method (which, in terms of the heat of passion, is worthy of reflection in a separate article). At startup, the system even wrote, they say, Start booting and all that. Then the black screen with this text froze indefinitely. I did not wait a couple of hours and rejected toys with a virtual floppy.
So, I have the method at my disposal USB-CDROM... Google gave out an order of magnitude less information about him. To implement it, you should format the USB flash drive so that the system begins to see our device at the same time as a CD drive and as an additional hard drive, for example. The first contains the operating system (in our case, the LiveCD), the second section is used as a drive, where you can drop additional programs (for example, a fresh working antivirus). Beauty! This is the only method that actually worked on my machine, and will be discussed later.
Actually I was looking badly. The USB-HDD option is often found in the Hard Disc Boot submenu
Preparatory stages
First, let's take care of what to write to the USB flash drive. That is, we need a bootable distribution (image) of the operating system (a file with the extension .iso). You can find a ready-made image on the network or make it yourself by gutting the original Windows disk (we don't take Linux into account), but this is worth a separate topic
Dancing with BIOS
Working in the BIOS is perhaps the most daunting and unexplored part of the business. Requires at least elementary knowledge of English, the ability to isolate words such as USB, Boot, etc. among other foreign words. Unfortunately, there are so many stamped BIOSes that it is unrealistic to reflect all modifications and their menus in the article. I will describe the stages of work using my computer as an example.
1. We get into the BIOS
You can jump in there when you turn on the computer (when the letters run on a black background) by repeatedly pressing (for correctness) the Delete key (less often F2 or Escape).
As a result, we find ourselves in the main BIOS menu. It looks like this to me:

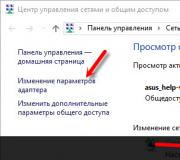
2. Turn on USB support.
It often happens that USB is disabled by default (value Disabled), and the BIOS "does not see" the inserted USB flash drive. It is clear that in this case any attempts to boot from it are doomed to failure. The main problem is to find the menu item in which the setting we need is located. In our example, it sits on the fourth line from the left - Integrated peripherals(see picture above). If we go there, we will see the following picture:

As you can see from the figure, the USB Controller and USB Device Legacy Support parameters are suspicious. In the figure, they are already enabled (Disabled - disabled, Enabled - enabled). However, the usb settings can have completely different names, and you may not see such a picture on another computer. That is, all this will be called something else. The key word for the search, as you understand, is USB. To help the inquiring mind of the user, I recommend that you familiarize yourself with the list of possible settings and a brief description of each of them. The seeker will find.
3. Set the order of loading
Having enabled USB, you need to force the BIOS to boot from it first. The order of priority in our example is determined by the group of settings Advanced BIOS Features

Also, quite often the order of loading is hidden in the menu item Boot or in combinations with this word. In the picture above, CDROM is specified as the First Boot Device. Following the logic of the planned actions, we change the field value to USB-CDROM. You can leave the Hard Disk as the second device (Second Boot Device). The work is completed, exhale, save the settings and exit (as a rule, F10 - Save & Exit). "Hot keys" and their functions are indicated at the bottom of the screen.
It also happens: no matter how much we look for where to turn on USB, we do not find it. And there are no options in the download sequence from USB. This is most likely the worst case - the BIOS is outdated and does not support USB. In this case, soap the rope and stand on the stool, go to the BIOS manufacturer's website and update the version.
And finally. For those who want to get to know this funny little beast called BIOS a little closer, there is a little bonus in store.
Showdown with a USB flash drive
Sidebar. Controller(English controller - regulator, control device) - control device in electronics and computer technology
If you have an exotic controller that is not on the list, you will have to go to the controller manufacturer's website and scour for the programs you need. A reasonable question arises: how to understand on which controller our flash drive is jammed? This is done simply. Download the useful ChipGenius utility, insert the USB flash drive into the port and launch the program. This is what she gave out for my Kingston:

So, we have decided on the controller (skymedi), let's turn to the software of this manufacturer. They are (according to the corresponding instructions) a set of utilities SK6211BA-20090227.
After unpacking the downloaded archive on the desktop, run the file SK6211_20090227_BA.exe

My flash drive was identified on one of the 8 ports, which is symbolized by the inscription Ready. Push the button Advance ( Advanced settings). We get into a new window:

This is an empty window (with inactive fields). Into the only active field Password(Password) enter 123456 and click Check. After that, the program will automatically select the settings, as in the screenshot below. However, you need to manually register PreCopyPath(after pressing the Browse button, select the PreCopy directory, which is located in the folder with the downloaded program).
The setup is not complete yet. Push the button Multi-Partition and we get into the third window, designed for additional settings. The most important here are the check marks. Enable CDROM, Enable CDROM booting and field ISO Image, where we indicate the path to the previously downloaded LiveCD image. The rest of the filling is done automatically, as in the screenshot:
By clicking OK, we roll back to the previous window, where in the Config File field we enter the name of our new configuration (for example, Kingston_4G). Next, we finally save the settings (Save) and return to the main window of the program. Selecting the button Auto-LLF and we are waiting ...
Formatting and writing have started.
Upon completion, we safely remove the device, and when reconnected, the system already sees two devices instead of one flash drive.
We send the computer to reboot and safely boot from the USB flash drive. I must say that the newly-minted LiveUSB got up without any problems, and besides, it was several times faster than the analogue on CD due to high-speed data exchange. If I understand correctly, the program for the skymedi controller from the considered example can knock out only 1 partition from the flash drive for the CD drive. This means that, alas, it will not be possible to write a LiveCD and a full-fledged image to the card at the same time. However, as a test, nothing prevents you from throwing an assembly with an integrated LiveCD onto a USB flash drive and getting a bootable gizmo "for all occasions" at the output. Besides, it is quite possible that this limitation can be bypassed on other controllers. You need to check.
USB Flash can be used not only in the traditional way "like a big floppy disk". There are more interesting and in some cases more useful options. This article will describe how to make a USB CD-ROM from a USB flash drive. Of course, the flash drive will remain a USB flash drive, but the computer will "see" it as a CD-ROM.
Such a trick may be needed, for example, to install Windows XP or 7 on a computer without a CD-DVD drive. Of course, in such a case, there are other ways, but such a CD-ROM flash drive allows you to install Windows on a netbook without any problems and any unnecessary gestures.
If you need to make an installation flash drive Windows 7 there is another way, simpler - Installing Windows 7 from a USB stick.
The first thing to do is get a disk image as an ISO file. It can be an image of the Windows XP installation disc or any other CD or DVD disc. There are many programs that allow you to save the contents of a laser disc as an ISO file. For example such as UltraISO, InfraRecorder, ImgBurn and many others.
Then, you need to find out exactly which controller is used in your flash drive. The fact is that even in one model of flash drives there can be different controllers, and programs with which you can make a CD-ROM from a flash drive are rigidly tied to the controllers, that is, each controller has its own program.
The most accurate results are given by the usbflashinfo program, by itself it produces "krakozyabry", but they need to be sent to the author and he will send information about the controller of your flash drive. You can search for your model among the ready-made results in this forum.
After that, on the website flashboot.ru, find a program for working with the controller of your flash drive. Through this program, create a CD-ROM partition on a flash disk and upload your ISO file there.
Below it will be described how to create a USB CD-ROM from an Apacer AH325 4 Gb flash drive. This USB stick uses a Phison 2251-60 controller. The programs for working with this controller are called Phison_MPALL. They come in different versions. This article will use version 3.20.0B2 as an example.
First, you need to make sure that the usbflashinfo program is not mistaken and that there is really Phison inside, for this you need to run GetInfo.exe and enter the drive letter under which your flash drive was detected in Windows, and then click the "Read" button:
If there is a Phison controller inside the flash drive, then the program will display information about the flash drive:

The next step is to create a configuration file for subsequent recording of the USB flash drive. To do this, run the MPParamEdit_F1.exe program:

and then specify the necessary options in it starting from the top, in the "CD-Rom Image" field you need to specify the path to the file and the ISO file itself:

Note.
It is possible to create two partitions on a flash drive, one will emulate a CD-ROM, and the second will be a regular flash drive or emulate a hard drive. In this case, the CD-ROM section will be allocated as much as necessary for recording the ISO image, and the rest of the space on the flash drive will be allocated for the removable / fixed HDD section. However, if the flash drive will be used for booting, and especially for installing Windows, I advise you to make only one partition - CD-ROM. You will "lose" part of the total capacity of the flash drive, but you will avoid compatibility problems with different BIOS versions.

In this program, you need to open the file that you created in the settings editor. If all the fields of the program are empty, then you need to click the "Update" button, after which a record about your USB flash drive should appear in one of the fields. After that, you need to press the "Start" button and wait until the program runs:


The green color of the field means that everything is finished. You need to close the program, and then open the Windows Process Manager (taskmgr.exe) and manually kill the MPALL program in it. The fact is that after closing the program window, its process remains in memory.

Now you can disconnect the USB flash drive through "Safely Remove Hardware" and unplug it from the USB connector. Then plug it back into the slot - but now Windows will recognize it as a CD drive.
Yes, yes, it is the CD-ROM section, you understood everything absolutely correctly, and now I will teach you everything, but before continuing, let me write one small formality: The author is not responsible to users and (or) other organizations and third parties, nor for any malfunctions, delays, incorrect work, deletion or loss of any user information, as well as any damage associated with the use of the software posted in this topic.
So first, let's figure out what a CD-ROM is?
The abbreviation CD-ROM stands for Compact Disc Read-Only Memory. In our Russian, this means a compact disk, the memory of which is read-only.
The urgency of creating such a partition on a USB drive is certainly growing, and the reasons for this are very different, most often it is associated with installing an OS or creating a bootable LiveCD. In my case, it is so. Due to the hackneyed question of how to make an installation USB flash drive with Windows XP more than once prompted me to think about it, but since there was no time to deal with this, I was content with the grub4dos bootloader, but in the end I decided to abandon it.
So what are the benefits of creating such a CD-ROM partition?
1. The ability to write any disk image, of any size (the only limitation is the size of the flash drive itself)
2. This section of the CD-ROM will be recognized by the system as a CD-ROM drive.
3. The functions of the flash drive will also be preserved. The CD-ROM partition will be exactly the same size as the disk image that you burn. Let's say if we have a 16GB flash drive and we write there a 1GB disk image, then we will have a 1GB CD-ROM partition, and the remaining 15GB will be like the memory of a regular flash drive.
4. This CD-ROM partition will be recognized by the computer as physical, which will allow you to boot from it by setting the BIOS to boot from USB-CDROM, it will also be possible to boot from the flash drive itself.
All this was verified by me personally as follows:
On my 16GB flash drive, a CD-ROM partition was created with the installation distribution of Windows XP, the weight of which is 593MB. The image is original and was recorded "as is." The rest of the volume was recorded with the installation distribution of Windows 7. The computer was able to successfully recognize and load what I needed, and there were no conflicts between the bootloaders. they are located independently of each other.
Let's start the creation process a little later. While we are writing comments, naturally observing the rules of the forum.
Now we will look at the process of creating a USB CD-ROM partition on a USB flash drive under the control of the USBest controller. You can find out under the control of which controller you have a flash drive in two ways:
1. Remove the cover of the flash drive and look at the marking of the chip.
2. Use an excellent program .... MPInfoCheck
So, we run the program and see:
....
A flash drive on the USBest UT165 controller, in my opinion, this is, by the way, one of the best controllers, since it is defined almost everywhere.
After we learned the marking of the controller, we take the service utility .... UFDUtility (works with controllers (UT162; UT163; UT165; UT190; IT1167; IT1168; IT1169). And run Autorun Manager as shown in the screenshot:
....
All CD-ROM section has been created!
picture:
Attachment 1 ****** 3
[collapse]
picture:
Attachment 1 ****** 3
[collapse]
picture:
Attachment 1 ****** 3
[collapse]
And what to do with this misfortune?
So let's start in order:
Message from amen51:
When launching the MPInfoCheck program, a picture was displayed:
picture:
Attachment 1 ****** 3
[collapse]
picture:
Attachment 1 ****** 3
[collapse]
It should be so, in the second screenshot you had to select the ports to which your flash drives are connected.
Message from amen51:
The UFDUtility_v3.4.8.0 program "made me happy" with the fact that the "device is not removable":
picture:
Attachment 1 ****** 3
[collapse]
In fact, the program wrote that the device is not connected, and this is not surprising, since this program works with flash drives on the USBest controller, and you have a JetFlash flash drive, which is most likely on the Alcor Micro controller, but I can't say which series, I'm not a telepath
Message from amen51:
And what to do with this misfortune?
I have Win7 x32 installed. Flash drives: JetFlash TS4GJFV10 (4 GB) and General USB Flash Disk (16 GB).
I made a 4 GB flash drive multiboot - it works great. I tried to do the same with a 16 GB flash drive. Works only in test mode, and does not load from it.
I can’t say anything about 16GB, because it’s not at all clear which manufacturer you have this flash drive, but about JetFlash I can recommend a program that works with flash drives on the Alcor Micro controller (again, if I’m not mistaken that this flash drive works on this controller) , this is just my guess).
Found a way
Hidden text
Create bootable USB flash drive with Windows XP or txtsetup.sif is corrupted
In the last article on how to create a bootable USB flash drive (Part 1), we looked at how to use the UltraISO program to write an image of the required distribution to a USB flash drive. But this method has some drawback.
After writing a Windows XP image to a USB flash drive, when trying to boot from a USB flash drive, an error occurs: txtsetup.sif is corrupted or missing, position 18
This problem is solved as follows:
You must use another method to create a bootable USB drive, which is described below.
So, let's begin.
First, we need to format our USB flash drive. Let's do it using standard means.
Go to My Computer, right-click on the flash drive and click "Format"
....
Now open the WinSetupFromUsb program
you can download it here WinSetupFromUsb.rar
The program does not require installation.
Choosing Bootice
....
In the window that opens, click Perform Format
....
Select USB-HDD mode (Single Partition) and click Next Step. We agree with everything, and wait until the process is over.
....
....
Then we exit all the minor windows, leaving only the main WinSetupFromUsb.
We put a tick in front of Windows 2000 / XP / 2003 Setup and select our folder with Windows XP, which we previously prepared by unpacking it from an ISO image (you can unpack it using WinRAR, for example, or another program).
....
And press GO
....
If everything is successful, then at the end we will see the message Job done.
Congratulations, our bootable Windows XP stick is ready.
When the computer boots, we see a boot window with 2 items: Start PLoP boot manager
Windows XP / 2000/2003 Setup
We select item 2, there is an item starting with the words First Part ... and start installing Windows XP from a USB flash drive.
By the way, here are described possible problems that may arise when installing this Windows XP from a USB flash drive, and their solution.
[collapse]
How to write a USB flash drive To avoid this error, you need the WinSetupFromUsb program, there were no problems with the old version of this program, but the new version of this program lacks some items, without which it is impossible to correctly write the Win XP image to the USB flash drive. Can anyone know an easier way to write XP to a USB flash drive so that this error does not occur?
I would like to use the latest version of WinSetupFromUsb, maybe someone knows how to use it correctly to write an XP image to a USB flash drive?
On one forum I also read "copy txtsetup.sif from I386 to the root of the memory card and rename I386 to $ WIN_NT $. ~ BT", but this did not help me, the error does not occur, the netbook just automatically reboots all the time.
Message from BEOWULF1986:
When trying to install Win XP on a netbook from a USB flash drive recorded via Ultra ISO, an error message appears "txtsetup.sif is corrupted"
Message from UniversalUserIS:
Message from BEOWULF1986:
When trying to install Win XP on a netbook from a USB flash drive recorded via Ultra ISO, an error message appears "txtsetup.sif is corrupted"
It is easier to reprogram the USB stick so that it is physically identified as a CD-ROM device. The process is completely reversible. I can help with that.
Thank you, I didn’t think about it, I’ll try now.
Message from BEOWULF1986:
Please write how to make a CD-ROM from a flash drive? I couldn't find a way for my USB flash drive (Silicon Power LuxMini 720 8GB) on a PS2250 controller. Can I make a CD-ROM from a USB flash drive without a controller (SD memory card)?
As for memory cards, I immediately say that it will not work, we will try with a USB flash drive. First, check if your flash drive is recognized by the program in the attachment?
All the same, I made a CD-ROM partition on a Silicon Power LuxMini 720 8GB flash drive. The controller identified it more precisely, it turned out to be PHISON PS2 ****** 0-F. I wrote a Windows XP SP3 image to this CD-ROM section. Windows and BIOS can easily see 2 partitions of a flash drive (regular and CD-ROM), I select a bootable USB CD-ROM, Windows XP installation starts, the error "txtsetup.sif is corrupted" no longer occurs. A convenient thing is this CD-ROM partition, you can burn any Live CD on it and extract the necessary files from the C drive of the killed Windows before reinstalling, or try to restore Windows without reinstalling. To create a section, I used the Phison MPALL v3.29.0B program.
controller ALCOR AU6990
Message from the programmer:
There is a transcend jetFlash 8 GB
controller ALCOR AU6990
Tell me the program and the exact instructions, otherwise it doesn't work out somehow)))
Message from UniversalUserIS:
Message from the programmer:
There is a transcend jetFlash 8 GB
controller ALCOR AU6990
Tell me the program and the exact instructions, otherwise it doesn't work out somehow)))
In principle, everything is written quite clearly there, or are you not on friendly terms with English and still need instructions?
Message from the programmer:
Message from UniversalUserIS:
Message from the programmer:
There is a transcend jetFlash 8 GB
controller ALCOR AU6990
Tell me the program and the exact instructions, otherwise it doesn't work out somehow)))
In principle, everything is written quite clearly there, or are you not on friendly terms with English and still need instructions?
I need it better, because I seem to have done it according to the instructions from the site, but not rolled
In general, open AlcorMP.exe, after determining the type of controller of the flash drive, go to Setup, there in the Mode tab, on the right toggle switch on AutoRun->
Message from UniversalUserIS:
Message from the programmer:
Message from UniversalUserIS:
Message from the programmer:
There is a transcend jetFlash 8 GB
controller ALCOR AU6990
Tell me the program and the exact instructions, otherwise it doesn't work out somehow)))
In principle, everything is written quite clearly there, or are you not on friendly terms with English and still need instructions?
I need it better, because I seem to have done it according to the instructions from the site, but not rolled
In general, we open AlcorMP.exe, after determining the type of controller of the flash drive, go to Setup, there in the Mode tab, on the right toggle switch to AutoRun-> ISO Mode. In the File Path, specify the path to the image file. Click "OK" everywhere and in the main window of the program "Start".
strangely last time I did it, but everything happened quickly and there was no drive. Everything worked out, but immediately when starting the installation of Windows when checking devices, a blue screen)))
In general, right now, I removed the drive and I'll try it .... - the program is already +1 ****** 0 times it can be updated and it will come out if not, then you will have to torment the flash drive with the drive again.