Adobe photoshop basic features. Most requested features by users
All sections of the site site
best photo editor for photoshop
Everyone knows that Photoshop is a very powerful and rather complex program. It is this power that causes difficulties for many beginners and leads to confusion in the head. But it's okay .... to master Photoshop can!
By the way, do you want to make such hand-drawn presentations? More details
The program itself Adobe photoshop is a product of hundreds and thousands of developers, while remaining fairly simple and intuitive for the user.
But for those who meet her for the first time, she will show all her pride and greatness, thereby, as if once again proving her high status among the programs of competitors, although she has no worthy competitors :-)
V photoshop there are quite a few pitfalls and various hidden chips, knowing which an ordinary user turns into an experienced one with one movement of the mouse, and for beginners, you can easily learn this thanks to video courses.

Each has its own reasons. Even if you are not going to use a photoshop program in professional life, there are many other reasons to master this wonderful program.
For example, quick removal of defects (mole) of the face
And at the same time, lighten bluish circles under the eyes


After finishing the work with sharpness, the perfect portrait is obtained.
=====================
New video course - video training in Photoshop
Video training therefore it is appreciated that all actions take place right in front of you. You can always go back and look in more detail and study in detail what you did not immediately understand or seemed too difficult!
Videos are good and practice is even better, but when they are put together they are a gold mine for clear and productive learning. But it so happens that even the simplest video is not understandable to a person, since against the background of everything that is happening, the announcer reads incomprehensible words.
============================
Do you think how glossy magazines create such effects ?!
Beauty with Photoshop
With the advent of the computer era, the function of preening was almost completely taken over by Photoshop. Today even second-graders know how to make even Britney Spears or Paris Hilton out of Lyudmila Zykina in ten minutes using this wonderful program.
Here is a short video on how to make a beautiful figure in a photo in Photoshop.
But far from everyone is still guessing that almost no photo in a glossy magazine can be published without significant adjustments by the designer.

It was in ancient times that the pinnacle of embellishment was retouched eyes for expressiveness and artistically drawn eyebrows (in the printing houses in the workshop where the photographs were used to make lead prints for printing, a special person was sitting). Remove acne, wrinkles, oily shine from the face? By itself!
Change waist thickness and hide belly folds? Three minutes! Reduce the volume of the thigh and the shape of the lower leg? As easy as pie!
Make-up artist, stylist and hairdresser are, of course, important even now, but the main of all arts for glamorous divas of the XXI century today is photoshop.

Looking at the expressive forms of the seductive Marya Carey, men in all over the world sighed deeply.
They agreed to put up with the fact that the sweet-voiced roulades of the pop diva were modulated in the studio, but the paparazzi who knew no barriers watched the planet's singer on a private beach, and a terrible thing happened!
It turned out that the star's slender legs and slender waist are also pure "computer". And in general there is nothing in her that would differ from the girl from the next doorway. That, perhaps, will also be more built.

It turns out that you can't even believe your own eyes! The sex idol of the Russian stage of the 90s Natasha Koroleva in the Makhim magazine is one thing, she, emerging from the water in its natural form, in the picture of a photographer "uninterested" in an elegant result is already another thing.
But what is the Queen, when the queen of domestic glamor Zhanna Friske, and she turned out to be dishonest, or rather, on the leg!
And you don't really need to look at a photo taken at one of the parties to make sure: the singer, actress and model, which, in her own words, “half the country wants”, has frank cellulite! In the sense - on all the parts of the body that rely on him.
The effect of the exploding bomb was caused by photos from the shooting of the calendar with the participation of the Venezuelan top model Angelica Panganiban that got on the Internet at the end of last year.
In between photosets, someone took and snapped a naked beauty a couple of times, and then these pictures leaked to the Web.
When hot Latinos found out what their first beauty really looks like, a lot of people got culture shock!
After all, if two pictures - a natural raw and a glossy lacquered one - just put them side by side ....... And these pictures were taken on the same day !!!

Probably the biggest misconception that a person can have at the beginning of the 21st century is the belief in the authenticity of what is shown to him on television and shown on the pages of magazines ...
And in continuation ..... three more photos of famous models.
Learned? Adriana Lima in person:

Our top model Vodianova:

================
====================

That's it! Photoshop works wonders! In real life, these super mega beauties lose even to those whom men do not consider beautiful :)
====================
====================
Look how in one minute ... a super-model was made from an ugly woman
========================
In general, you need to master Photoshop! and not only to learn how to retouch a photo - imagine how great it would be if you make a calendar for your organization yourself, develop a corporate logo, draw a congratulatory collage for a holiday, an exclusive postcard for your boss, or prepare a colorful presentation and show it on a projector!
Start using technological advances to your advantage! They will make your life much easier and brighter! Perhaps it is thanks to good knowledge of Photoshop, You will take a huge step forward in your life and career!
Photoshop versions
You can find more than 10 in runet now versions of Adobe Photoshop, starting with the fifth and ending with Russian CS4 Extended Final and CS5 Extended
(in Russian)
By the way, some people still install Adobe Photoshop 7.0 for themselves. Since after using Adobe Photoshop 9.0 for a short time - aka Adobe Photoshop CS2 and Adobe Photoshop CS3 return again to the good old and simple 7th version
Indeed, it may not be suitable for in-depth use, but it's like with a very "fancy" mobile phone. There are a lot of functions, but you just need to call, send SMS, and sometimes a camera with a player.
Although the best option for today is Adobe Photoshop CS3 Extended
 |
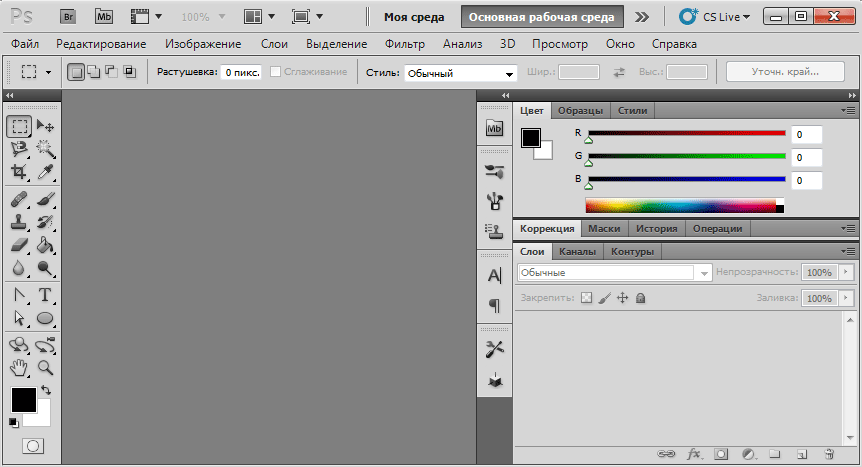
Check out a great tutorial! Once again, Adobe has pleased us with the next improved version of Photoshop. CS5 opens up new perspectives for digital imaging, combining powerful photo tools, superior image extraction and coloring, and smart retouching. 1. Excellent painting effects (new) 2. Easy selection of difficult areas (new) 3. Fill based on image content (new) 4. Puppet warp (new) 5. Automatic lens distortion correction (new) 6. Automatic lens distortion correction (improved) 7. Improved HDR image processing (improved) 8. Improved media management (improved) This material opens a whole cycle of articles devoted to the basics of working in the most popular graphics editor Adobe Photoshop. Today we will get acquainted with the program interface and some primitive image operations. IntroductionEven if you are the most notorious newbie in the computer world, you probably already know the word "photoshop". Among computer users, it has long become a household word and is used almost always when it comes to processing photographs and images. For many, the term "photoshop" has become synonymous with such words as "photo processing", "photomontage", "photo editing" and others. But in fact "photoshop" is not a process, but a program for image processing, the first version of which was developed and released by the American company Adobe Systems back in 1990. To date, Adobe Photoshop is the most advanced graphics editor, used to work primarily with raster images consisting of colored dots (pixels). Nevertheless, this product is constantly being improved and in the latest versions, developers increasingly endow the application with various vector tools. Thanks to its rich features and user-friendly interface, Photoshop is very popular among both professionals and ordinary users. For what purposes can this program be used? Highly professional processing of digital photos and images; creation of images and designs of websites of varying complexity; work with 3D files; design of postcards, calendars, multimedia discs and business cards; converting files to various graphic formats is just a fraction of what the mighty Photoshop can do. It can take many months or even years to learn all the functionality of this application. Despite all its many possibilities, the main purpose of Adobe Photoshop is image editing. Over the years of its existence, the program has evolved, acquired new features, acquired advanced functionality, but at the same time it has always remained and remains a graphic editor. In fact, the workflow in Photoshop can be described in just a few words: you take a picture or take a picture, then edit the selected image and finally save the finished result in a file or print it. Of course, in the series of materials "Photoshop for Beginners" we will not study the editor professionally, but will only get acquainted with its basic features. But believe me, this is enough for you to carry out most of your daily tasks when working with images or photographs. In the future, after taking your first steps and understanding the basic concepts, you can continue to improve and master more complex functions of the program. Before we begin to master Photoshop, I would like to say a few words about the methods of distribution of this application. Probably no one will be surprised if I say that it is paid. But the price ... The cost of one license is over 25 thousand rubles, which is certainly not affordable for most ordinary users. However, recently, Adobe has switched to a new method of distributing its products - by subscription. Now for the use of its programs, including Photoshop, you will have to pay a monthly fee of 600 rubles per month. The only outlet for users can be a 30-day free trial period after the first installation of the application. And the last thing. It is important to learn to work in Photoshop by understanding your actions, and not performing them mechanically, just following the written instructions. To do this, the user must have at least a basic understanding of the basic types and characteristics of digital images. Therefore, if you still do not know what raster graphics, resolution and image format are, then before starting to study the capabilities of a graphic editor, read the article. InstallationProbably the first question that most users have is where to get or download Adobe Photoshop. At the moment, the latest version of this graphics editor is Photoshop CC, which is part of the cloud package Adobe Creative Cloud. You can download a free 30-day trial version of this product from the developer's official website. As for the previous versions of the program - Photoshop CS6, CS5 or earlier, you can download their distributions using any search engine on the request: "download photoshop". If you download the application from the manufacturer's website, then to install it you will be prompted to download and run a special small utility that will help you install the program in a few simple steps. In this case, for the successful installation of the application, you will need to go through a short procedure at registration. If you downloaded the disk distribution kit of the previous version of the program (CS5 or CS6), then find the folder with the name Adobe CS (5/6) in it and run the Set-up.exe file inside it. Then just follow the instructions of the installation wizard. During the first launch of the graphics editor, you will be prompted to either enter a license key or activate a 30-day trial period during which you can use Photoshop for free. In some cases, the original copy of the program may be accompanied by means for cracking it (key generators), which can be used only at your own peril and risk, since their distribution is illegal. Program interfaceAfter the first launch of Adobe Photoshop, you will see the main program window, which has several areas.
At the top of the window is main menu bar programs and control Panel(in CS5). Moreover, they can be located both in one line and under each other. Everything will depend on the size of the application window. The control panel is divided into three areas. The leftmost bottom includes the following items:
In the middle part of the control panel there are buttons for selecting the working environment of the program. The working environment in Photoshop is understood as a certain arrangement on the screen of the application control interface elements (windows, panels, palettes). By default, the editor is set Main working environment, considered universal for all types of work. In addition to it, the developers offer us several specialized working environments designed to work in certain areas (3D, Drawing, Animation, Photography, and so on). To switch between them, you can use the arrow icon. Finally, each user can independently customize the interface to their liking and create their own working environment. At the initial stage, we will use the main working environment. On the right side of the control panel there is a CS Live button, clicking on which opens a drop-down menu with access to thematic Adobe online services. In Adobe Photoshop CS6, there is no longer any control panel. All that remains of it is the PS button and a modified switch between working environments. Immediately below the menu bar and control panel is Properties panel the current instrument. The next most important control in Photoshop is Toolbar, located by default along the left edge of the program window. It contains icons of working tools, as well as buttons for selecting the main / background colors, turning on / off editing in the "Quick Mask" mode and changing the screen display mode (in CS6). By default, all icons on the control panel are located one below the other in one column. But you can place them in two columns as well by clicking on the small arrow button at the top of the panel. You can also detach from the left edge and place the panel anywhere by dragging the mouse pointer over its header. Along the right edge of the application window, there is a system for placing various panels or, as they are also called, palettes, which, like tools, are actively used in creating and processing documents. Palettes are rectangular windows that can have several tabs at once, in each of which you can scroll through the contents. In addition, just like regular windows, you can minimize and maximize palettes, resize them, or move them anywhere on the screen. At the same time, to expand the working space of the document, all the right panels can be collapsed into icons using the button with two arrows located above them. Pressing it again will expand the panels back. The set of panels displayed on the right side of the screen depends on which one was selected. working environment... As we already noted, the default in Photoshop is set Main working environment, in which at the right edge of the window three main panels are displayed in an expanded state: Color with an additional Swatches tab, Adjustments with an additional Styles tab, and Layers with two additional tabs, Channels and Paths. To the left of them, but already in the form of icons, the History, Properties, Symbol and Paragraph panels are located. If, for example, switch to the Drawing environment, then the following panels will be displayed in the open view on the right: Swatches, Navigator, Brushsets, Layers, Channels and Paths, and in the form of icons: History, Brush, Source of clones and Toolbox. Thus, switching between environments, you can quickly change the current set of panels based on the direction of work. Photoshop is a very feature rich program with many commands. Therefore, to make it easier to call the most popular of them, you can use keyboard shortcuts. This will significantly speed up the work in the editor and save you from searching for the necessary actions in its bulky menu. Create and open a documentWorking in Photoshop begins with creating or opening an existing document. To create a new document in Photoshop, select the item above File and then in the drop-down menu the command Create(Ctrl + N). Immediately after that, you will see a dialog box in which you can set a number of parameters for the newly created document.
First of all, you need to enter the values Width and Heights the created image. The units you can select are Pixels, Inches, Centimeters (default), Millimeters, Points, Peaks, and Columns. Subsequently, you can always change these values, as well as all the others. Permission document must be selected based on the purposes for which you plan to use the image in the future. The default resolution is 72 ppi and is suitable for most digital graphics applications. Higher resolution values may be required for images intended for printing on printers or printing houses. Color mode there is no need to change for no particular reason. For most computer images, the type is ColorsRGB 8 bit which is installed by default. We will also not touch additional parameters, such as Color profile and Pixel aspect ratio. The last main parameter that you can set for a new image is its Background content... By default, the background is set to white. You can also choose any other color or make it transparent. A transparent background appears as a checkerboard pattern and is the most versatile choice. When all the parameters are set, click on the OK button. After that, an empty document of a given height and width will open in front of you, which in Photoshop is called canvas. And yet, most users use Photoshop at home to edit ready-made images. In order to open the desired file in the program, use the command of the same name Open(Ctri + O) from the menu File.
Next, you will see a dialog box in which you need to find the necessary document on your computer, select it and click the button Open... The selected image will then appear in the Photoshop workspace. You can also open the desired file by simply dragging its icon into the application window. Modes of working with documentsThere are three modes of working with documents in Adobe Photoshop. Switching between them is carried out using the main menu item View and options in it Screen modes... This can also be done using a special button located at the very top of the program screen.
The first, the most basic mode, is called "Standard window" and is installed by default. In it, you can open and work simultaneously not only with one, but also with several documents at once. In this case, each image will open in its own tab. The bookmark bar is located at the top, just above the work area. The active tab containing the document you are directly working with is highlighted from others in light gray. At any time, you can unpin the desired tab from the panel, after which it will turn into an independent window. To do this, just hover the mouse cursor over it and drag it in any direction. You can also return a tab to its place by moving its header back to the panel area. In the next mode "Full screen with main menu" the bookmark bar, scroll bars and status bar are removed from the screen, which somewhat expands the workspace. But at the same time, work in this mode is possible with only one image. Finally, you can choose full screen mode, so called "Full screen", where all panels will be initially hidden. To call the toolbar or panels on the right, just move the mouse cursor to the desired edge of the screen. You can also press the Tab key, after which the display will show all panels, the tool properties bar and the main menu. As in the previous case, you can work in full screen mode with only one document. To return to standard mode, use the F or Esc key. If you open several images at once in Photoshop, then by default they will be displayed on the screen exactly one at a time, each in its own tab. But sometimes, when working, it is required that several documents be displayed on the display at once. For example, it is convenient when you want to transfer a fragment of one image to another window by simply dragging the mouse.
To control the display of all open windows, the application provides the option Arrange located at Window main menu. You can also display all documents in CS5 using the button Organize documents located at the top of the program window on the control panel.
Using this command, you can arrange working images on the screen in any way convenient for you: in vertical or horizontal tabs, in a grid, mosaic, cascade, in groups and others. Saving an image and changing its formatAs with many other applications, it uses two commands to save work done: Save(Ctrl + S) and Save as(Shift + Ctrl + S). You can find them in the same drop-down menu File... The first time you save the document, the actions of both commands will be the same. A dialog box will open in front of you, where you will be prompted to select a name, location and file format. Further, the command Save used to save all changes to the current document. The action Save as selected if you want to make another copy of the file, changing its name, type or location. Despite the fact that Photoshop is an advanced graphics editor, it can be used for fairly simple, but at the same time, very popular image operations. In particular, this concerns the ability to quickly convert graphic files from one format to another, for example, in order to reduce their size.
Open any image in Photoshop and choose the command File - Save As... In the dialog box that opens, click on the arrow in the field File type... You will see a drop-down list containing more than four dozen different graphic formats. Select the appropriate one and click the button Save... Thus, if necessary, in a matter of seconds, you can change the image format, for example, from PNG to JPEG, TIFF, GIF and many others. Image resizingAdobe Photoshop is a graphics editor mainly designed for creating and processing the most common type of images - raster images. Recall that raster images are a rectangular grid consisting of points (pixels), each of which corresponds to a specific color value. Thus, the main quality characteristic of any raster image is resolution, which shows how many pixels it consists of. It is clear that the higher the resolution, the higher the image quality. True, for high quality, as a rule, you have to pay with an increased file size. Of course, modern hard drives have large volumes and allow without any special inconvenience to store photos and pictures in the best quality, without worrying about the lack of free space. But there are often situations where too high image resolution becomes a problem. For example, let's say you want to post your photos online or email them to friends. In the first case, the large file size can cause serious difficulties for users when opening your images from the site pages. In the second, the files may simply not be sent due to certain restrictions imposed by the postal service on their size. Also, do not forget that processing large images imposes increased demands on computer performance. Therefore, when working with digital images, you often have to change their resolutions in search of the optimal balance between image quality and file size. It is important to understand that the resolution and quality of the image are formed during its creation and depend on the settings you choose in the editor, as well as during scanning or photographing. And although in the future you can increase the resolution of the picture, its quality will not improve from this. Therefore, initially it is better to create high-resolution photos, and then, if necessary, lower it, but not vice versa. So let's get down to business. First, let's open any image using the command already known to us Open from the menu File.
As an example, we will use this picture with a resolution of 2560 x 1600 pixels and a size of 3.26 MB. For obvious reasons, you see a small copy of it on this page. You can use any other photo for training.
After opening the document in the program window, select the option in the upper main menu Image, and then the item Alt +Ctrl +I).
In the window that opens, there are two areas with the specified dimensions at once. The upper area reflects in pixels or percent the current image resolution with which it is displayed on the monitor screen. It is she who interests us in the first place, since here you can change the size of the picture in the event that it is being prepared for further digital use, for example, publication on the network, viewing on a computer or fitting to the size of the desktop picture. To resize the document, enter any value in the Width or Height field. In this case, the other parameter will change proportionally, since initially in the lower part of the window in paragraph Maintain proportions there is a check mark that can be unchecked if necessary. Immediately after changing the values of the width and height, in the upper part of the window you can see how the file size will change after this procedure. Below the dimension of the digital image, one more dimensions are displayed that the drawing will have, but not on the monitor screen, but after printing on a printer. They can be set in more usual values for this - centimeters, millimeters, inches and others. In this case, the resolution of the printed image is set separately. If you do not plan to print the image with which you are working, then there is no need to change these parameters. The default print resolution is 72 ppi. As we have already noted, this resolution is standard when viewing an image on a computer monitor, but if we are talking about high-quality printing, then it is better to make its value equal to at least 200 pixels per inch. The standard resolution for photographic laboratories is considered to be 300 dpi.
To achieve the desired resolution, you must either change the width or height of the print, or set its value manually (then the width and height will change automatically). In this case, if you do not want to change the size of the digital image, then uncheck the box Interpolation. After entering the desired values for the width and height of the image, press the button OK in order for the accepted changes to take effect, and then save the picture in a new file.
In our example, lowering the initial image resolution to 1600 x1200 pixels resulted in a halving of the file size - from the original 3.26 MB to 1.57 MB. At the same time, visually, without strong scaling, no difference between the two pictures is visible on the monitor screen, as you can see for yourself. There is another way to resize images in Photoshop - geometric. It is carried out using the option (Alt +Ctrl +C), also located in the already familiar menu Image.
As in the previous case, we are again asked to independently select the required width and height of the image. Let's do it and see what happens. Let's set the horizontal and vertical dimensions again to 1600 x 1200, and press the OK button.
As you can see, the image was simply cropped proportionally at all edges to the size we specified. That is, in this case, we do not change the resolution in the drawing, reducing the number of points of which it consists, while preserving all its contents, but directly the physical dimensions of the width and height of the canvas on which the drawing is located. At the same time, the resolution remains unchanged, since along with a decrease in the number of points, the content of the picture also decreases. Now let's go back to the window and see what other interesting possibilities this tool offers us. First, you can enter the dimensions of the visible part of the image, both in absolute terms and in relative terms. For example, if you need to increase the canvas by 10 cm in width, then check the box Relative and enter in the field Width figure "10", choosing centimeters as the unit of measurement. To decrease the size, you must enter negative values. Secondly, you can specify the direction of resizing the canvas. The switch is responsible for this function. Location, made in the form of a square, divided into nine sectors. To see clearly how it works, enter any arbitrary values for the size of the picture, different from the original ones. Next, click on any sector, and you will see how the arrows will show which sides of the picture will be changed and how.
By default, the center sector is active. This means that when the image is resized, each of its sides will be enlarged or reduced in equal proportions. For example, if you want to reduce a picture 100 pixels wide and 50 pixels high, then it will be cropped 50 pixels to the left, 50 to the right, 25 to the top, and 25 to the bottom. If you choose the option as in the left image, then 100 pixels on the right will be cropped, 25 on the top and 25 on the bottom. Well, in the right version, the image will be cropped 100 points from the top and 50 points from the left. After you have selected the appropriate sizes and areas of their application, click the button OK for the changes to take effect. To achieve the desired image size, both of the tools we have considered are often used in combination. For example, suppose our task is to prepare an image of a tree for printing on 15x10 cm photographic paper.We know that our digital image is 2560 dots wide and 1600 dots high, which means that we are dealing with an aspect ratio of 16 :ten. We need a 15:10 ratio, so first we need to crop our image to 2400 pixels wide. To do this, open a window in the field Width drive in the value 2400 and press OK... After that, our image will be cropped by 80 pixels on each side, without much damage to the overall composition. Next, select the team. Since we are preparing a drawing for printing, check the box Interpolation can be removed so as not to change the digital resolution of the image. In the dimensions of the print, set the width value to 15 and check that the units are centimeters. In this case, the height value will change automatically to the 10 cm we need, and the resolution to 406.4 pixels / inch, which is redundant even for very high-quality printing. Now, after clicking OK, our image will fully meet the necessary requirements and is ready for printing. Rotating and flipping an imageAnother simple, but often demanded image manipulation is its rotation and reflection. Therefore, these functions in Photoshop did not go unnoticed by the developers. To rotate the canvas in any direction, use the option in the menu Images.
After hovering the mouse cursor over this item, you will see a drop-down menu with all the available commands, including:
As you can see, all the command names speak for themselves, so comments here will probably be superfluous. ConclusionThis concludes our first acquaintance with Adobe Photoshop, in which you learned what basic elements the user interface of the program consists of, as well as learned some basic operations with a graphic document (creating, opening, saving, resizing and resizing, rotating and flipping ). In the next article, we will talk with you about how to work with fragments of images in Photoshop, and consider methods for scaling them, as well as the tools responsible for selecting different parts of the document. Find out what's new in the latest version of Photoshop. Photoshop version 2018 (20.0) introduces useful new features for designers, digital photographers and illustrators. This section provides a brief description of these features and links to more information. Note.
Easily mask images by placing them in frames. Use the Frame Tool (C) to quickly create rectangular or oval placeholders. You can also turn any shape or text into frames and fill them with images. To frame an image, simply drag and drop an Adobe Stock asset or library asset from the Libraries panel or local drive. The image is automatically scaled to fit the frame. Content that fits within frames is always added as smart objects, allowing for reversible scaling. Improved Content-Aware FillPowered by Adobe Sensei technology The new dedicated Content-Aware Fill workspace provides interactive editing for the perfect fill. You can now choose which source pixels to use and then rotate, scale, and flip using Adobe Sensei technology. It also supports full-resolution preview of the changes while you work and saving the results to a new layer. Launching the Content-Aware Fill workspace
The default sample area is displayed in the document window within this workspace. It looks like a superimposed mask inside the image. You can change the sample area and the source area for pouring using the tools in the Tools panel (on the left side of the screen). In the Content-Aware Fill panel (on the right side of the screen), you can specify sample area settings, fill and output settings to obtain the desired fill result. As you make changes, the final result will immediately appear in the Preview panel at full resolution. New Multiple Undo ModeYou can now use the keyboard shortcuts Control + Z (Win) / Command + Z (Mac) to undo multiple actions in a Photoshop document, just like in other Creative Cloud applications. The new multiple undo mode is enabled by default. When Multiple Undo is on, the Edit menu displays the following commands:
How do I revert to obsolete undo keyboard shortcuts?(Photoshop) To revert to legacy undo mode in Photoshop, do the following.
(Adobe Camera Raw) To revert to legacy undo mode in Adobe Camera Raw:
In the Edit menu, next to the Undo and Redo commands, the name of the step that will be undone is also displayed. The Step Forward and Step Backward commands have been removed from the Edit menu. These commands are still available from the sub-drop-down menu in the History panel. In addition, you can now undo layer visibility changes by default. Clicking the visibility icon in the Layers panel creates a state in the History panel. This behavior can be changed using the parameter Turn on undo to change the visibility of layers in the dialog box History panel options, which can be opened using the additional drop-down menu in the History panel. Usability improvementsCheckpoint is hidden by defaultBy transforming objects, you can now easily move them around on the canvas. The control point, which used to appear when transforming objects, is now hidden by default. You can check the box Toggle checkpoint in the Options panel if you want to display a breakpoint. You can now double-click a text layer with the Move tool to quickly start editing the text in your document. Now you no longer need to switch tools to edit text. AutoapplicationCrop, transform, and place or type efficiently with auto-apply. You no longer need to press Enter (Windows) / RETURN (macOS) or click the Apply button in the Options panel to apply changes. While cropping or transforming, do one of the following to automatically apply the changes.
When entering text on a text layer, do any of the following to automatically apply your changes.
Default proportional transformPhotoshop now transforms most layer types (including Pixel, Text, Shape Layers, Bitmaps, Placed Smart Objects) proportionally by default. Shapes and paths that are vectors are still transformed by default without preserving proportions. Now, to maintain the proportions of the layer while transforming, you no longer need to hold down the Shift key while dragging a corner handle to resize the selected layer. Dragging a corner handle while transforming will always resize the layer proportionally. Now holding down the Shift key while dragging a corner handle while transforming results in disproportionate resizing. To resize a layer proportionally when transforming, follow these steps.
How can I turn off the default proportional scaling when transforming layers?To revert to the previous behavior of the transform function, do the following.
Prevent accidental movement of panels thanks to the work environment lock functionUse the new parameter Lock the working environment to prevent accidental movement of workspace panels, particularly when working in Photoshop on a pen tablet. To access this option, select Window> Workspace> Lock Workspace. You can now scroll through the different blend mode options to see how they look in the image. Photoshop shows a real-time preview of the blend modes on the canvas as you scroll through the different blend mode options in the Layers panel and in the Layer Style dialog box. Scroll through the blend mode options in the Layers panel. Symmetry modeBrush strokes for a perfectly symmetrical pattern. With the Paint Brush, Mixer Brush, Pencil, or Eraser tools, click the Butterfly icon () in the Options panel. Choose one of the available symmetry types: Vertical, Horizontal, Dual Axis, Diagonal, Wavy, Circular, Spiral, Parallel Lines, Radial or Mandala... As you paint, strokes are reflected in real time along the axis of symmetry, allowing you to create intricate, symmetrical patterns. A pattern created using Mandala symmetry. (Designed by Mike Shaw.) Color wheel for choosing colorsUse the color wheel to visualize the color spectrum and quickly select colors based on harmonies such as complementary and similar colors. From the additional drop-down menu in the Color panel, choose Color Wheel. Home screenYou can quickly get started with Photoshop from the Home screen. Go to the home screen to learn about new features, connect to learning resources, and quickly return to open documents. You can go to the Home screen at any time by clicking the Home icon in the Options bar. Improved in-app learningAfter completing a lesson in the app (Learn panel), you can enhance your own images in less time. Most requested features by usersDistribute distance (like in Adobe Illustrator) Now you can distribute the distance between objects. Photoshop can already distribute objects by evenly positioning their center points. If the objects are of different sizes, they can now be positioned at the same distance from each other. For more useful information on this topic, see Align and distribute layers . (Left) Options for distributing the distance between objects in Photoshop. (Right) The distance between objects is distributed horizontally. Mathematical operations in number fields You can also perform simple math on any numeric fields. For example, you can now enter simple math operations such as “200/2”, which are immediately calculated as 100, and the final result is entered in the field. This is very useful when you need to quickly find a multiple of a specific value or divide a value. For more information see Use simple math on numeric fields . An image with simple math in the Canvas Size dialog box. Photoshop now preserves the beginning and ending of the name for long layer names, and replaces the central part with ellipsis (...). Previously, the end of a long layer name was replaced with an ellipsis (...). Photoshop now puts an ellipsis (...) in the center of the long layer names. Adobe Photoshop editor (photoshop) is a computer program for working with computer graphics. The main features of this program:
Interface The graphical editor interface is simple. After starting the program, a window appears on the screen, similar to the windows of other programs running in the Windows environment (Fig. 1). Fig. 1 For convenience, the graphic toolbar and palettes are not docked in the window and can be moved around the screen. The central part of the window is the work area in which windows with images are placed. There can be several such windows in the workspace, i.e. simultaneous work with several images is possible. A layer is a separate image or part of it that you can modify as you see fit. Layers are used to create, copy, merge and delete layers, as well as create layer masks. In addition, this palette allows you to control the display of individual layers. The final stage of work is to combine all the layers into a single image. The menu bar contains all the commands for working with images. The docker changes depending on the selected tool in the Graphics Toolbar. Palettes provide additional options for working with the program, have almost the same structure and several tabs. They contain controls to help manipulate the image and are used to select presets of colors, brushes, layers, and more. To display the palette, select "Window" in the menu bar, and select the desired palette in the menu that appears. You can remove the palette if you uncheck the corresponding checkbox in the "Window" menu item or close it like a normal window with the button. Most palettes have additional settings. To display the auxiliary menu, click the button in the upper right corner of the palette. The status bar is located at the bottom of the program window. The current scale of the active document is displayed on the left side of it. Information about the document is displayed to the right. The line contains an auxiliary menu, invoked by a click on the button It selects the information to be displayed on the status bar. The graphical toolbar is most often located on the left side of the working window and consists of two columns. It is displayed by the menu command Window-Tools. graphics photograph color correction Images in Adobe Photoshop. Any image in Photoshop is a bitmap, whether it was scanned, imported from another application, or entirely created in that program using drawing and editing tools. Bitmap programs are ideal for creating painterly, photographic or photorealistic images containing subtle color differences. If you drag the cursor over any area of the layer while one of the drawing tools is selected, the pixels under the cursor will be repainted. Permission. Image resolution is the number of pixels contained in an image; resolution is measured in pixels per inch. Options in the Image Size window allow you to resize the image as well as its resolution. Monitor resolution is also measured in pixels per inch. Output devices also have their own resolution, measured in dots per inch. File size. The file size of any image is measured in bytes, kilobytes, megabytes, or gigabytes. The image has dimensions - width and height. RGB and CMYK color representations. To display a color image on the monitor, red, green and blue (Red, Green, Blue - RGB) rays are used. If you mix these three primary colors in their pure form, you get white. There are three main inks used in four-color printing: cyan (C, cyan), magenta (M, magenta) and yellow (Y, yellow). When they are mixed, a dark, opaque color is obtained. In order to obtain a rich black color, printers usually mix black ink (K, black) with a small amount of cyan, magenta and / or yellow inks. The display of color on the monitor screen changes frequently and depends on the lighting conditions, the temperature of the monitor and the color of the surrounding objects. In addition, many colors visible in real life cannot be printed, not all colors displayed on the screen can be printed, and some printed colors are not visible on the monitor screen. All monitors display colors in accordance with the RGB model, CMYK colors are only simulated. But the CMYK model is only important for printing. Each image in Photoshop consists of one or more semi-transparent images of a certain color, called channels. For example, an RGB image is composed of red, green, and blue channels. (For a visual representation of them, open a color image, and then in the Channels palette, click on one of the Red, Green, Blue elements to display only that channel). Sometimes color adjustments only affect a single channel, but usually the changes are made and displayed in a multi-channel, composite image (the topmost element on the Channels palette) and affect all channels of the image at the same time. The special halftone channels used to save the selection as a mask are called alpha channels, and they can be added to the image (Figure 1.4). Only the currently selected channels can be edited. Picture modes. The image can be converted, displayed, and edited in any of eight modes: Bitmap, Grayscale, Duotone, Indexed Color, RGB, CMYK, Lab, and Multichannel. To take advantage of the unavailable mode (its name looks dim), you first need to convert the image to another representation. For example, if you want to convert an image to Indexed Color mode, it must be in RGB or Grayscale mode. Some picture mode changes cause noticeable color shifts; others touch only subtle nuances. A dramatic change can occur when converting an image from RGB to CMYK mode, as the printed colors are replaced by rich, vivid RGB colors. Color matching can be degraded if the image is repeatedly converted from RGB to CMYK and vice versa. Mid-range and low-end scanners usually only produce RGB images. If you are creating an image that will later be printed, to speed up editing and applying filters, work with it in RGB mode, and then when you are ready to print the image, convert it to CMYK representation. To preview an image in CMYK mode as it will be printed, use the commands in the "View> Proof Print Settings" submenu in conjunction with the "View> Proof Print Colors" commands. We will consider the modes most necessary for operation. In Bitmap mode, pixels are either 100% white or 100% black, no access to layers, filters, and adjustments submenu commands other than the Invert command. Before converting an image to this view, it needs to have a Grayscale view. In Grayscale mode, pixels can be black, white, and up to 254 shades of gray. If you convert a color image to grayscale, then save and close, the luminance information will be preserved, but the color information will be irretrievably lost. An Indexed Color image contains one channel, and the color table can have a maximum of 256 colors or shades (8-bit color representation). This is the maximum number of colors available in the most web-friendly GIF and PNG-8 formats. When using images in multimedia applications, it is often useful to reduce the number of colors to 8-bit representation. You can also convert the image to Indexed Color to create artistic color effects. RGB mode is the most versatile, since only in this mode all filters and tool options in Photoshop are available. Some video and media applications can import RGB images in Photoshop format. Photoshop is one of the few programs that allows you to display and edit images in CMYK mode. An image can be converted to this mode when it is ready for printing on a color printer. Duotone mode corresponds to a printing method that uses two or more printing plates to produce richer and deeper color in grayscale images. Sources of images. Any image can be created, opened, edited and saved in 12 different Photoshop formats. But usually only a few formats are used: TIFF, GIF, JPEG, EPS, and Photoshop's own file format. Due to the fact that Photoshop accepts such a variety of formats, an image for it can be obtained from almost any source: from a scanner, from a graphics editor, from a CD, a photograph, a video image, and even from other operating systems. Also, the image can be completely created in Photoshop itself. Work with text. In Photoshop, text is vector. It has rigid, well-defined boundaries because the program uses a vector path when creating and modifying text. At the same time, the text is bitmap and has the same resolution as an ordinary image. Created text in Photoshop, automatically appears on its own layer. At any time, you can change its attributes: font, style, size, color, kerning, tracking, line spacing, alignment, position relative to the baseline. In addition, different attributes can be set for different letters in the same text layer. You can also change the content of the text, apply different layer effects to it, change the blending mode and opacity level. So what can you do with an editable text layer? You can apply filters, outline text, or fill it with a gradient or pattern. To carry out these operations, you need to convert the text layer to raster format using the menu command Layer> Rasterize> Type (Layer> Convert to raster format> Text). But it’s not that simple. Once the text is rasterized, its typographic attributes (such as font or style) cannot be changed. Any types of text (editable, etc.) are created using the Type tool, the "Layer" menu, the Character palette (Font). Editable text can be moved, transformed, change its position relative to other layers, in a word, perform various operations on it without affecting other layers. Photoshop also provides a spell checker. To call this module, right-click on the text block and select the Check Spelling command in the context menu that appears. If it finds a word that is not in the dictionary, the spelling checker will offer to replace it, add it to the dictionary, or ignore it. Categories
|