Configuring the Integrated Realtek Sound Card (High Definition Audio) @ Windows Vista / 7/8/10
A complete description of the parameters, as well as instructions for configuring the built-in Realtek sound cards. Setting up playback, recording, 3D sound. Windows Vista / 7/8
2012-02-17T18: 19
2012-02-17T18: 19
Audiophile "s Software
Copyright 2017, Taras Kovrijenko
Full or partial copying of the text is allowed only with the written permission of the author.
Prologue
This time I will touch on a topic that is relevant, so to speak, for beginner enthusiasts - that is, for those who have not yet got hold of a discrete sound card and want to get the most out of the integrated one.
1. Educational program
For a start - a short educational program. Who does not know, or does not fully understand what it is hardware audio codec, carefully read the relevant Wikipedia pages:
Have you read it? Fine! And now it would still be very nice if you read my two articles:
Well, now we can start.
2. What do we have
So, I have at my disposal Windows 7 SP1 Ultimate x64 (the setting described in the article is suitable for all operating systems, starting from Vista), the ALC887 codec built into the motherboard (ASUS P7H55-V) (there is a datasheet), an external amplifier connected to the rear connectors and microphone (green and pink jacks, respectively). Please note that we will configure the map for withdrawal stereo sound by analog interface.
3. Software installation
First of all, you need to install the drivers. Of course, most likely Windows has already found and installed the drivers for the sound device itself, but to gain access to all the functionality, as well as for peace of mind, we will install the driver package directly from Realtek, the latest version of which you can download on the corresponding page of my website. By the way, the settings specified here were tested on the R2.67 driver version.
We download the drivers, perform a simple installation procedure (by running HD_Audio / Setup.exe), restart your computer.
After loading the OS, a brown speaker icon should appear in the system tray:
4. Driver configuration
First of all we go to Windows Control Panel-> Hardware and Sound-> Sound and, after making sure that our headphones or speakers are connected to the green jack of the sound card, we disconnect all unnecessary devices, and make our connected device the default device:

We'll do the same with recording devices at the same time:

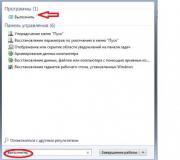
Now double click on the tray icon. If there is no icon, we are looking for it in the hidden icons, if it is not there, we go to Control Panel-> Hardware and Sound->... One way or another, a dispatcher window should open:
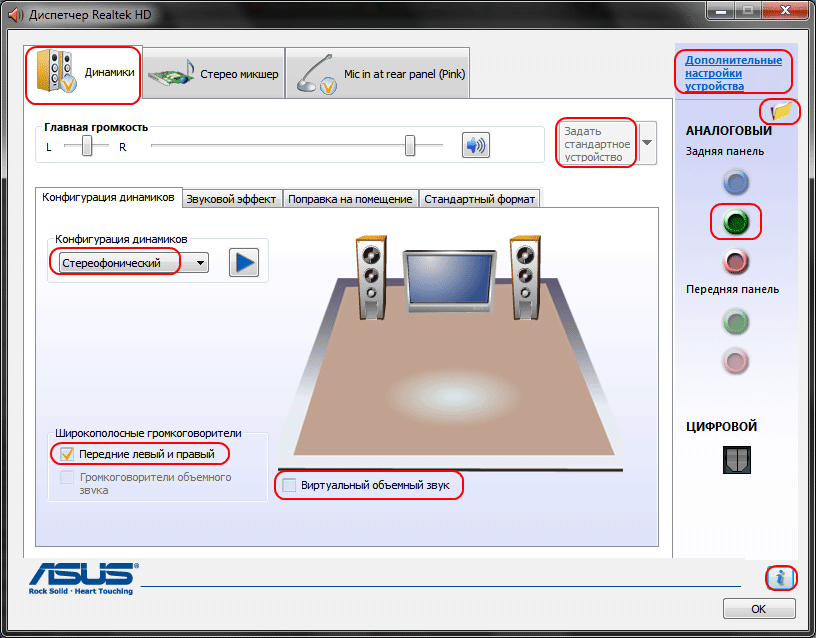
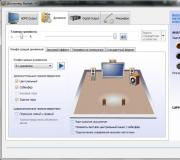
Here we immediately set the speaker configuration (stereo), set our analog device as the default device (after which the corresponding button will go out), turn off, if, God forbid, surround sound is turned on.

The button in the form of a yellow folder can be used to disable the detection of front panel connectors:

Also note that the connected connectors are displayed in bright color - in our case, speakers are connected to the green output, a microphone is connected to the pink input. Here is one very important detail: by double-clicking on the connector icon, you will see a window with a choice of the type of connected device. This is important because if you choose "headphones", then the codec will use a special additional amplifier (otherwise the sound in the headphones will be too quiet), for the connected active speakers or external amplifiers, you should choose "Output to front speakers"... Here, the automatic pop-up of this window is turned on when the device is connected to any of the card slots:
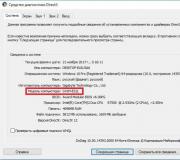
Using the "i" button, you can open a window with information about the driver version, DirectX, audio controller and codec version, in the same place you can turn on / off the display of the icon in the system tray:

Now let's turn off the effects:

The "Room correction" settings for the stereo configuration are not available, which is generally strange - in the same console from THX (which is included, for example, in the Creative X-Fi driver package), you can adjust the distance and angle of direction to the speakers relative to your location, which it can be very useful when you are not sitting directly in front of the speakers, or they are not symmetrically located relative to you. Well, okay, let it be on the conscience of the developers.
The last tab duplicates the settings of the control panel (however, most of the settings from the Manager are also in the control panel):

Here you can set the parameters of the system mixer - with what sampling rate and bit depth Windows will mix all played sounds. Let's set it to 24 bit, 96 kHz. Why - I'll tell you further.
Since I am constantly being stormed by questions of how to set up a microphone (which, in my opinion, should cause a minimum of confusion), I will still focus on setting up recording devices. Their settings, by the way, as well as playback devices, are located on separate tabs at the top of the window. Let's start with a stereo mixer:

Everything is elementary here. This device records everything that you hear through the speakers, that is, the finished audio stream that Windows transfers to the sound card. It is reduced to the indicated form (since the mixer operates with a sampling rate of 96 kHz, then we will put the same here).
But our main recording device is, of course, the microphone:

So, set the recording volume to maximum, and turn off the microphone gain (then, if necessary, you can turn it on). Also, very often people complain that the sound perceived by the microphone is being reproduced, so that this does not happen, we turn off the playback. To your taste - noise filtering, echo cancellation... In the tab , again, the recording format is set:

Considering the characteristics of the sound recording path, the standard 16 bit / 44.1 kHz is enough here.
5. Setting up foobar2000
In principle, the work done is enough to ensure the highest (for this card) sound quality in any player. But for the real paranoid, I'll give you the foobar2000 settings. We will need, in fact, the player itself and several plugins for it - WASAPI output support and SoX Resampler... Well, or you can download my assembly, which already has everything.
So, in the player's output settings (File-> Preferences-> Playback-> Output) select WASAPI:<наше устройство>
, we set the bit depth 24 bit:

When outputting via WASAPI Exclusive, all sound card effects (if enabled) are bypassed, as well as the Windows mixer (for which we specified the sampling rate).
Now let's move on to the DSP settings:
 Here we add the SOund eXchange and Advanced Limiter resampler to the chain. In the resampler settings, set the frequency to 96 kHz.
 And now - why 96 kHz. I did a series of experiments and here's what I found out. In the "front speakers output" mode, if the volume control is set to more than 90%, when playing a test tone udial(44.1 kHz sampling rate) Strong distortion is heard. Distortion disappears if you either turn down the volume, or switch to headphone mode, or resample audio to 96 kHz.
It is difficult to judge the reasons for this phenomenon according to the available data, but conclusions can be drawn and double safeguarded: output all audio at a sampling rate of 96 kHz, and do not increase the volume to more than 90%.
And a couple of words about the need to configure foobar2000. Basically, it is possible to output sound to the “DS: Primary Sound Driver” device. In this case, resampling will be performed using Windows tools (the resampler is not the worst there), besides, all other sounds will not be turned off (as when playing via WASAPI Exclusive). In addition, by selecting this device, Windows will output sound to the device that is set by default in the control panel, which is convenient (for example, when one of the devices is disconnected, the sound automatically switches to the other). So the choice is yours - convenience, or confidence in quality.
6. Resurrection of 3D sound and hardware mixing
And of course I haven't forgotten about the gamers. Since in Windows, starting from Vista, there is no access to hardware mixing of streams (all operations are performed by Windows, and then one single stream is output to the sound card), the developers came up with a special program, analogous to Creative ALchemy, but for Realtek - 3D SoundBack. It connects to hardware resources through the OpenAL interface, emulates Windows for the specified programs, emulates a DirectSound device (like in Windows XP), and then simply converts DirectSound (or DirectSound 3D) commands into OpenAL commands, as a result - we get real EAX 2.0 in games. and the ability to convert multi-channel audio to stereo with surround effects.
To run the program, open the folder ... / Program Files / Realtek / 3D Sound Back Beta0.1, in file properties 3DSoundBack.exe in the tab "Compatibility" install Windows Vista SP2 compatibility mode:

Now run this file. To add an application - click Add Game, enter the name and address of the folder that contains the executable file of the program. For instance:

After adding, do not forget to highlight the added application and press the button Enable.
Now the specified application will use the emulated DirectSound device by default and will have access to the hardware resources of the sound card:

Epilogue
Well, another grandiose article is completed. By the way, I was thinking here: in fact, in an amicable way, this article should have been written one of the first ... However, at that time I still would not have enough knowledge to describe everything in detail like this, so it may be for the best.
If something is not clear, there are still some questions - ask, comment. Good luck!
Information from the sponsor
EuroTechnika: a network of household appliances stores. On the website http://euro-technika.com.ua/ you can familiarize yourself with the range of modern 8-core smartphones (using a convenient catalog) and place an order here (with delivery or self-pickup).