How to take a screenshot on a computer
A screenshot (English screen - a screen, shot - a snapshot) is a snapshot of the monitor screen. Using the function and programs of the operating system, as well as additional tools, the user has the opportunity to take a snapshot of the entire monitor screen or a separate part of it. Screenshots are placed as illustrations in the software installation instructions and attached to the manual, placed in textbooks and manuals.
PC users use screenshots:
The ability to transfer a picture quickly from a computer online helps both in business correspondence and in friendly communication. It is useful for a novice PC user to learn how to take a screenshot of the screen, and where it is saved. Your attention is invited to an instruction illustrated with the same screenshots obtained from the monitor.
Screenshot without programs in Windows
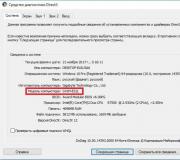
Taking a monitor snapshot is a function of the computer operating system. No additional software is required. It is enough to press the PrintScreen key. Depending on the keyboard model, the key may be called PrtSc, PrtScr, PrnScr, or PrtSc / SysRq. When pressed, it instantly copies what is displayed on the monitor.


Photo: the classic layout of the PrintScreen button 
Photo: options for PrtSc buttons
Like all copied material, the snapshot is stored on the clipboard. To save it on your computer as a file, you can use any graphics editor.
The easiest way to save photos is through Paint, one of the standard Office utilities. To do this, follow these steps:

By default, the file is saved on the C drive, in the Pictures folder in Windows 7 or My Pictures in Windows XP.
The screenshot can also be immediately sent by e-mail, printed. And also it can be pasted into Word.
To do this, you need to do:

In this case, the screenshot is saved along with the Word file. The resulting image can immediately illustrate the text. You can work with it as with any picture inserted into Word: change the quality, size, position, compress, crop, copy ...
Screenshot of the whole screen
The software utilities provide the ability to take a screenshot of the entire screen. With the help of "Scissors", you can select the entire field and, save the image or select the fragment of interest. To get an image from your laptop, just click keyboard shortcut Fn + PrtScn... The picture immediately opens in Paint - it remains to save it or select another task: print, send by e-mail. Most of the above image editors allow you to take a screenshot of the entire screen immediately after launching them and pressing the PrintScreen key.
Video: Screen Capture in Windows 7
Image from a separate part of the monitor
Scissors and Fn + Alt + PrtScn on any laptop to save an image of the active window is the fastest way to get a snapshot of the desired fragment. A screenshot of the active program is also performed by the key combination Alt + Print Screen.
Scissors is a very simple graphics editor.
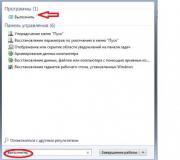
To open it, you need to follow these steps:
- press the Start button;
- select "All programs";
- find and open "Standard";
- open "Scissors".
The image you are interested in should be on the monitor before opening the "Scissors": when they are in operation, you will not be able to perform actions outside the program. It is better to save the file in JPEG - by editing pictures of this format, you get more options.
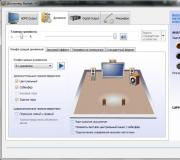
Let's consider the work of an image editor. Program Picpick not the most difficult, but it has a sufficient number of functions for working with images, including the function of creating screenshots. If you open PicPick and press PrintScreen, the image of what is on the monitor at that moment immediately appears in the working area.

By default, in the same way as in Paint - the image is saved in the "Documents" folder. If you have previously worked in Paint, then understand how to take a screenshot of a separate part of the screen in Picpick, not difficult.
You need to do the following:

Working in PicPick, you get the opportunity not only to save the resulting screenshot in the selected format, but also immediately insert it into the desired program: Excel, Word, Power Point.
Arbitrary area
You can select an arbitrary area of the screen by selecting "Custom area" from the list of tasks. The cursor moves like a pencil, highlighting the outlines of the area you want. The shape of the selected area depends solely on your vision of the future screen and your confident use of the mouse.

Selecting an arbitrary area of the PC screen, copy the desired fragment. But when you use such a screenshot as a picture in Word or Power Point, you still get it in the shape of a rectangle. A white background is formed around the picture you selected with the cursor.
Screenshot program
An example of working with Paint can be considered a classic way of taking a screenshot. However, in Windows 7 in the "Standard" section there is still a very simple program "Scissors", with which you can select and "cut" any part of what we see on the working monitor. The figure shows how a screen of the "Scissors" process is made through Paint.

The compact "Scissors" window does not interfere with the view. The cursor covers the entire screen or selects the desired part of it. Minimum editing tools. For saving, you can select the format PNG, GIF, JPEG. If you need only a fragment of the picture of a working monitor in your work, you can resort to processing the image obtained in Paint, that is, cropping it. This is cumbersome and archaic. The task is simplified by the aforementioned "Scissors".
There are many additional programs with more advanced capabilities: graphic viewers, converters, image editors. Depending on your goals, choose the most suitable one: simple - for quick obtaining information, or voluminous - for editing, transforming photos like Photoshop. A simple editor has the necessary functions to get a screenshot of the entire screen or a separate part, to create labels, draw, add labels.

More complex programs have the functions of correction, deformation, transformation, image conversion, video creation, presentations:

You can use an online editor like Pixtick. It has the necessary set of functions for receiving screenshots, processing them. Some programs for digital cameras, photo and video converters also have a capture function. In addition to this, they have dozens of other functions, which makes the work longer if the user has not yet acquired the necessary skills.
We do without a print screen
The PrintScreen key may not function due to a defective or clogged keyboard. If the print screen does not work, this will limit your options a little.
To get a screen without the PrintScreen key, you can use one of the following methods:
- apply "Scissors" - this is possible if you have Windows 7 or the newest version of the OS;
- use an additional image editor: PicPick, EasyCapture, DuckCapture, Clip2Net or others;
- perform a screen using additional equipment - a digital camera, which is the least convenient, therefore, acceptable only as a last resort.
It is still better to install one of the above image editors on your computer, since the standard utilities of the operating system can fail and do not always have a sufficient set of tools and functions.
>