How to put a line in Word. How to draw a line in Word
It is a multifunctional program, and, perhaps, at first it is very in vain underestimated by many users. Of course, in some moments it is still better to use the same Excel, but, in general, Word is able to cope with many tasks.
With its help, you can always beautifully design a document, giving it a deliberate businesslike quality, or vice versa, making it informal. You can work with tables, change the text style, etc. In addition, the Word interface is thought out to the smallest detail, it allows you to find the necessary tool for work in a matter of seconds. By the way, in Word you can even draw a line if you suddenly need it. Actually, we will talk further about how to draw a line in a Word.
Method one
In fact, in almost any controversial situation that arises in Word, there are several options for getting out of it. And this is very good, because each user can choose what he likes and suits him the most. So, let's start with the first method, in my opinion, very simple and understandable to everyone.
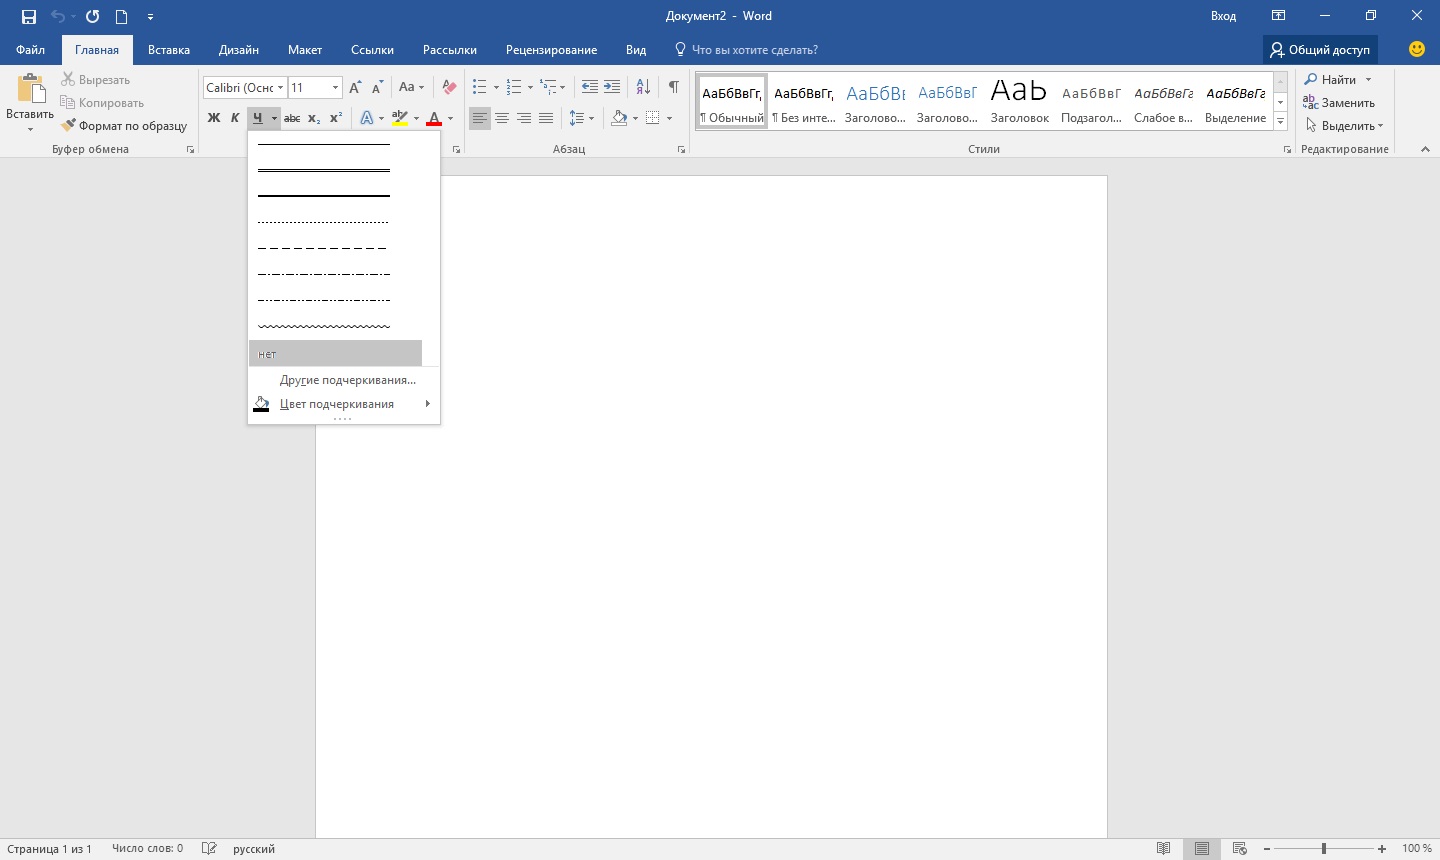
Imagine that you have typed some text, and you need to highlight it with an underscore. To do this, we do this: select the text, then in the "Home" tab on the toolbar we find the "Font" block. There are three buttons: bold, italic and underline, and if you still need it, you can do it through another menu. Accordingly, just click on the last button, as shown in the screenshot below.
Method two
This method is even more functional. It is useful in those situations when you want to draw one or more lines in any area of the sheet, and it doesn’t matter if it is horizontal, vertical, across, or something else. Do this:
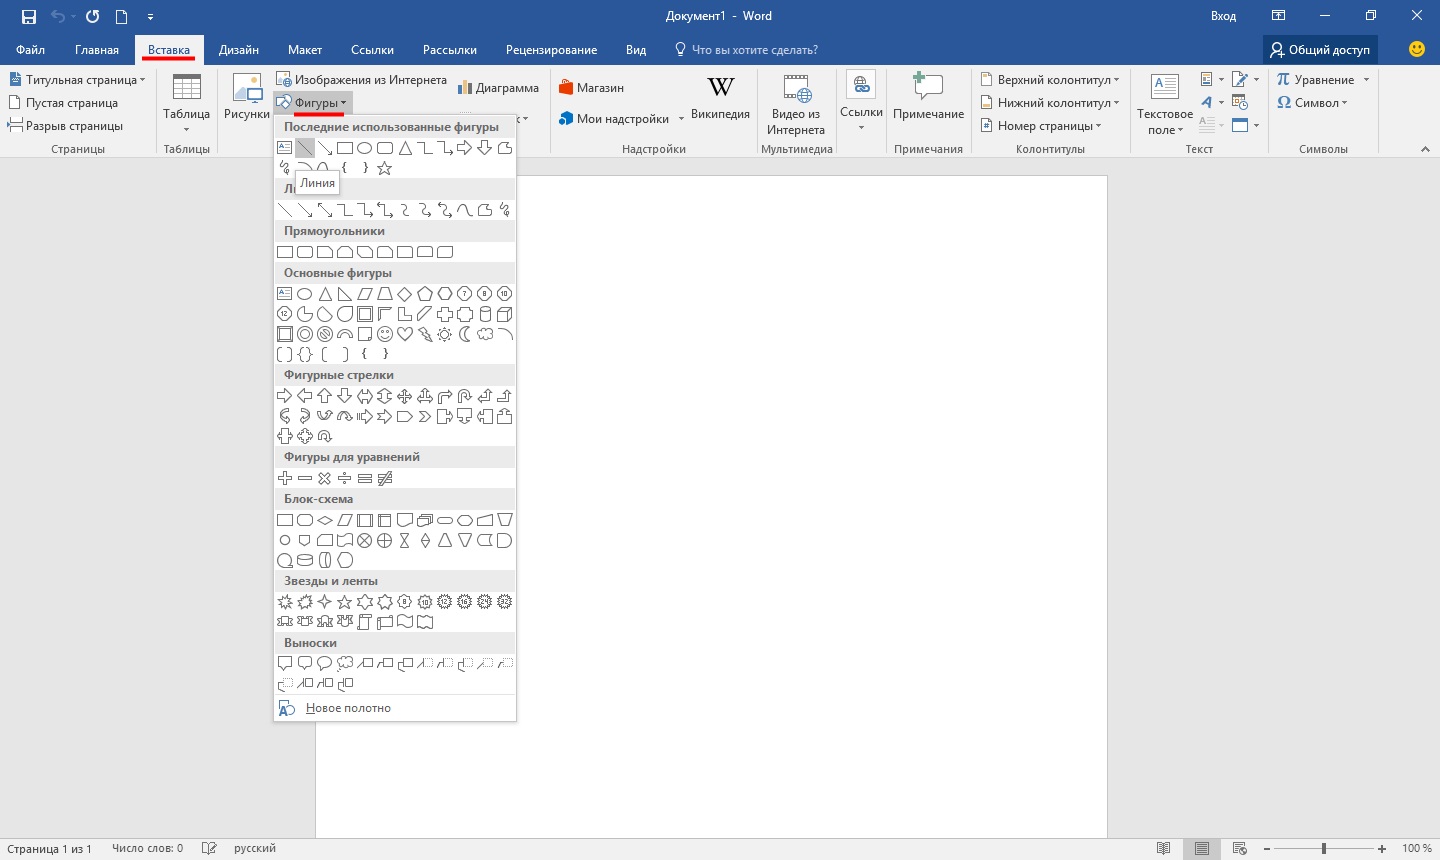
- There is an Insert tab on the toolbar, open it.
- There is an "Illustrations" block, which has a "Shapes" button.
- By clicking on it, find a straight line among the proposed ones. Click on it at the moment when it becomes necessary to insert a line into the text. Please note that you will have to specify two points: the place where it will start and where it will end.
Method three
This text editor provides another tool that is useful for quickly creating lines. To draw a line, place the cursor in the right place, then click on the "Borders" button, which is located, again, in the "Home" tab. After that, a horizontal line should appear across the entire width of the sheet.

I hope you liked one of these ways of drawing a line in Word. Choose any and feel free to experiment!
Video to help
This article deals with the recurring problem of the spontaneous appearance of a line in a document. If you got here from a search engine with a question "How to remove a bold line in Word", "Word how to remove a line on a page", how to remove line in word document or similar, then you've come to the right place. You can skip straight to the Uninstall section. It is there that you will learn how to finally get rid of this annoying dash.
And if you were looking for "How to make a line in a document in Word", "How to make a long solid line", "How to put the bottom line in the Word on the whole sheet", "How to put a signature line in Word" and others, then my article will also help you with this. A little lower in the Addition section, you will learn how to put a solid line in the Word and not only.
Addendum
Sometimes in a document it is required to separate something with a horizontal bar. Many mistakenly believe that if they draw an underscore “_” or a hyphen “-“ on the entire line, then visually the line will turn out, which means everything is fine. In reality, this is not the case, because when changing font sizes, margins, or other formatting, this pseudo-line will change and be either longer or shorter than required.
Word has its own tools for this. So, for starters, make sure that there is a checkmark in the settings that allows you to implement what you want.
For Word 2003 and below:
Go to the "Tools" menu and select the "AutoCorrect Options" command. In the AutoCorrect dialog box, select the AutoFormat As You Type tab. Check the box next to "Boundary Lines".
For Word 2007 and above:
Press the "Office" button and select "Word Options". In the window that appears, select "Spelling" and press the button "AutoCorrect Options". In the AutoCorrect dialog box, select the AutoFormat As You Type tab. Check the box next to "Boundary Lines".

Now we can use the following methods to set the trait:
- Type three consecutive "-" (three hyphens) and press Enter (Enter) - the hyphens will be converted into a continuous thin line across the entire width of the page
- Type three "=" in a row (three equals signs) and press Enter (Enter) - equals signs are converted to a double non-breaking bar for the entire width of the page
- Type three "_" (underscores) in a row and press Enter - underscores are converted to a solid, thick line across the entire width of the page
But there is another interesting way that puts not a solid, but a dotted line across the entire width of the sheet.
- Type three consecutive "*" (three asterisks) and press Enter (Enter) - hyphens will be converted to a dotted line for the entire width of the page

Removal
Sometimes it happens that extra lines are formed in the document. They are removed quite simply.
For Word 2003 and below:
Place the cursor over this line, then go to the Format menu and select the Borders and Shading command and in the Border tab click on the topmost border type: none. Click OK. The line will disappear.

In ordinary text in Word, lines are used quite rarely, but they are indispensable when drawing up various forms or forms. It is quite simple to underline a ready-made text, but when compiling forms, you need to underline the empty space, and given that this form will be filled out electronically, the usual underlining is indispensable here. Next, we will look at how to make a line in the Word in various ways, from which everyone can choose the appropriate option for themselves.
The easiest way to make a line under text in Word is to use the underline text menu. You can underline text and tabs in this way. But to use such an underline to place a line on an empty space, i.e. it is extremely inconvenient to create fields for further text input with such lines. When text is written on such a line, underlining will be applied to it, but all further text will move, which can immediately disrupt the structure of the document.
To make such a simple text underline is necessary on the tab "Home" In chapter "Font" find icon "Underline Text", and click on it. The text selected in advance will become underlined, and all further typed text will also be underlined.
If you click on the down arrow, you can choose different styles of underlining and even the color of the line.
The next way to make a line in Word is to use the underscore character found on the keyboard. To do this, press the key "shift" and clicking the underscore icon «_» draw a line of the required length. But such a line is also far from ideal. Writing on such a line in Word will not work, and it does not match the level of the usual text underlining.
A more suitable way to make a line in Word for a signature is to use a table cell in which you only need to leave the bottom border visible. In this case, some problems may arise with the positioning of a single cell, but for the sake of being able to fill in the underlined area of the document in electronic form, you can try. You just need to insert a single cell table and adjust its placement, size, and borders.
Well, the last way to draw a line in Word, on which you can write, is simply to draw a line as a separate object. To do this, go to the tab "Insert" and find the point "Shapes" In chapter "Illustrations". In the figures we find the usual line, click on it and draw in the right place on the sheet. If you hold down the key while drawing a line "shift", then the line will be horizontal. If necessary, the line can be further configured in the corresponding menu.
Good afternoon.
In today's short lesson I would like to show how you can make a line in Word. In general, this is a fairly common question, which is difficult to answer, because. It's not clear what line you're talking about. That is why, I want to analyze 4 ways to create different lines.
So, let's begin...
1 way
Let's say you wrote some text and you need to draw a straight line under it, i.e. emphasize. Word has a special underline tool for this. Just select first, then select the icon with the letter "H" in the toolbar. See screenshot below.

2 way
There is a special button on the keyboard - "dash". So, if you hold down the "Cntrl" button and then click on the "-" - a small straight line will appear in Word, like an underline. If you repeat the operation several times - the length of the line can be obtained for the entire page. See picture below.

The picture shows a line created using the buttons: "Cntrl" and "-".
3 way
This method is useful in cases where you want to draw a straight line (and maybe even more than one) anywhere on the sheet: vertically, horizontally, across, obliquely, etc. To do this, go to the menu in the "INSERT" section and select the "Shapes" insert function. Next, just click on the icon with a straight line and paste it in the right place, setting two points: the beginning and the end.

4 way
There is another special button in the main menu that can be used to create lines. To do this, place the cursor in the line you need, and then select the button on the "Borders" panel (located in the "HOME" section). Next, you should have a straight line across the entire width of the sheet in the desired line.
Lines in text documents are often used to underline, emphasize information, create a blank line, fill or define text. And how to draw a line in Wordp is a fairly common question, which is difficult to answer. First you need to decide what exactly you need.
There are three main options for how to make a straight line in Word, each of which can be useful in different situations. Ways to remove straight lines depend on the chosen way of creating them.
First way
Perhaps a situation has arisen when you don’t know how to draw a line in Word, simple, solid, in the middle of a line. Most often, when you need to leave an empty space in the text in order to fill in the data by hand later. This applies to letterheads, contracts and acts.
On the keyboard, find the “-” key and press it simultaneously with the “Ctrl” key. The result is a small straight line. If you repeat this operation many times, then you can "stretch" it to the width of the entire page. When you reach the fields, move to the second line.
How to remove a line in Word created in this way? It is also quite simple - we exploit the "Backspace" key.
Second way
Do you need not a horizontal line, but a vertical or oblique one? How to draw a line in Word, which tool to use? A straight line created as a figure is easily executed.
You can draw a straight line using the second method absolutely in any corner of the sheet: parallel and perpendicular to the text, at an angle. To do this, you need to take several steps:
- Go to the special section "Insert", select the command "Shapes".
- Click on the straight line icon.
- Click the mouse at the start point on the sheet, instead of the cursor you will see a cross.
- Move the mouse in the direction you want while holding the left button.
- Release the button at the point where you want to end the line.
In the same way, you can draw arrows, curves, wavy and so on. Subsequently, you can change their appearance, width, color and other parameters. If you accidentally stopped earlier, you can lengthen the straight line: to do this, press the circle on the tip and drag it to the desired size while holding the left button.
How to delete a line in Word, made as a figure, if, on the contrary, it is not needed? Any shape can be removed by selecting it with the mouse, then pressing the "Delete" key or selecting the "Cut" button in the toolbar. To select, just click on it anywhere.
Third way
How to make a line in Word at once the entire width of the page? There is another nice handy button in the editor's main menu. In order to use it, you need to place the cursor in a suitable place, then find the "Borders" button in the panel. You can remove the extra border by operating the same button by clicking on it to deactivate it.